


alb
-
Posts
182 -
Joined
-
Last visited
Content Type
Profiles
Forums
Events
Blogs
Gallery
Store
Everything posted by alb
-
Australian Saddle - Replacing Girth Strap
alb replied to alb's topic in Saddle Identification, Restoration & Repair
Thank You!! Ann -
Australian Saddle - Replacing Girth Strap
alb replied to alb's topic in Saddle Identification, Restoration & Repair
I did drop the front stitches. It was pretty tight but I got it finished just now. I still can't figure out how the panel comes off. It looks good and feels very strong. Thanks for your e-mails. Now I just need to punch the holes. I was a bit worried I might not get the strap in exactly the same position at the connection point so I waited to punch the holes. It would have been easier to do them before but considering this was the first time I did this, I wasn't sure it was going to match up. Ann -
Australian Saddle - Replacing Girth Strap
alb replied to alb's topic in Saddle Identification, Restoration & Repair
Hi Barra, Thanks so much for your reply. I noticed that you hadn't been on the list for a few days and was hoping everything was okay. I was able to source a braided thread which looked to me and to my thread source to be virtually identical to what was originally on the saddle. It's a Barbours Corus Braid , wax, 1mm. It's average strength is 24kg. I could have purchased a 2mm (with an average strength of 106), but I figured it was overkill. Considering it was black and would have shown up quite a bit more on this brown saddle where I needed to restitch the front stitches I had pulled, I went with the smaller braid. I would have had to wait too long to get it in brown. Of course strength over looks any day but since I was able to match the original, I'm confident in it. I'm trying to stitch from underneath. I've pulled the strap through but it's still a bit tight. The original stitch was in a pattern of three lines. I'm going down one side, up the next and down the center. It's how the other one was done. Again - I appreciate the note and the video. I think I'm on the right track. Is there anything special about tying it off that I should keep in mind? Ann And Denise - thanks very much changing the title. I hope you're having a blast in Sheridan! Ann -
Australian Saddle - Replacing Girth Strap
alb replied to alb's topic in Saddle Identification, Restoration & Repair
Okay - I just noticed the title of my post. I promise I'm not a complete idiot!!!! I'm not replacing a cinch, I'm replacing the girth strap (properly called the girth point, I think...) and I can't figure out how to rename the post. Ann who's sitting at home wishing she could be in her shop but is trying to recover from pneumonia... -
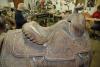
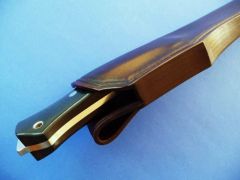
Hi all, I have an Australian stock saddle in my shop. It's the first one that I've seen. I've made a new girth strap and am getting ready to stitch it to the webbing. I need to make a decision on which thread to use and the style of stitching currently on the saddle is something I'm not familiar with. The stitches are approx 1/2 in in length. I plan to look at the other side and match the stitching there but if anyone has some info on this type of saddle and the correct way to stitch it I'd appreciate the input. I just found a book covering repairs on this style of saddle but I won't have it in time for this repair. Thanks, Ann
-
AAAAHHHHHHH, much better!!! My tired eyes thank you! Ann
-
Hi Is there a way to change the font size of the overall site when viewing leatherworker.net? A little over a week ago I noticed that the font size had changed. I don't know if it's something I did with a setting, but it's driving me crazy and I can't figure out how to go back to the nice, pleasant, large font I had before. All other applications that I use, and all other websites are just as before, the font is fine. But when viewing leatherworker, the font size of everything (including menu items, forum postings, etc...) is tiny. HELP PLEASE!!! Ann
-
Jon - thanks so much! I'll try it. Ann
-
Recently I've made various small projects using harness leather. This leather has been a dream to work with but I'm having difficulty getting a good burnished edge. I've tried saddle soap/canvas which ends up just looking like a dirty mess, hardwood slicker with water, which never seems to get to the completely slicked down clicking phase, and a plastic burnisher on a drill. Does anyone have any tips for getting a nice edge on harness leather? Thanks, Ann
-
Thanks for the response Bruce. I really appreciate you taking the time. I think another of my mistakes was trying to punch the slits when the leather was too wet. We'll see how attempt #2 goes.... Ann
-
Bob - thanks for looking. I very much appreciate you taking the time. Deb - I did finally find a couple of sources for stainless steel: http://www.lyonindustries.com/index.html and http://www.mcmaster.com Lyon's minimum order is $25. The lace is much more expensive than the 3/16 available from Weaver, but I spent several days searching and calling places and the only other source I could find was for a minimum of 400 ft. I purchased 1/4 in stainless in .01 thickness. It worked but I'll probably get .008 next time. THere is also sterling silver bezel available from jewelry findings places, and it's actually not that much more expensive than the stainless. Hope they have what you want..... Ann
-
Hello all, I'm in the process of replacing the cheyenne roll on this saddle. It is the first time I've done one with a rope edge. I just pulled off the first attempt, which I determined was probably too thick, and cut a new piece of leather from the belly. How do I get the leather pulled in really tight around the rope? How much forming needs to be done before I lace it? I just read in another post dealing with a cheyenne roll that the underside should be skived down to about 3-4 oz. I've not done that before and I don't remember seeing that on any of the bindings that I've replaced. Is it common to do this? If someone could give me a quick walk through the process I'd appreciate it. Also, at what point in the process should the buckstitching be done? Thanks very much, Ann
-
Hi, Jiffy rivets can be a pain. I don't use them very often but I remember how trying it was when I first used them. Something that helped me understand what they were supposed to look like when they were properly seated was to take a rivet and cap and use a pair of pliars to slowly squeeze them together until I felt them give. At that point the post has spread out into the cap and locked it in place. They will be quite hard to pull apart. When using them to rivet together pieces of leather, be sure that the hole that you punch is as small as possible while still being able to get the rivet into the hole. If the hole is too big, the rivet will bend. When I set a jiffy rivet I use a concave anvil on the bottom (really a flat metal plate with a small concave depression for the rivet to set in, and a concave rivet setter on top and give it a very sharp whack with my maul. It took a bit of practice at first, but now it's easy. Good luck! Ann
-
Hi all, I am doing a repair on a saddle with a rope edge that originally had 1/4 in metal lace. I am looking for replacement lace, ss or nickel silver. I have plenty of 3/16ths but I would really like to stay with 1/4 on this saddle if I can find it. I'm replacing the cantle wrap but the rope is in good shape and I want to leave it. It is a large diameter rope, so the 1/16ths will make a difference. I have called Weaver, Sheridan Outfitters, Tandy, Springfield. IF anyone has some 1/4 they could sell me, I just need enough for a couple of saddles. Or, if you know of a source, I would really appreciate it if you would pass it along. Thanks, Ann
-
Thank you! Thank you!
-
 phenomenal edging! how do you do it? Ann
 -
Does anyone have a source for 1/4 in stainless lace? Thanks, Ann
-
Wow - so 40 people have looked at this thread and not one has a source for stainless lace they're willing to share? If anyone knows I would really appreciate a source. Thanks, Ann
-
Does anyone know of a source for 1/4 in stainless lace? Weaver has 3/16ths but I need 1/4 inch. Thanks, Ann
-
Hi, I am a 4-H leader and have done very basic leathercraft with my club for a few years now. It sounds like you are doing a great job. Thank you for volunteering!!!!! One thing to remember, the skills learned by kids doing projects are great, but they are not the most important benefit. For kids to have another adult in their lives that has taken time out to share things with them and spend a little time with them and encourage them makes a HUGE difference in their lives. IT's hard to see at the time, but it's true... I first got into leatherwork with my son through 4-H. It sounded like a fun project. We invited the Tandy people (from a shop 75 miles away) and they came down and did a basic stamping class. The kids had a great time. We bought some tools and started messing around. We did lots of simple projects and my son and I made a terrific knife sheath and we were hooked. He has a real gift for leatherwork. For the next several years we would invite the Tandy folks back to our meeting once a year and the kids again did stamping and started with swivel knives. One of the oldest boys in our club always attempted projects that were beyond his skill level. I would try to get him to practice more before working on his main project, but he didn't want to. He would end up discouraged. Finally, this year, I convinced him to sit down with me while the rest of the group was working with the other leader, to practice, practice, practice with the swivel knife. He finally got it!!! My point is you never know what these kids will end up doing with leatherwork down the road. Enjoy the time you have with them. Stay encouraging. Help them to see their progress, no matter how small. Who knows - maybe one of the parents will get hooked too - I did - I now own a saddle shop and am making saddles and boots!!! Again - THANK YOU!!!!!!
-
Hi All, I purchased my shop in September from a long time saddle and boot maker who was self taught and had a one person shop. He is still working with me and teaching me the trade. So far I have done very basic accounting via paper and pencil - basically just a list of income from repairs/sales and expenses categorized into operating expenses and materials. I then create simple monthly income/expense reports. I've decided to purchase Quickbooks 2010 Pro and automate the process. I do lots of saddle repairs and some custom leather jobs, both of which are billed for materials (taxed) and labor (untaxed). I do not purchase items for straight resale. I have not yet done so, but plan to also create a few standard items for sale on a website, with a fixed price per item. Right now I'm trying to figure out how to set up all the accounts and also what to do regarding inventory. I've never owned a business before and this is a bit of a challenge.... I went to see an accountant a couple of days ago and I think I understand their requirements. I don't necessarily have to do an inventory but I'm trying to figure out a good system to keep track of things and easily see how various things are selling. Also, while some of this work is stuff I've done enough times to feel confident about bidding and charging a fixed hourly rate, I am still keeping close track of other jobs that are taking me longer to do because of my inexperience. For example, I'm pretty confident in relining skirts. I know what I'm doing and while I'm not the fastest person out there, I think the time it takes is pretty reasonable. Doing horn wrap and caps is another matter. Right now I'd say I'm spending probably two and a half times as long as it will when I have more experience. So the hourly rate varies depending on how experienced I am in that particular repair. For the most part I am charging overall what I think is a reasonable amount, calculating the cost of materials and including a markup for those, then backing out the labor amount. When it's something I'm not very experienced doing and I know it's taken me a lot longer to do because of that, my hourly rate is *very* low, but I don't show it on the ticket. I just show the overall labor charge. How have others handled this when first starting out? What system works for you???? I would really appreciate hearing how others have their accounting set up, how you handle inventory and what you include on invoices. Also, what kind of markup do you charge for materials? What info do you find helpful to keep track of??? Thanks in advance.... Feel free to e-mail me offlist if you'd prefer. Thank you, Ann
-
I love it! What did you use to color it? Ann
-
Tree Hardware Sources - English Saddles
alb replied to Kate's topic in Saddle Supplies, Tools & Trees
Hi Kate, Sorry about the delay. Well I was using the term bareback rig a bit loosely. I had a customer come in who loves riding bareback but wanted stirrups. She drew a picture and I built her what she wanted. I can't find a picture of the one I created but it turned out that it was pretty similar to this: http://www.bozsaddlery.com/bare2red.jpg I wish I had a picture of mine. It was a fun little project to work on. Hope you came up with your stirrup bars. I had a side saddle in the shop for an estimate a couple of months ago. I was really looking forward to working on it but they decided they couldn't spend that much right now. It was in really rough shape. The gentleman that I am learning from has had three side saddles on the bench at one time, but that's been many years ago. I have a question for you. I'm quite new to saddlemaking/repair. I'm learning from a gentleman who has been doing it for 45 years, all self taught. We use pure neatsfoot oil to oil saddles that come in for cleaning and oiliing. Is there some product that you would recommend that works well to condition but doesn't darken as much as neatsfoot oil? Some of these saddles have been neglected and left out and the leather is as stiff as a board. Take care, Ann -
Tree Hardware Sources - English Saddles
alb replied to Kate's topic in Saddle Supplies, Tools & Trees
Hi Kate - I purchased a pair for a bareback rig that I made a couple of months ago. I think the supplier was Smith Worthington. When I get to the shop tomorrow I'll check and if that's not it, I'll let you know. They don't have repair parts listed on their site, but I'm pretty sure that was my source. http://www.smithworthington.com Ann -
Hi all, I was a bit impatient and started messing around with the tension - both top and bottom and have now succeeded in putting the machine so out of whack that it will no longer even sew thin leather. The thread is going through just the top tensioner. I used the picture in the book so I'm pretty sure it is threaded correctly. I need to know how the thread is supposed to move in the top tensioner. When first threading the machine through the tensioner the thread sits on the outside of the metal plates and moves around them. At some point the thread goes inside and between the plates and then it seems like the top tension is extremely tight, even though I've turned the screw on the tensioner to the point where it's almost off the post. (It was in this position when it was stitching) I'm not sure how it's supposed to work or what it's supposed to look like. I've just realized that I've been threading the machine when the foot lift is down. Is this the wrong thing to do? Maybe I should have been lifting it which releases the spring on the tensioners and then the thread would go inside the plates. Okay - I'm going to stop babbling. Could someone please give me an idea of how to systematically go about adjusting tension and give me an idea of what the tensioner is supposed to look like when it's working correctly? Should the metal plates move with the thread? Should the thread just slide between them? Should I be able to see anything rotating with the thread? THANKS to everyone who has posted so far!!! I really appreciate it. Ann
