


busted
-
Posts
314 -
Joined
-
Last visited
Content Type
Profiles
Forums
Events
Blogs
Gallery
Posts posted by busted
-
-
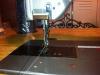
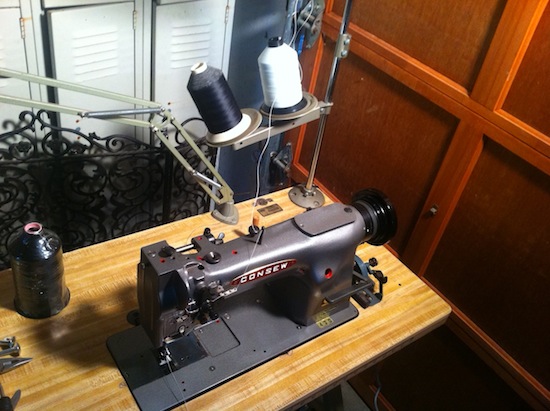
Hey Guys,
I'm a new owner of a Consew 226R-1 and I need some help getting it all setup and sussing some problems out. I'm completely new to sewing machines (well, except for really cheap home machines) and am not the most mechanically inclined so please be patient with me. I spoke on the phone with Bob from Toledo Sewing Machines a bit today, who I bought a servo motor off, but I didn't want to bug him too much so I'm hoping some of you out there could give me a hand. Any help or suggestions whatsoever would be hugely appreciated. Thanks!
I have a million and one questions but I'm going to try and keep this concise and post a couple questions/problems at a time.
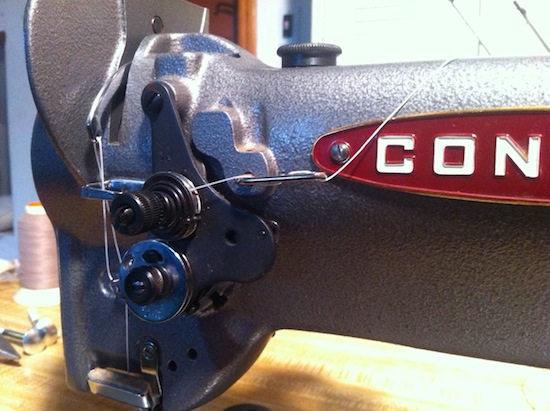
• One of the most noticeable problems I'm having is that after switching to 138 thread, the top thread won't manually feed when I try to pull on the thread without me giving it some slack by hand first. By that, I mean, I have to tug on the thread right after the first post it threads through to give it slack, then pull from where it exits the needle. There doesn't seem to be any excessive tension anywhere, it just seems to be a cumulative effect. This leads me to wonder if I'm threading it wrong, which by reading the manual and looking at all the comparative pictures and youtube videos I can find, it seems I'm doing it right.
• One thing Bob mentioned is that the tension discs may not be disengaging, which is actually true, but even with the tension discs screwed all the way loose so there's no tension on the thread, I still can't pull the thread from the needle.
• Obviously, another concern is fixing the tension discs. I do see that there's a metal plate on the back that pushes against a spring to disengage the threads, but I don't see any mechanism that would push the plate to disengage. Hmmm...
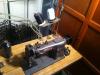
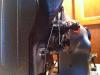
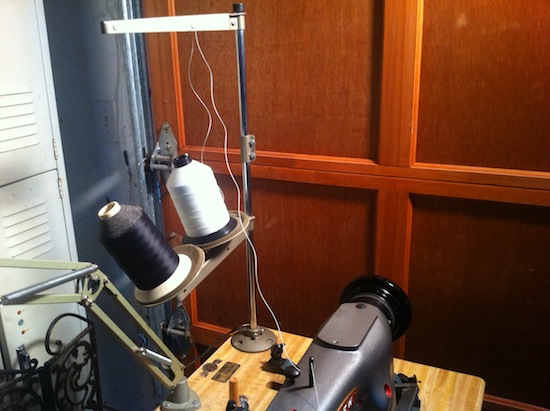
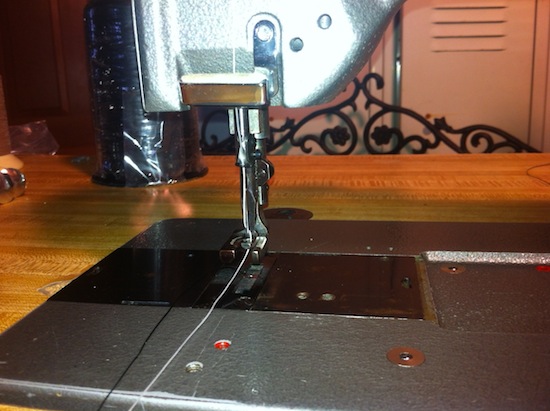
I'll attach some pictures of the whole setup as well as details of how I'm threading it. I am very likely screwing something up somewhere so let me know if you see something fishy. Thank you!
The whole setup:
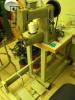
Threading detail:

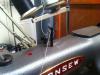
The thread is not between the discs in the fifth photo from the top. It looks to be behind the rear disc instead of between both disc.
-
singerco.com/IPinstManuals/97-1_10.pdf This might help a little.
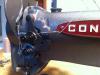
I went over some things, and found one thing that "might" be the problem! Just need input from others familiar with this machine!
Looking at the picture, where my finger is pointed, I found this nut to be loose! This is the "hammer" piece I was refering to which seems to work as a "brake" on the thread as it cycles?
HELP!!!
-
You are right of course but it is still called a 'walking foot' machine by many.
Imagine my surprise!! The picture in the file I found has a regular sewing machine listed as the 132k6 the one at auction is a walking foot.
-
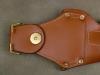
That is a very nice wallet. I have not seen one like it. Thanks for sharing your skill!!
my new wallet.
-
The 132K 6 parts list I found lists the machine as an alternating presser foot not a walking foot.
http://www.ismacs.net/singer_sewing_machine_company/model-list/classes-100-199.html
Thanks Trox but I have these manuals in my very large collection of industrial manuals and information database. The 132B26 is the same as the 132k7 and is the normal drop feed version, the 132k6 is a walking foot machine.
I cannot find any instruction manuals for any of the 132k class (except the B26) or the 31k19 and 47 which are the walking foot versions of the 31 class.
I know these machines very well and have recconditioned and sold many of them before 'retiring ' from the business in 2001. I have noticed a lot of enquiries for these manuals oin this and other sites but have never seen any offered.
If none are available does anyone have any of these machines and could they take some close up photo's. of the walking foot mechanism with the foot up and down thenI can construct an instruction page for both machines which can be added to the drop feed manual.
and made available to anyone.
Bob Jenkins
-
I scored a batch of tools, and there were some shorter modeling 'tips' that obviously need a holder to be used properly. I have a larger-diameter barrel (yes I need to measure, but it looks about 5mm); I think I need one that will hold 2 - 4 mm tips. The barrel that these would fit in have a tip that is 'frozen' into it from lack of use. Sigh.
I could also use a smaller barrel that has a screw in the side to help secure the tip.
Appreciative of any leads, possibilities, and commiserations,
Elizabeth
Mpls, MN
A picture of your device would be nice also a picture of the "frozen" in place.
-
I was out rummaging two weeks ago looking for leather working stuff. I found an elderly gentleman who has been doing harness and leather work since forever he is around 80. He showed me some of the machines he has and what is for sale and what is not for sale. I did manage to buy a number 7 singer from him, no table but all of the original accessories bobbin winder, motor and clutch, 3 or 4 different needle sizes. He did not want to sell his #3 Landis nor the Patcher all sorts of hand tools. And buried beneath a 3 foot tall pile of leather and stuff from the shop is a wooden box. He told me he bought it from government surplus he had 3 and sold one and has the other 2 in his shop. The box contains a stitching pony from the US Army Calvary Division. It is new in the box does anyone have an idea of the value of this stitching horse? I don't know what wood is used in its construction.
-
Twin Oaks - Thanks for the Particle tip!
I believe this Boss was sitting idle in someone's closet for several years and seeming with the presser foot tension cranked as tight as it could go.
Backing off helped greatly and seems ok. What little I can see of the cable doesn't appear rusted. I do have a copy of the manual but it doesn't mention a lube point for the cable - should I oil the part where it enters the arm?
Gracias!
-Ellen
If you want to oil the cable it is very easy. Disconnect the cable from the top side of the leaver. Take a sandwich bag now take your scissors and cut a very small corner from the lower side of the bag. You are trying to make a hole small enough to slip over the end of the cable. Now that the bag is attached put a rubber band tightly around the bag. You are trying to seal the bag to the cable so when you pour oil in the bag it will run into the cable and not down your arm.
-
Hi all you Boss experts out there,
I've recently picked up a used cast iron Boss from a fellow Leatherworker.net member and as he never actually used it can't ask him about it's foibles.
So far I've got it cleaned and oiled, correct needle and thread in place but before I even get to fiddling with tensions there is a major problem.
On the downstroke when the presser foot lifts to allow the material to advance it usually doesn't go back down.
I took off the front cover to observe the action and it appears that the pressure foot cam is just not advancing quite far enough to click into the next notch at the end of the handle downstroke.
If I manually push the cam forward before the upstroke the foot will pop down. The amount of not advancing enough is inconsistent. Sometimes it will be just barely, other times it gets halfway, some times it even reverses a bit. If I slam the handle down as hard as I can it will make it to the next notch maybe 1/10 times so it is not a matter of short stroking from the handle side.
Any ideas? I'll call Tippmann on Monday morning but if I can get any sewing in this weekend I'd be happy dance'n.
A couple things to note:
* When the machine arrived the presser foot tension knob was cranked all the way down so tight I needed two hands to pull the foot lever.
* The action of the presser foot lifting lever is pretty clunky (Is there a spot to lubricate?)
* The thread take up arm doesn't go anywhere, is it supposed to?
* Probably unrelated but my thread is fraying badly, needle size and placement are correct, brand new spool of bonded nylon.
Many thanks,
-Ellen
Take the thread out of the needle and off of the machine and and put some more oil on it and cycle it several times until it releases. Don't be timmed about cycling the handle then put some more oil on it. Make sure it is anchored solidly; rocking back and forth while you are trying to cycle the handle will not do. Keep it well oiled
A couple things to note:
* When the machine arrived the presser foot tension knob was cranked all the way down so tight I needed two hands to pull the foot lever.
back off the tension screw use pliers if necessary
* The action of the presser foot lifting lever is pretty clunky (Is there a spot to lubricate?)
Don't you have a manual?? Oil anything that has a sliding or rotating motion.
* The thread take up arm doesn't go anywhere, is it supposed to?
all it does is go up and down oil that too
* Probably unrelated but my thread is fraying badly, needle size and placement are correct, brand new spool of bonded nylon.
sounds as though someone jammed a needle into the hook and put a scratch on it. If this is the case the machine is probably out of time and you need to take the hook out and sand the scratch off with emery cloth. You have to be a mechanic to own a Boss. Don't worry about the thread for now. Get the machine cycling through the sewing motions like it should then worry about the thread fraying
-
I am just wondering what you folks use for a cutting surface when you use your head knife. I have been laying my hide out on a sheet of plywood but as you can imagine this is not the best surface as the head knife point digs into the wood. What is a good reccomendation for a cutting surface? Any help will be appeciated. Thank you! Frank
HDPE high density polypropalene 1" or 3/4" would be my choice.
-
Im planning out making my first belt and pretty much have my process done except for what to do with the belt loop. I notice most belts have the belt loop made out of a thinner leather. What if I only have the size leather im using for the actual belt? Any tips/methods you use for making belt loops is appreciated!
I make my belt loops from 4 oz material 5\8ths wide or 1\2 depends on the belt width. Do you have a leather splitter? This would be the best way to split the leather.
-
Ok. I still need help on this. After submitting a request for these hooks (plus several other items), I received an email from Paul Gallin (president of Ohio bag) saying that they were wholesale distributors and he directed me to their sister company Hardware Elf. Fair enough and it was kind that he responded. Unfortunately Hardware Elf doesnt carry these hooks (nor most of the other items I was after).
So once again I'm hoping that someone has seen these hooks before and can recomend a supplier.
Thanks
It's a swivel. Try this company url
-
I need a machine that can handle wallets and guitar straps. I have been using a hand crank Singer 66 that worked ok for that but it was on loan and is going back to it's owner. The guitar straps are 4-5oz with a 2oz decorative layer stitched on top (tribal pattern, flames, band name...) then the top assembly stitched onto a liner. Wallets 4-5oz and I have been using goat to make the inside with a cloth liner. I can get a Singer 16-188 (old walking foot) machine as well but seems that a lot of boot makers like using the 31-15. I think this machine will end up with 69 thread most of the time but may go as high as 138 at times. I really would like as much input as I can get. I might be purchasing this weekend.

This might be of interest to you.
Craigslist Topeka, Kansas
sale-8en5d-2821274943@craigslist.org
2 needle, Needle feed Lockstitch, machine with an automatic thread trimmer. Model # LH-3128, LH-3128-7. Works! Instruction Manual included. One corner of the cart is broken, but nothing wrong with machine itself. $900.00
-
ANy chance you could post a picture of bobbin and shuttle. I can't find any pictures of that part of the machine. Also I have no idea what a waxpot is. Is that like the oil cup on my industrial sewing machine? Where is it located when it is present.
Thanks for the info. I lost out on 2 Singer 7-34's today.
There is a gentleman in Illinois that rebuilds the Landis Wax thread sewing machine. His phone number is two one seven 543 three four six four. I can't think of his name.
If you can get into the Smithsonian website there is a book in there on the Landis.
This link should work.
-
Busted, just wondering why you don't use latigo for belts. I make small dog harness and leads and I only order latigo or bridle leather, I've been thinking of making myself a belt with some of the black latigo leather that I have. I'd use the bridle leather but the only color I have right now is pink and I don't want a pink belt.
I have used it for belts but I could not get a satisfactory finish on the edge. I was probably doing something wrong so I stopped using it.
-
Gregg from Keystone sewing machine sold me the last of what he had! they are too small for the parts that came with my machine! What size needles are you using now? the top of the shank is narrower on the needle, so need the two pieces pOinting at to make use of these needles! When bought my machine from Kplan sewing machine sales it came with only a size 28 needle! lots of them have been knocking the rust off of!
What size needle does the 97 use?
-
I'm curious if anyone uses a heavy skirting leather for belts? I was thinking of trying a 10-12 oz quality Skirting.
Feedback would be appreciated!
Thanks
I use double shoulders or sides of 9 or 10 oz. split to the specific thickness. 12oz is to hard to fold over a buckle. Skirting is acceptable English bridle is good too. I do not use latigo.
Hope this helped.
-
I am having mega problems getting proper tension my Cobra 4. It's been months of hours, trying and giving up. Going back to hand sewing and my old crappy flatbed machine. But I am thinking it might be more than just tension. There are times when I am able to wheel the machine by hand, so, the wheel IS turning, but the rest of the machine doesn't move. Ie, the needle (and everything else) stays put, near the top of it's rotation. Im wondering if this may be effecting the tension some how, maybe if something has come loose ? Im really at a loss...
http://www.youtube.com/watch?v=y8rBZfq29_E
(I posted about the tension problem yesterday, under a different user name, but thought I should instead start a new thread because it does seem to be more than just a tension issue and I didn't want to hijack that thread. I also for some reason wasn't able to sign in under my old name, so I had to make a new account)
Here are the tension issues:
I finally got it tensioned for one type of sewing I do, took DETAILED notes of the tension settings, then went back to try and tension the other way I sew, and it took hours and hours. Then I need to go back to the first way I sew, and my notes don't work. I can't get it tensioned back to the way it originally was. Am I missing something? It's wasting so much of my time, and a lot of materials. I've asked Steve, but his feedback hasnt seemed to have helped. I am hoping someone else with a Cobra or 441 clone can offer me some tips?
The first type of sewing I do is one layer of veg tanned about 6-7oz to one layer of chrome tan 3.5 oz. I use a 25 needle, with appropriate thread.
The second type of sewing I do is min 2 layers of chrome tanned, to max about 4-5 layers. I use a 21 or 22 needle, with appropriate thread.
I have got the machine to flawlessly sew both, eventually. But every time I try and tension for the other type of sewing, it takes me hours, days. Or longer. Or I give up (and thank God my old crappy machine still works well enough!)
In these photo examples, you can see how it varies between top tension is too strong, and then too loose. I CANNOT find the balance. (and yes, the top & bottom thread are the same thickeness & brand). It seems I cannot make a small enough adjustment, so it goes between too little and too much tension immediately. Sometimes I can get it to sew normal for 5-6 stitches, but then it always reverts to one way or the other (top is too loose or too tight)
I have adjusted bobbin tension as well. It seemed to like being just off the tightest setting for the thicker sewing, and as tight as possible for the thinner sewing. But so far its made no difference..
I borrowed a photo from the archives of LW to illustrate what I mean. It is not a very good blow up but you are able to see the thread coming down from the upper tensioner to the lower tensioner. Your machine does not do that. You need to put the thread on the back side of the tensioner then do the two counterclockwise wraps before going to the thread take up arm. There should be only one thread running through the retainer loop to the take up leaver. You are not allowing the lower friction disc to do it's job. Good luck.
-
If I cut a strap like this to do extra long pieces, and I use Latigo leather, can I expect it to pull into a straight lead if I soak it? Just curious if the soaking will soften it enough given all the oil in the leather?
Water can not penetrate oil impregnated leather. If you use latigo it will stretch. Use English bridle or Herman Oak, harness leather is a good choice too. 10/12 oz. you can straighten it after you cut it out. Anchor one end and pull on the other end then swap them around and do it again.
-
This is an excel spreadsheet that will calculate the amount of thread to stitch a item.
Set the average seam thickness to the total leather thickness in mm
The type of thread setting is not a part of the formula
Use the worksheet tab to do the calculation. The new help guide tab is the help and the ISO stitches tab explains the ISO stitches choices.
We normally use 301 lockstitch
I talked to someone at A&E they suggested we use this sheet for Heavy weight leather for leather total thickness 4 oz and up.
the example on the sheet is a belt I did that was 55 inches total so the stitch length was 110 and I was set at 6 spi.
It seem pretty accurate to me but I could be wrong. The numbers at least make sense to me.
Michael
I don't see where a thread usage calculator is of any use for small hand sewn\machine sewn projects that are done by any of the shops in this forum. I could care less about the ISO or anything to do with it. These are European manufacturing standards. I don't live in Europe. I live in Pennsylvania. That is my opinion others may differ.
-
Good Morning -
I am not a leatherworker at all. Just a novelist who put in a plot device she doesn't fully understand. I am hoping to pick all your brains on the below questions.
I appreciate the time you would take to help me with all or some of the below. I know everyone is busy, and I'm not really a proper member here, nor am I a leatherworker. So I hope you can forgive the intrusion....okay here goes!
*Is there an endangered species skin that can be easily confusedwith a really nice version of another, permitted skin?
*What is a CITES cert? (I'm sure I'm saying this wrong) Is this something that will let an endangeredspecies skin through customs? How can it be allowed at all? What do they haveto certify? This seems crazy, but I'm totally uneducated on the subject. (maybeyou have a good link to the info?)
*Are ALL skins checked at customs? I'd like it if a small amount got throughand then the big shipment is blocked.
*What skin would you recommend? I'd like it to be so luxuriousthat when you touch it you say, "oh my god this is the nicest leather I haveEVER touched." And what country would it be from? I can easily have it comefrom one place, be dyed/tanned in another and shipped from a third – possiblywith a third treatment on it if necessary. No problem for the story.
Thanks in advance for your help.
You can check out my website at http://fashionismurder.com (the "murder" part refers to the murder mystery aspect of the books)
And you can look at the first book in the series here....http://www.amazon.com/Dead-New-Black-Fashion-Mysteries/dp/1466338121/
Have a great new year!
Are you a member of that pitiful group calling themselves peta. You should go some where else and do research.
-
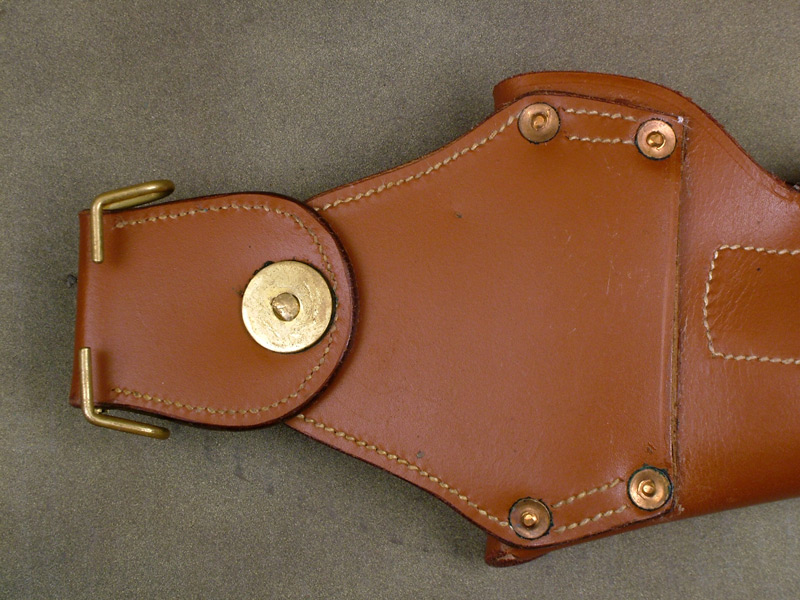
Please add some dimensions to this request.
What size is the rivet head that I am looking at in this picture??
What is the OD of the washer??
What is the thickness of the material that the swivel is supporting??
-
Is there a black dye that won't rub off? I like dyeing belt edges black, but fiebings pro black rubs off really easy. What's the best? Angelus, Lincoln, something else? I hate putting heavy coats of clearlac on the edge to keep black from rubbing off.
Yes there is. I use a product from Beiler's called Tuff Coat to do the edge of my belts and tack, it is available in quarts or gallons. The only time it rubs off is when it is not dry. After it dries you will need acetone to get it off. If you are interested Beiler's number is seven one seven seven six eight 0174
-
The machine came as you see it. We did not get any other parts with it. The folks I got it from took it from a guy that owed them money. He was a harness maker in NV. He never paid them back & they brought it to CA when they moved. There is a holding pot that seems to have a greasy looking wax in it. It looks like there was something attached to the front of the stand & also like there was a rod or something that went thru a hole in the back. I am presuming that it was something that held the thread spool. The shuttle is there but there was no cover on it. Did these have a seperate bobbin somewhere ?
Bdt46 is right the covers are missing. Yes, there are two shuttle covers. You have to take the needle plate off and slide the one on the right into place both of the covers have a bevel on both edges. The bobbin is about four inches long it goes in side the shuttle. Remove the shuttle to see if there is a bobbin in there.


Singer 78-3 Help
in Leather Sewing Machines
Posted · Edited by busted
16x99; 16x100; 16x198 are the needles listed. I don't know what size thread this translates to. Walking Foot - One Needle. Max. speed 1600 spm. For lightweight work in imitation leather; upholstery. Automobile tops. Combined upper and needle feed. No under feed. This is the operators manual www.singerco.com/IPinstManuals/78-1_2_3.pdf