Charke
-
Posts
44 -
Joined
-
Last visited
Content Type
Profiles
Forums
Events
Blogs
Gallery
Store
Everything posted by Charke
-
Hivemind, no eyelets? I've been putting them in. They're probably not very "period" but I figured it would make them last longer. I'm wondering what your take on them is. Mark Charke
-
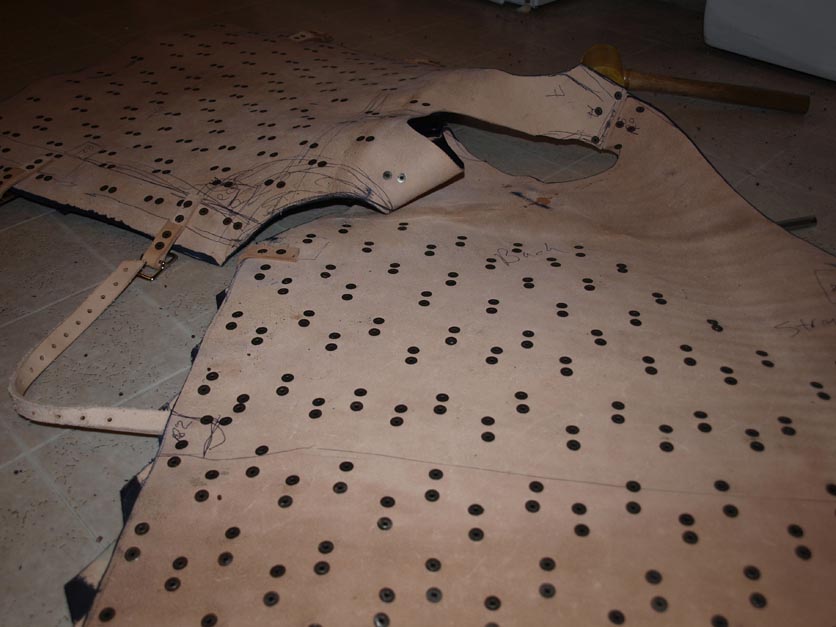
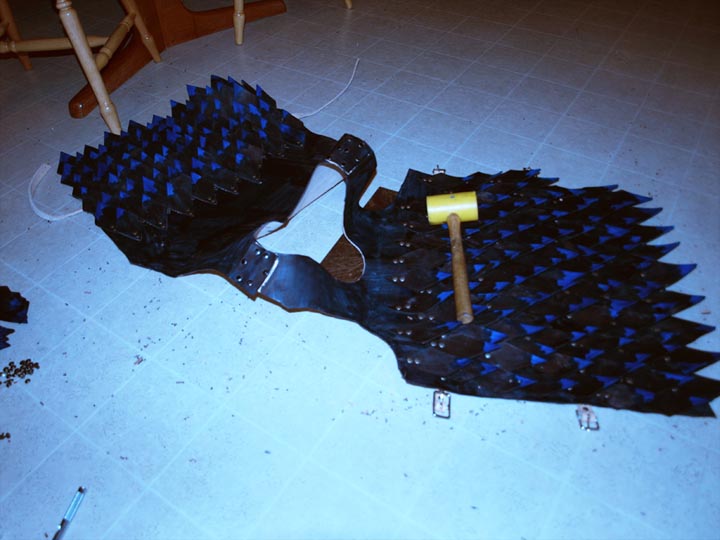
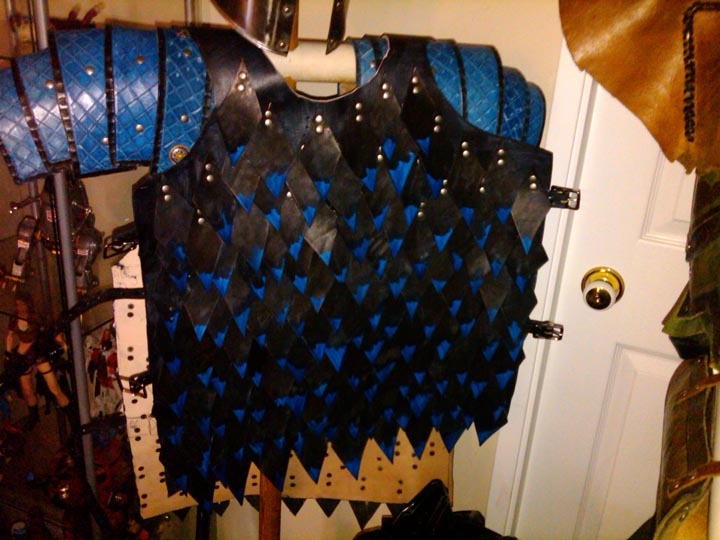
This is a leather scale-mail commission. Two fellow LARPers got their hands on a half shoulder of 8oz and 4oz. and basically handed it to me and said, "make something great, do whatever you want". I've never had a better commission. Free reign to go crazy, experiment and dig myself into a deep hole of work! While this armor was not hard to make, it ended up being a heck of a lot of work. I am happy with the results but I ran out of leather. I would have scaled the shoulders and made matching pauldrons to finish it. Still, if everyone told me to just "do what you want, we trust you to make something cool" it would all be so much more fun. The scales are diamond shaped, 2 inches on each side, about 3 inches long. I ended up needing 250 just to cover the front and back. Each needed 2 rivets, so I had to punch 500 holes and put in 500 rivets. The highest cost of the project shifted from dye to rivets. Dying the scales two tone turned into an assembling line project and took forever. (I'm still not done?) I boiled the scales a fairly long time to make them fairly hard. Scalemail is very forgiving because of the soft backing. The overlaping scales create an intresting bit of a spring-board effect. I'm only worried about wear and tear, but that's normal. The finished product feels noticably heavier than the leather. I remind myself an entire Tandy Large bag of rivets is bolted onto the thing! Image 1: This is the 3/4 complete suit. Image 2: This is the inside of the armor, showing the rivets. One the outside the scales are mostly overlapped to hide them. Image 3: This is Mike wearing the armor at a game. Image 4: This is the armor stored. It's sitting on top of a leather Lorica of mine. Those shoulders aren't actually part of the armor. Mark Charke


-
I just made a suit of leather scale-mail. While it was not hard, it was a heck of a lot of work. The scales are diamond shaped. Each side is about 2 inches so they are about 3 inches long. I ended up needing 250 just to cover the front and back. Each needed 2 rivets, so I had to punch 500 holes and put in 500 rivets. The cost of the project shifted from leather to rivets. The leather came free and I was asked to make "anything" out of it. They had some 8oz and some 4oz. I suggested it would make good scalemail. I boiled the scales a fairly long time to make them fairly hard. Scalemail is very forgiving because of the soft backing. Your scales could be steal and on a soft leather backing the suit remains very flexible. The overlaping scales create an intresting bit of a spring-board effect. I'll grab a picture for you although, you've probably done your project by now. Mark Charke

-
New To Leatherworking, My 2Nd Project
Charke replied to wawa's topic in Satchels, Luggage and Briefcases
That's amazing for your first leather project. Heck, for your 10th leather project, that's amazing. Mark Charke -
It's like you took all the things I've been told that you can't do with leather and put them together into a single peice; The white is incredible. I've heard nothing but complaints from other leatherworkers about how hard it is to work with white. Gold - I didn't even know, well until I saw the matching suit, that you could make gold leather like that. I don't even see how you've attached the cord. Amazing work. Mark Charke
-
I wish everyone could field armor like that. How about some more pictures! I want to see the whole armor! What grade of leather did you use? Just curious. A solid effort on the makeup too! Mark Charke (www.IALARP.com)
-
I'll pass along what little I've learned about rivets. My work is generally on leather armor, which has to take a lot of weight. Losing rivets is simply going to eventually happen in this case so I've had plenty of chances for repairs and rethinking. I started with a rubber mallet which was just terrible. Plastic or metal creates a sharper strike which creates a better mushroom. If the rivets are leaning over, if the top and bottom aren't lined up straight, something is wrong. Usually the rivet is too long, but it can also happen if you are not striking the rivet straight on. When I started I always used 3 rivets per critical joint. I'm more comfortable with my riveting and I've gone down to 2 rivets. One thought about multiple rivets is that they aren't supporting as much weight that way. Twisting and pulling are a consideration. Are your rivets comming out of the some locations but not others? There might be more force on certain areas, especially as the product is used, that you may not have considered. I can not say looking at the pictures. It's a stab in the dark. You might try enhancing your rivets with stitches - but I don't know the pattern of what you are doing so that might not be possible. It does sound like you are using knock-off rivets - especially if they are comparing themselves to Tandy but skirting copyright by avoiding their name. That could be your problem. I would try some Tandy rivets and see how they hold up. I've never used double caps. I have some. They just haven't gone into anything yet because most of my rivets are hidden on one side. So I am speaking here without a gap in my knowledge. I do swear by Chicago Screws for strength, but you've already mentioned costs are an issue. Screws tend to cost about 50 cents each which is a LOT more than a rapid-rivet. Screws never break (that I've seen) but they are notorious for working themselves undone unless you use thread-loc or screw-lock on them. Even then, there is always the odd one determined to come out so you end up checking your gear on a regular basis. I hope I've been of some help. Mark Charke
-
I've been collecting crow feathers for a project for years. We have a lot of crows locally. In fact, I started collecting feathers before I started doing leatherworking. With this skill in hand, it seems logical that I attach the feathers to leather and I'm thinking about how. The most straight forward technique is to copy nature - use an awl to punch a hole and put the feather in - but how do I make it stay there? I was thinking about glue, latex, stitching and I'm not sure what would be best. Has anyone attached feathers to leather to make wings before? Mark Charke
-
There are two kinds of leather I've seen on armor and I don't know how to acheive them. Soft Rubbery Texture I've seen leather with a rubber texture and I don't know how to acheive this. It isn't stiff at all. It's soft and spongy but not weak, like wet leather. It looks well oiled. It bends like butter but it doesn't feel weak. This was a web-glove arrangement to protect the back of the hand and fitted with eyelets and rivets. The leather was 10-12oz. Pebbled Texture I saw a pair of bracers, well crafted, hard as a rock with a pebbled surface. They felt like stiff plastic. Usually when I boil leather that hard it gets brittle (although I haven't worked with 15oz leather yet) and the surface remains smooth. I'm guessing it was wax hardened? Is there a special oiling process to keep hardened leather from getting too stiff? Do you want to soak the leather in oil? Do you want to oil hardened leather - a little, a lot? Can anyone recomend a guide to hardening/finishing leather? (Any good youtube videos?) I've made a lot of leather but there is still a difference between what I am producing and the textures I am seeing the professionals produce. I think I'm missing something and I'm not quite sure what it is. Mark Charke
-
Wood Grain Biker Wallet
Charke replied to Big Papa Leather's topic in Purses, Wallets, Belts and Miscellaneous Pocket Items
Wow. That's really amazing. I can't beleive you did that with thin leather. I assume that's 4oz leather, maybe 6? Where did you get the liner? Is that a bandana or a silk pattern? That's really incredible, I love the skulls rivets. I really want to do something like this one day. Mark Charke -
First Messanger Bag
Charke replied to dscott's topic in Purses, Wallets, Belts and Miscellaneous Pocket Items
It's sort of a funny thing but if a leather bag is a certain size, or shape, suddenly it switches from being a "purse" to being a sachel. This bag has got that action-hero archilogist look to it, especially if it were scuffed up. Indiana Jones anyone? It's well done. I'd like to see more pictures. I always want to see how the straps are done, the inside especially and how the stitching was done. Just curious! Mark Charke -
Well, I copied your armor. I'm not sure if I should feel bad about that or not but you very much inspired the creation of my leather Lorica Segmentata. Mine is also blue. I really like the color and my next LARP character was a water-elf so it fit very well. I have a metal suit at home and used it as a base. The number of plates is higher and the neck design is very different. The shoulders got very long as I encountered much trouble getting in to add rivets but I'm happy with the result. Also I went crazy and tooled it, which made the project take about 20x as long as it could have. Thanks for the inspiration. Here's a facebook link to an image of the armor. I thought it wouldn't be appropriate to post images of my own armor in your thread. I'll throw it up on my own thread later once it's dry and I can put it on. http://www.facebook....1f&id=695372463 Mark Charke
-
I LARP a lot in leather armor. I've been in heat and rain and both will affect your armor. Waxing and waterproofing help but the thickness of the leather seems to be the most important element. All the thin elements "wilt" first in negative conditions. Tandy Leather sells a Sole Bend that is 15oz leather that is compressed for use in making soles of footwear. It's quite expensive but it's so hard that you could get away without hardening it at all and still have a solid amount of protection. If you did harden it, you'd have some pretty protective armor. I think you've got the ideal form of armor, brigadine, if I'm not mistaken - a soft leather shell with hard plates on top. The soft leather will prevent a lot of your sweat from getting onto the hard leather. There is no stress on the plates so they won't crack. I would dye it black. If paint stains become a problem, you can just dye it black again. I've never had paint ball paint on leather and I don't know what it would take to block it, or get it out. As mentioned previously, test peices are the way to go. Mark Charke
-
Finished Saddle 004.JPG
Charke commented on Little John's gallery image in Our Leatherwork Galleries
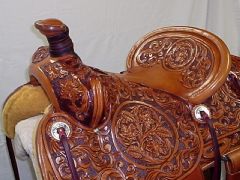 Saddles are just amazing on their own. I had no idea what a work of art they can become. This one is fantastic. Not even knowing the prices for regular saddles, I can only imagine what a saddle like this would go for. I've seen the better suits of leather armor on the net running for up to 4000$ so I'd guess this is in that range or more. The horse folk are probably a little more serrious than us LARPers and SCA folk.
 -
Ah thanks! I was just surfing around. I can't tell you how much your armor has inspired a lot of my recent work. I wanted to modify a helmet to articulate it but I was trying to figure out how to get it to stay open or shut. Snaps don't seem like a bad idea. Mark Charke
-
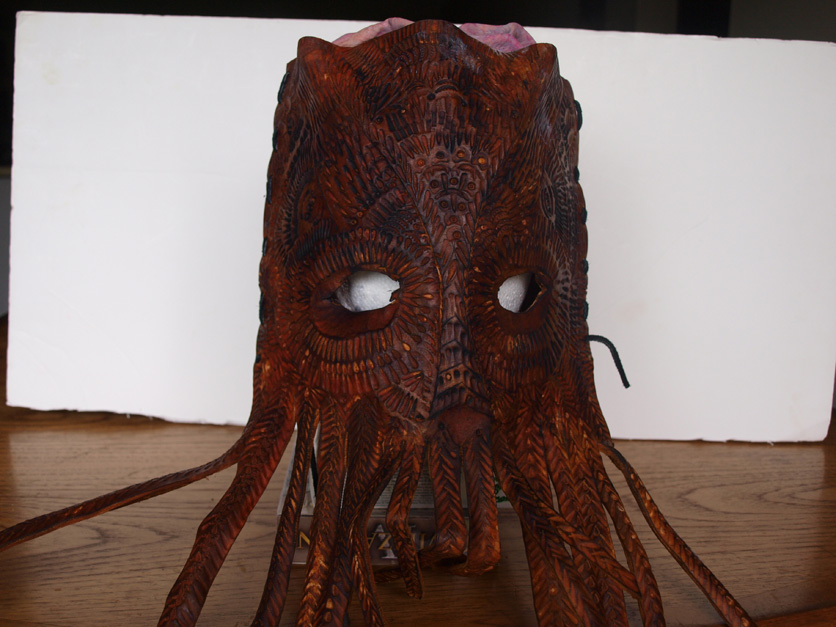
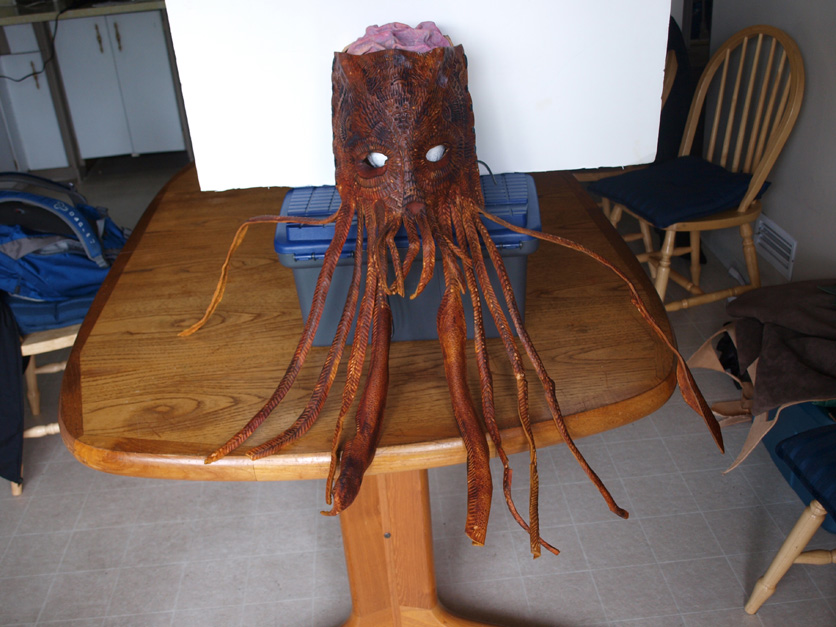
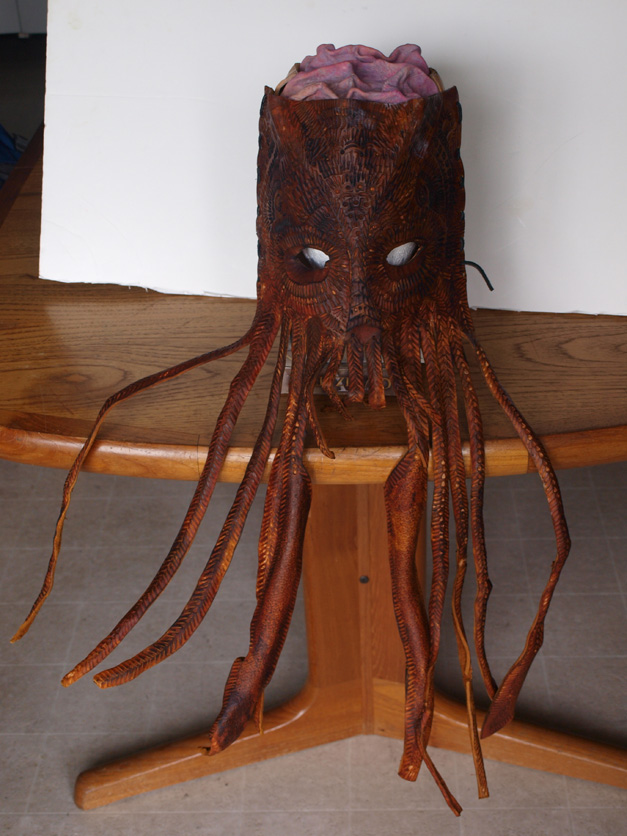
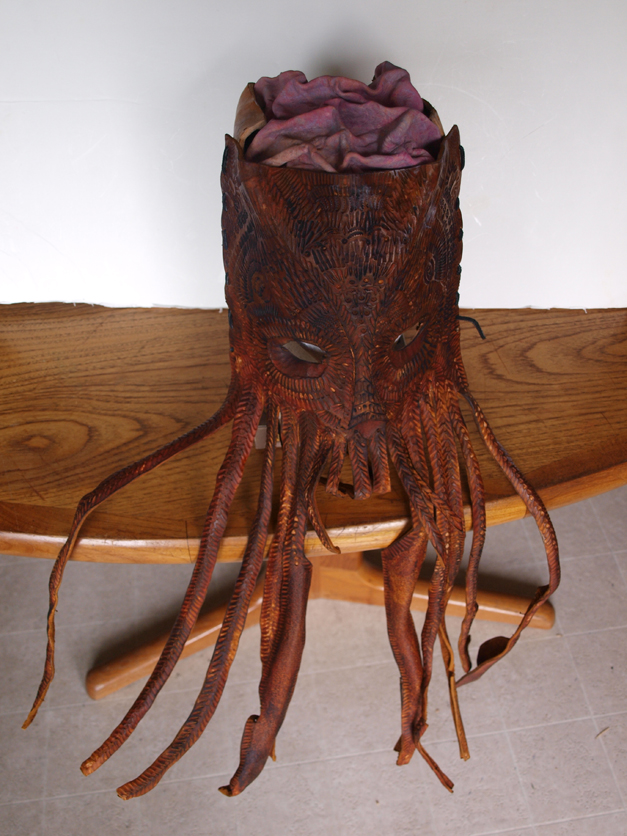
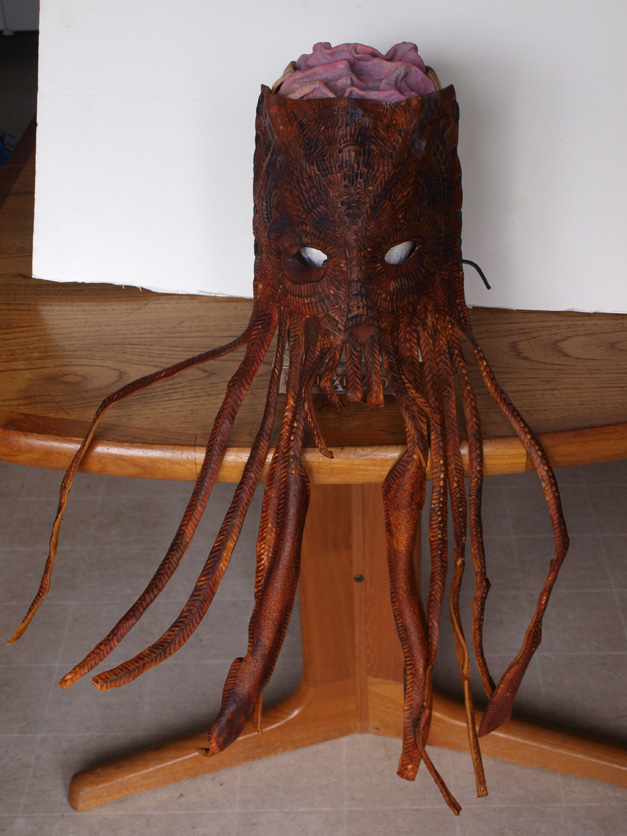
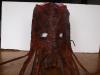
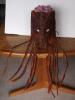
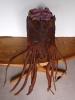
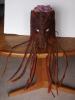
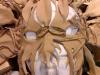
This mask came in a flash of insight when I was playing with some tools and I spent every spare moment after working on it or thinking about it. I wanted to create the texture you see in the finished mask. My LARP system manager had asked me for a Cthulu type mask so I made the mask with tentacles. It is 8oz leather, water hardened and dyed a tan color. Not having any antiquing, I used shoe polish to add some depth. I like working with the heavier leather and the 8oz will give it better survival, especially considering the tentacles. The pinkish brain on top was a solution to the odd size of the mask. It really was made from scraps (large scaps) so I had not planned everything out and was left with this big hole in the top. I was going to stitch something on but the brain came to mind. It's just white/pink dyed leather, scrunched up and water hardened. Now, let me tell you, white leather dye is some nasty stuff. When it gets all mixed with other dye and water and wax, well, yuck. I might need a respirator to be around that stuff again. The helmet is two basically rectangular peices laced together. To adjust it, I just loosen or tighten the lace. The "brain" is just friction fit into the top with a foam sponge pad underneath it. I wanted the wearer the option of being able to yank out the brain bit during LARP. I did a lot of work on the eyes to make sure visibility is good in the mask. A monster that can't see just isn't that frightening. The tentacles are hardened so that the outer two go down the back of the wearer to give it a 3D effect for all the viewers. Mark Charke
-
Bracelet with Gemstones
Charke commented on lederwerner's gallery image in Our Leatherwork Galleries
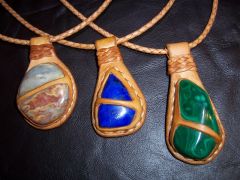 Wow. And there's yet ANOTHER project I've seen around here that I really want to try! That's such a brilliant use of leather... ...I hope you guys don't mind imitation?
 -
I got the bug to create masks from some professional masks availible onlne. I created about a dozen but this is my first very serrious effort. It's a little flimsy at 4oz but I don't think I could make it thicker and have this detail. It is water hardened but I'm thinking about wax hardening it to stiffen it up more. I've never wax hardened before so I'll have to play with that first. The project started with a face template as an outline but the rest was freehand doodled on the back of the leather. (I've got to get a good green pen.) Mark Charke

-
That is amazing. This is my first post to his board and I am happy to find it. I thought I would post some of my own leather working, and I will, but comming across this peice is daunting! The callibur of skill required to do that is mind blowing. I haven't done any antiquing and my tooling needs, well, more tools and a good bit more practice. This is what I would shoot for. Just incredible artwork. With that over your shoulder, it just screams, hollars and bellows out - 'pool shark'. That is the bad, by the way, that everyone will think you are going to take them for all their money. If you are as good at pool, I imagine you would. I did think it was a quiver. That would be a heck of a peice on the fields of LARP or SCA. Mark Charke