


TomG
-
Posts
1,025 -
Joined
-
Last visited
Content Type
Profiles
Forums
Events
Blogs
Gallery
Store
Everything posted by TomG
-
 What's a hessian sack? Good job painting the cat
 -
Looks like a good one. There used to be a YouTube video from a guy in GB that showed how to do the mods for all sorts of adapters,and even snap setters and such If I can find it, I'll post a link. Has anyone ever made their own dies for snaps, rivets, spots and so on? they seem to be quite pricey...
-
Hi All, I use a lot o mink oil paste on the back of my collars and leashes. I normally use Kiwi Camp Dry as it is a very stiff paste, and it usually does not affect the front of the strap, as in color shifts or irregular staining/oiling. I had purchased some Fiebings mink oil paste some time ago and stopped using it because of the issues of it absorbing unevenly from the back to front and looking blotchy. It's half the consistency of the Kiwi. I was cleaning up tonight and found it, opened it and almost passed out from the smell. I think the mink crawled back in and died! Has anyone else ever experienced this?
-
Has anyone found a resist that will block the Fiebings black oil dye? I apply the dye with a sponge or dauber. I've tried --- Super Sheen, Resolene, Leather Balm, Blockout and even wood Shellac! I've seen Cyber and some others use Latex, but want to hear if it is a good choice for black before buying some, or if there is something better that will work.
-
Go back to Springfield and look for this item: Groover, Pro Stitching Set. I tried t insert a link but something is not working right and it won't let me right now.
-
They do make a white dye, but it doesn't work worth a crap on veg-tan. You have to put lots of coats on and I've never been able to make it look good. And, it STINKS....
-
Yeah.. the alcohol strips out the oils of the leather. Read through the posts here, and you'll find many ways to fix this. Lots of folks use a light coat of NFO before or after dying. Others use Carnuba, or RTC, for Bee Natural, or other products. Personally, I use Atom Wax with Leather Balm on top and just before shipping, I rub in some thick mink oil paste to the back. Not too much or you can change the color of the item. These are mainly strap type products. But this makes most of them soft and flexible. Take some dyed and dried straps to your local leather supplier and ask if you can try some of the products and buy what works best for you.
-
How Do I Put A Cap On A Socket Straight For A Snap
TomG replied to leathervan's topic in How Do I Do That?
Amen on the Leathercraft Tools book. In my opinion, it is one of the "bibles" of this craft. And light taps are definitely the right way to start out. After a while, you can feel when the rivet is seated. I then give it one more whack and I'm done. As in every other aspect, practice is key. -
How Do I Put A Cap On A Socket Straight For A Snap
TomG replied to leathervan's topic in How Do I Do That?
Your stem is too long. It needs to end about 1/16" above the uncompressed leather. There are a number of ways to trim them. Files a score line around them and try to snap the tip off is one way, but I found it to be awkward at beast. I use a pair of flush cutting nippers to cut the tip above the leather. I then use the nippers to reshape it to some semblance of a round shaft again. Never had a problem with them holding or he caps being lined up. -
As cheap as commercially made glue is, I'm not sure why you'd want to make your own, buy you might do an Internet search on a book called Dr Chase's Recipies. It's a free book if memory serves me.
-
I stamp a good bit of 3/4. And your thoughts on putting a heavier piece of scrap under it is a good one. It will make a world of difference. Try some different firmnesses of leather to get the impression you want. I haven't used my arbor press is a while so I really don't remember if I used a piece under those jobs or not.
-
Magnets and any card with a stripe are an invitation to having the card erased or scrambled. I'd keep them well apart.
-
Check this thread http://leatherworker.net/forum/index.php?showtopic=52488&hl=
-
I have a rotary New Hermes Engravograph for plastics that I have experimented with. Does a pretty good job as long as I adjust the cutter to the proper depth, but it's a fixed depth of cut. Places like Disney, Six Flags, etc that sell the engraved, pre-made bracelets and engrave your name on while you wait, use a digital rotary engrave like the M20. With its computer interface, I can cut a wide variety of designs. But again... it's pretty much a fixed cutting depth. I would think a CNC milling machine and a small cutting bit would let you cut almost an design into the leather. Post some pic of your tests!
-
Thanks. I'll have to try that for my edger...
-
Cool Tool. I use a big plastic paperclip with a piece of felt to apply edge dressing. Same idea, but yours is slicker!!! What did you use? a dowel rod The smell was not vinegar. it was a rusty - musty -- weird smell. Can't remember it exactly no. Been a few since used it. But your description my be similar.
-
Hey Todd, I am NOT a Vingaroon pro by any means, but I have used it. I stopped because I could never get the smell out. But... My Roon was never coal black. My 1st batch was a rusty color and my second batch was rusty as well, but not as dark. Both dyed well. I always used Resolene diluted 50/50 with water for my finish coat. But I actually used the Roon for dying the whole piece... not as an edge dye. Once think I would be careful of is the wicking effect of the leather. I'd experiment with it fist to make sure it's not going to oak in further than the edges.
-
RE the Skiver - Tandy has the same thing for $8. It uses a old-style single edge razor blade to do the cutting. I've used the Tandy one but not the Osborne. I assume from the picture the Osborne looks to use the same.
-
Ditto on what Aaron and Dwight said. Especially the one about smaller projects. Make a single coaster. A key fob. Something you can do in an hour or so. It will give you the sense of accomplishment and ease the frustration
-
For those of you who use an airbrush, what do you use to put your piece on to spray? I need to redo the way I've done it in the past. One guy I met a few years ago, built a square box about 3 feet long and 2 feet high, put a piece of wire mesh on the front with hooks to hold the piece vertical. He had a fan and filter in the back to exhaust the overspray. Nice if you have the room, which a lot of us don't have. Pictures? Thanks
-
Thanks to all. Looks like my method was OK, just not a steady enough hand. I finally got a good one. Actually, I have an airbrush, but apparently I didn't clean I well enough last time I used it and it's all gunked up and I think my needle might be damaged Plus, right now, I don't have a place to spray without triggering divorce proceedings. That brings up another subject, but I think I'll start a new thread for it. Later
-
As the title says, what is the best way to achieve a fade on a 1-1/2" wide strap without an airbrush? I need to go from saddle tan in the middle to almost black on the outer edges. I've done it a long time ago, but can't remember exactly what I used. I've got pictures of some pretty smooth fades. I'm thinking sponges with several shades of brown, but it's not working this time around. It's choppy and streaky at the edges. Any tips or help? Thanks
-
Noob Needs Help With Resist - Tandy, Eco Flo Super Shene, Block Etc
TomG replied to fscii's topic in How Do I Do That?
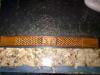
Here's a couple of different shots of a bracelet I'm making for someone. This was resisted with full strength Resolene, dried overnight, dyed with Fiebings oil dye cut about 50% with denatured alcohol. Then Leather Balm with Atom wax applied, dried and buffed. Then a heavy coat of black antiquing gel rubbed in and then wiped off immediately. Like I said before... Only one way of many.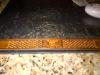
-
What is Linwax?
-
Noob Needs Help With Resist - Tandy, Eco Flo Super Shene, Block Etc
TomG replied to fscii's topic in How Do I Do That?
That stuff is actually a water-based stain. Like Cyber said.. NOT a dye.. Looking at Tandy's video on using resist, George only applies 1 coat and says to let it dry overnight. But again, Cyber is right. If you put a very heavy coat on, 30 minutes is not enough time to set. If you look through these forums, you are going to find dozens of different techniques, tricks, tips and suggestions. You will find that most, it seems, do not like Super Sheen (or Satin Sheen) and prefer Resolene diluted 50/50 with water. A less expensive equivalent is Mop N Glow floor wax cut 50/50 as well. Lots of folks swear by it for a resist as well as a top coat. But your coasters don't look bad- especially for a first attempt

