


Gregory B. Moody
-
Posts
60 -
Joined
-
Last visited
Content Type
Profiles
Forums
Events
Blogs
Gallery
Store
Everything posted by Gregory B. Moody
-
So you are asking if there is something which will keep the dye from affecting the flames while putting the other color ON TOP of the flames also ? As compared to the other color bleeding farther than desired at the juncture of the two ? You are wanting something to protect the flames color while basically dunking the entire article ? To dye the entire case minus the flames you pretty much need to only apply the other color to the areas which are not flames. No shortcuts in that area that I have ever seen.... Things having to do with dyeing leather are usually slow , tedious, and subject to accidents like drips falling into areas you don't want them... and likely to look faded or worn ten or twenty years out... there are some finishes which do not have those disadvantages... but they don't provide multicolored affects... Greg
-
Putting a finished leather towards the dog is a great idea... and contact cements are good enough by themselves... no need to sew unless you just want to... Remember, shoe soles are held together with this stuff.. the sewing around the edge is eyewash... the evidence ? Your soles don't fall off even after you wear through the stitching from the bottom... You can use your skiver to take the edge to nothing and you won't even be able to see if from the side...
-
I am not going to suggest anything which your description has not pretty much said by itself... only assure you that you are not ' missing out' on some secret which the rest of the leatherworker community is keeping from you... It is the nature of dealing with organic spongy materials which makes sealing it when faced with the kinds of variables which you have described pretty much impossible. Some reduction of transfer is possible with buffing and those sorts of things... but basically in a friction situation like against your dog's neck pliable clear finishes are just not going to last forever... even in the unlikely event they work well initially.. So, Don't put finish on the back side of your projects which might rub off on animals , people, or people's clothes... This is also why , about 40 years ago I started using only one finish... based on Fiebings Antique and covered by neutral shoe polish... Two coats carnauba cream, medium brown Fiebings Antique ( the almost paste consistancy ), and then neutral shoe polish .... And even that finish I do not put on the backside of belts... years of friction and sweat and dirt are very hard on the backside of belts... It is a Zen type thing.. go with the flow created by the physical properties of the materials you are working with...instead of fighting them... Greg
-
"border on heresy"--Bruce Johnson I will join you there Bruce... on thick leather almost impossible to avoid having to go back and finish the cut somewhere... However, if one has the ability to cut just before a project is to start then cutting while WET is the trick... I have never seen my father use a round knife even though we always had one... Bruce's note about pulling a hook knife is right on the money... I always thought that they sharpened the wrong edge of round knives... if you sharpen the backside then you could pull it and have the control Bruce refers to on the hook knife. The yellow plastic handled rotary cutters are great. Hold them with your wrist parallel to the table surface. Use the thinnest straight edge you can find because the depth of cut is limited... and it depends on which direction you hold the round cutter with relation to the straight edge... 3/8ths inch is about the max cut even though the cutter is much larger than that..... We usually used a good Exacto knife for the first part of the cut. Greg
-
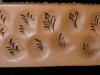
Here is a sample of the effect on a practice piece... The small white spots were left to show what happens if bubbles are allowed to stay in the cuts... but this shows the intermediate darkening effect of the crosshatched pear shader... still allowing the decorative cuts to be darker... and the non stamped area around the edge of the leaf or petal will be even lighter.. Greg
-
Tandy kits done by novice
Gregory B. Moody replied to BigAlC's topic in Purses, Wallets, Belts and Miscellaneous Pocket Items
Ok,,, lets talk about the Roper Wallet ... and center section leaf on the side opposite the initialed side.. On the upper side of the carved vein the decorative cuts went far enough that they wound up pointing away from the center line of the leaf... on floral carving everything should be contributing to the ' flow' downstem... Also, decorative cuts should be deep at the beginning and fade out to sharp points at the end ( which is going to be downstem ).... they should be like apostrophe's... where your decorative cuts end I can see the impression of the shape of the swivel knife blade... so you need to be gradually withdrawing it as you near the end of the decorative cut. I am pretty much against dyeing parts of a project in the first place.. and this one gives a good example of why. When you look at it one of the first things to catch the eye is unusual pattern of black... The irregular black pattern caused by the decision to only color parts of the background which are 'captured' in the floral pattern.. as compared to dyeing the entire background takes away from the impact of the floral pattern because it is more prominent color wise. I am also against dyeing all the background... particularly on an item which gets the friction wear of a wallet... It is a lot of time and work... and at some point will require a lot of time to try to bring back to nice looking (redyeing )... { and other finishes are available which won't }. Specifially on this pattern is also causes a blip in the visual impact where two leaves accidentally appear to be one leaf with black painted in the center... when in fact you were following the rule you were using for the rest of the project... It is very important to case your leather several hours... if it is not evenly moist all the way through at some point then it is very hard to get nice clean curves... I know that most books claim you can just wet and go but even with the background I have I never consider not properly casing a project. It makes at least 25 percent difference in the way your carving and stamping looks... and few are so good that giving up that 25 percent won't show up in the visual impact..... At some point you will want to cut out your own projects so that you won't be using round holes with flat lace... and some kits are not too good about having the holes match up anyway... and remember... anytime you are going to sew or lace anything you glue it together with contact cement before punching the holes. Here is a practice piece I did a few days ago trying to get my hand back in shape to do decorative cuts.. Greg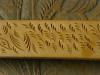
-
Yes, I will do that... give me a couple of days.. Greg
-
The reason people who have worked in places that sell black dye for use on leather tell people to use some other dark color in addition to black is that regularly over the years people come into the store saying " I used the black dye and my project has Iridescent blue tones " like a water puddle will show when oil is on its surface. The construction of your sentence makes it sound like someone suggested this in order to minimize rub off of the black.. but that is completely seperate from the true black color using the blue/black is suggested for. Since I don't ' oil ' most of my projects... I prefer to use the lighter spirit carrier in regular black dye ( as compared to Black Pro Dye, etc ) and then use neutral shoe polish or carnauba cream for long term conditioning.... Buffing any loose residuals off before applying some clear finish is always good procedure. Institutional dye is for places like prisons or schools... where the users can not be trusted to follow the safety rules.... It is generally considered inferior to regular dye formulations... Greg
-
Need help making a holster
Gregory B. Moody replied to wes's topic in Gun Holsters, Rifle Slings and Knife Sheathes
Lexol is pretty much accepted as the oil which will change the color of upholstery leather the least... However, let me remind everyone that the finish on upholstery leather is pretty much impermeable... so the effects are very shallow... if you have a car with leather upholstery and want it to really last you must take the seats apart and apply oil from the backside... I would say once every five years depending on the climate you live in and whether you roll up the windows and leave it out in the sunshine... The only oil I have seen at the Mercedes Dealership is Lexol... and for the record.... for those plastic parts of your car Lexol makes Vinylex....and is highly recommended by the old diesel mercedes guys... -
Using life-eye needles with 'roo lace
Gregory B. Moody replied to Dan Hammons's topic in Sewing Leather
I received a complaint about my answers in this thread so I am going to be more complete in my composing... I was asked what my father being a Tandy manager when I was a teenager had to do with anything... I worked most saturdays at the store because both my parents worked there... We got things like rivets and snaps by gross packages and I am the one that counted them out into dozens and stapled the glassine bags together.. I also spent most of the summer with my father when he went around to Texas Hill Country summer camps doing demonstrations on carving and any other leatherworking questions that were asked... So those the first two posts at the beginning of this thread are only the latest of many years of hearing complaints about thread dependant lacing needles... People have problems with those needles because screw threads were designed for keeping harder materials together... metal to metal, metal to wood, wood to wood... and the size of the area available for making the threads can aggravate the situation even more... people are going to have problems with anything which requires expertise in judging exactly what taper to cut the spongy lace ..... As compared to the obvious friction created by the change of direction the lace is required to go through with the hook and eye needle... this is the same principal which keeps knots tied... a combination of change of direction creating enough friction to keep the cord in place. "I do not like hook & eye needles because they tear up my hands, especially when lacing anything more complicated than a checkbook. They bend and break, and cannot stand the force (or the pliers) when buckstitching or going through several layers of leather. They are dull, and don't sharpen well, so they have to be aimed at the holes dead-on. "---Johanna I assumed by saying that the holes were not properly made that the connection with tearing up your hands would be made by readers... but it was not... so I will rephrase ... A lacing needle is not made to be used like a sewing needle.. the idea that it would ever be bent , broken, or need to be sharpened means that the hole was not properly opened up... " I was a Tandy manager for five years, and I can't remember anyone we ever showed how to use a LifeEye needle going back to using kit needles again. When you are teaching a new student, and they twist the lace, it is easy to unscrew the lace, pull out the stitches, and screw the lace back in. "--Johanna I do not know what needles they put into the kits you are referring to... if they did not put the hook and eye then they were shooting themselves in the foot.... When you were teaching those students you did not show them how to avoid twisting the thread by the method which I have described... so that ability to unscrew the lace was only necessary because they did not know how to avoid twisting in the first place... which of course is the time and frustration saving method out of the two... A fid is a dull Flat awl... you can not expect all the holes you punch in a soft spongy material like mulitiple layers of leather to still be as open as when you punched them.... As soon as you think you need something like pliers to pull on a lacing needle it means the hole is not open enough.. Sore fingers , broken needles , bent needles..... all a thing of the past when care is exercised in making sure the holes are correct at the time you get to them... I am not sure any needle will work well on what I usually think of buckstitching... but a hole opened up with a fid will allow a sharpened end to go far enough to be pulled on through without a needle attached... -
Need help making a holster
Gregory B. Moody replied to wes's topic in Gun Holsters, Rifle Slings and Knife Sheathes
"The treatment that I use on my holsters is Renaissance wax."..Wes Ooops... My best guess right now ... with just a little checking on the internet....and years of dealing with trying to keep leather from drying out is that you are using that for the look which it gives you as compared to understanding the lubrication needs of your holsters.... What you are needing is to replace the oils which the animal's body would have been giving to the skin on a constant basis when they were still together. Basically you are needing something close to (or actual) Lanolin. The Lexol products Johanna mentioned are great... carnauba cream would be great.... Intensive Care Hand lotion would be great.... In other words the chances are you are needing a liquid at this point to penetrate and try to stop the drying which has been going on. From what I have read about your wax it will not provide what you are needing. Holsters are nice in one respect ... you can access both sides of the leather...and you need to do that. Since you already have that weight leather why don't you consider putting two layers together for this project... not what I would normally suggest for a first project but you will learn more about molding leather doing that... just mold the first one... then contact cement the next layer to it molding as you wrap it... and many people don't know it but contact cement is regularly used on wet leather... in the shoe repair industry... and two layers will be stiffer than the same thickness in just one layer.... the plywood effect.... You could treat it like a lined holster and place them facing opposite directions... would give you a smooth inside with never any production of leather ' dust'.... Greg -
Absolutely... we have brushes labeled ' nuetral, brown, black ' ....and at least once a year my father would get out the dishpan and wash all the brushes... they can last decades if treated right... Greg ".. and label that clean shoe brush "black" because it will be black from then on,"---Bill
-
Two coats dark blue.... Two coats black.... vigorously rub off any loose residue with cotton rag.... apply two coats of neutral shoe polish in small circular motions by hand (to heat up).... brush with clean shoe brush. avoid getting dyes on the backside where they may contact clothes... However, no cowboys wore white pants when hanging around at the saloon....... so for show something like acrylic paint....may be needed ....
-
Using life-eye needles with 'roo lace
Gregory B. Moody replied to Dan Hammons's topic in Sewing Leather
UH.... Did you see the first post in this thread ? My father was a Tandy manager for 5 years... once we taught people to simple push down on the prong instead of beating it into submission everyone loved the hook and eye needles... Sometimes if something has survived long enough to be considered ' archaic ' it was because it worked for a long time... Greg -
Need help making a holster
Gregory B. Moody replied to wes's topic in Gun Holsters, Rifle Slings and Knife Sheathes
I will take that wager... no chance of that happening.... there is a reason leather is chosen to make holsters out of... LOL I will make a wager right now that my first major mistake will be stretching the leather too much and destroying its inner fiber structure, destroying its firmness and rigidity after it has dried. Is this a hazard or possibility? -
A motor powered plastic slicker will do a good job... but in order to have more size options... which means different width slots in the round edger it is easier to deal with what is the traditional material ... a wood which has natural oils in it... I don't know that that really makes any difference... but it is fun to feel Rosewood and those types of wood... This is probably one of those times you need to contact a local wood worker to make what you need.... be sure they don't make the cuts too deep as that will put marks onto the top face of your project... Or, with a little work you can drill a piece of wood and mount it onto the electric motor and then sand/cut it down to what you want... a lathe effect in which you leave the lathe power attached permanently... I suggest at least a 1750 rpm one third horse motor ( easy to find in old washing machine ) ... Greg Where do you get your wood slickers? (Sorry, I only use tandy as a source right now. Its the only local vendor) Thanks for all the advice. I am going to try some of these different things....
-
I think you are correct. I grew up hand slicking belt edges... but that is a special case for that weight leather... you can hold one end and cup your hand with the rough cloth in the other and pull hard and fast... but with smaller items which you hand can not reach both sides of ...or both sides are not being slicked... that is a problem... you can hold some items on the edge of a table and keep them straight while applying the necessary pressure and speed... but at some point you will realize that you are working way too hard and not getting the perfect edge that a simple wooden slicking wheel mounted on an old washing machine motor will give you... But as well as that worked on the main part of belt edges I was always aware that at the tip where it went to a point there was no way the simple slicking with a cloth can do the job right.. you can't compress your hand in an even fashion down to nothing ... so if you are going to have to use a slicker at any place on the project you might as well use it all over it... For some things it is really hard to beat a nice laced edge.... no matter how much fun you have hand stitching... I have used denim , burlap and cheesecloth at different times... the later probably the best combination of coarseness and conformity for ease of holding... we are talking several folds obviously... On belts it is just easy to go one direction... and if you use a knife edge to make your long fibers hang out I have always felt that it then needed to be slicked in that same direction.... Greg "I mainly do smaller things like purses, folders, wallets and briefcases. From the sound of it, it doesnt sound like this would be applicable. I could be wrong. What kind of cloth do you use?"
-
Using life-eye needles with 'roo lace
Gregory B. Moody replied to Dan Hammons's topic in Sewing Leather
"It sure does make short work of it. " I used to be able to lace a billfold in 30 minutes , including the one splice half way around to keep the lace from getting fuzzy on the backside, WHiLE WATCHING TV.... you only have to glance down at the point where the needle has to choose a hole or cross... so it does not take away from TV watching AT ALL.... LOL Greg -
Using life-eye needles with 'roo lace
Gregory B. Moody replied to Dan Hammons's topic in Sewing Leather
Johanna, Ok , lets back up... Do you have a fid and use it ? There should be a proper hole before you stick the needle in... it is only made to steer the lace where it needs to go...and if you have a good hole I have even used a lacquer dipped end of the lace for some things...( but I digress....) I have seen hook and eye needles last 10 years... not the two pronged... not suggesting them for anything since the physics of that turn through the hole are what make the hook and eye good design. If you are using pliers to pull the lace through you have not constructed your hole properly... and that will make lacing unpleasant with any needle... "I was taught never to let go of the needle" .... But I can show you the proper way... you only just now asked... LOL The trick is that when you go through on normal double cordovan you only hold onto the needle until you get it far enough to loop back towards you ... then you place the needle between your first and second fingers pointed towards where it will be going next... and you use your first finger and thumb to pull the lace on through the hole.. I can do an entire billfold without ever having to straighten the lace... and it is not hard... Yall are the ones complaining about the needles which require the threads inside them to hold... you put them together with the lace in compression and then it is likely to let go when the force put on it is in the stretching mode... That is taken care of by the hook and eye needle... the two pronged needles ( which lack the hole ) are junk... LOL Everyone should try my method first because it is likely to work just fine and save the cost of other tools... and sore hands....LOL ... Greg -
Using life-eye needles with 'roo lace
Gregory B. Moody replied to Dan Hammons's topic in Sewing Leather
My question is why you are wanting to use the Lifeeye needle ? I have seen lots of people who had problems getting them to work well for them... Have you tried the hook and eye ? That change of direction through the eye takes the torque... so the two prongs don't have to do any work except keep the end down out of the way... Greg -
"I know leather is traditional for strops. "--Tom Yes it is and that was a big mistake allowing it to be that way... and I think I know how it happened... Barber's used leather strops for their straight edged razors... so people assumed that was the way to get a sharp edge... But the difference is that those old razors had a thin blade and almost no pressure could be applied at the edge being sharpened... If the blade had been heavy enough to apply pressure they would have figured out that the leather gave under the edge and the rebound effect rounded over the edge... If you don't believe me ( Dave ) there is an Al Stohlman book that says exactly that... Greg
-
Here are the rules my father followed... Use only plain water to case the leather... Otherwise you take a chance your mixture will mess up whatever finish you apply later or react with the chemicals used to tan the leather. Place the leather under water until the bubbles stop... then case. My father often did pictures on full sides of leather.... for that size object 6 inches of water in the bathtub and the hide slowly pulled through it from one end to the other worked just fine...smaller items would be held under running water in the sink. Only wet the leather once. Otherwise the leather will swell again and mess up the crispness of your carving and stamping. To keep from rewetting a large project like a picture spritz it from the backside on a regular basis.... 10 to 20 minutes normally depending on the drying rate in your shop... If you accidentally allow any of the front of the article to get dry lightly spritz that and shorten the time between spritzing ... ' dry lines' are usually permanent marks on leather. He often kept leather wet on large pictures for 12 hours straight by spritzing only from the backside after starting to carve. The idea on spritzing from the back is to allow capillary action to bring the water from the back to the front to slow down the RATE of drying... but it is still a one way function.. from carving wetness to background wetness .... at whatever rate you are able to work the front of the leather without ever causing the cells to reswell. Use brown paper around the leather inside the plastic holder when casing. Otherwise the leather may get mold spots starting at places water condenses on the plastic and touches the leather. Brown wrapping paper or paper sacks from a supermarket cut open work great. Allowing the individual cells to get evenly moist inside the leather is extremely important to making clean graceful cuts with the swivel knife. That is the purpose of casing. I consider 8 hours the minimum.... but we almost always just wet and cased the day before. Not properly casing leather is the number one mistake people make in leathercrafting. If your carving and stamping are not what you want them to be this is the easiest , cheapest and first thing to examine in your leatherworking proceedures. In many great books about carving they say it is best to case for some time.. or overnight... then mention wiping water on the front and back, looking for a certain color, etc... What people need to know is that is caused by commercial ( the people selling leather and supplies ) pressure to make the process look quick and easy. Planning ahead and committing to doing a project the next day is a real pain. I understand the desire to have a quick and easy method to start your project when you feel the excitement or you have a break in your schedule. But the physics of the situation require something extra if you plan on doing better than average carving and stamping... there is a magical point after the leather is taken out of the plastic at which carving is a real pleasure and then stamping ' takes' instead of mushing the area next to the tool imprint... many people have never experienced that... and look at other's works wondering what magic principles they know and are not sharing... That is the main secret people don't appreciate. The physics has to be satisfied first... and the books often make it sound like the longer casing is only optional... I would never ever consider carving a project that I had not cased properly..... Greg
-
"for some reason it is important to not let the plastic rest on the top of the leather."--Tom K That is the reason we used brown paper around the leather inside the plastic bag... most of the time we just cut open old fashioned brown paper bags from the supermarket... we also used those for making patterns... Greg
-
I was encouraged by the picture of Verlane's bench.... I don't know how she uses those two wide adjustable lights... but that is what is needed ....at about three inches off your carving stone to give a person the ability to see differences in depth when stamping...and to see the line one is trying to hit when carving .... having two of them that wide means you can position them and not have your working point in a shadow made by your hand or tools.... Greg
-
I have never owned or tried out those fancy expensive edgers.... all I have ever used were a number two bent stem Tandy edger... for belt weight edges....and a number 3 for thicker projects... The straight shank are too hard to find the right angle. The best trick I know is to use a sharp knife blade held at 90 degrees to the edge to cause long fibers to be loose at the edge... and to do that you must scrape only ONE direction... the longer they are the smoother and easier you can make the edge. Use the knife to round take out the line between where the edger cuts and the side of the project. Then also only slick in one direction.. you are trying to make those long fibers lay the same direction. I grew up using rough cloth held in the hand for slicking... but you can not get something like a belt slicked right down to the tapered tip with that.. so I suggest a powered wooden slicker... I have tried Gum Trag... but a properly prepped edge slicked with plain old beeswax is cheap and longlasting for almost no cost. We used a single piece of beeswax for at least 10 years... I was about 12 when I saw my first new clean round beeswax... could not believe how nice it looked...

