Cyberthrasher
-
Posts
2,397 -
Joined
-
Last visited
Content Type
Profiles
Forums
Events
Blogs
Gallery
Store
Everything posted by Cyberthrasher
-
I've been giving this some thought myself recently just so I'm prepared for a belt extension. My thought was to shorten the belt as needed and put a square ring (or any other piece of hardware that will look good) in at each end with rivets. Then you can add another piece on each end that would extend the belt out to it's needed length. I think this will make it look kind of like a piece of horse bridal (I think I have the right term), but could add some interesting appeal. I think it would be a good option for yours, especially since it doesn't sound like you want to any stitching.
-

Leather Burnishers For Dremel Issues
Cyberthrasher replied to renegadelizard's topic in Leather Tools
I don't know how you would do it with a sanding drum, but when polishing frets I use the grinding disks and take a round file to them to make a groove in the center. 2000 should be fine, just make sure you're good and lubricated and don't hang out too long on any one spot. -
Should I Change My Logo?
Cyberthrasher replied to HellcatLeathers's topic in Marketing and Advertising
Ditto Glendon, Tina and Spinner on this one. I LOVE your tattoo, but from a business standpoint, I don't think it works as well as your current one for a logo. -
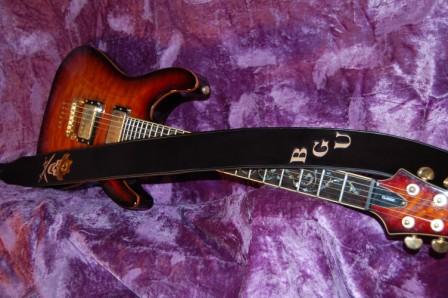
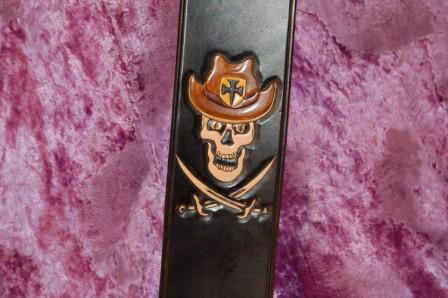
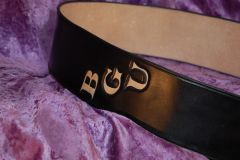
New guitar strap I finished up today. The customer is a member of the Blues Guitar Unleashed forums (BGU) who's family had a history of "privateering" after they came over from Britain. So, we went with that and the fact that he's from Texas and threw his family crest on there as well.


-

From the album: Cyberthrasher
© Hellhound Kustoms
-
From the album: Cyberthrasher
© Hellhound Kustoms
-

From the album: Cyberthrasher
© Hellhound Kustoms
-
 That's a pretty cool idea.
 -
 The most important thing is that you've spotted your mistakes Best thing I've learned in life is that once you think you're good, you'll never get better. If you stop to see what you could have done better then you'll likely do it next time and then get better.
 -
Leather Burnishers For Dremel Issues
Cyberthrasher replied to renegadelizard's topic in Leather Tools
I had a reminder in Spinner's response to the other post - about 1500 RPM's is what you're looking for. My Dremel is set to about 15. In the FAQ's on the leatherburnishers.com website it says about "halfway" on a variable speed rotary tool. -
I'm Almost At The End Of My Rope...or Lace, Whatever.
Cyberthrasher replied to Wink's topic in Leatherwork Conversation
Yep!! We all started somewhere. I'm still shocked at the progress I've made in less than a year. I still keep those "scrap heap" pieces around to show people what I used to do when they admire my work -
That's pretty cool. I'm really digging that border.
-
Leather Burnishers For Dremel Issues
Cyberthrasher replied to renegadelizard's topic in Leather Tools
What are you using for sanding? I used to have that problem quite a bit before I found the sanding method that works best for me and also changed to a wet rag with saddle soap for burnishing. 1.) use preferred edge beveler on both edges (front and back) 2.) use a small piece of 220 grit paper (courser grits will leave it "hairy") curved over the edge in a round profile. Rub vigorously until you have the desired shape and consistency. 3.) Match burnisher to the profile of the leather. Sometimes the leather is just a touch to thick, causing the center of the edge to not contact the burnisher. This may require to you to use the next size up in burnisher. 4.) wet rag down and rub on some saddle soap. Apply it generously to the edge so that it's got plenty of lubrication. I like to work in small sections abuout 6 inches in length so that the leather doesn't have time to suck up the moisture I've just applied to it. 5.) keeping the 6 inch length in mind, I start from the beginning and move somewhat quickly over to the other end, then back to the beginning a little more slowly, then back to the other end one more time (a total of 3 passes over the section being worked). The whole time I like to feel what's going on to make sure that things are getting smoothed out the way I like. From there, I've ended up right at the next 6 inch stretch and just continue on (I do a lot of straps). Really, I think it sounds like an adjustment in the grit of sandpaper may be the way to go. Also, take a look at the speed of your dremel. I'm not sure of the exact RPM's, but Chris (Spinner) always said to set it at the halfway mark, which seems to work pretty well on mine. -
I'm Almost At The End Of My Rope...or Lace, Whatever.
Cyberthrasher replied to Wink's topic in Leatherwork Conversation
Well, if you'd like to feel better about it, just look up some of my old stuff I'm late to the conversation, but I'm glad you got it figured out. -
Both of these artists are good close friends of mine. For those of you not familiar with CJ, he's been well known in the chopper world since at least the 60's, and has been documented throughout all the magazines with much of his work being highly sought out. Why do I say this? To show how seriously KOOL this piece is going to be!!!!
-
Well, if that's the case, mention what you want to do and they'll be more than happy to get you steered in the right direction as well.
-
1St Seat And Some Finishing Questions
Cyberthrasher replied to Miloradovich's topic in Motorcycles and Biker Gear
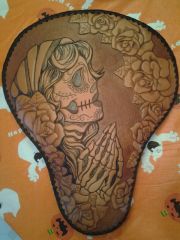
Ditto that one. I'm still in awe of the subtle color combinations you got here Milo!! I can't tell you enough how BEAUTIFUL it came out!! And don't feel too bad about it taking so long - I have a seat that I started back in April that's still not done. Since it was for fun it keeps on getting put aside until I clear up customer orders. Suppose it's a good thing that that hasn't been happening -
I've never worked with bridle leathers but I'm not sure how well this will work out. You may be able to strip off the top finish ok, but I'm not sure if the bridle leather will take tooling that well (depends on how it will accept moisture). If you're looking to actually strip off the color, that will be next to impossible in my experience. If all else fails, you can always test and see what happens
-
I've had MILD luck using isopropyl or denatured alcohol to lighten it up in the past - just enough to possibly add another coat over the top. Takes LOTS of rubbing if it will ever work. Since the dye penetrates the leather, you're pretty much stuck. So, if you try removing it, go into it with the assumption that you have to start over anyway and if you're successful you just saved yourself the work. As a note, I usually find this happens to me when I was really light and careful on my test piece and then I ended up applying too much dye to the real piece. I'd say find a way to incorporate the darker color if at all possible. I just messed one up the other night - dyed a spot black that was supposed to be yellow. Absolutely NO way to fix that one so I ended up re-working the design to make it work the way I had it.
-
Pages 96 - 102 here cover quite a bit of lacing. http://kingsmerecrafts.com/page96.html I like to use a hole punch for lacing that has to be structurally secure and will take a lot of abuse. Things that aren't that abused or just decorative, I like a straight angled slit (the slit will tear under stress). Tandy also has several good lacing guides available at their online leather library.
-
I always like to find new ways of tweaking things around. But, for the most part I have basic templates and designs for things. After that it's just a matter of what adjustments will suit the project the best.
-
Just as an additional option, I use one of bearman's dremel burnishers in my variable speed dremel mounted horizontally to the dremel drill press (it will rotate either vertical, horizontal, or diagonal). This allows me to see the burnishing edge and just slide my straps right through with both hands on the leather. If I'm doing something larger I can just change the mounting angle on it.
-
I've found that some people think lace is fancy for some reason. Maybe the applique was just too much for him once he got it mounted up? Either way, that's an easy one to re-purpose but it still sucks that it happened. I always dread the day I get an email after the item arrives with the customer. They always love the pictures, but I'm afraid one of them might find some problem with it when they have it in their hands. You just proved that the day can come to even the best of us
-
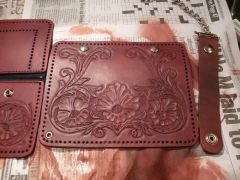
The only thing I've found to watch out for is the thickness of the fabric. If it's a lightweight linen, it's easy to get too much adhesive on that will seep through the lining. Also, with the 3M spray adhesives (at least the ones I've used) it's really important to follow the curing time if you want it to work at all. My suggestion for a wallet is to put the lining on with adhesive all the way past the stitching holes and just stitch through it after it's all cured.
-
2012 10 14 Nicks seat
Cyberthrasher commented on Miloradovich's gallery image in Gallery- Our Leatherwork
 Great to see this one finished up!!! Came out better than any of us could have imagined!!