GeneH
Members-
Posts
108 -
Joined
-
Last visited
Content Type
Profiles
Forums
Events
Blogs
Gallery
Everything posted by GeneH
-
Best Glue For Leather To Leather, And Leather To Fabric
GeneH replied to CCPhotog's topic in How Do I Do That?
Well since this topic has be revived - some specific questions: *E6000 - - flexible after cured? - bonds to the skin or outside of veg tan? (my Weldwood Contact Cement doesn't seem to adhere well) - stronger than the leather? (Pulls leather away when ripped off instead of separating from the leather) - water and / or solvent proof for water soaked or accidental oil soaking? *Barge - - flexible after cured? - bonds to the skin or outside of veg tan? (my Weldwood Contact Cement doesn't seem to adhere well) - stronger than the leather? (Pulls leather away when ripped off instead of separating from the leather) - water and / or solvent proof for water soaked or accidental oil soaking? -
Is this stitching weakening the belt loop?
GeneH replied to GeneH's topic in Leatherwork Conversation
UGH. Looks like I'm going to have to either shorten or bend a couple of needles. Will hitting the middle of the needle with a torch, and probably destroying any tempering the needles have, be a problem? Should I just dip after bending and hope they are not brittle for being too hard? I read somewhere a long time ago that a U shaped stitch line was the strongest but that didn't seem to make sense with nylon webbing if we are not damaging the webbing. However with leather this makes total sense! The ID of the hatchet loop is just under 2 inches so I'm really in a tight spot. -
Is this stitching weakening the belt loop?
GeneH replied to GeneH's topic in Leatherwork Conversation
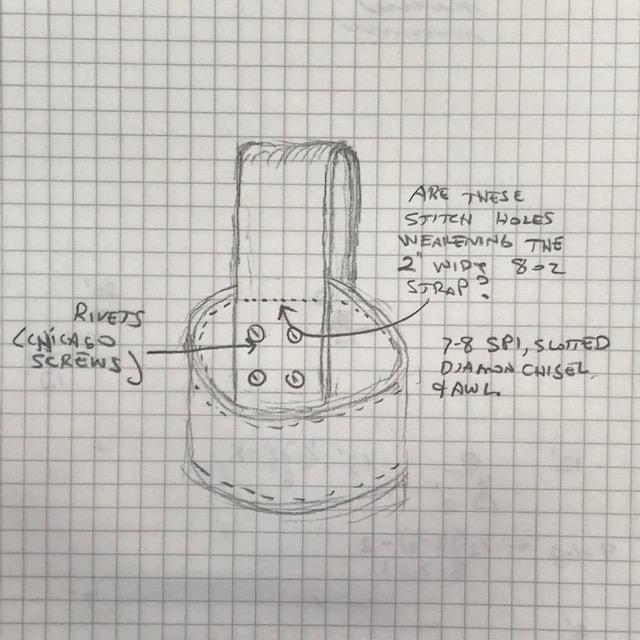
Looking at the sketch, can you describe where those 2 vertical lines would be? Down between the Chicago screws? I tried stitching vertically with a curved needle on a test cylinder and that didn’t work out too well for me. Also tried a lock stitch and didn’t like the way it looked. pretty sure this is what it feels like to paint oneself into a corner. -
Is this stitching weakening the belt loop?
GeneH replied to GeneH's topic in Leatherwork Conversation
Yeah the intent was to hold the belt loop to the hatchet holder. I expect it to be flexed and after I punched the holes I realized that it makes a very good hinge that seems would weaken very quickly. An alternate method, not stitching, is what I'm thinking now. The Chicago screws are solid brass from the hardware store. Plenty strong themselves. The big advantage of the screws, (unless I glue also) is that the strap can be changed out for a different mode of carrying. The hatchet is only 1 1/4 lbs but you never know what kind of pulling or twisting stress will happen when out camping or tromping in the woods. -
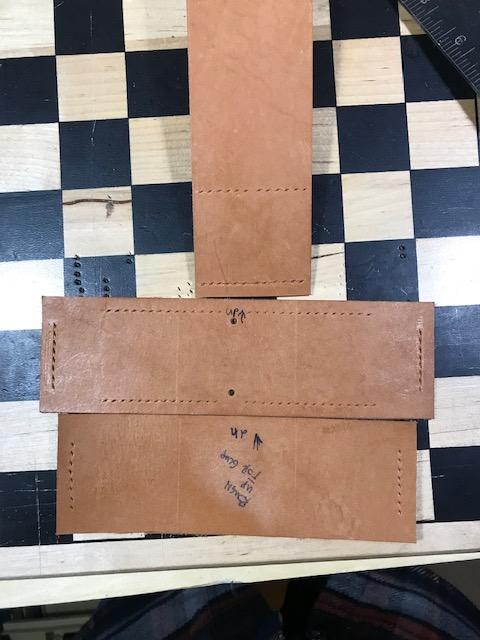
I am making a run of the mill hatchet loop style carrier. Seems the punched slits for stitching will weaken the belt loop. The leather is 2 in wide, 8 oz, punches at 7 or 8 SPI. Here’s 2 pictures. The strap is the vertical piece. Should I scrap it and just use Chicago screws?
-
A Couple of Knife Sheaths
GeneH replied to garypl's topic in Gun Holsters, Rifle Slings and Knife Sheathes
I'm digging the Japanese steel and envy your trip. Love the hard edges and thinner blades. A dream to sharpen. Oh, the sheath is really nice too! :-) -
To double stitch or not to double stitch
GeneH replied to c2369zulu's topic in Leatherwork Conversation
What did you finally decide? One row or two? Pictures? -
Sticking with chisels instead of pricking irons...
GeneH replied to scrapyarddog's topic in Leatherwork Conversation
I went back and reviewed Armitages videos again, picking up a lot of info that I had previously missed. Using the same chisel, actually causing the slit to be opposite each side, and still making a nice stitch. I bet if I watched enough of his videos now I could see the differences between awl-only and chiseled stitching. Niel did go on to mention that if he was doing saddles or harnesses the chisel wouldn't be sufficient because the stitching isn't secure enough, but for less critical applications like bags, sheaths, maybe holsters it's fine. Thanks for helping out (on my similar posts, 2 different and related threads) -
Sticking with chisels instead of pricking irons...
GeneH replied to scrapyarddog's topic in Leatherwork Conversation
If Armitage has a video showing apples-to-apples difference of chisels and awls I must have missed it. I’ll go back and look. -
Sticking with chisels instead of pricking irons...
GeneH replied to scrapyarddog's topic in Leatherwork Conversation
It would really cool if those of you with multiple tools to post pictures showing the difference of the hole and stitching quality and reference. Maybe even using unfinished leather so it is even easier to see raw differences between your pricking iron or chisel, and awl. Also, when your leather is 3 layers of 8 oz (3/8 inch) think, do you change your technique? Without hijacking your thread, here's why I ask: Just getting started I notice I have larger gaps or seeing the slits from my awl more than I expected, and am trying to resolve the contradiction of adequate slit size and ability to get the needle and thread through. [I have a topic started already over in "critique..." because I'm seeking answers... :-) ] -
Hatchet Belt Hanger-How do I stitch and rivet a cylinder?
GeneH replied to GeneH's topic in How Do I Do That?
Ha! I double checked a vice that I have yet to mount and it has an anvil end that should work. I just might have some curved needles also. I wish I would have thought of this sooner because just received straight needles and an awl from Rocky Mountain Leather. -
Hatchet Belt Hanger-How do I stitch and rivet a cylinder?
GeneH replied to GeneH's topic in How Do I Do That?
Corrected that omission. :-) -
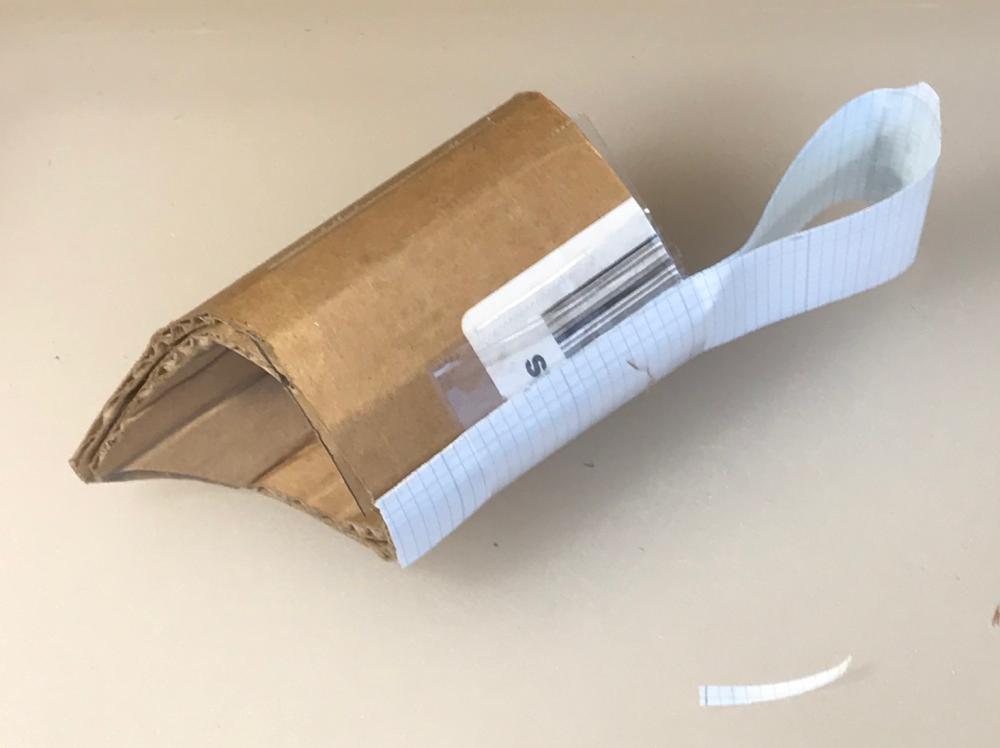
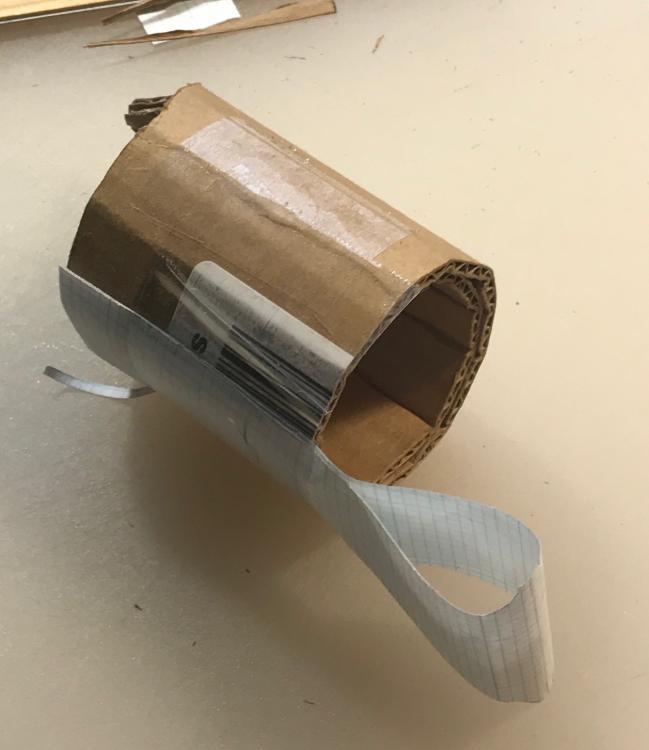
Am I going about this all wrong? Here are a couple pictures of the cardboard mockup. I planned on 8 oz leather. The brown cardboard hatchet hoop is about 1 1/2 inches diameter, 2 layers thick. This way I get rigidity and inside finished smooth leather. The belt loop is the grid paper, one thickness 8 oz. One of our members here, Skogsvana does this, so for my own personal use I want to make one. Prob 1: How do I stitch the 2 layers together, around the top and bottom circumference? I'm assuming I have to stitch after they are formed into the cylinder because the inside piece is shorter than the outside piece. (see below) The needles are longer than the inside diameter. Do I angle the awl up when pushing from the outside, so that the needle just clears the top of the opposite side of the cylinder as it goes through? Prob 2: When securing the belt loop to the hatchet hoop / cylinder, I will rivet through 4 layers of 8 oz. How am I going to get inside the hoop? Use a anvil or something? I expected to use 4 sold brass rivets, not the hollow or double cap rivets. But then I have no clue of how much rivet I strength I need, and no idea where to get small head rivets with such long shafts. Cut length to form the cylinder, inner is about 3/4 inch shorter than the outer piece. Inner piece is 1.5 ID = 4.71 circumference Outer piece is 1.75 ID (1.75+.125x2) = 5.5 circumference.
-
Clear picture or diagram or reshaped diamond awl tip?
GeneH replied to GeneH's topic in Leather Tools
Ha! This "Leather awl blade shape comparison: acute vs rounded tip" is one of the two videos that started this conversation, but I couldn't remember enough to post the link. Thank you. :-) I needed to come back here to get some depth and validation. Glad you posed these links. His "Dixon Diamond..." videos are really good following his tip comparison video. At 2 min into "Dixon Diamond" he draws the perfect diagram showing a edge-on view. And somewhere I saw a few seconds of someone actually clipping the end off a spear point. Snip! I do feel fortunate at this point I've gone through the trials of taking a chip out of a 4 mm V parting tool - those are the most challenging tools I've experienced so far, and if I feel the results are worth the fun and effort, cleaning up/minor mods I know I can learn to do. -
Clear picture or diagram or reshaped diamond awl tip?
GeneH replied to GeneH's topic in Leather Tools
That's really good information, folks. Helps me feel more comfortable reshaping the tip when the awl arrives. I see the point (no pun intended) of gradually changing the shape as I get used to using it. I watched Armitag's video also. Looks pretty straightforward, but I'll go back again so that I don't inadvertently sharpen the wrong, or all sides. The broadsword sounds like a good place to start as I won't be removing large amounts of metal - and I really like the idea of the holes being the same on both front and back. I think I'm more excited about getting and working the tool more than working on the projects. : -
Clear picture or diagram or reshaped diamond awl tip?
GeneH replied to GeneH's topic in Leather Tools
I'll keep that in mind. Ugh. -
Clear picture or diagram or reshaped diamond awl tip?
GeneH replied to GeneH's topic in Leather Tools
Here's were I start getting confused - (BTW thanks for the quick response and great pictures) is there seems to be a couple distinctly different shapes to the ends of reground awls, possibly because they are used differently. Or maybe it just comes down to who / how we learned to sharpen our tools. I *thought* I read somewhere around here about nipping just the very end of the awl off to make a more rounded and stronger tip. Then I picked up from 2 different YouTube videos showing a more rounded, flattened, chisel-ish end. Actually I found this last one just a couple minutes ago. The first one I found spoke English, but this second I don't understand a word. However you can see they are suggesting the flattened tip helps line up with pre-marked slits from a pricking iron. The very sharp pointed tip is mentioned as more likely not follow the pricking iron slits. Is there a different use for slightly rounded very pointy ends compared to very rounded chisel ends? Here are the just-discovered rounded chisel tips clipped out of the YouTube video, link after the pictures. https://www.youtube.com/watch?v=124-PKajwic -
I have a Vergez Blanchard diamond awl on the way and as I understand I will have to reshape the tip as well as sharpen and polish it. Can someone show me good pictures or diagrams what that reshaped tip should look like? I"m not really sure where to flatten the tip, i.e. which direction to the sides and which sides to sharpen. The videos I've watched so far are not sinking in. Thanki!
-
That's enough votes for Vergez Blanchard so I'll go that route and a couple sizes JJ needles, just have to pick out shop to buy both from. Last night I penciled in the pattern for this first tooled hatchet sheath. Kinda anxious now to get started. The previous 2 sheaths I used my drill press and would like the looks of more traditional stitching just a little better, especially with thin leather over a plastic or wood core. addendum: I have a scratch awl if I can find it, compass, and a divider so I should be good to for for the moment.
-
Fabulous! This last bit of info helps push me over the edge. I’ll hunt down the awl and needles tomorrow and get them ordered. Any new info is still greatly appreciated though! I may just get a better awl blade and haft if I can get the courage to mount it. I’d hate to damage the finish of a perfectly good awl.
-
Not sure what size John James Saddlers Harness Needles to get- my current unused Tandy are (I think) 00 (1.2 mm shank). Maybe get two sizes? I would like to get the Leder_Louis but that's $39 as far as I can tell, the WUTA from Banggood is only 6.99, the Osborne 144-43 pretty cheap at less than $10 and I can get that pretty quick. Vergez Blanchard from Rocky Mountain at $22 ... My guess is I will have to fiddle with any of the really inexpensive ones, any comments on the Vergez Blancard steel and shape of the blade vs the cheaper Osborne? (Osborne also has thin Saddlers Harness think Awl blades and a nice haft total together though is close to $30. (I like the haft shape- it's like my wood carving palm chisels)
-
I probably should get a diamond shaped awl to help stitch 2 or 3 layers of 8 oz leather, and thinner leather in upcoming projects. Steel and comfort I suppose matters most. Sharpening and finishing is a side-hobby of mine. From reading threads here, I found these in my $ comfort zone. Which should I purchase later this week? What size? - LeatherCraftTools dot com PRO Diamond Awl 3 Tools Set $21.50 - Rocky Mountain Kyoshin-Elle Awls $18.00 - Rocky Mountain Vergez Blanchard Awl - Diamond $21.99 - Springfield Leather Stitching Awl $11.99 - Adding Wuta, good price, long shipping... This might have been my first mistake - (incorrect size?) I have a 2 prong Tandy Craftool Pro 3.5 mm chisel (wow did I actually spend that much on it?), Tandy waxed thread and some needles.
-
I've moved from incandescent and Ott lights to LED, just being a little careful of the CRI (because I hate blue tinted lights). The LED's run so cool that I don't get head drying me or my projects out. My current setup are a swing arm lights from the thrift shops. Glare and shadows are always a problem for me, so using a pair and I can position them easily. A good overhead soft light in addition to the swing arm lamps give both bright light and helps minimize pesky shadows.


