-
Posts
181 -
Joined
-
Last visited
Contact Methods
-
Website URL
http://http:/etsy.com/shop/snakebiteleather
Profile Information
-
Gender
Male
-
Location
Tacoma, WA
-
Interests
leathercraft, history, cowboy action shooting, my family and kids.
LW Info
-
Leatherwork Specialty
little bit of everything so far
-
Interested in learning about
everything!!
Recent Profile Visitors
6,494 profile views
artycpt's Achievements

Member (2/4)
-
Thanks for the heads up and compliments. I will definitely be watching that.
- 7 replies
-
- scout tank bib
- indian tank bib
- (and 3 more)
-
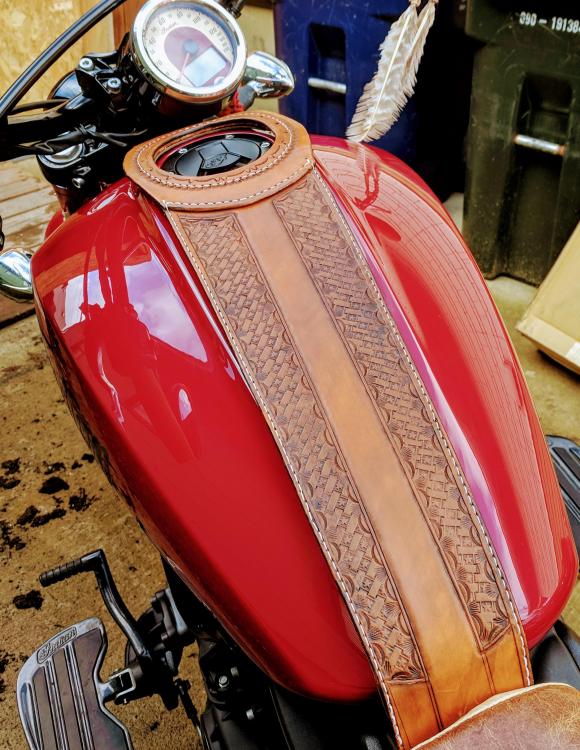
Thanks All. The pattern matches my seat re-upholstery. This was initially going to be a plain prototype but I can't leave anything plain for some reason. It attached under the front of the seat via a hole that allows the front seat post to go through it. In the front it attaches by a strap that feeds through the tank bib and goes around the frame, in front of the gas tank. I will try to get some pictures to show what I mean. A lot of people use Velcro to attach it to the tank but I didn't want to stick Velcro on my tank and wanted to see if I could some up with a different way.
- 7 replies
-
- scout tank bib
- indian tank bib
- (and 3 more)
-
Made up a tank bib to fit the new Indian Scout. Now that I have the pattern down I am going to try to make up a few different styles.
- 7 replies
-
- scout tank bib
- indian tank bib
- (and 3 more)
-
Somewhere on the site there was a tutorial posted on this topic. I don't remember the link but have some of the general information. As far as weather proofing the process goes something like this: 1. Dye 2. Neatsfeet oil 3. Resolene (cut 50/50) 4. Pecard Motorcycle leather conditioner 5. Pecard Motorcycle leather Dressing. The original tutorial used felt as a backing for the tank bib. I have used felt as well as thin craft foam.
-

Can I Use this Dye on a Holster?
artycpt replied to steelhawk's topic in Gun Holsters, Rifle Slings and Knife Sheathes
I have used it and can tell you that it rubs off very easily and smells GOD AWFUL -
I have a feeling there is another side to this.....as in, the back where there is a second piece of leather sewn to what you see. The top is open for a bill pocket (hence the bills in the picture) and something sewn in. Without seeing the opposite side we don't know if there is any more stitching or what may be going on internally.
-

Advice for creating weathered black effect?
artycpt replied to PerniciousDuke's topic in How Do I Do That?
Yet another Tacoma member.. I am thinking the idea of using already weathered leather might be the trick. Either that or start with brown and layer diluted washed of black over it. Haven't tried that but worth a shot on some scrap. I know that back in the day (when the army used to have black boots) just a couple days in the field, in the snow would weather the leather pretty rapidly. -
Know exactly what you mean. I ended up starting a board that is titled "projects I would do if I had more time" and constantly fill it with all the great ideas that look really cool and maybe someday I will get to.
-
Yup. That is right. I case and tool it, oil it, then dye it. Allowing for sufficient time between each step.
-
different materials will give different impressions of the stamps. I agree that in order to see what it will look like in leather you need to tool it in leather. Depedning on what and who is around you, scrap leather pieces can usually be found pretty cheap.
-
Just a quick note from looking at your pictures and it appears that you aren't getting the antique down into the tooled areas. The dark areas are all on the raised portions. I know from my experience that getting it down into the tooling is not always easy and that the antique will tend to want to stay on the top. I normally use a wool dauber for getting the antique down into the recessed areas. Make a small circle motion, making sure it gets down in there then keeping a paper towel or cloth as flat as possible, wipe off the excess. I will use a damp towel and a dry towel to wipe off the excess and if too much it removed from the tooled area I will repeat. I am not a huge fan of the super sheen. I had an old bottle (pre eco-flo) that worked a lot better. With the newer super sheen it seems to take a couple pretty heavy coats to have an evenly resisted area. I was working on a larger project and used the newer super sheen as a resist, applyed evenly over the entire piece and when I antiqued it, there were areas that seemed to have no resist at all. Ended up with a big dark blob in the middle of the piece. For the monogram in the coaster I wouldn't rely solely on antique to fill the letter. I will take a small brush and either apply the antique to the background stamped area or use a brown leather dye to that area first. This also works for areas in a floral pattern that are backgrounded. OK. going on longer than I planned....hope this helps a little.
-
Here's a couple ideas: http://www.peggysuealso.com/servlet/StoreFront http://www.theleatherguy.org/ http://barbarossaleather.com/
-

New Bible Cover, Tried Some Baroque Style Tooling
artycpt replied to artycpt's topic in Books, Journals and Photo Albums
Thank you. It is the first time I did any baroque style tooling. There are some things I would do a little different to get a little more detail but it is definitely a fun style to work in. -
I have learned more by making mistakes than by any of the projects I have had go right from the start. Every time I mess something up I make it into an experimental piece that I come up with a new technique to cover up the mistake. This leads to a lot of half finished things around that need some kind of fix or other but makes it so I always have a new skill to learn and keeps me from giving up.
-
From the picture is does look like a single layer that has just maybe had the rough side burnished like crazy...
- 4 replies
-
- leather
- type of leather
-
(and 2 more)
Tagged with:


