-
Posts
504 -
Joined
-
Last visited
Content Type
Profiles
Forums
Events
Blogs
Gallery
Everything posted by lightningad
-
Hi Reimer, i designed my logo years ago when i wanted to create a t-shirt logo for an imaginary record label! The name and logo stuck, nd when i started making leather stuff i decided to dust it off and use it again. I got the stamp made by http://lwleathers.com and am really happy with it! adam
-
thanks for the heads up...i'll have to go check it out. adam
-
spuds? whats a spud? in the UK a spud is slang for a potato! so now i'm really intrigued....
-
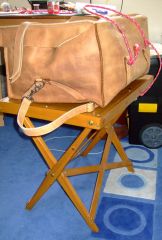
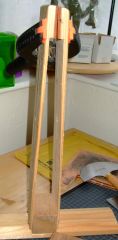
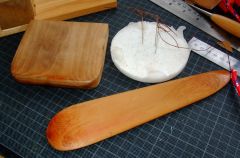
finally got around to getting some pix of the things i made and use.... Bone folder, Slicker both made from Walnut, the pin cushion is some leftover silicone a stitching pony made from two old ikea bed slats! a folding table that i made years ago, brought out to hold the bags at the perfect height to work on! adam
-
From the album: screengrabs
you can never have enough worktops...so i drafted in this folding table i made many years ago. Its perfect for holding the bags at the right height to work on whilst sitting.© ©2013 Barkingrooster.co.uk
-
From the album: screengrabs
i made this rough and ready stitching pony from an ikea bed slat ! I simply split the wooden slat with my bandsaw, leaving a thicker block at the jaw end, glued some leather pads to the jaws, and the other end was screwed to a wooden block attached to a perpendicular slat that would go under my knees. Originally i used a wing nut to clamp it shut but it took far to long to tighten or undo so opted for the much simpler spring clamp.© ©2013 Barkingrooster.co.uk
-
From the album: screengrabs
the two wooden items are my slicker and my bone folder. Both have been made from American Walnut, and the shape was achieved first through a belt sander, then finally hand sanding. The white pin cushion is cured silicon that set in the bse of the cup used for mixing it - its a waste leftover from some mould making, but its perfect as a pin cushion!© ©2013 Barkingrooster.co.uk
-
So far most of the bags i have made have been stiff enough without any extra work, but i was wondering how everyone else goes about adding extra firmness to overly large bags, or those made from a softer leather but needing more structure? Ideally, with as little extra weight as possible! adam
-
My New Website - Critique Please
lightningad replied to lightningad's topic in Marketing and Advertising
Hi Nicole, I did it all myself using iWeb. I have been trying various options for the pop-ups but haven't found one that does exactly what i need...yet! The link you gave looks very promising. As for the coding, i've never learned any. I did try Dreamweaver a few years back but i just couldnt take to it. I like iWeb because its pretty simple unless you want to do something thats different from the supplied templates. I have been using it for a few years now on my wifes website, which we decided long ago would need to look unique, so i figured out ways to make it look different from the standard iweb templates. You can do quite a lot using HTML snippets. I've just carried that notion over to my own site....and unfrtunately Apple have ceased to develop the software any more, so i will have to start learning new software once this becomes too outdated. adam -

My New Website - Critique Please
lightningad replied to lightningad's topic in Marketing and Advertising
Thanks Nicole, appreciate the help. now if only i could figure a way to do image pop-ups in iWeb!!! -

My New Website - Critique Please
lightningad replied to lightningad's topic in Marketing and Advertising
Thanks, glad you like it. I wanted to design one that had a rustic, crafted feel that was somehow reminiscent of the old west without coming across cliched or too cluttered. I have just uploaded a new version of the site, following on from your very helpful comments. I'd be grateful if you could give it the quick once over....see if it looks any better on your screen. adam -
you need to get hold of the Al Stohlman books "Making Leather Cases" - one of those has a detailed section showing how to make exactly what you are asking about. I dont have the books in front of me, and i can't remember which volume you need though! rgds Adam
-

My New Website - Critique Please
lightningad replied to lightningad's topic in Marketing and Advertising
that would explain it! although your points are very valid ones which i am going to work on. i had felt something was awry...just not sure what. I think you spotted the cause! thanks adam -

My New Website - Critique Please
lightningad replied to lightningad's topic in Marketing and Advertising
Hi Nicole, thanks for the comments- hope you dont mind me asking...what resolution is your screen set to? adam -
From the album: A Newbies Progress
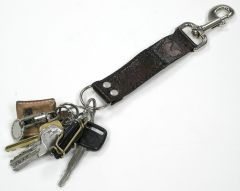
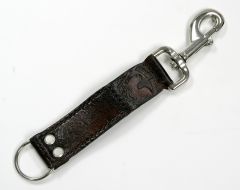
this is the lanyard with keys in place for a little scale reference.© ©2013 BarkingRooster.co.uk
-
From the album: A Newbies Progress
after working on a single project for quite a while, i decided to try something completely different for a couple of hours. This lanyard is the result. made from veg-tan leather, dyed dark brown. embossed with the Barking rooster logo then doubled over and glued and stitched. It has an inch wide trigger hook stitched into place, and at the other end, the D-ring is held firm by the use of 2 chicago screws. This is to allow the user to easily swap out the D-ring for a different piece of hardware should the need arise.© ©2013 BarkingRooster.co.uk
-
as was mentioned way back at the start of the thread - if you want to try leathercraft before you decide to spend a heap on tools - The Tandy Basic kit is a good way to try it out....and its currently on Sale for £36.99 . <---(this is also a link to the tandy uk webpage) in fact i just noticed its a clearance sale with only a few left. The quality may be debateable, but as a cost effective way into the hobby its pretty good. You get a few stamping tools, stitching tools, glue, dyes and a range of projects to make, along with a basic instruction book. It was enough for me to get totally hooked, even though as a total beginner you quickly become aware of the kits quality threshold. Its not intended as the basis of your tool collection, merely a chance to try a few projects to see if you want to progress....only then does it become a very expensive and fulfilling hobby!
-
greetings from sunny Oldham! i'm sure you'll find all the info and advice you need right here on this fine forum. adam
-
Agreed - Round Knives are brilliant! I just decided not to mention one yet as they can be costly. i noticed you're in the UK, also. I got my round knife from leprevo.co.uk - i think it cost around £24 - and whilst the site gives no specifics, when it arrived the blade is etched with the George Barnsley name (which has a rather good reputation!) It needs quite a bit of sharpening and honing, just like all new knives, but its a great tool. In fact, i get most of my stuff from leprevo, and if you need advice before buying your leather (assuming you can't actually get to a supplier to see your purchase) they are really helpful if you ring and speak to them.
-
i too started with the Tandy kit, and quickly found i was hooked!. Its surprising how little you need to get started....essentially you will be cutting out shapes, possibly stamping patterns, marking stitch holes and then stitching pieces together. The Tandy kit will give you some of the basics (their leather pieces are pre-cut and pre-punched, so they dont give you a knife or awl/stitch markers). Heres what i would suggest as well as the tandy beginners kit:- a good knife - keep it extremely sharp, and learn how to maintain a polished cutting edge. engineers dividers - these can be picked up at tool shops for very small amounts. They are ideal for marking stitch lines, and for marking up parallel lines (such as for belts). Stitch markers - pricking iron or overstitch wheel - the choice is yours depending upon how you want your stitching to look. A virtually free alternative i have heard of is to use a fork to mark the stitch holes! Awl - a diamond awl is perfect for making stitch holes you will need to sharpen it when first bought so it makes clean holes easily.....it can also be used to mark the leather if you want a fine scratch mark for cutting (but be careful not to damage the tip.) Needles - I use John James No2 Harness needles - pack of 25 is a couple of quid. You may also want to use glues - i find evostick impact works best for the things i make...just make sure you have plenty of ventilation. Once you get a few projects under your belt, you will have a better idea of how you want to develop and the tools you will need to achieve that. Its so easy to get sucked into the mindset that you need to get new tools for every little task - you don't! I bet all of us leather crafters have boxes full of tools that hardly ever get used, but we bought them because we thought they would be indispensible. Most important thing is to have fun, and learn how to get the most from the tools you do have. adam
-
a mallet? thats a bit violent isnt it? I find its easiest to flatten the waxed tip between my two thumbnails before threading..
-
just remembered my other re-purposed thing... My wife makes lots of silicon moulds, and occasionally the residue that's left in the bottom of the mixing pot creates a little 1-3cm thick disc of silicon. Its perfect for using as a Needle cushion - keps them all safe and easy to find. i also used one to create an anti-topple base for a tall thin bottle of solvent. Just cut a hole in the silicon fractionally smaller than the bottle, so it grips it tightly. Now it has no chance of tipping over, and i can jam the brush handle into a small hole in the silicon so the solvent applicator is always with the bottle.
-
i made myself a wooden bone folder from a scrap of Black Walnut. Just roughly cut it to size, then used the bench sander to add the smooth curves and flat areas i wanted. Then finished it with plenty of very smooth sandpaper. Its my cheapest tool and probably the one i use most!
-
i'd suggest you learn how to add your website as a link on your forum signatures (assuming you visit other forums as well as this one). Its usually just a case of clicking the little "chain" icon on your profile page setup. This forum has a special place to add your URL, but as i use a few sites, i just added the links as part of the signature. As well as letting people easily access your site, everytime you post on that forum, you are creating a new link to your site, which will be picked up by Googles search spiders and help increase your sites rankings.
-

Makers Mark / Stamp. How Big Is Yours
lightningad replied to Boriqua's topic in Leatherwork Conversation
mine is 3cm square. It still astonishes me how much detail gets imprinted! adam


