


lightningad
-
Posts
504 -
Joined
-
Last visited
Content Type
Profiles
Forums
Events
Blogs
Gallery
Store
Everything posted by lightningad
-
 Looking on your website, its obvious you know how to do the carving, and so probably already know the correct thickness of leather you will need. As you need to work out a price, find the cost from your leather supplier for 50 shoulders (hopefully you will get a discount for such a large order, then add the amount you want paying for the time spent carving and finishing. That will give you the overall price. Also for such a big order, i would want a large portion of the money upfront. You dont want to buy all that leather only to find the client changes his mind. If the price is too much for them, then so be it. You need to make a profit too. Good luck - sounds a plum job ! Oh - i would not lower the cost for each shoulder either. Just because you might get some use from the offcuts, you would not have had to buy it in the first place were it not for this job...
 -
Personal Opinion On What The Best Way To Learn Leatherwork Is
lightningad replied to sawyer1989's topic in How Do I Do That?
for me, i find i learn better if i start with an idea of what i want to make, and then either try find a tutorial that shows the technique i need to learn, or look for an example that someone else has made, and study it to see how it was done. Often all it takes is to look critically and you will see what needs to be done to achieve the end result. Then before i get too bogged down in learning - just jump in and start making. I always find that the learning will only really start when i am making the piece. I started out using cheap leather as i didnt want to waste expensive materials on a learning exercise. Once you can make the cheap stuff look good, then its time to think about spending more on the leather. And don't try to make your stuff like high-end products - aim to do better! Many high end products are not so brilliant (many are!!), they are just well marketed and branded. The most important thing though is to HAVE FUN!!! -
i've made very similar pouches and attached them to my leather satchels. Mine were not glued, and the leather was a different kind to that you're using The way i found worked for me was this :- scribe a guideline where you want the stitches using a divider- do this on both the main panel and the side. then using a pricking iron, mark the holes...making sure you start at the same edge for both pieces - This is to ensure the holes line up when you bring the pieces together. You can either stitch the "proper" way, by punching each hole as you stitch, but i find it easier to punch the holes before i start stitching using a diamond shaped awl. These images show the finished result.... As with all things crafty - the key is to practice practice practice. just looked again at your image, and i wonder if by rough, you are actually meaning the rough edges of the leather? if thats the problem, then you need to sand the edges before burnishing them. I recently started using a dremel to sand my edges and it does a great job of lining the edges up.
-
My Best Satchel So Far...
lightningad replied to lightningad's topic in Satchels, Luggage and Briefcases
I think i paid approx £50 for around 20-22sqft. (plus tax and shipping etc!) its much firmer than the veg tan i have used before, and you need to be careful not to scratch the surface. i found it really pleasant to work with. i'm not sure if the butt youre refering to is quite the same kind of leather. I think the sort used for leads and collars tend to be an oily leather, whereas the one i used had more of a painted surface. -
My Best Satchel So Far...
lightningad replied to lightningad's topic in Satchels, Luggage and Briefcases
thanks for the encouraging comments. To answer a few points....I have used contrast stitches on some of my other bags, but for this one my sister-in-law (for its now hers) wanted it matching. The edges were burnished as best i could with just beeswax and a rounded wooden burnisher. It starts off looking quite nice but after a few days it seems to soak into the leather. Hopefully it will help stop moisture being absorbed. I will be looking into getting some edge paint for future projects. In fact, i've just remembered - i made the shoulder pad as an afterthought, and used a different leather for the underside, then dyed it with a dark brown fiebings dye to help bind the two edges colourwise. Having seen the result, If i had not already beeswaxed the edges i would have tried dyeing all the edges as it does look better....live and learn!! I think the stitch marker i have is 7 stitches to the inch... Tom - what foil are you refering to? -
My Best Satchel So Far...
lightningad replied to lightningad's topic in Satchels, Luggage and Briefcases
I was wondering about trying to heat the stamp with a blow torch before stamping! I cant afford anything as fancy as a heated press just yet! I'm actually making myself a flight bag at the moment - I often travel abroad on business and i'm fed up with bags that dont have the flexibility for my needs. Its bigger than most, but it is within the regulation dimensions for carry on luggage. I am sticking with a single BIG inner so it can hold my clothes and any other crap i might want to carry. The backside has a large flat document pocket, and i'm probably going to add a water bottle holder to one end. Its made with a thick yet soft oily mottled tan coloured cowside. It has an instant aged look. One plan is to make a matching smaller laptop bag that will fit inside the main bag using trigger clips to hold it secure. Then when get to the hotel, i can unclip the shoulder strap from the big bag and transfer it to the laptop bag. Only downside to this is that i need to buy more leather to make the smaller bag. -
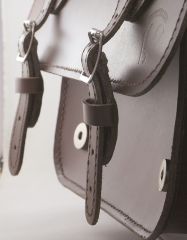
From the album: A Newbies Progress
heres a close up of the magnetic snap/buckle arrangement© ©BarkingRooster 2013
-
My Best Satchel So Far...
lightningad replied to lightningad's topic in Satchels, Luggage and Briefcases
another Adam! hello!! thanks for the kind words. The leather is not veg-tan but something i got from Leprevo.co.uk called Dyed Thru Full Butt. So i didn't have to colour the leather at all. The buckles and magnetic catches also came from leprevo. The closure was made by using two leather strips sewn back to back, with a magnetic catch on one side and a standard buckle further up the strip and mounted on the other side of the strip . This buckle attatches to the billet strap as normal and allows the position to be altered if required. this might show it a bit better.I got my maker stamp from LWLeatherworks.com (http://www.etsy.com/.../LWleatherworks) - they also advertise and post on this forum. adam -
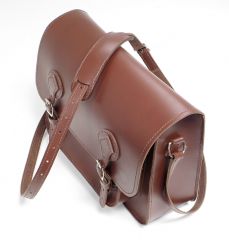
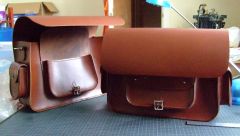
Here's Satchel No5. made for a friend with arthritic hands, I designed this one with a larger front pocket and adjustable magnetic fasteners. They look like traditional buckles, and it works to allow the strap length to be changed, but the actual closure is magnetic. Its also the first bag i have been able to use my Maker Stamp on. Makes me feel like a proper leatherworker now i have the stamp! love to hear any comments, suggestions etc. adam
-
From the album: A Newbies Progress
This is the first outing for my new Maker Stamp. really pleased with how professional and finished it makes the bag look to have a little branding! I'm also pleased with how the stitching is improving with each new bag.© ©Barking Rooster 2013
-
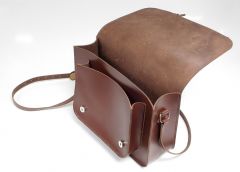
From the album: A Newbies Progress
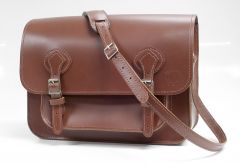
here the bag is shown open. For this one, I decided not to have a flap on the front pouch, but made it higher so the main flap would also work with it.© ©Barking Rooster 2013
-
From the album: A Newbies Progress
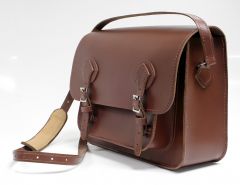
Here the clean lines of the design, and the shoulder pad can be seen.© ©Barking Rooster 2013
-
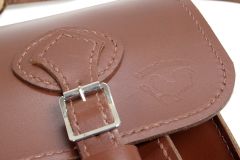
From the album: A Newbies Progress
the rounded detail behind the billet straps looks really nice, but was actually a solution found to hide a mistake i made punching holes in the wrong place!© ©Barking Rooster 2013
-
From the album: A Newbies Progress
my fifth satchel, and probably the most successful to date. includes a shoulder pad for the first time, as well as adjustable position magnetic catches.© ©Barking Rooster 2013
-
Satchel No.4 - front view
lightningad commented on lightningad's gallery image in Our Leatherwork Galleries
 totally agree. I actually find the stitching can be quite therapeutic....at least it is when i'm not stabbing myself with the awl!
 -
Satchel No.4 - side view
lightningad commented on lightningad's gallery image in Our Leatherwork Galleries
 all sewn by hand !
 -
greetings from up north! You've come to the right place to learn!
-
thanks - i can't take credit for the colour, as it was bought like that. as for the strap, i decided that as its not a big bag, and the recipient likes things a bit more refined, the size is fine. If the bag were any larger, then it would certainly need a thicker strap.
-
nice use of colour and curves!
-
Thanks LL, i only have the one size stitch iron and whilst you may be right, i don't want to have anymore stitches to do if i can avoid it!! I've been considering one of those padded strap attachments...maybe i'll try one on the next bag.
-
Thanks - i must be doing something right if you're comparing it to a Billingham!
-
Satchel No.4 - side view
lightningad commented on lightningad's gallery image in Our Leatherwork Galleries
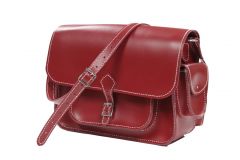
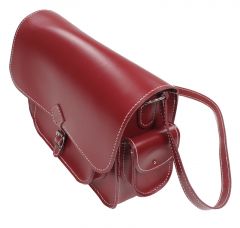
thanks. I made it from a Whole Butt Split that was already coloured Red when i bought it. My wife spotted it whilst we were rummaging through an offcuts pile at a suppliers, and mentioned it would make a nice satchel. A project was born, along with a new direction for my leatherworking, and i managed to get two satchels out of the hide!....now i feel a little addicted to bag making! Other than beeswaxing the edges, there is no other finish applied. -
thanks for the kind words. As for the leather - Its the last bit of a larger hide i bought from J Woods Leather. I think its a Whole Butt Split, but as i got it of the offcuts pile, i can't be 100% certain. adam
-
I finished this a few weeks ago, but only just got time to upload the images! In fact, since this was completed i have almost finished a 5th version. This is a progression from my previous designs, with little improvements made in each one. I'm starting to feel like i know what i'm doing with these things! This is also the first bag i have used my new maker stamp, although the photos were takn before the stamp was used, so i will need to update the photos! love to hear your comments, suggestions etc adam
-
 why thank you!