


lightningad
-
Posts
504 -
Joined
-
Last visited
Content Type
Profiles
Forums
Events
Blogs
Gallery
Store
Everything posted by lightningad
-
Andies Clone Bags 02
lightningad commented on lightningad's gallery image in Our Leatherwork Galleries
 I am very pleased, and even more pleased that the lessons i learned have already improved the next two bags i have made.
 -
Andies Clone Bags 06
lightningad commented on lightningad's gallery image in Our Leatherwork Galleries
 thank you very much.
 -
Andies Clone Bags 07
lightningad commented on lightningad's gallery image in Our Leatherwork Galleries
 Thanks for the comments. sorry for the late reply - the forum doesnt seem to inform me when a comment has been posted! The leather i used was from LePrevo in UK, and according to their website its called "Full Dyed thru Butt".
 -
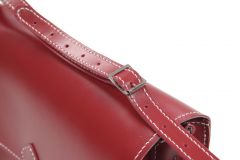
From the album: A Newbies Progress
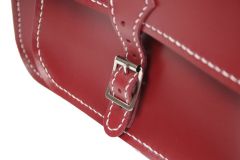
another close-up detail...this time the front buckle used to secure the bag.© ©Barking Rooster 2013 www.barkingrooster.co.uk
-
From the album: A Newbies Progress
here you can see a close up view of the stitching used on the strap to try help prevent the leather from stretching during use.© ©Barking Rooster 2013 www.barkingrooster.co.uk
-
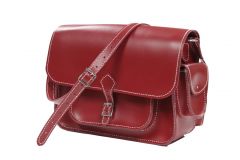
From the album: A Newbies Progress
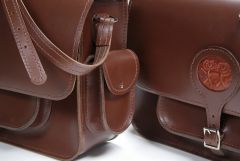
the satchel is completely hand stitched throughout. No glue used whatsoever (except to cover the metal on the reverse of the magnetic clasp)© ©Barking Rooster 2013 www.barkingrooster.co.uk
-
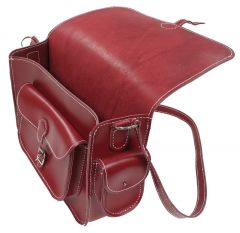
From the album: A Newbies Progress
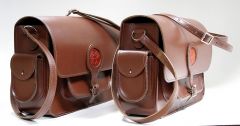
This shows No.4 flaps open! Where this differs over previous bags is the use of a magnetic clasp for the front pocket. The Sam Browne studs used previously just didnt feel right in use.© ©Barking Rooster 2013 www.barkingrooster.co.uk
-
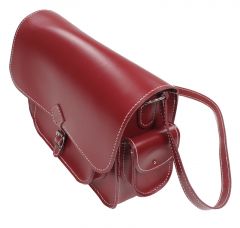
From the album: A Newbies Progress
as the name suggests - this is my 4th go at making a satchel. It is a design on progress, as each version has improvements basd on the lessons learnt on the previous bag. Completely handstitched, with the pieces cut from the hide freehand with a Round knife.© ©Barking Rooster 2013 www.barkingrooster.co.uk
-
i think when you use the iron to punch the holes, the hole will be wider on the front because of the bevel on the cutting edge. The rear of the hole will be a slit. Using a diamond awl gives a more even shape to the hole on both sides of the leather. You should watch - Nigel gives the best explanation of how to saddle stitch - and shows in detail how to do it correctly. He also has plenty of other videos on his youtube channel. In my opinion you should watch all of them, because he is such a good teacher and craftsman.adam
-
My New Website - Critique Please
lightningad replied to lightningad's topic in Marketing and Advertising
never thought i'd hear a Texan call himself a Yankee! Thanks for the kind words. I always felt the Logo would look good as if painted on the side of a wild west livery stable - hence the photoshop job on the wooden planks! I very pleased you noticed it. I will be changing the navigation buttons - the one really annoying thing about Apple iWeb is the complete inability to alter anything to do with the look of those buttons. Everything else you can adapt but not those. regards Adam -
My New Website - Critique Please
lightningad replied to lightningad's topic in Marketing and Advertising
Again, thanks everyone for your comments. I really appreciate having some unbiased eyes looking over the site. Aside from larger image pop-ups and rebuilding the navigation menu, which will have to wait until i have more time...I have updated the site based on your comments. I think its certainly an improvement - and if you have any farmyard related funnies you want adding, just let me know! -
My New Website - Critique Please
lightningad replied to lightningad's topic in Marketing and Advertising
thanks chaps - you have mentioned the same things that were bugging me ( i didnt mention them as i wanted honest uncoloured opinions). Annoyingly, the one thing that is virtually impossible in iWeb is changing the navigation bar. I will have to build a new one from scratch...i just tried holding off as its a lot of work. I did this on my wifes website (also made in iWeb !) and wanted to avoid the hassle ...but as you've mentioned it, then its not just me! As for the jokes, i think they will stay for now. I heard a great quote recently that sums up my own opinion - "Just because your offended it doesn't mean you're right!". It might be arrogance on my part, but thats why its my own site and not a corporate one. I am prepping more files and code so that the images will open larger views in pop up windows. As with the other site i made, i have a feeling this will go through several incarnations before i'm happy with it. Thanks very much for giving me your thoughts...now for some more work !! -
My New Website - Critique Please
lightningad replied to lightningad's topic in Marketing and Advertising
thanks Ferg, appreciate the positive comments. We'll have to add "Eagle-eyed" to your signature!! well spotted -the typo will be changed on the next upload. adam -
Hello all, finally got my finger out and created a little website to help promote my leather crafting. The site is not finished yet (i suppose they never are!) but i was wondering if anyone wants to take a look and tell me what they think. I want to make it as usable as possible, and whilst i know i need to make some image pop-ups, i am really keen to gauge the feedback. the url is....www.barkingrooster.co.uk thanks in advance adam
-
Can't beat the feeling of accomplishment when you first go "off kit"! I think its only then that you actually start to learn. The kits are just enough to convince you that you want to learn more. Keep up the good work!
-
test it it on either thin cardboard or cheap fabric first...even cheap leather is expensive ! Then if its right, unpick it and use as your template. I dont bother stitching the template - i just use a stapler as its much quicker and works similarly to stitches.
-
How about Pictures of Your Workshops
lightningad replied to Jordan's topic in Leatherwork Conversation
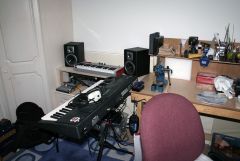
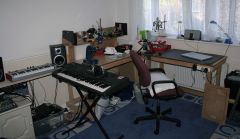
About time i added a few images of my workspace.... until last week I was working at a very cramped little table in the loft, but after a week of graft, we have converted the loft into my wifes studio (she's a proper artist!)...and i have taken over her previous room. needs some pictures on the wall to brighten it up a bit heres where the leather will magically transform into beautiful works of art and this is where i get to make some real noise! -
From the album: A Newbies Progress
and this is where i have finally managed to set up the keyboards and make some serious noise. I really should learn how to play them properly.© ©2013 BarkingRooster.co.uk
-
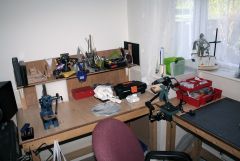
From the album: A Newbies Progress
This is where the leather will be transmogrified into beautiful examples of the leather artisans craft - or just as likely into offcuts in the scrap box! Visible are my three new presents to myself - Maker stamp, Arbour press, Dremel.© ©2013 BarkingRooster.co.uk
-
From the album: A Newbies Progress
finally got my new workroom sorted out. A mancave all my own!© ©2013 BarkingRooster.co.uk
-
Underbust Holster In Action
lightningad replied to ReneeCanady's topic in Gun Holsters, Rifle Slings and Knife Sheathes
very impressive!! dont know why but it reminds me of a playground joke from decades ago - What do you call a stone age bra? - an Over Shoulder Boulder Holder. -
new mancave completed...next job - making use of it!
-
Put up some pics in this thread, love to see it!!
http://leatherworker.net/forum/index.php?showtopic=826&st=180
-
okay - pictures added !
are there any of yours on the thread?
-
You know there aren't any of mine. I have a 4 day weekend coming up so will take some pics.
-
-
greetings from a fellow tyke, stuck on the wrong side of the hills!
-
hmmm...maybe i should have thought about putting a url on the end of my stamp! Oh well, live and learn.
-
i have no experience of cutting belts, but perhaps if they are stitched along the edge this will prevent them from stretching. I do this on straps for satchels, mainly because i once read it prevents stretch but also because i think it looks good!