


lightningad
-
Posts
504 -
Joined
-
Last visited
Content Type
Profiles
Forums
Events
Blogs
Gallery
Store
Everything posted by lightningad
-
heres the first impression (literally !) of my new Maker Stamp..... really pleased with the final product - if anyones interested, i got it from LWLeathers.com (via Etsy). Its a solid Brass stamp so will last for years
-
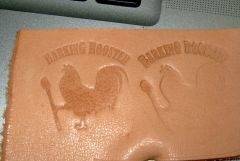
From the album: A Newbies Progress
finally took the plunge and bought myself a Makers Stamp. Now realise i need to get an Arbor Press to use it properly! next - design a website for my new brand "Barking Rooster"© Barking Rooster (Adam Taylor) ©2013
-
My maker stamp just arrived in the post...looks great. Now i need to buy an arbour press!
- Show previous comments 5 more
-
Yhis
http://www.tippmannindustrial.com/clicker-700-die-cutting-machine-p-117.html
will solve your problems...
-

wow bargain! - i could only buy 38 Arbour Presses for that money!
-
Yeah, expensive - but worth the money!
-
How To Skive Consistently With Super Skiver?
lightningad replied to pgivens's topic in How Do I Do That?
thanks chaps - now i get it. Think i'd better practice that a bit before using it on a real project... -
How To Skive Consistently With Super Skiver?
lightningad replied to pgivens's topic in How Do I Do That?
mind me asking, Ferg...how do you skive with a round knife? I tried with mine but it just seemed clumsy and highly dangerous for skiving! adam -
Lining Tankards With Brewers' Pitch
lightningad replied to Toadflax's topic in Leatherwork Conversation
very useful link Renee...thanks for posting it. -
my stamp has just been shipped! WOnder how long Hong Kong to UK will take?
-

Really!? He told me he would send me a proof in a day. I emailed him 2 days later and he sent me the proof right away. I paid for the extra fast shipping and haven't heard a word from him since.
-
maybe its because i sent a finished .ai graphic file, making it easier for them to work from without needing to do proofs.
-
-
From the album: screengrabs
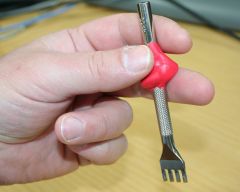
the sugru addition helps the iron to balance between fingers without needing to be gripped too tightly -
just made a couple of mods to my tools using this amazing material i discovered called "sugru". Its an easily moldable silicon rubber compound that air dries in 24hours. Using this, i was able to add a grip to my pricking iron that means i no longer get hand cramps from tightly gripping the thin handle. It now just balances between my fingers and is a pleasure to use. The scalpel handle was too thin to allow a decent amount of pressure to be applied - now it can be used with more force, and its also easier to control. If you ever wanted a more customised grip (its got so many other uses too ) then you should really try this stuff out! The stuff is also great for strengthening computer cables! I dont have any affiliation with sugru, other than thinking its amazing! adam
-
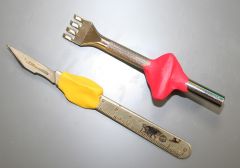
From the album: screengrabs
a couple of modifications made using "sugru" - an air drying silicon ruber compound. Now these tools fit my hand perfectly and i no longer get cramps and pain after holding them for a while. -
just a quick query.....has the way images are uploaded to personal galleries been changed. I just tried uploading three images and was greeted with a message saying they needed to be approved before they could be seen. I am certain i have never seen that before, and just wanted to see if this is normal? thanks Adam
-
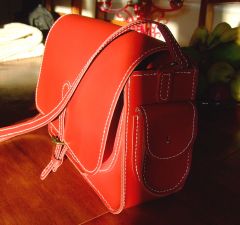
how did i miss this posting? really nice looking bag. Very impressed with the stitching. Hopefully the ones i'm making at the moment will look as good!
-
http://leatherworker.net/forum/index.php?showtopic=47365 you need to watch this video, and also the earlier ones Nigel did (the very first pinned post on this forum). They are by far the best videos i have seen explaining the saddle stitch. adam
-
First 'old Skool' Satchel
lightningad replied to humperdingle's topic in Satchels, Luggage and Briefcases
worked out nicely. -
Attaching Pocket Gussets To Satchel
lightningad replied to humperdingle's topic in How Do I Do That?
the hard bit comes when attaching that gusset to the second side! Then you have it bending in three ways - the curve of the pocket plus the curves to the main pockets, etc. It can be awkward but i found it really rewarding too. -
Attaching Pocket Gussets To Satchel
lightningad replied to humperdingle's topic in How Do I Do That?
on the one i just finished (and the three i'm currently working on), I did not use any glue - just stitching. I attached the gusset to the pocket front by stitching the edges back to back. Before stitching, i marked the edge of the gusset that would be joined to the body of the bag - NOT the edge joining the pocket front. As you say - that would be backwards! I measured the centrepoint of both the gusset and the pocket stitch line and worked out from the centre in both directions so i would be guaranteed the same overlap at each side . The only marking was done on the front of the pocket. To ensure it was all lined up, i had traced the outline of the pocket onto the gusset with a light scribe and used this as a guide to hold the gusset against as i punched and stitched each hole with the awl. Clips just got in the way for me, and the parts too bulky to use a clam so this was all hand held whilst the stitching was completed. Going around the bends was just a case of ensure the two edges were aligned before pushing the awl through, and only making one hole at a time and finishing the stitch before moving on. For me, it made much more sense to attach the gusset to the pocket BEFORE attaching it to the main bag front, before fitting the bag front to its own gusset. Essentially you want to avoid stitching into an enclosed bag as your hands and needles will find it much harder to do anything, especially if you have chunky hands! The main bag gusset was the final part i attached. What i'm thinking might work even better - although its untested until this weekend - is to mark the stitches on the pocket front panel, and before attaching the gusset, use those holes to mark the stitch positions onto main bag front with awl , then when you have attached the pocket and gusset and come to attach the gusset to the main front, the holes marked on the gusset edge should line up with the holes made from the pocket front template. good luck. -
maybe its time i took the plunge and tried an airbrush! Got an old Badger knocking around somewhere...
-
thanks Dwight, for this job the leather is a pre-dyed butt so i dont have to worry about the colouring this time around....but you're spot on - i definitely need to have a little practice before slopping it onto the finished work. adam
-
thanks - at least it will last longer that way!
-
I am making a couple of satchels that i want to apply a waterproof finish to, and so have bought Resolene. I have never used it before, and the instructions are pretty vague, so wanted to ask my questions here... When is the best time in the fabrication process to apply the Resolene? should i apply it before stitching the leather together or as the very last step? Would Resolene be the last goo to apply or would you apply other waxes after its dried? I've read that it can be watered down - whats a reasonable dilution to use? thanks Adam
-
I have found that my cuts have improved by vast amounts now that i use a saddlers round knife. Its kept honed and kept razor sharp, which is essential to stop the blade dragging through the leather. I also firmly believe that using the round knife to push cut rather than pull cut helps keep the cut accurate. Pull cuts seem to stretch the leather (but that could just be me!)
-
 I have since been told the leather is called Thru dyed full butt. Judging by the grey band within the leather cross section, its my guess its chrome tanned.
 -
Greetings!!
-
Flask Completed
lightningad replied to jayjay's topic in Purses, Wallets, Belts and Miscellaneous Pocket Items
like the flask. story remonds me of the time I had my front door off its hinges whilst i was installing a brand new one, ladders up as my wife was painting the window frames...a guy comes into the garden and asks me if i'm interested in buying replacement doors and windows!! He didn't even figure it out when i asked if he was being serious! -
might as well add my job to the list - i'm work in tv post-production, making ads for a toy manufacturer. Difficult to say what i do because i do pretty much everything! Editing, 3d graphic design, animation, audio mixing, some directing, and i've even done the music for a couple of ads. Also make a damn fine cappuccino! Before that i was video editor on "Bob the Builder", and before that i worked in regional tv news. adam