Jump to content

Solofalcon

Members
  • Posts

    419
  • Joined

  • Last visited

Everything posted by Solofalcon

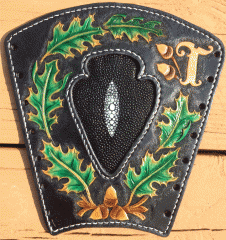
  1. I did look up a pinstriping design to stitch into an archery arm guard in conjunction with some Celtic knot work. This may not be exactly what your looking for but may be a different approach.
  2. Looking good as usual. Love that color. I got Peter Mains book as you mentioned, but I need to practice, practice, practice. That design is kickass too.
  3. Thanks Dave, I did not have to work with the foam at all. The customer gave me a finished seat with vinyl on it and I removed the vinyl and made my pattern from it. I did do some looking around for info on foam and see that high density foam is the preferred choice which you can find at a craft store and some people use an electric turkey knife to shape ant trim the foam. Sorry I don't have more for you. Good luck, Kevin
  4. Nice job. That's a sweet design.
  5. Cyrex, I love your work. I've been wanting to do some biomech stuff myself but haven't found a project/customer with interest in it. Do you use an airbrush for coloring? Is that your original artwork for the design too? Pretty cool.
  6. That is very attractive. Nice work. Were the billets stitched on before the lining? The whole chicken or the egg question on your assembly was messing with me. Regardless of how you did it, obviously worked out for you. Just my curiosity. Take care. Kevin
  7. That looks well constructed, smart, and spacious. Very cool. Is that your own pattern? Nice work. I know what you mean about the hours. I hand stitch all of my work too. I think it's a reasonable price. You just need to find someone who can truly appreciate the time and effort you put into it.
  8. Thank you for all of the comments. I can't take credit for the closure design. I found someone else's take on it after browsing The web for a while. I made this with the understanding that it will more than likely get a little abuse from the string and will hopefully add more character as it wears. Take care, Kevin
  9. You caught my attention with the word airbrush. I swear by an airbrush, but not for the finish. I have tried using the Eco Flo stuff and it's nice but I have gotten used to the Fiebings oil dyes over the years. With the exception of using a paintbrush for black in backgrounder areas, I dye all of my projects with oil dyes through an airbrush. The dye dries almost instantly after it hits the leather, and you get so much control with shading and tones. Lately I have been playing with different resist methods to block out certain areas from getting dyed with lacquers and I just started using a liquid latex frisket mask that I paint on before any dying and after the dye has been applied, you just rub your finger on the mask and it rolls right up easily without leaving any residue and the leather remains untouched. I also love using Gel Antique, and paste Antique stains to create a really nice look. Good luck and have fun. Kevin
  10. Well you could have fooled me. You sure don't seem like a newbie. You do very nice work. Keep absorbing knowledge, it's obviously paying off. I could use some more absorbing myself. Welcome!!
  11. No, I made this for a friend who is building one from scratch and he may have me tool the same emblem for his dash board on the passenger side.
  12. No, there was no masking. I used a double action airbrush to apply the dye. I have so much control with the airbrush. I can spray as wide as a two inches or as thin as a pencil line.
  13. Thanks. I made my own color, mixing Fiebings Light Blue and Green until I got the hue I wanted and applied it with an airbrush.
  14. Wow. That is pretty cool. I have been wanting to make a leather pick guard of some time now, but this takes the cake. It's very inspiring. I think I would enjoy taking on a similar project in the future. Great job!!!
  15. Thank you everyone for the great feedback. I had a lot of fun making this project. I have since added an appliqué braid with multiple colored 1/8 inch lace keep the holster front and skirt together due to the fact that it fealt a little floppy. I will post a picture soon of the addition. Form AND function. Take care. Kevin
  16. Thank you everyone. To answer some questions: 1. For the coloring of the bag, I used Fiebings dye applied with an airbrush, SaddleLac as a resist to maintain the blue and green on the logo, dark brown gel antique stain, and then white acrylic paint for the lettering. 2. The stitching is all done by hand. I don't use a machine for any of my work. 3. I did make my own pattern, using other bicycle bags of similar style as a reference and following the wisdom in the Making Cases books as a guide.
×
×
  • Create New...