


WoodBoneAndStone
-
Posts
131 -
Joined
-
Last visited
Content Type
Profiles
Forums
Events
Blogs
Gallery
Store
Everything posted by WoodBoneAndStone
-

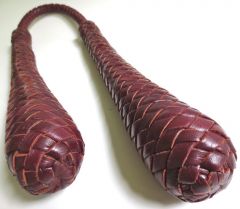
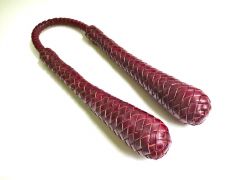
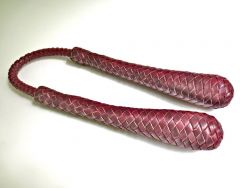
Medicine Chucks
WoodBoneAndStone commented on WoodBoneAndStone's gallery image in Gallery- Our Leatherwork
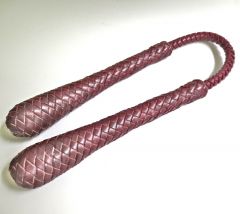 When I get to the end I make a U-turn by going over one and then under, over and under in the other direction following the original weave. On the last tuck under I don't pull the thong all the way through but leave a little loop. I apply some Fiebing's Leathercraft Cement (white) to the top and bottom of the loop with a toothpick. Then I pull it the rest of the way through, wipe up the extra glue and snip off the working end. I know that's a lousy explanation but I don't know how else to say it. Hope it makes sense.
 -
Medicine Chucks
WoodBoneAndStone commented on WoodBoneAndStone's gallery image in Gallery- Our Leatherwork
How they are made is an involved process too complicated to explain in detail in a short space. I'll just say that they are packed tight with BBs and are quite heavy. They take many hours to make and are not cheap. They ARE really cool and of all the ones I've made I've only let a couple go. -
From the album: Medicine Chucks
© WoodBoneAndStone
-
From the album: Medicine Chucks
© WoodBoneAndStone
-
From the album: Medicine Chucks
© WoodBoneAndStone
-
From the album: Medicine Chucks
© WoodBoneAndStone
-
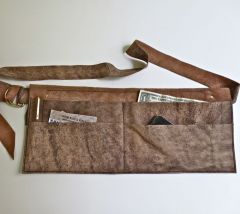
From the album: Art Fair Vendor's Apron
© WoodBoneAndStone
-
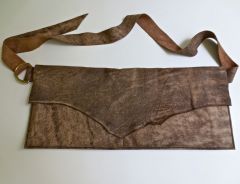
From the album: Art Fair Vendor's Apron
© WoodBoneAndStone
-
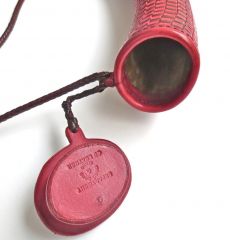
From the album: Braided Steer Horn
© WoodBoneAndStone
-
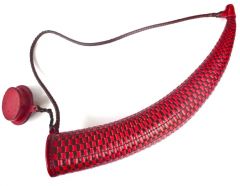
From the album: Braided Steer Horn
© WoodBoneAndStone
-
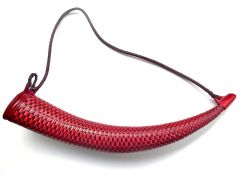
From the album: Braided Steer Horn
© WoodBoneAndStone
-
Very nice! I often avoid the use of hardware, especially on rustic and renaissance type pieces.
-
The one I have has a backing plate so in this case the tabs would be bent inward toward each other over the plate.
-
I purchased one of these the other day but have yet to use it on a project. You are correct that there is only one place for a rivet. Maybe they were referring to the two parts of the rivet. With clasps in general I always attach the part that goes on the bag first and when the bag nears completion (most of the stitching is done) I adjust the flap length if necessary and determine the placement of the other part of the clasp.
-
Selling "kits" --- Clicked Parts ---
WoodBoneAndStone replied to J Allen's topic in Leatherwork Conversation
I am in total agreement that instructions shouldn't be necessary for such a project. I'm just not in the market for a kit. I almost always make templates for my projects to facilitate reproducing them if I choose to do so. I just prefer to use my own designs, as simple as they may be. If I was inclined to sell my templates I would certainly include some directions. Not that hard to do. The more information you provide the customer the more they are inclined to buy. -
Selling "kits" --- Clicked Parts ---
WoodBoneAndStone replied to J Allen's topic in Leatherwork Conversation
I'm not in the market for this sort of thing but I would think that some sort of explanation or direction would be incumbent. I would think it would be well worth you time to write up a little instruction if you really want to sell this. -
New Sheath.
WoodBoneAndStone replied to billymac814's topic in Gun Holsters, Rifle Slings and Knife Sheathes
The sheath matches the old knife perfectly. Great job distressing and antiquing the leather. -
Jacket Repair
WoodBoneAndStone replied to John at Byson's topic in Clothing, Jackets, Vests and Chaps
Very good restoration! I'm sure someone is very pleased! -
Buffalo Hide Journal Cover With Stone Inlay.
WoodBoneAndStone commented on WoodBoneAndStone's gallery image in Gallery- Our Leatherwork
 Thanks!
 -
Fantastic! Very cool! I love the colors! What did you use to do the cutting?
-
Buffalo Hide Journal Cover With Heart Photo Frame
WoodBoneAndStone posted a gallery image in Gallery- Our Leatherwork
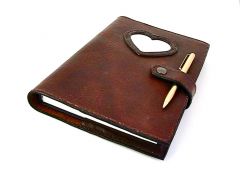
From the album: Leather Covered Sketchbook Journals
© WoodBoneAndStone
-
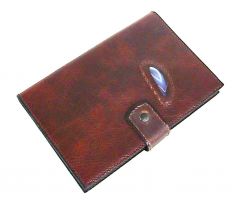
Buffalo Hide Journal Cover With Stone Inlay.
WoodBoneAndStone posted a gallery image in Gallery- Our Leatherwork
From the album: Leather Covered Sketchbook Journals
© WoodBoneAndStone
-
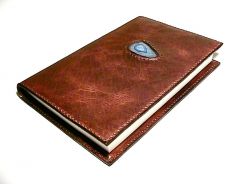
Agate Stone Inlay On A Bison Leather Journal Cover.
WoodBoneAndStone posted a gallery image in Gallery- Our Leatherwork
From the album: Leather Covered Sketchbook Journals
© WoodBoneAndStone
-
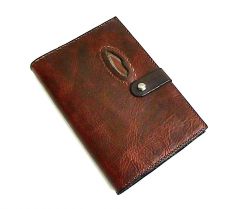
Bison Leather Journal Cover With An Agate Slice Stone Inlay.
WoodBoneAndStone posted a gallery image in Gallery- Our Leatherwork
From the album: Leather Covered Sketchbook Journals
© WoodBoneAndStone
-
Western-Biker Saddlebags
WoodBoneAndStone replied to shadowryder's topic in Motorcycles and Biker Gear
Looks great! I like the color. Nice to see something other than black on a bike.