


toxo
-
Posts
2,098 -
Joined
-
Last visited
Content Type
Profiles
Forums
Events
Blogs
Gallery
Posts posted by toxo
-
-
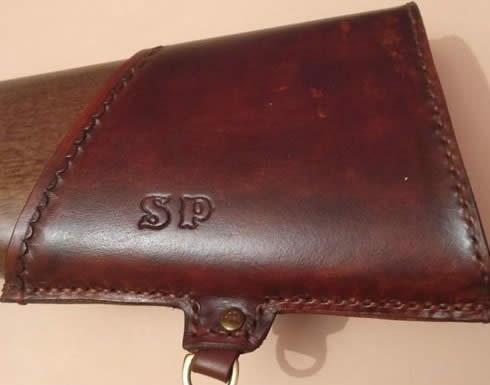
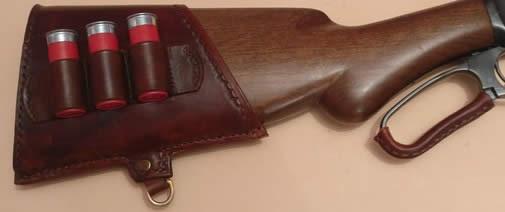
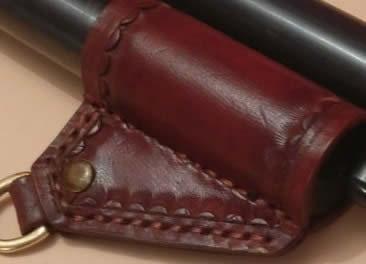
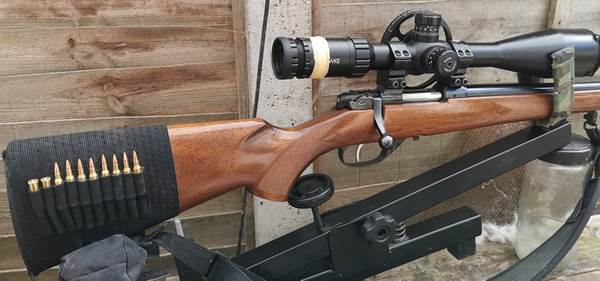
Although this doesn't include a comb riser it might give you some inspiration. I did the shotgun for a friend because he didn't want to drill the stock. The last pic is mine and just shows an alternative elasticated wrap instead of leather if you can find one.
-
25 minutes ago, PeltMe said:
Greetings from the UK.
This is officially my first post, so, hi and here we go.
I'm essentially looking for the best way to work leather around my rifle and build a small cheek rest/comb into it, as mine is rather low.
I've made axe covers and sheathes, but never something that covers so many contours.
There's bits on MeTube but nothing for air rifles apart from bits of bent 68mm downpipe with neoprene and two ugly bolts on the side.
I want to make something that sits elegantly around the gun and doesn't make me look like a whopper. Anyone?Welcome to the forum from a neighbour.
There are many ways to do this. Assuming you don't want to damage the stock I think the safest way is to glue up several layers of leather (or anything else) and trying and shaping as you go. when you're happy with the result, wrap the whole thing with leather and stitch along the bottom.
-
Can't stop watching this girl. She builds shelters, catches and traps fish takes em to market and lots more. She makes me feel inadequate.
-
This has been bouncing around in my head for a long time and without access to intelligent people who might be interested you guys are it. Sorry.
A PATTERN OF ISLANDS
By Arthur Grimble
This book has intrigued and fascinated me for years. I’ll be brief here but if there’s any serious interest I’ll gladly get into the detail.
An upper middle class white collar worker gets sent to some Pacific Islands as a young man to assist the Governor of a group of islands.
Some years later he gets promoted to Governor.
The big chief of a group of islands, on hearing the news, feels his biceps and declares that he’s not fat enough to be a chief and needs to out on some weight.
A date is agreed about a month ahead when the chief will arrange for the Porpoise Caller to come and start the fattening up process.
On the arranged day the chief collects him in the big canoe and takes him to one of the islands where all of the islanders were gathered on the beach.
The Porpoise Caller had a makeshift shack at the end of the semi circular beach. He goes into the shack and according to the chief he’ll have an out-of-body experience and flies over the ocean to call the Porpoise’.
He comes out of the shack and at a signal from the chief all the islanders gathered at the waters edge and joined hands. The new Governor was in the middle holding hands with the chief. They all start to walk out until they’re chest deep in the water where they stop.
The Governor looks at the chief with a look that said “What now?”. The chief nods his head toward the water and, looking down he sees a Porpoise just under the water about 3 feet in front and there was another next to that one on both sides and another and another and another.
At a signal from the chief everyone turned around, re-joined hands and slowly walked back to the shore closely followed by the Porpoise’.
When the Porpoise’ got to the shallow water and started thrashing about the islanders set about them with clubs and stuff.
This is how the islanders put their weight on.
OK, This is a serious story/book written by someone who’s as straight as a die. The rest of the book is “normal”. You tell me what’s going on?
Some years ago I recounted this story to a friend who was well travelled in that area and he didn’t bat an eyelid and said he’d seen weirder things than that.
The reason this has surfaced in my head at this time is watching something on TV recently that has given me a possible answer. Over to you guys.
Paul.
-
On 2/26/2025 at 7:23 PM, Prusty said:
This is my second large-ish project after about a year’s absence. I had the idea for this back in 2022 but never felt I had the design quite right. Turns out it only took 3 years of rumination to figure it out!
It’s made from 2.5mm lamport shoulder, split down for the gusset and for the binding. I considered a darker or lighter leather for the French binding, but ultimately never felt it looked correct.
Any questions or critique is welcome!

Some class work right there. Has me puzzled though.
Can't work out what you've got under the flap rim to give that precise bump and the line where the top of the bump meets the flap is very neat but too far for the stitch line to hold it so what is holding it, glue? However you've done it, it's a great job.
Is there a reason for the flare out on the gussets?
Can we see the inside?
Bin the strap. Detracts from the rest.
Since you said you made it to sell I'm surprised you've put so much time into it because if Leeds is anything like Kent you're never gonna get back half of what that bag's worth. Maybe you've got a good outlet. I hope so. Again, excellent job, well done.
-
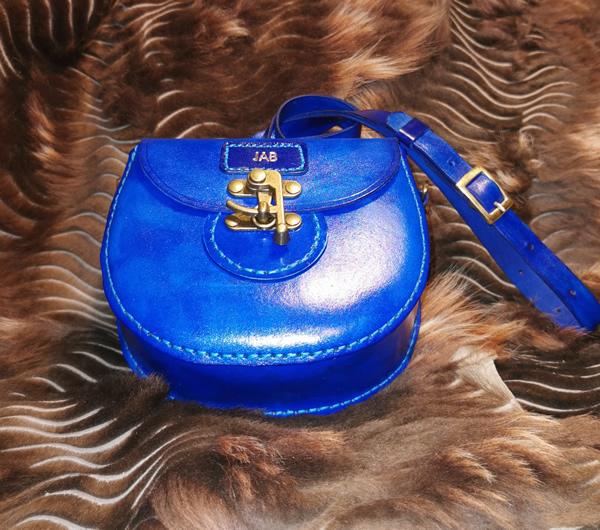
Can't remember the exact dye. Almost certainly Fiebings but I do remember how I did it. Starting with a bright veg tan I used a sponge that I picked lots of holes out of. I then dabbed three coats lightly (letting each coat dry of course). I remember being bimpressed at the time at how bright it was.
-
Every part of the process has to be right and in tune with all the other parts. The machine needs all parts working together.
Needle size right?
Bobbin wound properly and evenly?
Is the thread installed correctly?
Is the check spring releasing the thread at the right time so the thread can form a loop at the eye?
You can't judge tension by pulling on it. Tension is about right when you can's see the knot on the top or the bottom. Use a different colour on one to see this easily.
Is the timing right? That includes when the presser foot holds and releases the work. Is the hook meeting the needle at the right time and is it meeting the needle on the rise?
If you don't get on top of this lot you'll likely get in the same trouble with whatever machine you buy.
-
Bugger, I had this mostly done, got distracted and now it's gone. Oh well.
Not a business for me either. Don't think I've sold half a dozen bags in 4 years. It's the challenge of trying to achieve something different. I think I might have a latent inferiority complex. My brain is constantly looking for better/easier ways to do stuff and then I try to pass it on. I guess I should learn to mind my own business.
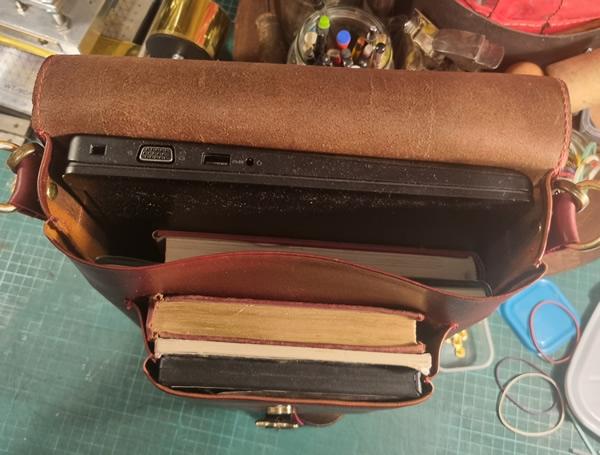
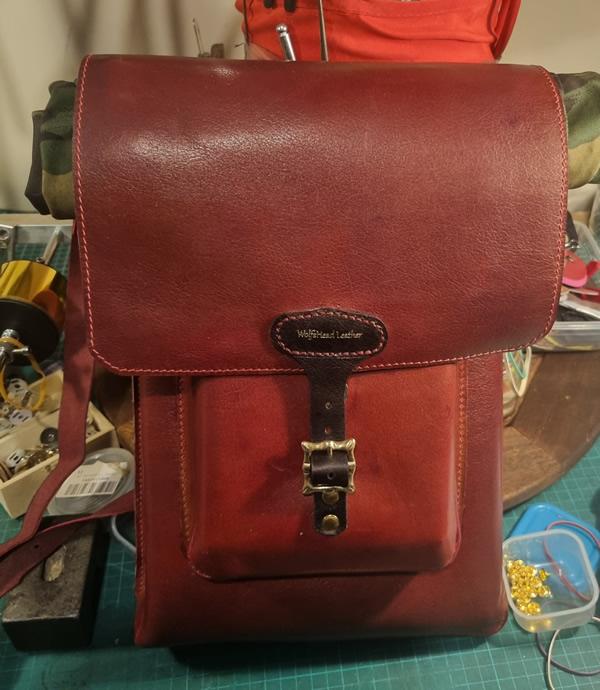
The leather was part of a job lot I bought some time ago. Most of it I'll never use but always looking for something. This next pic is typical. I wanted to make a bigger bag that would take a laptop, books etc. I had some leather that would do but it was a horrible colour. A kind of dirty yellow but nothing like a tan. I decided to see what it would turn out like. Because it was bigger I had measure for each panel and cut out by hand. Still didn't like the colour so sprayed a light coat of Fiebings red over it. Turned out OK so I carried on. Original thought was a magnetic closer but by the time I got to the end I realised that if I wanted to put rolled up waterproofs under the flap the magnet wouldn't hold it so added a buckle. Do the pic in a min.

-
6 minutes ago, SUP said:
I envy you there! Sometimes cutting by hand is a little tiresome and I get impatient with the time taken! Curves are easy with a round knife though. That is all I use round knives for these days. Small to large, the sizes matter.
I suppose I have the knowledge to "fix" stuff after years of different jobs around engineering so when it comes to making things easier, I'm equipped. Let me walk you through a way to make things easy. Don't know how you're fixed budgetwise but for me this procedure more than makes up for the cost in terms of speed and ease of use. I'll give you the basics and if it appeals I can go into more detail including where to get stuff.
When I find a design I like and am likely to make more than one this is what I do. 1st I download a pattern or draw my own design on paper. I then transfer on to the right thickness of wood, usually plywood. I then cut out the shape in wood so I end up with the pieces, usually just the main panels that would have been leather. I then take a piece of rule steel and bend it to the shape of the wood pieces and screw it to the sides of the wood shapes. Now I have a clicker die that I can use over and over again.
Once you have the means to do this, over time, as well as having the main parts of all the different designs, you've made dies for those little pieces that you can use for many designs like the small straps for "D" rings or buckle straps maybe. You get the idea.
Some people think you need a clicker press to use your new toys but not so. Lay it flat on the table, lay your leather on top and tap around the outside with a small resin or plastic hammer. I progressed to using a cheap arbor press for a while before I eventually upgraded to my Lucris Mk3 which I love.
So now I can make something like this for which I have cheap die for every single part.

-
1 hour ago, SUP said:
@toxo Thank you. I will check there too. I came across Instructable and their contests and submissions by chance. I find all this particularly useful to learn specific techniques now, rather than entire items.
These days, I am trying to come up with my own designs It's fun. I'm planning to use Inkscape for the pattern. I just attended the Inkscape tutorial with Elk Track Studios. Excellent class for beginners.
I'm not very artsy so I look at sites like these for inspiration. I've looked at design software but it's not for me. I mainly use a machine so putting dots on a pattern is a bit pointless. I do envy proper designers though when it comes to curves which the machines can't handle.
-
22 hours ago, SUP said:
I recently found on Instructables, several free patterns for leather items. The same patterns, in a more polished manner, are for sale on Etsy.
I wonder which came first? Several are too similar to be just coincidence.
Now, when I want the pattern of something, I plan to check Instructables first.
I seem to remember Instructables from a long time back. I'll have another look. You might want to look at "Pinterest" I seem to remember lots of patterns on there and for someone like yourself I think you could get a lot from it. Let us know if it's of any use.
Click on "Explore" & "Leather patterns" in the search.
-
3 hours ago, kgg said:
I approached the problem with inline binders by installing 3mm brass inserts for mounting in a 3D printed table top. I think you could do something similar with the table top you have. ( drill / tap or drill and press in a nut)
kgg
Thanks Keith. I've just discovered swing away binders. Will probably still have to do some fettling but they seem to be a good idea. You could mount one far enough back so that when not using it you can just swing it away and leave it there instead of demounting it. Still some more learning to do, the binders that I have are not mounted on anything and are meant to be mounted to any system according to what width you want to use. know nothing about these swing away binders but it looks like the whole thing (system & binder are fixed so you'd need a different set up if you want to change the tape width, I might be wrong on this, more learning to do.
-
I'm sure I'm not the first to ask this question but this binding business seems to be more complex that it needs to be so I must ask this most knowledgeable hive how to do it.
I can get a needle plate and feed dog from China for a very reasonable price and I can fashion a presser foot out of an existing one.but I'm still waiting for an answer as to how to attach a tape folder to the sliding bobbin cover which has no holes in it.
I've come up with an idea but I have to ask you guys if you think it will work.
Instead of mounting a folder on the bobbin cover, I'm thinking of mounting it on a steel plate and then fixing the steel plateto the flatbed attachment which is rigid enough to work. Here's an idea of how it would look with a piece of white card where the steel plate would go.
What's the verdict?
![IMG-20250217-WA0001[1].jpeg](https://leatherworker.net/forum/uploads/monthly_2025_02/IMG-20250217-WA00011.thumb.jpeg.f24a3b27a4c07baa88c19232d7a7fd8f.jpeg)
-
26 minutes ago, CJJ said:
Thanks so much! I used a pattern from leathercraftpattern.com. I highly recommend their patterns by the way. super detailed and come with hundreds of photos of the various stages of construction.
Yes, it was definitely a labor of love. easily 50+ hours over a couple month period. No machines were used in the making of this bag. I guess the time I saved not setting machines up was quickly spent hand sewing, skiving, etc.
If you haven't already, you might check out Leather Patterns by Dieselpunk.ro or Tony See. All his patterns usually come with a detailed video. He also has a world wide group that's usually lively.
-
Rayna pretty much did the same thing. Couldn't do enough. In fact I've just asked her if they do a pre-drilled bobbin slide plate thingie to take a binding attachment. (Does anyone know?)
Re; the code, you might get some English out of it around page 70.
-
Definitely out of sync. Maybe you jammed it up at one time and threw it out. You need to do two things. 1st, find out what's making that noise and 2nd, go through each stage of the sewing procecess and make sure everything is as it should be. It's easier with a manual of course but many things are common sense such as the feed dog having clearance all the way round in foreward and backward positions. Is the needle clear of the hook and does the hook point reach roughly just above the needle eye at the right time? Usually when the needle is on the rise. Needle and presser foot bar adjustments for each machine are above my pay grade I'm afraid but the big guns will be along shortly I'm sure. Good luck.
-
I feel like we're brothers-in-arms having bought a Jiang Long 341 directly a little while back. Was it Rayna that you dealt with?
Might be worth scanning that barcode thing on the side for a manual or at least a parts list. Good luck with it.
-
1 hour ago, RBD said:
So…I’ve bought 2, neither worked. Much like a dried out ballpoint pen. Tried soaking it in hot water, alcohol, scribbling on kraft paper, on leather, etc. to no avail. Anyone have a similar experience? Something I’m not doing? Cap is tight. Just unlucky? Mostly use a scratch awl to mark leather, but it would be handy to have an erasable marker for darker leather.
Thanks for your input.
Go here. There are two main types. One comes out white straight away and the other takes a second to appear, then turns white and disappears when you put a hair dryer on it.
-
Welcome back Bob and I agree, teaching is great.
-
On 1/8/2025 at 4:36 PM, CJJ said:
Hey everyone, happy new year! I wanted to share a project I recently completed that I'm really proud of. This is my first attempt at a high-end handbag. It's inspired by the Hermes Garden Party bag. I'd love to know what you think!
Nice job! Did you make it from a pattern? Good job either way but I know how difficult complex bags can be without a pattern and how much forward planning goes into it. Also how difficult it can be to line things up with no straight lines. Lining up that bottom strap with the side straps to allow for the piping for example.
These big makers that have a different machine set up for each part of the process have it easy. It's a bit different when you have to set your one machine up differently for different parts of the processes. Well done.
-
-
I don't think my brain can process this properly but I do know that the distance between two points on a curve is different compared with the same two points on a straight line if you are manipulating the leather by hand. The best machine I've seen for curves is a wheel foot machine rather than a walking foot.
-
Don't think it matters how you got there but you might have made a banging push knife and an excellent overhand drag knife (if you roll that way). Well done.
-
I'm guessing the spring has something to do with it. Needs a spring to pull it back up.

![IMG-20250217-WA0001[1].jpeg](https://leatherworker.net/forum/uploads/monthly_2025_02/IMG-20250217-WA00011.jpeg.e2e644343353ffd89bc1469f0986efb0.jpeg)
help from the masters..... Is the machine fixable?
in Leather Sewing Machines
Posted
Firstly it's on the top shelf because it's not sellable. I wouldn't risk $50 on something that Might work. If you jump through all the hoops necessary to get it home and find it doesn't work you'll not get your money back. If he can get it down and it turns freely you might have a chance but it still might not be in sync.
If it looks like there's a chance you could make an offer but I wouldn't be offering anything near $500. Welding cast steel can be difficult so you can use the cost of repair in your favour.