


toxo
-
Content Count
1,844 -
Joined
-
Last visited
Posts posted by toxo
-
-
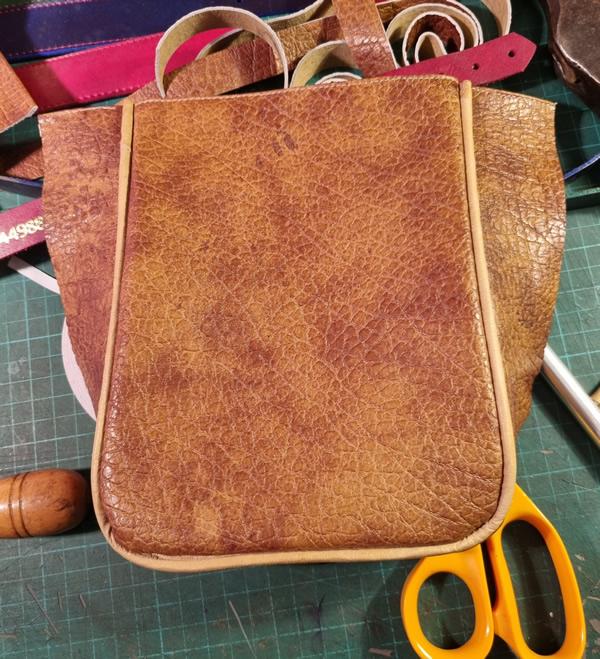
It's not too bad from ten feet but I don't care, I've learned so much. I like to challenge myself and this was a challenge . I even made the leather strap thing that goes around the cord and joined the pieces together with that diagonal/right angle thing. I didn't do myself any favours with a fairly tight curve and those corners were tough. Even though I skived everything it's difficult to find the piping under the second piece of leather and it's a constant worry that you want to get as close to the piping as you can but you don't want to break the needle. Not sure if I was using the right size piping foot and I'm not sure sure if a piping foot is even needed with tight corners because they just wanna go straight on. I don't know if I'm brave enough to attempt the smaller pocket that sits in the middle of this one.
-
On 8/22/2023 at 1:22 AM, Frodo said:Today was rather interesting
try and follow along. I ramble
we have an insurance card that gives us $75. We can use for food or utilities, they load it on t by e 1st of the month
we went grocery shopping, we live rural so we only go 1 time a month
we had 2 carts full of junk at the register and after it was wrung up. I used 2 crass to buy the bill
first the insurance card.
thh my en my debit cardno problems, off we go to unload
when we got home the wife reforms me that our bank shows we paid all of the bill and the insurance card was not applied
quickncall to that cards number verified that yes it was used
hummmm. Seems that t by e store owes me the $75 it collected twice
phone calls made and facts are laid out
we arbiter for 45 minutes store says no record of a card being used and the card co says, yes it was used at xxxx time and xxxx register
after demanding supervisors they say they will reimberse
i feel vindicated. Feeling good
then wifey tells me thevreceipt she gave Me from the day before and the one she now has clearly shows the card transaction
opps
so now I have to call them back and say I was wrong do not reimburse
vhess I am about to eat some crow
We've all been there Frodo. No point wasting any more brain time on it. Just move on.
-
11 minutes ago, SUP said:I just realized yesterday, when I inadvertently placed a couple of dyed -waiting-to-dry leather sheaths next to a candle warmer, that the heat from that candle warmer is sufficient to dry the leather. it is gentle enough to dry but not so hot that it will warp or damage the leather.
It is essentially like a hot box that people make to dry their leathers, with bulbs. This uses a bulb as well. The ones with a warming base might not work but the ones with bulbs do.
Only requirement -no fragrant candles, since leathers pick odors fast.
Maybe it's me that's doing it wrong but I've never mollycoddled my leather, mind you I've never used really delicate leather. I regularly use a hair dryer in between coats of dye etc. I've put wet moulded stuff in the oven. I even put a big soft lump through the washing machine cos it had some mould on it.

-
I don't know how many times I've said I'd like to learn this stuff. I use Fireworks MX2004 and I can do a lot of basic stuff but not even a tiny fraction of what it's capable of.
Trouble is if I try to go further I get a headache and in six months time I've forgotten it and have to learn it all over again.
-
4 hours ago, AlZilla said:The video above shows a machine with a speed reducer. The thing we always see here is that Needle Positioners don't work with reducers. Seems like the seller would know what they're selling, but who knows?
You have to keep everything in mind but I don't think that's a factor. My two other machines have enormous pulleys instead of handwheels and the ups work fine. I've noticed that most I've seen are sloping. I think that's just to keep away from the belt but I'll check later.
I'm impressed with this motor though, I can start ultra slowly and at any time can go to full speed and back to ultra slowly to finish just on the treadle. I want the np to work because I want to avoid that twitch, that errant stitch that ruins a project.
This is still only a hobby for me and I don't get anything like the machine time that some of you guys put in so I want every advantage I can get.
-
Now I'm wondering if the slope of the needle positioner has any bearing? Will investigate molla. (Baby speak that I probably shouldn't use any more).
-
54 minutes ago, Thadrick said:There's no better reason for doing anything. He was just proud of you and you have a precious keepsake. Well done.
-
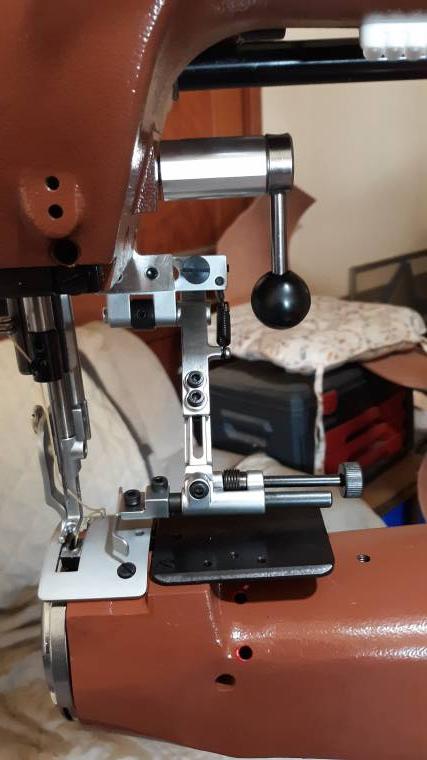
On 3/29/2024 at 10:08 PM, dikman said:That drop-down guide is a rather strange-looking contraption. The two notched rods on the left had me puzzled until it occurred to me that maybe that's where the spring fits that holds it up and down?
You're right dikman. I know I answered this on Friday. Don't know where it went.
Got it working after a fashion but don't like it.
Now having trouble with the needle positioner. The machine is good in that, if I go slow at the beginning and end I can stop it up or down without the np. But if I go quickly there's no consistency. I did get it foot down heel up once but I lost it and don't remember what I did.

-
Hurry back else I'll only have ya mate to moan at.
-
And they're easily changed. When I made his big weekender I toyed with the idea of making one end a zipped rip stop bag within a bag for dirty shoes to save putting them in the main bag. Didn't do it though.
-
23 minutes ago, SUP said:It is a nice pattern. Dieselpunk.ro has a different pattern for $1.99 each week. Have you seen them as well?
I don't always like em. Sometimes I think he's just putting out stuff that's not moving. But I thought this one was a good practical pattern that could have many uses.
-
I can't believe no-one has come back about this practical pattern for 1.99.
-
Dieselpunk doing a nice weekender + tutorial for cheap.
-
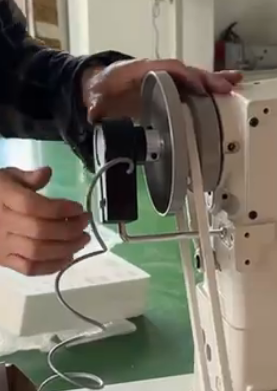
8 hours ago, DieselTech said:Yeah I finally found a video by Van Plew on youtube about cobra class 4 eps installation.
On another note I got a thread in thread guide I'm not sure as to where it goes. I found 1 spot right on top it threads into. Lmao I just dont know if it goes there.
I cant find anything about it.
Makes no sense. Pictures?
-
Looks good to me. If not quite right just turn those discs.
-
3 minutes ago, DieselTech said:Here how my drop down guide is mounted. I did buy the extended hand lift knob & bracket to make this all work.

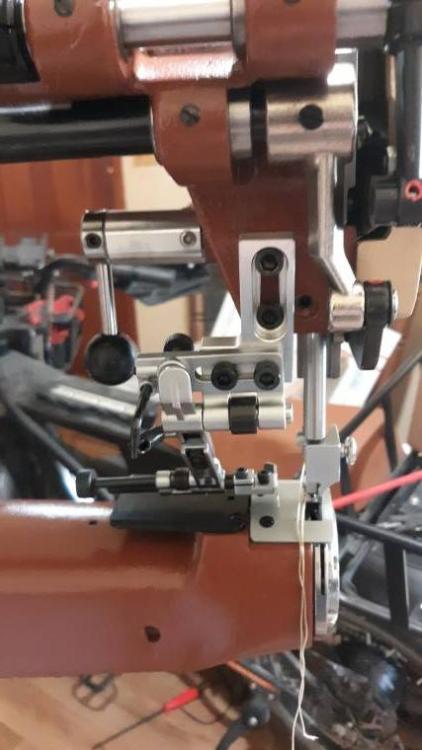
That one looks way better than mine.
-
2 minutes ago, DieselTech said:Thanks. I appreciate the photos. I'm slowly figuring it out.
Not the proper way to do it but inside the black cover you'll find two discs, each one has a cut out and the cutouts will be opposite each other, These cutouts are needle up and needle down. You can slacken them enough to turn them by hand to get them where you want. But don't tell anyone I told you.
-
15 minutes ago, toxo said:It's easy. You should have an L shaped rod with a thread on one end. Probably a hole quite close to the handwheel. The threaded part screws in there. It's sole purpose is for the L bit to sit in the slot in the black bit just to stop it turning around. Only by that black bit keeping still can the machine work out where the needle is.
-
46 minutes ago, DieselTech said:Yes it is. Lol I'm kinda lost at the moment. Trying to figure everything out. I'm trying to figure my EPS out now.
Lmao I have seen a couple videos & it's got me kinda lost. But I think I'm right. Waiting on a phone call to make sure.
Love it!!!
It's easy. You should have an L shaped rod with a thread on one end. Probably a hole quite close to the handwheel. The threaded part screws in there. It's sole purpose is for the L bit to sit in the slot in the black bit just to stop it turning around. Only by that black bit keeping still can the machine work out where the needle is.
-
30 minutes ago, DieselTech said:Yep I watched a bunch of videos & they all said the same thing as you. Thanks.
Well it showed up! Pallet full of stuff!
Cant wait to try it out.
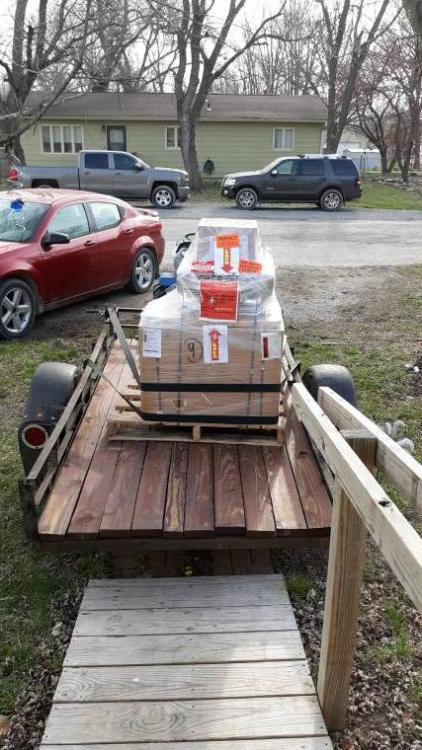
Exciting innit!
-
3 minutes ago, kgg said:I would email the company and ask for instruction.
kgg
I already have done. I have her on WhatsApp. Trouble is 8 hrs difference. I could probably work it out but I doubt I'll be using it. The actual roller is quite small and whichever way it goes together, there's very little sliding going on. More like unscrew and move to another hole. Can see it being set up for one job and left there.
@DieselTech Thanks mate but I hope yours is better than this. I hope I'm not missing something and it turns out to be brilliant.

Finished messing with the pedals. Just moved the big one as far to the right as possible and the little one as far to the left. Will still take getting used to but better than it was. Just the needle positioner left to do now.
-
Some great advice here but before all that, does your project warrant edge beveling at all? In the image above, I don't think so, Not thick enough for beveling. A good straight cut, maybe a light sanding, job done. Especially with soft Chrome tan leather.
-
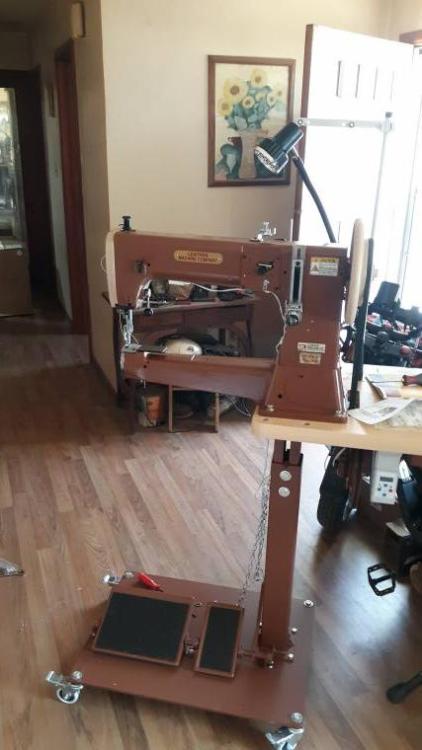
First demerit - threaded hole missing for the L shaped rod that arrests the needle positioner. Not much of a problem, just annoying.
On the plus side there's a QR code on the side of the machine that instantly gives you the instruction manual.
The drop down guide has defeated me. If anyone has a pic or anything that makes sense out of this - Please.

Just messing with the foot pedals at the moment. Just tweaking really. Gonna take some getting used to, having a pedal instead of a knee pad for the presser foot. The flatbed is good and simple to put on. The arm is a bit chunky compared to some but I guess it has to be to house the massive 28mm bobbins and I can't say I've ever needed the thin one on the Adler 69. I will do a video when it's all done.
-
welcome Ingrid from the UK. Lots to learn here.


My 1st attempt at piping.
in Show Off!!
Posted · Report reply
Thanks mate but I think you might be overdue a visit to the optician lol.
The machine choice was purely because of the presser feet. I have lots of em for the Durkopp 239 and the new machine but not so much for the Adler 69 and because it was "practice" the thread/colour didn't matter so much either so the turned edges were done on the 69 using the colour "Toast" and the piping foot was on the new machine using a blue thread which also tested the theory that, if done right you won't see the thread.