


toxo
-
Posts
2,103 -
Joined
-
Last visited
Content Type
Profiles
Forums
Events
Blogs
Gallery
Posts posted by toxo
-
-
-
I don't think my brain can process this properly but I do know that the distance between two points on a curve is different compared with the same two points on a straight line if you are manipulating the leather by hand. The best machine I've seen for curves is a wheel foot machine rather than a walking foot.
-
Don't think it matters how you got there but you might have made a banging push knife and an excellent overhand drag knife (if you roll that way). Well done.
-
I'm guessing the spring has something to do with it. Needs a spring to pull it back up.
-
17 minutes ago, fsrground said:
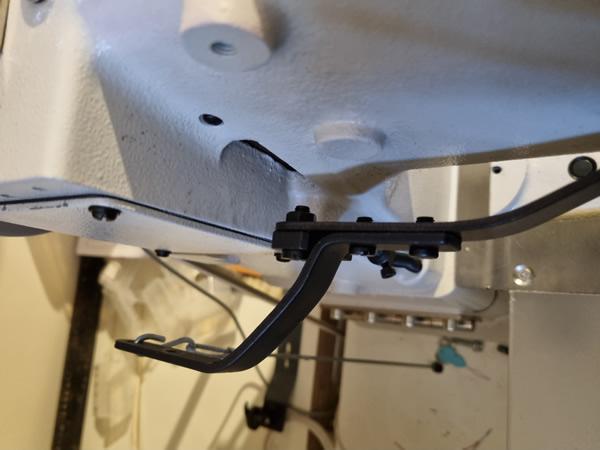
where does the chain attach ? I've heard I have to drill a hole in one of the plates on the back of the machine or do I just remove the knee lift from the front and reposition where it connects to and drill a hole through the table to connect it ?
you don't happen to have a picture of the rear do you where the chain came out lol
Here you go. Bear in mind this is a 341 clone.
-
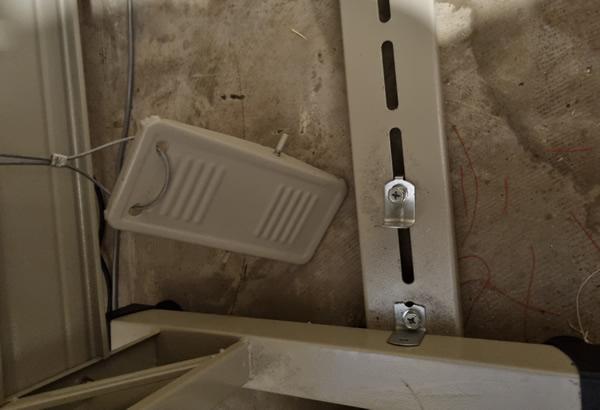
1 hour ago, fsrground said:
I have a juki 1341 that I'd love to get rid of the knee lift and goto a pedal lift. I see in the manual you can do it and see the parts for it but I haven't been able to find a how to or what exactly to do.
has anyone done this, has pictures or a video on how too ?
thank you a head of time
Sean
HaHa! I've just done the opposite and changed the pedal to a knee lift.
Mine is a clone but the original had a chain that went from the bit at the back straight through the table to the pedal on the frame.
-
27 minutes ago, SUP said:
Oh. Okay. I'm lazy, I'm afraid. So I'll stick to the wax block until someone enterprising, like you (
") ) comes up with a good recipe for making that wax in a bottle and shares it. However, if I don't use the wax block, I have the headache of needing to cut more splits, more frequently. Melting and hardening wax is infinitely easier than doing that. It also is the safest for the tips of my chisels. I have never ever punched right through the wax block.
) comes up with a good recipe for making that wax in a bottle and shares it. However, if I don't use the wax block, I have the headache of needing to cut more splits, more frequently. Melting and hardening wax is infinitely easier than doing that. It also is the safest for the tips of my chisels. I have never ever punched right through the wax block.
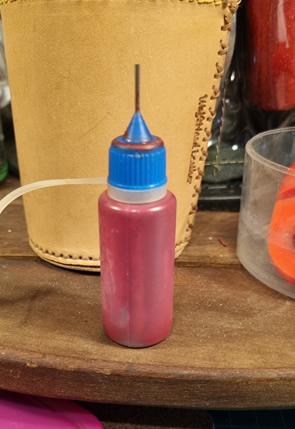
Beginning to think you're winding me up SUP LOL. Not about punching through the wax. Get one of these bottles (cheap as chips). Take the top off, put wax inside, put in microwave for a few seconds, put top back on and run along the stitch line or groove. Simps.
-
35 minutes ago, SUP said:
@toxo why noy make a brick of coad and rub that along the stitching line or run your thread through it before stitching? You can make it as hard or soft or sticky as you like. Punching on wax helps the chisel slip out of the leather easier. Coad on thread might help as well, getting onto the 2nd needle through a stitching hole, the first going through a clean hole and pulling the waxed thread behind it, and waxing the stitching hole enough to wax the 2nd needle.
This site has plenty of information on coad, only not easily available right now as the site recovers from last week's hack attack. You could buy it but where' the fun in that?
Search on google for 'coad wax' though and the first item you see is the thread on this site from 2016, with a good recipe.
This is not about the thread SUP. It's about pulling chisels out of leather after punching. I don't do much hand sewing these days but when I did I did use both methods to make the pulling easier. Rubbing a bar along the stitch line is fine on a paper pattern before punching but doing it on the actual leather may interfere with whatever finish you want to put on. What I'm talking about above is just a way to contain the wax to where it's actually needed in a very thin line thus negating the need for any other waxing.
-
Have no idea how much 17000 Rand is but this is on facebook.
ORYX OR341 cylinder arm leather sewing machine.Almost new. Done 1 project with it. About 30 hours sewing time. Not fit for my purpose as I do not foresee having a need to sew M8 size thread or thick leather again soon.The Oryx is a differently branded Cowboy and is renowned for its durability and quality.It comes complete with torque converter for thick material and speed control, piping and left/right zipper feet and manuals. Also a makeshift flat bed for sewing larger flat pieces.Price new with extras about R22000. I'll look at offers around R17000 slightly negotiable for fast sale.A steal at this price.Contact/Whatsapp Denys 0621276065 -
3 hours ago, fredk said:
And how do you keep it soft or liquid enuf to come out the wee spout?
Just asking for a friend,

I think you're clever enough to work that out Fred. How do you keep your glazing iron hot? Heat pad maybe? How long does it need to stay liquid for? Some waxes are thinner than others when liquid. Maybe a slightly bigger spout? Takes seconds to run a stitch line and it doesn't matter if it hardens once in place.
-
I think @Beehive is the only one that mentioned that some irons/chisels are wedge shaped. The harder you hit em the bigger the hole.
As far as waxing the tips, any wax will do, I've even used a block of soap. Running a thin piece along the stitch line is better than stabbing wax although using both ain't gonna hurt. An invention thought just popped into my head (happens all the time). What if you melted the wax and poured it into one of those little bottles with the tiny metal spout they us for paint and then drew it along the stitch line or better yet stitch groove?
My mother never bred no fool!
-
10 hours ago, dikman said:
Showing some skills there dikman, well done.
I find the term "head knife" confusing. When following a pattern I find it difficult to use any knife that I have to drag apart from a fine pointed utility type because my hand seems to get in the way. I note that some people hold them like a dagger and drag them. Doesn't work for me. I do have a quarter round one that I quite like because it has quite a lot of blade after the curve so I can push it and still clearly see the line. Not so good in tight corners but I have other knives for that.
Well done again. I always think antler/bone/horn handles look great.
-
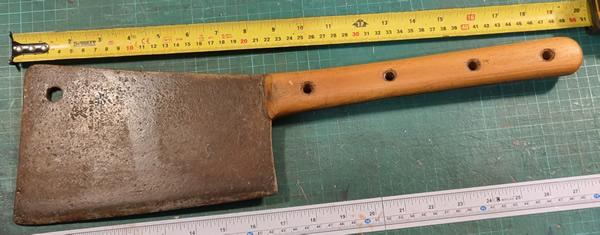
On 1/30/2025 at 5:46 PM, c2369zulu said:
Finshed making this cleaver over the weekend and wanted a decent covering for the edge. I used my laser and cut this one out. Hermann Oak Chestnut Bridle with a biothane retention strap and black Ritza Tiger thread. I went ahead and pigskin lined the interior sides for the snap and rivet to help prevent scratching...
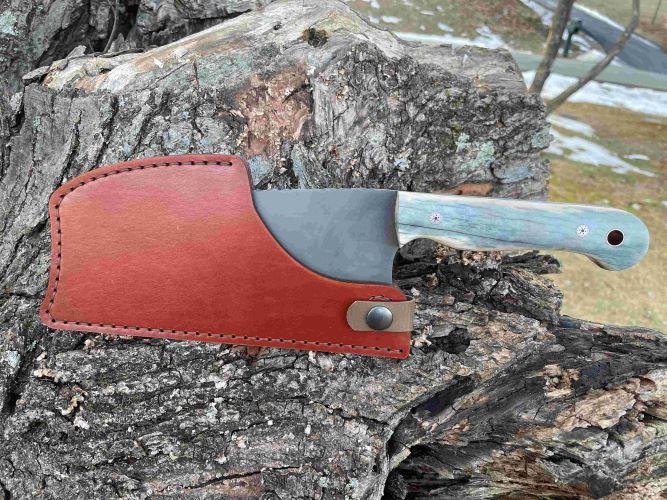
`Excellent job. Very stylish. I keep meaning to do a sheath for my double hander. I didn't make it of course but I think it deserves one.
-
Well done Jo. I "think" my old eyes are liking the cleaner look. Personally I'd like the ads to be less intrusive. You get so used to them being there. I know whenever I've needed stuff the top of the page is the last place I look. The space could be used for easier navigation, maybe to a more meaningful ad page.
For later maybe. You have enough on your plate right now.
-
17 hours ago, SUP said:
really do not care whether they are old or vintage or from last year. Their value is in the fact that they are all hand-made. Someone made them, used them and took care of them and now I will do the same.
That right there Sup is the ethos of this hobby. Hope you get lots of use out of em. Good find.
-
Been fortunate that my main leather shop has a big clicker press and over the years I've collected various sizes and thicknesses of off cuts that they use on that. Don't know what it's called but it's tough. In the thicker sizes I can use it almost like an anvil. Perfect for stuff like belt ends etc and unlike the thinner stuff there's absolutely no distortion. I use the self healing mats for intricate stuff like patterns.
-
1 hour ago, ArtD said:
Hi all. I want to start foil stamping my company name and location onto my products. However, I am feeling challenged by the price of type. It seems that it is sold only in sets at $300 to $500 a set. But I only need 16 characters. Is there a stamp maker that sells individual characters to fit the Dream Factory hot foil machine?
Art
It will be much cheaper to have a single stamp made with all your details on it.
-
On some machines its on the front panel. On mine I think it's F1 and F2.
-
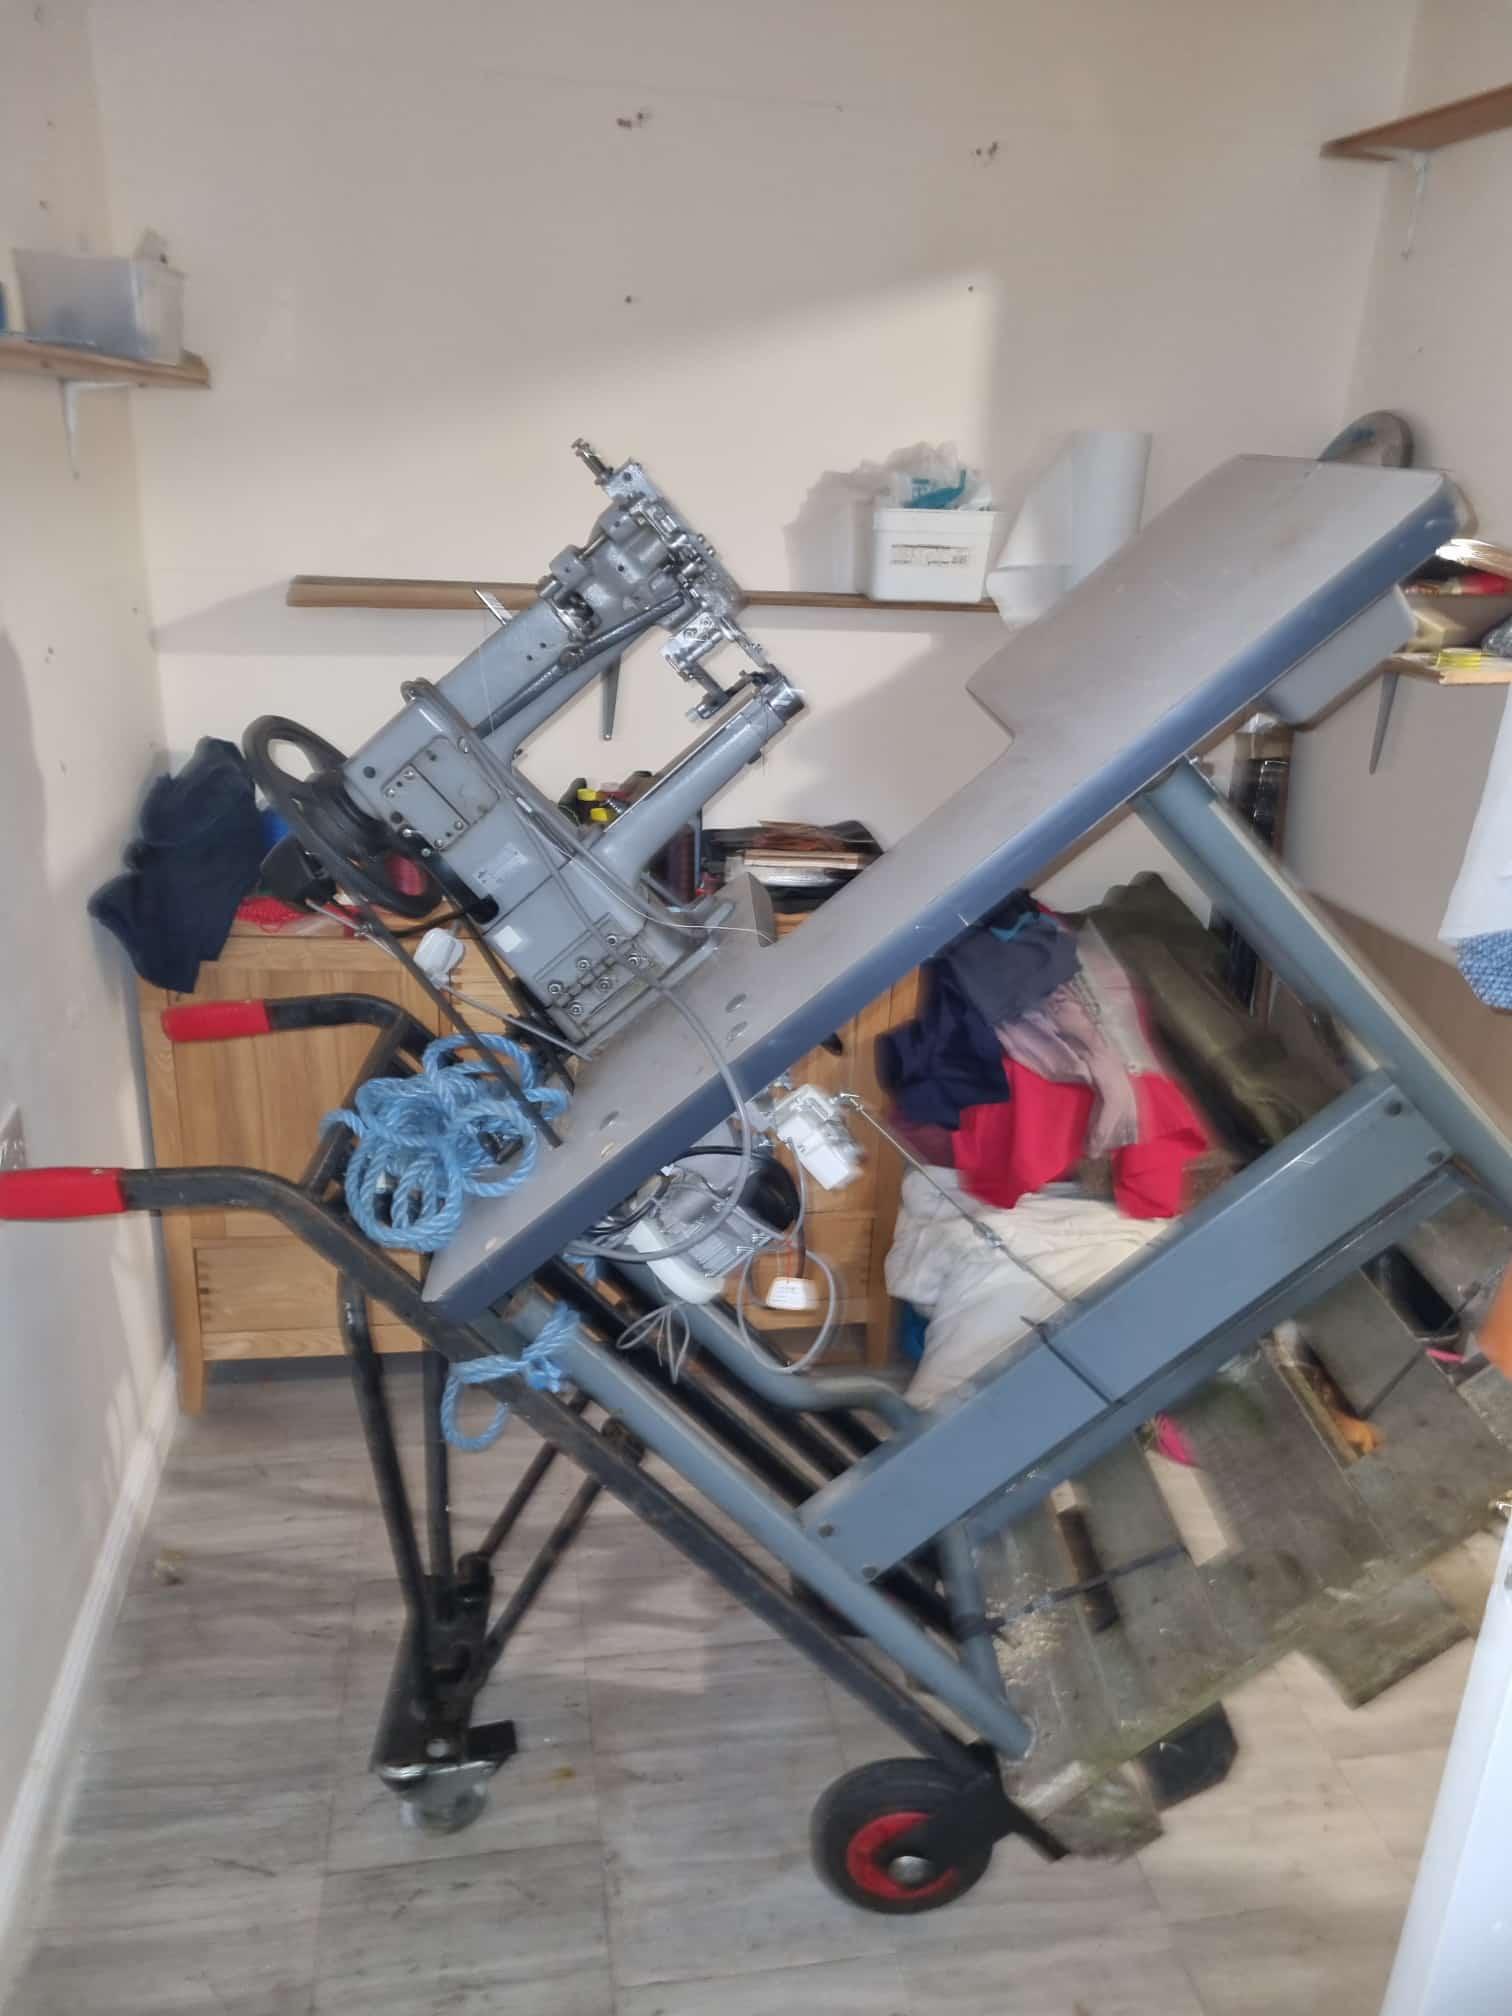
I have one of those sack trucks that transform into different guises but any decent sized truck would do. I also have a strapping system that you normally find around heavy duty crates or cartons.
When I sold my "69" there was just me so I cut a pallet to size and strapped it to the bottom of the machine. this made it extremely easy to move around on my own. If I was doing it just to move around the "pallet" would be just high enough to get the sack truck under.

-
I've never molly coddled my leather. I've even put it through the washing machine. I'll try white spirit, thinners, acetone, even I think the most potent, brake disc cleaner before I give up on it. Obviously try on a small area first. If it dries the oils out, replace with neatsfoot oil.(don't saturate)
-
Unless you buy from Europe where it's measured in millimeters.
-
20 minutes ago, Gridix said:
Good Evening Everyone,
I was reading up on the different types of leather and the different thicknesses, however, I am not sure I completely understand how to order leather. I have purchased some cheaper leather on buckleguy for learning some techniques. I was hoping to get some leather to make a small laced bag, but I am not sure how much leather i would need.
I think I want some chrome tanned leather around 7 or 8 oz, but even having a template to work from I am not sure what to buy (size or brand). Any advise would be appreciated.
Thanks!
Josh
Hi Josh. First of all you need to fill in your profile so we all know where you are. I'll hazard a guess at the US since you've used Buckleguy so as far as where to buy and sizes I can't help because I'm in the UK and I buy my leather face to face after I've examined it and felt it. The reason I've said that is if you want to make a bag it's not just a question of how thick/thin. If you're learning then veg tan leather will give you more opportunity to try different techniques than chrome tan will. Chrome tan is usually softer than veg tan so do you want your bag to stand up or flop like a hobo type bag? Chrome tan can come in all sorts of colours whereas veg tan can come ready coloured mostly you have to dye it yourself. You can't tool chrome tan like you can veg tan. So you have to balance what you want your bag to look like when finished but the thickness will come into it also. Like I said, I go by feel but you might not have that option. There are many charts out there showing thicknesses in ounces and millimeters and no doubt someone will come along with a more helpful explanation. I will add that both veg and chrome tan comes in different tempers (floppiness). Best advice is to talk to whoever you want to buy from, tell them what you want to make and ask them what they have. Most will be only too pleased to help. Good luck Josh and don't forget to post the pics when your done.
-
I had the same experience with a 341 clone. Each time I questioned an aspect of the machine, they took the trouble to send a video, ie one stitch at a time, same hole reverse etc etc.
I don't think some people on here realise that the machines they're denigrating now have top brand (non Chinese) labels on em all over the world.
-
A white horse goes up to the bar in the pub and the barman says "We've got a whiskey named after you " The horse said "Wot Eric?"
Hermes Inspired Handbag
in Show Off!!
Posted
Nice job! Did you make it from a pattern? Good job either way but I know how difficult complex bags can be without a pattern and how much forward planning goes into it. Also how difficult it can be to line things up with no straight lines. Lining up that bottom strap with the side straps to allow for the piping for example.
These big makers that have a different machine set up for each part of the process have it easy. It's a bit different when you have to set your one machine up differently for different parts of the processes. Well done.