-
Posts
49 -
Joined
-
Last visited
Content Type
Profiles
Forums
Events
Blogs
Gallery
Store
Everything posted by malchik
-
From the album: KAMILeather
-
What Is This Tool Called, And Where Do I Find It?
malchik replied to conceptdiba's topic in Leatherwork Conversation
I'm not using chrome tanned leather often, but I didn't have problems creasing those. Creasers are traditionally heated on alcohol stove/burner like this one http://www.ebay.com/itm/ALCOHOL-LAMP-BURNER-WITH-WICK-SPIRIT-LAMP-/200531827611?pt=LH_DefaultDomain_0&hash=item2eb0a0db9b -

What Is This Tool Called, And Where Do I Find It?
malchik replied to conceptdiba's topic in Leatherwork Conversation
Like those from Joseph Dixon http://www.josephdixon.co.uk/products/bevel_Crease.html or http://www.josephdixon.co.uk/products/Double_Crease.html -

What Is This Tool Called, And Where Do I Find It?
malchik replied to conceptdiba's topic in Leatherwork Conversation
I'm not using those tips for creasing since originally they are too sharp and cuts leather like cheese even on low temp. I didn't experimented a lot with those as creasers since I have traditional creasers I heat by spirit burner. Surely, for my purpose (I'm doing small stuff) this works perfectly well. -

What Is This Tool Called, And Where Do I Find It?
malchik replied to conceptdiba's topic in Leatherwork Conversation
My soldering iron is 16w (I believe) and I don't use any heat control (even I can use dimmer for such purpose). You have right, it is not precise at all, but you can compensate to certain degree with technique. I took me a while before I use to work with Chinese brass tips from ebay and soldering iron and I'm using it solely for edging. French stuff is, of course, much better but quite expensive if leatherworking is not your daily job After all Trox, I see you're living in Oslo (as I do) so you can drop and I can demonstrate my technique both on veg and chrome tanned leather (even combination of those two). It works well both with high end and cheap leather as well. The result is (booth look and feel) as on Hermés stuff -

What Is This Tool Called, And Where Do I Find It?
malchik replied to conceptdiba's topic in Leatherwork Conversation
I said I tried wit some acrylics (not Angelus) even I tried to mix acrylics with wax and other resins. Didn't work (maybe it was too hot) whe wax part went to smoke, acryl just peeled. It is logical after all, acrylics doesn't melt, polyurethane does (and it's part of Fenice paint). Main purpose of heat glazing (as far as I understand) is to melt edge paint s it can penetrate deeply into the leather. Angelus, despite it famous stickiness, doesn't penetrate leather at all... -

What Is This Tool Called, And Where Do I Find It?
malchik replied to conceptdiba's topic in Leatherwork Conversation
If is it not hot enough for soldering it doesn't mean is not hot enough for hot glazing since required temp. is lower than to melt a tin (about 230C - 450F). But, if is it to low, dimmer doesn't help since it is used to lower temp. About edge paint, I'm using Fenice (section lacquer) made - Tandy used to sell it as Professional Edge paint. Works fine for my use. I doubt regarding Angelus since it's acrylic paint. I did some tests with some other acrylic paints without any success - at least in combination with hot glazing (just peels off the paint). -

Mini Satchel Bag
malchik replied to malchik's topic in Purses, Wallets, Belts and Miscellaneous Pocket Items
Thanks I found those at local (Norwegian) leather-goods store. Maybe http://www.buckleguy.com/ can source some, at least they have a lot of hardware for bags an purses. -

Mini Satchel Bag
malchik replied to malchik's topic in Purses, Wallets, Belts and Miscellaneous Pocket Items
Video showing how I did edges before (I simplified the process recently) . Unless you want to se a whole video, jump 27:13 to see the process. -

What Is This Tool Called, And Where Do I Find It?
malchik replied to conceptdiba's topic in Leatherwork Conversation
Video showing how I did edges before (I simplified the process recently) . Unless you want to se a whole video, jump 27:13 to see the process. -

Mini Satchel Bag
malchik replied to malchik's topic in Purses, Wallets, Belts and Miscellaneous Pocket Items
Thanks Monica, I checked your work on Etsy as well, beautiful -

Mini Satchel Bag
malchik replied to malchik's topic in Purses, Wallets, Belts and Miscellaneous Pocket Items
Thank you Conrad Well, what I'm referring to is professional edge ink (it seems Tandy sell no longer - only edge dressing now) which comes from Fenice, Italy. Yes, Tandy says let it dry, but on Fenice web-side states the heat can be applied for increased adherence. The main reason I'm applying the heat after first pass is to smooth fibers (what's left after un-smooth after burnishing and sanding) and making it ready for flawless polishing after pass 2. The effect of this procedure is finished cut edge binding a'la Hermés There's nothing wrong with traditional burnishing/dying/waxing the edges, but what I do gives me more durable edge with not so much more effort than traditional approach. On bags like one on pictures it is essential having as durable edges as possible. After all I'm giving lifetime guaranty -

Mini Satchel Bag
malchik replied to malchik's topic in Purses, Wallets, Belts and Miscellaneous Pocket Items
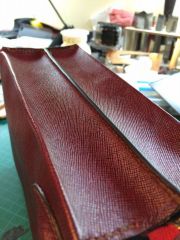
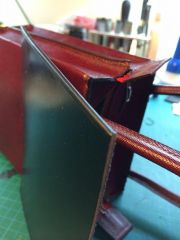
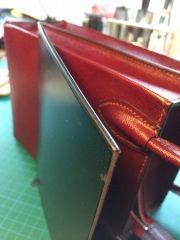
Edges are both burnished and applied edge coat afterwards. Burnished with saddlers soap, sanded lightly, and two coat of Fenice (Tandy) edge ink (section lacquer) with heat polishing between coats. Sedgwick bridle, it's an art of the leather, beautiful to work with (still didn't found how to bend it without damaging top coat). It comes with white stuff both on top and bottom - works like tallow not wax. When you remove it (with a help of elbow grease ) beautiful bridle finish pops up! Find difficult to cut precisely it with tallow on a top, but was afraid to place ruler on unprotected leather. Pretty stiff, had to sharpen knife couple of times before I was finished cutting. With other words, gives a lot - requires a lot Thank you Joe, personally I'm not satisfied with all details, but customer was overjoyed Not bad for beginner -
Mini satchel bag with one main compartment, one back pocket and two front pockets. Shoudler belt in combination bridle / alcantra suede. Made of 2 - 2.4mm Sedgwick english bridle shoulder for the main parts and for curved parts (gusset, flap corners) colored trough (bridle top finish) 2mm belly. Gussets on front pockets made of 1mm goat skin. Hand stitched with 0.8mm braided polyester thread (aka Tiger thread)
-
-
From the album: KAMILeather
-

What Is This Tool Called, And Where Do I Find It?
malchik replied to conceptdiba's topic in Leatherwork Conversation
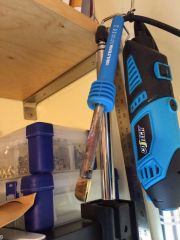
Hi, I did nothing special, just widen top of the rod so it can accommodate Chinese brass tips (which are wider than the ones supplied with it). For temp. regulation I'm using just external dimmer unit - less voltage - less temp.. So, nothing special, ordinary cheap soldering iron bought in Clas Ohlson/Biltema (Scandinavia) or Walmart or wherever you find cheap 16W SI. Some images: 1. Soldering Iron 2. Finished edge on printed calf 3. One pass with ink after burnishing, before heat treatment on J&E Sedgwick english bridle shoulder 4. After second pass with ink after heat treatment on J&E Sedgwick english bridle shoulder -

What Is This Tool Called, And Where Do I Find It?
malchik replied to conceptdiba's topic in Leatherwork Conversation
I'm using modified soldering iron with brass tips (from China) in combination with Tandy (Fenice) EcoFlo Proffecional Edge Paint (Section Lacquer). The procedure is: Traditional burnishing (saddle soap/water - not Gum Tragacanth!), than a coat with edge paint. Leave it to dry at least two hours, than apply heat treatment, sand it with sand paper 320, and final coat with edge paint. For smooth effect (like on Hermes stuff), sand it again lightly, rub some beeswax, polish with canvas, rub a paraffin wax and final polish. -
Referring to pictures you posted at http://leatherworker.net/forum/index.php?showtopic=55732#entry357442, it seems you have problems with consistency of stitching. It seems needles doesn't pass each other on the same side every time (important) nor your thread tension is equally from stitch to stitch. Take a look at Nigels excellent video about stitching on Youtube (https://www.youtube.com/watch?v=TGuiha5S2oE)
-
Hello from Norway, Oslo It seems I'm not alone having fun with leather "her på berget"


