


indypbear
-
Posts
189 -
Joined
-
Last visited
Content Type
Profiles
Forums
Events
Blogs
Gallery
Posts posted by indypbear
-
-
Nighthawk, that looks really good and retro too. In the 70's Tandy put out leather that had the yellowish base but you can't get it today, at present, so tooling hides need to be adapted with the yellowing technique that you have discovered buy trial and error (nice research). Another way to apply the darker color of choice is to wrap a small block of wood with scrap tight weave linen, daub the dye on the linen and wipe over the project until you get the effect you want (old school approach). Keep up the good work!
Indy
P.S. The leather was called "Nature Tanned".
-
Doc, nice job! I'm sure your Dad will love it. I know I really like anything that my sons make for me. I haven't made holsters for my LE peers for a long time. Keep up the good work. Each project gets better with time and you'll notice the difference in comparison-I have. Indy
-
Good job for an early try. I agree with the lacing comment. Try to work the tooling/carving when the color returns natural after casing. It takes the impressions better and gives you better depth and definition. What leather did you use-weight & type? Keep up the good work and we'll see your work on the front of a trade magazine in the future.
-
Bobby, Good job smoke eater. Your Buds will love them! A few suggestions: 1) make a stitch line and follow it slowly stopping at the points and lifing the foot, turn and proceed to the next point. sometimes you just have to hand turn the drive wheel OR hand stitch them using a stitch spacing wheel. 2) try using an acrylic white for the background at the bottom and around the red numbers. It is forgiving and can be colored over if there's a booboo. dab out a lot of the extra runnyness on a paper towel then proceed. 3) good idea regarding the stitching then glue. use a good contact cement and fasten small binder clips to hold the edge until the glue sets-it's a short wait. approximate the edges then sand them even before slicking. I hope any of this helps! MERRY CHRISTMAS
John aka indypbear
Thanks for the comments. You're exactly right about learning from mistakes. I've also been teaching myself upholstery work over the last year and it's amazing how far I've come and how much more confident my sewing has become.
The stitching was done with my walking foot upholstery machine and there is two layers. I used some weldwood contact cement to glue them together before I stitched them so the stitching is visible from the back.
I think next time I will do the stitching for looks and then glue the back on. I will just have to make sure that the two are glued really good on the edges.
Thanks again,
Bobby
-
I am looking for a pattern for a Bible cover that is relatively simple in design with a loop or tab to fasten it closed. The design I can create but need help with the construction design.
Indypbear
-
Nice work Gesa! I appreciate his love of our working tools and knives. Leather always enhances the hardware and you have made them look really good. I look forward to seeing more of your work in the future. Give him my best regards for a safe career to a happy retirement.
Sr. Insp., retired
Indy
-
BOSS™ manual sewing machine (cast iron casing) with needles, thread, bobbins and maintenance tools. $1000.00 firm plus shipping from Weatherford, TX. Photo available for interested craftsman. Contact at John <front_line42@yahoo.com>
-
-
Tim,
I like the construction design, quality leather weight and workmanship. Your color choice (Desert Tan) is good also. I've not used any of the Eco-Flo finishes todate but I'm going try them soon. Good job on the edges and stitching. I agree with Tom's "girlfriend" on the minor flaws. They show handcrafting as long as they don't jump out and grab the recipient. We all start there though.
My $0.02 worth:
Basketweave & Camouflage tools seem to large for the size of the project. Maybe try smaller ones on your next project this size.
The basketweave on the strap gets busy. Try using a small Camouflage or border tool top and bottom and leaving the middle open and see what you think of it.
Basket weaving the back is nice but rarely shows. It's a good place to set your maker's mark (ID).
Over all good job. Keep toolin' then carving!

John aka Indy
-
Okay all who asked, edges was done today so here are two shots of them. Had to do inside, it's raining.....again.
I sanded off the rough stuff first then I used water, spit, tandys bonefolder and some good 'ol elbow grease. Last but not least a layer of black edgewax polished with a cloth.
Also put on a top coat of leatherbalm...darn, I knew I was going to get probs with lift getting into the decorative cuts. If anyone wondered why the red is slightly pinkish, now you know, I expected lift from the topcoat.
Why did I not apply the balm with the same type cottonball rag as I blockdyed with...


Tom
Looks good bud! "That's the way I like, I like, I like it-uh huh..........." so the song goes.
JKK
-
Hey Tommy,
Good lookin' belt. Can't read what's above the skull if it's lettering. What kind of finish did you use on it? Hope you're doing well and what's with the weight loss? Doing something to make that happen like starving artist stuff? I'm a fan of slicked edges but that looks good natural. I agree with the comment on swivel cuts-looks like someone has been practicing his name and other great images. Hope to see some items this year again at the IFOLG in Indianapolis. Let me know if I can help you at all with that again.
Best regards,
John aka "Indy"
-
While looking for garb for our Ren Fest here in Minnesota my wife fell in love with these, but hated the price... I decided I'd give it a try myself... I Ordered some elk leather and started prototyping, first in canvas, then deer leather and tried to figure them out by looking at the photos on the website , a bit of trial and error and finally... Success!!! we think... She loves them.


You did a really good job on those. I saw some at a recent Scottish Festival here in TX and want to make some for my wife and myself to wear with our Scottish clothes. They put a sole on theirs made of a composite shoe sole. I understand the prices. The high tops wear $250-$275 a pair and nothing special.
Best regards,
John aka "Indy"
-
Josh,
Your workmanship is getting really good or you're covering your mistakes better or both. That's what we all learn to do donchano! I carried one of those for 25 yars and what I looked for was comfort and functionality. Mine was for concealment though. The best I wore counter balanced with two magazines on the opposite side and draped over each shoulder hanging under my arms.
This one looks comfortable with the shoulder pad but I question the strap around the back (I know it's a design necessity) for long periods of time. How easy is the weapon drawn and does the bottom strap have a tendency to tip the grip out? Look at your stress points and how they effect the wearer by trying it our your self (I know you did already).
Beautiful work. Looks like your our next upcoming John Bianchi.
Best regards,
Indy
-
Okay, so something functional! I made this for my cousin out of two layers of 5-6oz hard-rolled, tannery-dyed horsehide leather glued together and stitched with hand-waxed hemp thread. It is set to fit a 36" waist, but has a total of 9 size-adjustment holes because it is my hope that it will last through any weight changes my cousin has throughout his life (he's only 20, after all). The buckle is held on with Chicago screws so as to allow it to be removed so my cousin can stick his giant cowboy buckles on it. I don't think I will be making a double-thick belt again for some time, because sewing it by hand was a pain in the ass. The edges were kind of difficult to burnish, too, but I am going to go over them with wax again here in a few minutes just to make sure they stay smooth. Thanks for looking!
Noah,
Did you use an edger on both sides? Try Gum Tragacanth, let it sit for ten then slick with your cocobolo then burnish with your wax. Do the same for your key keeper. Also try the tip of a modeling tool down the dampened stitching groove and see what it does. This will make your belt have a much more professional look. Be patient as this takes time to get used to the feel. My $0.02 worth.
Indy
-
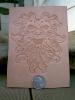
Thanks art!! Still trying to figure out how to fit the heart more securely than just glue it in. The fit is very snug in the cout out of the main leather.
Forgot to mention this in original post, lol but it is a development project the trial and error way. I could just mak two holes through it all and and run a thread right through. Maybe a small stone or small silver heart with a fit fitting could sit on top hiding the thread if so.
Sometimes it's fun to just start of a job and solve problems as we go so to speak. Normally I think my stuff through very well before starting.
Jepp, finns bara en;-)
Bra jobbat Syrran

Formen är tagen från en korp som sträcker upp vingarna.
Tom
Ha ha thanks alot Bud!!!
Starting to get warmer here now, my heart is defrosting ha ha
Tom
Hey Tom,
That really looks great. I thought that I was looking at a new design from Rene Berends. Maybe some 2mm round lace with a creative loop and knot ball might be a good fastener system-just thinking out loud.
Indy
-
Obsession! Indeed. I got so obsessed I made another rose barette and dyed red this time. The shading didn't come out as I'd hoped but still OK.
Brent
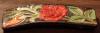
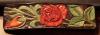
Brent, These are nice! You're doing really good with the colors. I have been trying to find these blank clips at OTB etc. to no avail. Where did you find them?
Indy
-
I have a Tippmann 15 ton pneumatic and it works well for my needs. They also have a 7 ton. The only draw back is the clamshell vs. swing away head for inserting the material for cutting. It's workable when you develop a system. Tippmann also makes great quality dies. Check with Jim Miller at Tippmann (800)286-8046. Price and quality are what we look for in a die. Big Sky, Weaver and TX Custom Die (888)755-9025 are all good also!
Hope this helps!
Indy
-
Hey Randy,
Nice job!!! You do pretty good work for a 'Shurif' yuk-yuk-yuk!! Merry Christmas to ya'll in the Cornelius family in KS from the Karnes family in TX.
Best regards,
John aka Indy
-
Welcome to the forum. I'm in Weatherford and a member of Lonestar Leather Crafters also.
-
Jarl,
If you are still interested in a stamp for the sillhoute girl let me know size and design and we'll give you a quote. I can be reached at <front_line42@yahoo.com>. We have made stamps for several in the forum-TomSwede, UKRay, Jbird, etc.
I look forward to helping you.
John aka "indypbear".
-
Donna,
Nice looking sturdy belt. You added the design that made the Thistle work. I love the Kiwi buckle too. Do you have a resource for different buckles like that in NZ?
Keep up the good work.
Indypbear aka John
PS-thanks to Tom and Josh for your kind words. We try our best for ya'll.
JKK
-
indypbear
i appreciate the compliments & critiques but your gonna have to put the above in english for me...cuz i don't have a clue what ya mean lol...i sent ya the design...so if ya don't get it for some strange reason lemme know -k-
thank ya there spider...glad ya dig that leafy fella...hes almost cool enough to roll up & smoke
 hehe
hehe enjoy
darryl
Darryl
Check out a TLF catalog on page 45. You will find the H series of tools are called stops. They are used at the end of a swivel cut in certain designs. You'll get the hang of that with practice. The undercut bevelers are also known as lifters by some and also require a technique that is easy to master. Thanks again for the graphic. I'll send you the line art pattern when I finish with it.
Indy
-
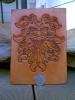
heres a practice piece i did...it was a tough lil s.o.b...as ya can see hes not a big fella...but i wanted to try doing some sort of leaves...i just maybe should of started off with making it larger...but all in all this had to be the most patience trying & toughest picture i've done to date...definately some rough spots with the leaves...lotsa little cuts and trying to bevel some of those spots was a nightmare and made my eyes go
 ...i think i need some micro tools lol
critiques always welcome...thanks!!
darryl
with some antique on him
Darryl,
I really like your design and the tooling. Your undercut bevels are good but to pop they need to be lifted a little more. Have you tried different sized stops for the inside line ends and modeling tools for other areas that need clean-up and fine finish work? Keep up the good work! I would love to have a copy of the artwork (carving pattern) to play with if that's OK with you. Just send it to <front_line 42@yahoo.com>
Happy toolin',
Indy
-
Thanx to all of you for your insight and suggestion. I would by a not so great pair and take tem apart and use them to create a pattern. I have found some similar but not the same.
Thanx,
Storm
Storm,
Electrathon is correct, they are called Gypsies and were very popular in the early 60s. George Hurst reminded me of this information. The soles were premolded and punched with needle sized holes for stitching them to the tops whech were also prepunched. They were made from 10-12 oz skirting. Just keep the post uptodate and someone will have a pattern in their archives. I'll check with some of my resources also.
Indy


Bridle I Made For A Marine
in Saddle & Tack Maker Gallery
Posted
Nice job on the bridle. Keep up the good work. When you are in need of conchos for sale or future projects contact me-the marines is one of ours. I have them available for several different special organizations Masons, Military etc. I don't sell retail, so I'm not in competition with your market if you're a retailer/maker. We are making one now that you can adapt to any emblem that is maximum of 25mm diameter ie. lapel/hat pins or "bling". We also do maker's stamps for the craft. I can be contacted at www.front-lineproducts.com or johnk@front-lineproducts.com.
John aka Indy