-
Posts
47 -
Joined
-
Last visited
Content Type
Profiles
Forums
Events
Blogs
Gallery
Store
Everything posted by jshill
-

Evil clown weight belt
jshill replied to jshill's topic in Purses, Wallets, Belts and Miscellaneous Pocket Items
Thanks guys.- 4 replies
-
- weight belt
- circus
-
(and 1 more)
Tagged with:
-
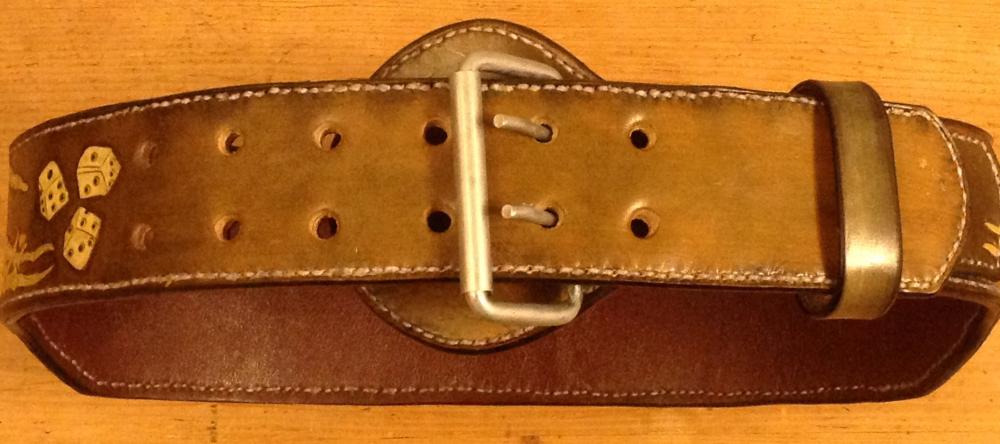
Made myself an evil clown themed weight belt. Been using it at the gym for a few weeks now and it's still holding up well. Photos aren't amazing but let me know what you think.
- 4 replies
-
- weight belt
- circus
-
(and 1 more)
Tagged with:
-

Jungle theme handbag
jshill replied to jshill's topic in Purses, Wallets, Belts and Miscellaneous Pocket Items
Hey sorry for the late reply Goldberry I did use a resist after painting using acrylics I used Eco-flo super sheen and the antique was Eco flo brun fonce gel antique. The acrylics I bought off eBay I think they are for minutiae painting but I got a set of 150 different colours for super cheap. -

Player of the week beer belt
jshill replied to plinkercases's topic in Purses, Wallets, Belts and Miscellaneous Pocket Items
Love it like the natural build With the light and dark contrast. I'd play harder to wear the belt as well! -

Jungle theme handbag
jshill replied to jshill's topic in Purses, Wallets, Belts and Miscellaneous Pocket Items
Thanks. Got to find ways to make our off cuts and scraps useful. Cheers, I was worried about the colours being too bright before I antique everything but they turned out pretty good. -
I've been making this bag on and off since September due to work have only just managed to finish it.I'm pretty pleased with the lacing and the general theme of the bag considering I've had to put it down and pick it back up at a later date. It is based off a Tandy pattern I copied off one of their Magnolia bag kits (I think). Its also the first time I have used acrylic paints and they seem to have worked well. Have to wait to see how they handle wear and tear. Let me know what you think?
-

Back Ground Tooling Does It Add Value To An Item
jshill replied to jshill's topic in Leatherwork Conversation
Hey thanks for the replies. I tend to always think pieces don't look finished until they have also been back ground tooled as well, but like Dwight says not in all cases sometimes the simplistic designs are the best! If it does make a piece sell more easily and for a little more all the better. Chain how much is a little more as a percentage of a piece do you think? -
I'm about to start back ground tooling a piece I'm working on at the moment. Although aesthetically I think it will make it look better would I make the time spent tooling back if I did sell the item. it made me wonder if spending the time back ground tooling actually adds any value to an item for a non commission buyer? Does any one sell items that are similar with and without background tooling?
-
Thanks for the nice comments. Do it! What have you been planning to use it on? I love his work I think the tessellations transfer over well to tooling I have been thinking of using his hand drawing a hand design for the next bag I'm making.
- 6 replies
-
- tesselations
- bag
-
(and 1 more)
Tagged with:
-
Managed to finish my Esher inspired bag with a little help from some friends on the board: http://leatherworker.net/forum/index.php?showtopic=64976#entry421959 Its from a pattern which I took from a Tandy Magnolia kit I had bought and made previously. Really pleased with the finish product but I had an awful time lacing it. /
- 6 replies
-
- tesselations
- bag
-
(and 1 more)
Tagged with:
-
Hi, okay I get you. Thanks
-
Hi thanks for all the advice. Red Bear Haraldsson yes I way definitely doing my Yosemite Sam impression when I noticed the mistake! Hopefully my leather work will be good enough to steal one day. Wild Bill46 yes I think you are both right. 25B I think I'm going to Splice in a section and see if it looks alright. If it doesn't then I will be unpicking. I doubt I won't make a mistake like this again but I will try my best. JLSleather the Calf lace I have been using has had a lot of cracks in it unfortunately. I will cut out past the cracked area. Electrathon I'm not sure I understand what you mean about starting the lacing earlier? Thanks for the advice and praise.
-
Hi, Ive been busy lacing a bag and haven't realised until I have finished a whole section that I have missed one lacing hole. This has caused a slight bulge in the bags panel. I don't really want to unpick the lace as it is about half way through two yards of lace. I think it would be better to cut the lace and splice in a section. If I do this does any one have any recommendation about how many holes above and below the missing lace hole I should go up to? Any help is appreciated. Thanks Jack
-
Hi for the slots on the guitar strap I think I used a 5/32" oval punch to make two cuts, which I then cut straight lines to with a Stanley knife. The punches I have don't have a make on I bought them as a set of eight of varying sizes off ebay a long time ago. Either that or I some times use some wood working chisels using the same technique as the punches, depending if I want the edges to be round or square. I had a quick search on ebay and SET OF HOLLOW PUNCH TOOL comes up with a good selection the set I bought weren't expensive and have lasted a number of years and I have used them on a lot of projects. http://www.ebay.com/sch/i.html?_from=R40&_trksid=p2050601.m570.l1313.TR0.TRC0.H0.TRS0&_nkw=SET+OF+HOLLOW+PUNCH+TOOL&_sacat=0 Cheers
-

Best Method To Cut Internal Holes And Finish The Edges
jshill replied to jshill's topic in How Do I Do That?
Hi, thanks for all the advice I'll give most of them a go. Cheers -

Best Method To Cut Internal Holes And Finish The Edges
jshill replied to jshill's topic in How Do I Do That?
Hi Camano thanks for your advice. I will give it a go. -
22-02-15 So I finished the tooling on my leather belt today. I'm pretty happy with the outcome. Next I've got to make the holes for hand stitching. Full belt Shark My initials in a sort of anchor design
-
Hi just wondering if any one has some good advice on cutting and finishing internal holes. For instance this half inch square I have drawn on a piece of scrap leather. I normally start by making an internal whole for each corner with a round bladed awl before cutting from one hole to another I find this prevents over/under cutting and means the internal piece falls out neatly. I'm having trouble using an edging tool and a slicker to finish the internal edge as good as my outside edges, mostly due to the hole being so small and not being able to run tools/glass ect down the edge as I would on an outside one. Any tips and tricks would be greatly appreciated. Thanks
-

Zombie Hunter Messenger Project
jshill replied to Mlitton's topic in Purses, Wallets, Belts and Miscellaneous Pocket Items
That's really cool. -
11/02/15- Okay so today I made a pattern for the back of the belt onto tracing paper which I then transferred to the leather. I also cut the pattern in with a swivel knife. Here is the design I drew. The water is flowing out a Cuthulu/Zoidberg like sea monster before turning into waves. I transferred the pattern onto the leather. Cut the right side using a swivel knife. Cut the left side. I'm very happy with the pattern and look so far. Sadly that is all I had time to do today. 15-02-15 so today I carried on making the pattern for the belt making a sun and windsurfing sections and continuing the wave pattern. Here is the windsurfing section added to the belt using tracing paper and a stylus: Here is the sun section after using a swivel knife to carve in the pattern: I only had a spare hour so that was it for today. 16-02-15 another day another spare hour. So I began tooling the pattern into the belt today using a beveler stamp. Managed to complete the sun and windsurf sections: Now I need to make some further decorative cuts to show the flow of the water on the waves and decide whether to background or not to background. 18/02/15 So I decided to stamp in a back ground. I finished off the beveling stamping from the left hand side of the belt to the center but I'm still not certain how I am going to finish the pattern off on the right hand side. Here is the finished center of the belt:
-
Hey no problem.
-
So I recently made a helmet with a wave design on it taken from a famous Japenese painting the 'Great wave of Kanagawa'. After making it I remembered I'd picked up a cool looking rusty belt buckle from Tandy leather store and decided it would make a nice design to use with the buckle. Here is the helmet and wave design: Here is the buckle: So I have made a start. The leather I have at hand was very thin so I decided to double it up, sticking it together to stitch after I have tooled and dyed the belt. I drew round an existing belt I had onto some leather I have, having mislaid my tape measure and metre stick some where! I cut a straight edge: Then used a strap cutter to cut two lengths out: Then I stuck the two pieces together. That is as far as I got today. 09/02/15 I stuck the two lengths I had cut together over night. The leather I have is old and seems quite dry and the edge of the hide is very thin. I trimmed the edges so both sides were equal and edge beveled the outside edges. I then cut a groove down the edges with a stitching groover set to 4mm. When I did the edges unfortunately the top layer of the hide started to crack in small arrow like shapes. I want to dye the edges so didn't want to add any wax or gel that might make the effect unbalanced. Due to this I dyed the edges black and then added some wax before burnishing with a slicking wheel. That is as far as I got today.
-

First Motorcycle Seat Rebuild-Progress
jshill replied to Twisted 66's topic in Motorcycles and Biker Gear
Love the tooling and dye job.


