


byggyns
-
Posts
253 -
Joined
-
Last visited
Content Type
Profiles
Forums
Events
Blogs
Gallery
Store
Everything posted by byggyns
-
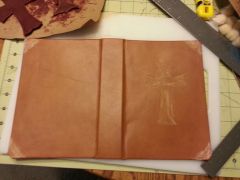
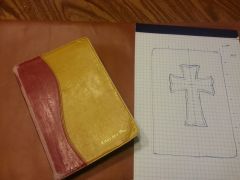
From the album: Re-binding Bible
-
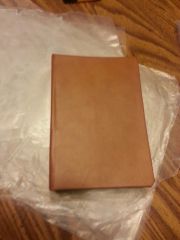
From the album: Re-binding Bible
-
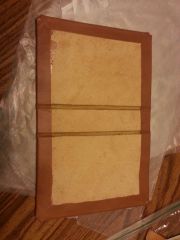
From the album: Re-binding Bible
-
8 oz veg tan and goat skin- contact cement
byggyns posted a gallery image in Gallery- Our Leatherwork
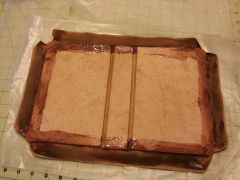
From the album: Re-binding Bible
-
From the album: Re-binding Bible
-
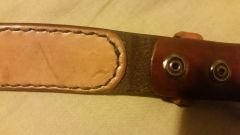
Here is the way I finished off the end of my liner My biggest pet peeve is that I didn't round the stamping design out to the right curve. I stamped before laying out the stitch line. Also, I'm probably going to make a different keeper, as this one didn't dye or crease like I want. I threw the keeper together as a last minute thing.
-
From the album: New
-
From the album: New
-
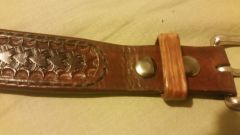
regarding your question about stitching: I grooved the belt all the way around the top piece. I used a round hole at the tip of the belt & worked back down each side with stitching chisels (the diamond shaped Tandy ones). I ended my stitching right at the end of the full thickness of the top layer- just before the skive from the belt blank started. I rounded the end of my stitch line, and the end of the liner as well. I'll have to post pics when I get home to show what I mean better. I punched into the top layer before I glued to lay out where the end of the liner would end up. After I glued, trimmed and sanded, I used the awl to put the hole through the liner while stitching. Then I edge beveled, dyed the edge, and burnished. I used resolene to finish the entire thing at the end.
-
Oblong Punch Size For Belts
byggyns replied to tardis86's topic in Purses, Wallets, Belts and Miscellaneous Pocket Items
The hole size is more dependent on the buckle than the belt. I have a Tandy size 7 (9/32 x 3/16). The buckle I use is pretty heavy duty, with a wide tongue. For a lighter buckle, I'd use size 5 (1/4 x 5/32). That would fit many western buckles, most dress buckles, and most buckle sets for smaller 3/4" to 1 1/4" belts. -
There really isn't an easier way to do it with hand stitching tools. You could use a drill press to drill the holes for your main seam, but I don't like the round hole look. You just need to sharpen that awl really well so it slides through the leather like butter. Also, you really need a clamp / stitching horse when dealing with this weight of leather. Having the ability to press a cork to the back side when pushing the awl through is really helpful, and not having to juggle the holster, 2 needles, thread, and the awl all at the same time is nice. For your first holster, your edges turned out a lot better than my first attempt. The stitching looks pretty clean as well.
-
I use scraps for simple wrap wallets, notebook covers for Field Notes sized notebooks, tabs for dees and rings on bags, interior reinforcements / washers for rivets, and straps for holsters. Most of my scraps are veg tan in various weights, but since most of what I make is holsters / sheaths, most is in the 8-10 oz thickness range.
-
I have to echo this. The awl is much too vertical. The diamond awl should have one facet parallel to the stitch line. This gives a really good angle to the stitches. Stohlman's book "Hand Stitching Leather" will give you a better illustration of the correct angle. The awl should be sharp enough to pierce your finger and you barely feel it. The same book will give you good tips on how to sharpen the awl. After it's sharpened, strop it well to polish the edge. I can push a wide awl through a 10oz piece of leather while just holding the piece in my fingers about 2" away from the awl. If your awl is a little small for the thread you are using, you can give the awl just a slight twist to widen the hole. If you sharpened the awl like Stohlman says: with a sharp point, but a dull shoulder, you won't permanently enlarge the hole & it will close back up.
-
that was actually Mark Twain; Carlin quoted it well. http://www.goodreads.com/quotes/539027-never-argue-with-stupid-people-they-will-drag-you-down To follow up on another joke someone told here: If someone is a vegan and into crossfit, which do they tell you about first when you meet them?
-
In my first and only belt project, I used a belt blank from Tandy (8-9 oz). After that was tooled & dyed, I lined it with 2-3oz veg tan. The result was a nice, stiff belt that wasn't too thick with edges that burnished easily. Hand stitching that thing took forever (about 4-5 hours). I need to lose weight to make my belt projects smaller
-
I'd point out that if she was such an "ethical vegan" she should not support the synthetic processes needed to make the imitation leather products she wants, and the vitamins she has to take in order to not die of malnutrition as a vegan. Both require large industrial facilities that use mined / drilled raw materials. Veganism is pretty idiotic. I can say vegitarianism has at least some basis in reality (still think it's dumb), but healthy veganism is only possible with modern synthetic industrial nutrition supplements.
-
Hand Stitching Beginner - Minimum Tools Required?
byggyns replied to makiba's topic in Getting Started
Basics needed are tools to mark your stitch lines: wing divider, ruler, or compass. Something to mark your stitch distance: ruler, overstitch wheel, stitching chisels or pricking irons. An awl: use a diamond awl in a middle size. Sharpen it to bleedingly sharp and strop it. I also strongly suggest a clamp or stitching pony / horse. It helps so much to have a 3rd hand while you stitch. You tend to get more even and regular stitches when you don't have to juggle the work piece. -
I think I might have taken my holster class with you. About 2 years ago?
-
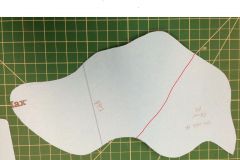
I'm glad it worked for you. I just got a new S&W J frame snubby, so I'm working up a new pattern for myself for an IWB holster. Once I finish that one, I may have to print out a copy of this page from the holster book and modify the pattern to fit the J frame. If that works, I may make this pattern longer to fit my old Model 10 4" bbl.
-
Your fold is in the wrong location / angle. fold on the red line, which is where the top of the frame/ barrel should be.
-
From the album: New
-
If you have a chance, take a look at some of the classes at the local Tandy on Morse Rd. I took their holster class to kick off my hobby, and I found it very helpful. I think their basic class goes into making a notebook cover as well as basic tooling.
-
Do All Chrome-Tanned Leathers Not Age?
byggyns replied to Acceptable's topic in Leatherwork Conversation
I also think it has more to do with the surface finish. Saddleback uses full grain chrome tan. If they used top grain chrome tan, then the surface would have been sanded, filled, and sealed. I have chrome tan that has a patina, but it all has a surface without a smooth gloss. Two pairs of my shoes from Timberland are an oil-tan style finish, but are chrome tan leather.. They have developed a patina already- within 1 year of wearing them. -
Best Type Of Leather For Belts? Best Conditioner?
byggyns replied to Acceptable's topic in Leatherwork Conversation
You can request their paper catalog. It has the wholesale prices in it. Since I'm not too far away from their shop, I stopped in last week and got a copy of the catalog. Their show room is really only good if you want to buy equipment- lots of sewing machines on display as well as clickers, setter presses, etc. If you want to pick out your own hides, they will let you go into the warehouse to do that. Their displays of hardware, conchos, buckles, etc has much to be desired. That being said, the employee said that not too many people come in to look at anything. -
Best Type Of Leather For Belts? Best Conditioner?
byggyns replied to Acceptable's topic in Leatherwork Conversation
For utility / casual belts, latigo is great. Before I started leatherworking, I bought my belts from an amish leather shop. The belts are a little stiff and thick for dress belts. The latigo, like the bridle, cannot be dyed after it comes out of the tannery. The waxes in the leather make for a great, long-lasting belt. I am wearing one right now that I've owned and worn regularly for over 12 years. It always used to fascinate me when I watched the amish guy pull the side of leather off the shelf, cut the belt strip, then finish the belt right in front of me.