byggyns
Members-
Posts
253 -
Joined
-
Last visited
Content Type
Profiles
Forums
Events
Blogs
Gallery
Store
Everything posted by byggyns
-
With my Eco-flo, I just open the bottle up and pour it into a canning jar, then slap a label on the jar and lid, I've also used old salsa jars that were thoroughly cleaned out. The wide mouth on the jar makes it easy to get a brush, dauber or sponge into the dye. If I need to get a smaller amount out (to mix or for some other use), I use a pipette or turkey baster.
-
A great resource is Al Stohlman's book "Belts Galore". It has a lot of things you won't need right now - dealing with tooling- but it is a great resource for construction techniques and designs.
-
I like the oval punches for the holes in the billet instead of round ones. - I've only bought the Tandy ones, so I can't give you any brand / quality comparisons. If you don't want to buy the slot punches, you can get away with a round punch and a straight wood chisel to connect the two holes (or a knife to cut between the holes) Strap end punches are fine to have, but not completely necessary. You can make or buy patterns and cut them by hand. I like having an English point and a round - it really depends on the look you are going for. You would have to buy them in each belt size you are doing. Personally, I hate the look of the belts made with the universal flat / angled strap end punch that Tandy sells that looks like this \_/ Regarding hole punch sizes, you have to match those to your hardware. Screws / rivets / snaps require different sized holes depending on the hardware size. Buckles require different slot hole widths depending on the tongue size. Slot length depends on the thickness of the leather (thicker leather needs a longer slot) and the buckle design. I've had good luck with a cheap set or round Chinese hole punches for a lot of what I do. I started with the replaceable tipped mini punch set, which is not as good. Once I start to break the Chinese ones, I'll invest in better quality ones. I got an Osborne round end punch in an EBay lot, and I'm pleased with how good it is; I would recommend one. They are pricey, but I can see myself getting more, and their English point punches. I really like stitched belts, but since I don't have a machine, it takes so long to do it.
-
I stop mine before the folded over area Like this:
-
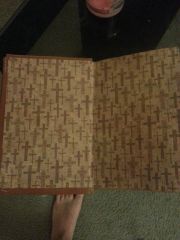
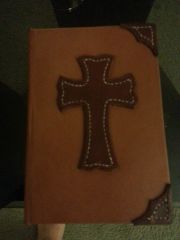
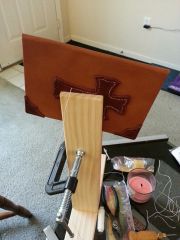
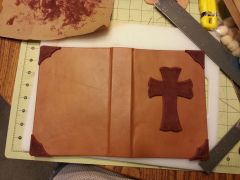
I did a project to replace the cover on a friend's bible. This is the way I went about it. Basically, I used heavy veg-tan leather (8-9 oz.) instead of book boards. I wrapped the whole thing in goatskin. I used fabric glued to the back of the book block to attach it to the cover, along with the end paper / fly leaves. this is the basic style of binding I was using: Here are the pictures of the project:
-
Is oil tanning a variant of chrome tanning?
byggyns replied to harimau777's topic in How Do I Do That?
Regarding your latigo question, my interpretation was that latigo was only veg-tanned, but is a "stuffed" leather. The waxes, oils, and dyes are forced into the leather at the tannery, which is what makes it different from typical veg-tan. From what I understand, bridle and harness leather are similar. There are chrome re-tan leathers like chromexel that use both veg and chrome tan processes. -
Tandy rapid rivets either bending or not holding. Help!
byggyns replied to nevadabob's topic in How Do I Do That?
I have to agree that you have too much post exposed. I set my double caps with the post flush to 1/16" proud of the surface. As long as the cap will center on the post, I've found that the act of setting the rivet will compress the leather around it enough to get a good flare out of the post and hold securely. -
New to leather and want to make a holster
byggyns replied to UncleQ's topic in Gun Holsters, Rifle Slings and Knife Sheathes
I have to echo the thought above that said to try out a class at a local Tandy. My entry into the hobby was a holster making class at my local Tandy. I paid $65 for the class, and left with a great quality holster, spare leather, and supplies. Then, I had to buy tools to make my next holster. Now, I'm way down the rabbit hole, and have spend lots more money on leather, tools, books, and other supplies. My $65 holster making class resulted in hundreds (thousands?) of dollars and tons of hours of commitment. I have made several holsters, knife sheaths, and many other things for myself and others. It's a great hobby, and you will probably enjoy it. Your first one will not look as good as the one you see there, but you can build a very functional holster on your first one. As you make more, and if you design them yourself, you will learn much more about how you can build holsters for many other carry styles than you have carried before. (I have a box full of prototypes now.) I've learned so many things about what not to do (and what to do) regarding comfort and access to the handgun. -
Strap cutters or plough gauges allow you to cut a long strip much more quickly than with a knife. They also allow you to get a more even result without wavy edges. When cutting along a straight edge, you can still get a lot of blade wander. That translates into a lot of time sanding and evening out the edges before you have a good looking result (if it's bad enough, you can also end up with a narrower belt than you intended). I've not made many belts, but I can tell you that cutting an even strap with a utility knife is very difficult. It still takes some practice with a strap cutter, but the learning curve is easier. I recently got a C.S. Osborne strap cutter that I will be using instead of the wooden Tandy model. I'll see if I like that one better for control. I think the Osborne will work well on heavy veg-tan, but on thinner and softer leathers, I think the wooden one that guides the leather on top and bottom may be preferable. Time will tell, as I have a few projects requiring straps coming up soon.
-
Need help dying. Leather is cracking and way too dark
byggyns replied to bigskyxj's topic in How Do I Do That?
First, dilute the dye. I begin at a 1:1 ratio and sometimes make it thinner than that. You can use denatured alcohol or 90% isopropyl. They will give slightly different color variations depending on which you use. Fiebings Dye Reducer is a mixture consisting of both ethanol (denatured) and isopropyl. Next, apply thin coats of dye. As stated earlier, sneak up on the color you want. After the dye dries completely, apply the conditioner you want: I use Neatsfoot Oil. Use light coats, and allow it time to soak in: 24 hours or more. When you start bending the leather, work it back and forth, gradually increasing the angle of the bend. Since you are using veg-tan, you can moisten the leather in order to aid in bending without cracking. After you've gotten it softened and formed, you can apply your top coat to waterproof. -
I treat with Neatsfoot. Some have said they use Lexol. I tried it once & didn't like it. First, I dye the leather, then the neatsfoot, After that I use either Resolene (spirit or oil dyes) or the Tandy pro finish (Tandy pro waterstains). I've done the wet molding before and after dying, and I'm still trying to figure out which way I like better.
-
Gold Initials Without Embossing Machine
byggyns replied to AndersenLeather's topic in How Do I Do That?
Something that I will be trying out is using acrylic calligraphy ink, then finishing with resolene. I have the ink from doing calligraphy as another hobby, and with the fact that so many leather products are so similar to other acrylic art supplies, I'm going to give it a shot. It probably won't be soon, but I'll try to remember to post a sample when I do it. -
I seriously can't understand what this means. Punctuation and capitalization subdivides different ideas to make English comprehensible. I get that there is something at the library called the Thomas Registry, but after that, I can't understand what you are talking about.
- 7 replies
-
- chrome
- chrome tanned
-
(and 3 more)
Tagged with:
-
Collecting Tools -Antique, New -Need Em All! ;)
byggyns replied to Erystawi's topic in Leatherwork Conversation
I found a stitching clamp at an antique store that has a really cool iron handled adjustment nut & what appears to be a hand forged loop on the adjustment bolt. The wood is old barrel staves and the hinge has some cool old hardware to hold it to the staves. Unfortunately, I didn't take pictures before I put leather over the hinge (to protect my wooden chair from the hinge while stitching), but I'll try to post pics soon. And yes, I go to antique stores to fuel my collections of cool old stuff: both tools (leatherworking or otherwise) and fountain pens. You really can't have too many tools, and the old stuff is so good. -
The way I do it is to glue, trim, then sand the edges before running the groover. Then after I make the groove, I'll stitch, use the edge beveler to round the edges, then burnish the edges. Regarding your utility knife, if you take a new blade & strop it, you will get a much better cutting edge that will last longer than if you just used the blades as they come. If I keep stropping one blade, it seems to get better each time I refresh the edge. When it gets dull & starts to drag, hit the strop. Make sure your angle when you strop stays the same as the blade bevel. Regarding the groover, I sharpened mine with a fine stone, then stropped it. To strop a groover, cut a nice deep groove using multiple passes of the groover into some thicker leather scrap. Load the groove up with some jewelers' rouge, then run the groover blade backwards through the groove. if you have a very small needle file, you can clean up any burr on the inside of the hole in the blade. I've heard of some people using a string with grit on it to do the same thing, but I haven't gotten the right abrasive to try that trick.
-
The first thing to do is to refresh the leather before you seal it. I would suggest cleaning the leather with Lexol, using the Lexol leather conditioner to bring back some of the suppleness to the leather. Then you can use a sealer. Unfortunately, I don't know what sealer you might use. I have had good luck with the Lexol products on jackets & upholstery to give them a nice refresh & regain the flexibility & supple feel. If the jacket isn't black, you will want to test the conditioner on a non-visible spot first as it can darken the color.
-
I've used the Tandy Pro Waterstains. They go on easily and the dyes stay put when exposed to water. I've only once used resolene over them and it has rubbed / flaked off. I've gone back to what I used to begin with, the Tandy Eco-Flo professional gloss finish. It plays well with the pro waterstain. I've used it on IWB holsters and had no rub off of finish or dye onto my clothes. So, it would probably work for belts as well. I haven't used Tan Kote, so I can't tell you how well they play together.
-
I use he Tandy Pro groover with the blade in the center and guide that hangs out on the side. When I thought it was too dull, I sharpened mine a little with an extra fine stone, then stropped it to polish the edge. There's a video on YouTube that shows how to set up a strop for groovers. It is really easy to use, but I always screw up at least one small spot on a curve and let the groove get a little too close to the edge. Whenever you change direction, you have to slow down and keep that guide on the edge of the leather. Taking the guide off and using it freehand works well for stitch lines on the holsters I've made.
-
I just (finally) posted pictures from a project I did over a year ago. Take a look at this and let me know if you have any questions about what I did. http://leatherworker.net/forum/index.php?showtopic=68208 The pictures are mostly of the cover construction. The book block was attached to the cover via cotton muslin. I used heavy kraft paper fly leaves, then attached the decorative fly leaves to secure the muslin to the cover and book block. I needed it to be tough because my friend took it around the world with her for a year & lived out of her backpack.
-
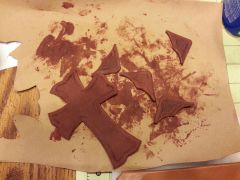
I did this over a year ago for a friend from church who was going on a year long missions trip. She's back now, but I never got around to posting any pictures of it. The book block needed some repairs, so I used linen tape to get everything back in shape. I didn't take any pictures of the actual binding to the cover, just of the new cover I made & the end result once I bound the book block into the new cover. Hopefully this will give a little bit of help if anyone wants to tackle a project of replacing a worn out cover on a book. The starting point: the old torn up Bible, goat skin for the outside & a concept drawing of the final look for the cover. The goat skin wrapped around the 6 oz pieces I used a book boards: glued using Weldwood contact cement
-
From the album: Re-binding Bible
-
From the album: Re-binding Bible
-
From the album: Re-binding Bible
-
From the album: Re-binding Bible
-
From the album: Re-binding Bible


