AdamTill
-
Posts
112 -
Joined
-
Last visited
Content Type
Profiles
Forums
Events
Blogs
Gallery
Store
Everything posted by AdamTill
-
Leather In The Garage? Around The House?
AdamTill replied to Shorts's topic in All About Us and Off Topic
Have you seen Keith's site here?: http://www.cowboyinterior.com/Cowboyinterior/Project_Photos.html When I found that I got all sorts of really time consuming, unfortunate ideas! -
Broken Fork Of Treeless Stock Saddle
AdamTill replied to troy's topic in Saddle Identification, Restoration & Repair
Ignoring the staggering design flaws of a treeless saddle with fibreglass parts, to properly stop a crack in fibreglass you really need to drill a small hole at each end of the crack. That reduces the stress concentration at the end of the crack, and prevents it from spreading. Then, you sand the length of the crack on both sides so you're down to the bottom of the crack in the mddle (essentially create a v-gouge). Finally, build up the thickness again using strips of fibreglass and resin, layering strips that get wider and wider. Your idea of filling the fork with expanding foam should help to prvent cracks again, since the fibreglass isn't as likely to flex and buckle. You can use epoxy over polyester or epoxy, but you can't use polyester over epoxy. The odds of this cheap saddle being made from epoxy resin are basically zero, however, since poly is much cheaper. This is overkill for a fundamentally flawed saddle, but there you go. -
Issues With First Pair Of Chinks
AdamTill replied to AdamTill's topic in Saddle & Tack Maker Gallery
Thanks gents - sounds like I need to get some photos to be more descriptive here. They hang below my belt fine when I'm standing, but as soon as I get on the horse they ride up over top of my belt. That's what led me to believe the upper length was too long. Will report back as soon as I can. Thanks again! Adam -
Hi folks, Hope you don't mind my posting this here, since lots of you folks both make and use use chinks as well as saddles. I recently finished my first pair of chinks, and while they turned out pretty decently I think and I got some great feedback in another forum here, over the last couple of weeks I've determined that I don't particularly like wearing them. The beltine hangs well when walking in them, but on horseback the leather kinks between the sidepanel and belt yoke , and the belt yoke rides up over my jeans belt. It's then a little tricky to get my mecate through my belt, and they end up not quite sitting right since the mecate holds one side down a little. The beltline riding up is annoying since they catch me in the ribs every now and then when my horse makes a hard turn. I'm guessing this isn't normal, but I'm new to chinks...is it? Did I get the measurement wrong from beltline to top of leg? My horse is extremely wide, and I'm not sure if that's exaggerating the fit issues. Also not sure if 7 oz leather was right for the carved panels, since they don't seem to want to bend at all which might be making the kinking of the chap leather worse. Not sure it it would be worth trying to move the panels down a bit by popping all the stitching and trying to unbind them, if I should just try to sell them, or if this is something that needs to "break in" I've ridden dressage and jumping horses for years, but I'm pretty new to the buckaroo and vaquero traditions, having had my first real introduction a year ago riding with Richard Caldwell. I bought some tall western boots recently, and I hated riding in them as well...I missed the freedom of ankle movement that I got while riding in english paddock boots. I'm just glad Andy is making me a saddle in the next little while...it'll be nice to have gear from someone who knows what they're doing before trying something else on my own! Thanks for any thoughts, Adam


-
Sorry, you said brand, not model. It's likely a Stubben Icelandic (ala: http://www.google.ca/imgres?imgurl=http://www.horseclicks.com/photos/saddles/08/22/9504-1-x.jpg&imgrefurl=http://www.horseclicks.com/saddles/d9jklv/&usg=__mHWxD-bUSvoHNJM5m5TQ9YshrmU=&h=360&w=480&sz=51&hl=en&start=0&sig2=i52z23iSY6e8rX5QF8451w&zoom=1&tbnid=rQbhUTfjLWJX1M:&tbnh=153&tbnw=204&ei=AiEZTp2VM-230AGh0YWXBQ&prev=/search%3Fq%3Dstubben%2Bicelandic%26um%3D1%26hl%3Den%26safe%3Doff%26client%3Dfirefox-a%26sa%3DN%26rls%3Dorg.mozilla:en-US:official%26biw%3D1440%26bih%3D658%26tbm%3Disch&um=1&itbs=1&iact=hc&vpx=949&vpy=183&dur=63&hovh=194&hovw=259&tx=110&ty=94&page=1&ndsp=20&ved=1t:429,r:11,s:0&biw=1440&bih=658)
-
First Pair Of Chinks Finished
AdamTill replied to AdamTill's topic in Clothing, Jackets, Vests and Chaps
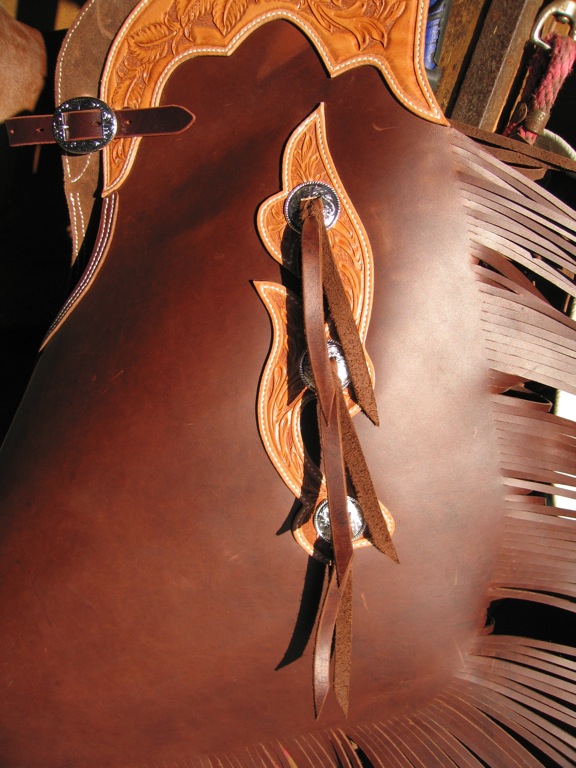
Hi Mark, >First just want to say Thank You for the kind words about the DVD. Not a problem, I meant them. >Next I will say that you did a great job on them. The tooling look well done for a first time. I really think you took the DVD and then put >you ideas into your chinks. The hand sewing look well done. Thanks much! The hand sewing should be strong, and looks good on the front, but I need a lot more practice getting the even lines on the back. Some of the issue came about in that I needed to get these done for next week for a vaquero horsemanship clinic, and so had to buckle under into using a Tandy awl blade instead of the Bob Douglas blades which SHOULD be here whenever the backlog from the postal strike clears out. I've been waiting a couple of months to get them from my local leather supply place. The other was the jaws of my stitch horse aren't quite deep enough to easily clamp some of the angles when stitching especially the belt yoke. I end up rolling the leg up as much as possible, but then the jaws don't close completely. Have to do some more thinking on that end (or buy a sewing machine, I guess). >I do see somethings I might work on but are not done badly at all. >First is that I would start cutting the fringe at more of an angle so that as you go around the corner it will take less wedge cuts and it >will also help the fringe to hang better down the side. Thanks again! I guesstimated at the angle based on what you'd shown on your pattern, but I could see pretty quickly once I was started that a steeper angle would have helped. That was compounded by the leather I chose, which isn't quite as compliant as some I've seen since (nice leather, just a bit too much body). Thinner fringe may have helped that. >In picture #4 you can see that a few more wedge cuts would have helped the fringe hang straighter sooner as well. I had already taken about 7-8, and was worried about losing too much leather. Probably would have been the proper decision though. >Next I would not have cut a border around the yoke just because I think it would look better where you did not back ground all the way out to >it. IMO Yep, my mistake there. The original pattern called for the partial bargrounding with no border, but I think I had been so used to cutting a border that it was habit. >Thanks again for the kind words about the DVD. I hope to have a pattern pack ready with carving patterns for my yokes and side panels as well. >I have some great Carvers working on patterns for it, guys like Troy West, Steve Brewer, Andy Stevens, Bruce Johnson, Clay Miller, and Bob >Park. It is looking like a very cool pattern pack with many different styles to look at. Sounds good, I'll look for it. Any chance you could send an electronic version (like a pdf or something similar) instead of the printed copies with an order? I'd like to order the tap pattern after the clinic, but since I'll end up scanning it anyway that would save tiling the images back together in photoshop. I generally do all my layouts on the computer. Any plans for an armita pattern? Cheers, Adam >Just a couple of things. First, a really admirable job on your first chinks. Anyone would be glad to have and use them. That said, just a >couple of comments, I echo Marks' commments on the fringe. Here are a couple of pics to show what he is talking about. One has twisted fringe, >but ; they are cut the same way. Second, where the reinforcement is sewn on the top inside of the leg, I see that it stops just short of the >yoke. I like to have it go up under the point of the yoke an inch or so. I skive it dorn to about 1/8 th thickness as the end so it does not >create a bulge there, but it allows for much better strength at the point of the yoke and will be more durable. Hi Bob, Thanks for your comments as well! I definitely goofed on the reinforcement, and that became obvious after everything was together and I went back and reviewed Mark's DVD again. After next week I'll probably pop some stitches on the reinforcement strip and yoke and stitch a skived bridging piece in there...may as well fix it properly. The other thing that didn't go quite to plan is that I must have mis-measured my knee measurement, since the upper leg strap fits great at the middle hole but the bottom one isn't quite where I'd like it even on the tightest hole. Not sure if the measurement was off or I leaned the concho reinforcement side panel too far, but I'd like to fix that too. Don't have time to pop the six rivets, trim the leg, and sew on a new doubler there this week, but I'll get it in a little while. I'd rather do it properly then try to rush through a fix right now Thanks to you all! (cowdog128 as well for the nice words!) Cheers, Adam -
How much is the set, by chance? I've looked through the whole site and couldn't see a price listed. Cheers, Adam
-
Looks like one of their Icelandic models. Beware the extra long panels that sometimes come with such saddles. Cheers, Adam
-
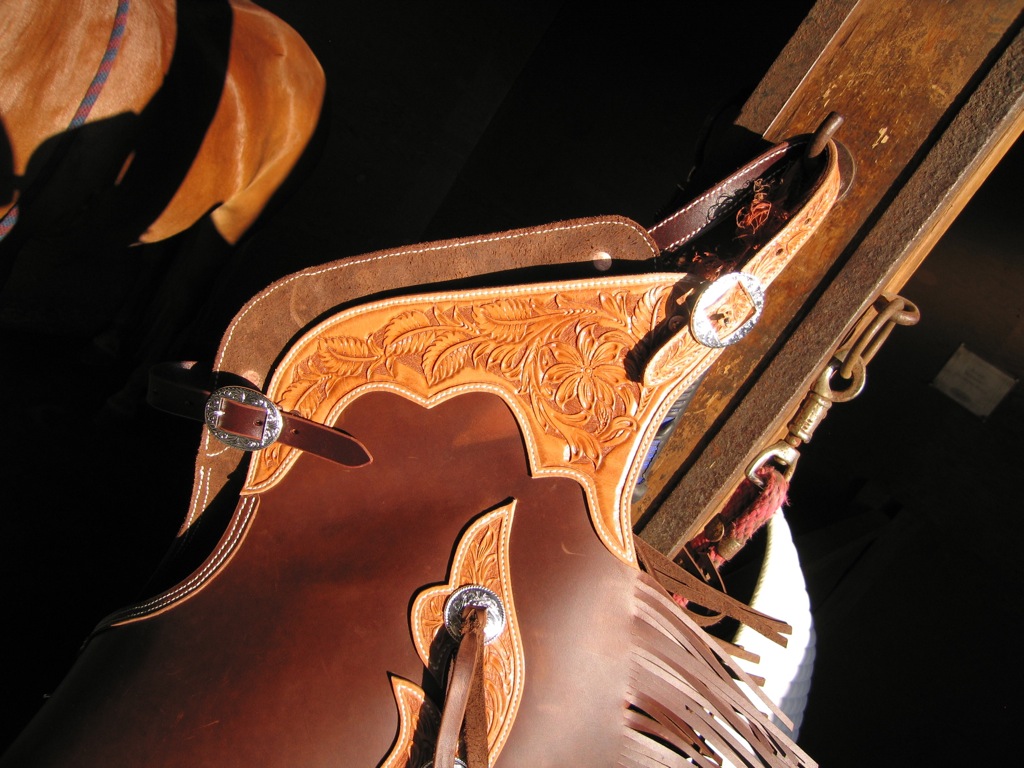
Hi folks, First off, I wanted to thank MarkB for making such an amazing video on making chinks - it was invaluable for a newbie like myself in making sure I didn't make any critical errors. Thanks also to Chan Geer for the carving patterns, which I adapted from his belt pack and chaps trim pack. This project was actually a bunch of firsts for me: first chinks, first sheridan carvings, first time hand sewing, and first time using my newly completed stitching horse. Lots of obvious places to improve, but overall, I'm quite happy for a first effort, and they seem to ride well (my horse was fascinated by the fringe). The trickiest parts were bargrounding (by the end it started to look okay), getting an even stitch line on the backside (clamping was tricky in some spots), and working quickly enough on the carving side to not run out of moisture. The carving pattern on the belt was a bit of a bad choice - when rubbing the edges, I tended to roll them over the pattern a little since the border was only about a eighth of an inch wide. Anyway, thoughts would be appreciated! Cheers, Adam


-
Australian Saddle Questions
AdamTill replied to The Farmers Daughter's topic in General Saddlery Discussion
I'm not sure if you're right or wrong, but I don't think you're too far off. I've had a bit of a process on my hands in order to find a saddle to fit my gaited Icelandic, for example, and he's very wide, short-backed, and with pronounced shoulders. I tried to find a stock saddle for him a while back, but couldn't find a fit that I particularly liked. Even finding an english saddle was a challenge - I took a model of his back to one of the tack stores around here, and we must have tried 60 odd saddles over two visits and only found one that fit. That saddle fits him fine, but is a bit small for me. When I eventually conceded that I needed to get a saddle done by someone who made their own trees I contacted Andy Knight, who came out to measure my horse when he was in town. Andy brought out Dennis Lane's card set (developed in Aus), and discovered that while my horse fit the middle rock profile, even accounting for the horse being overweight he was wider then both the widest front and rear profiles. So, if Dennis' system represents the range of back shapes he usually sees over there, then I'd likely have the same trouble that you did in finding an Aussie saddle to fit him. Cheers, Adam -
It depends on how the conchos are setup, since I've seen quite a few different versions. The simplest are conchos with two chicago screws set apart at 12 o'clock and 6 o'clock. You punch a big hole for the button in the middle of the border circle, add a slit to allow them to be placed over the button, then two smaller holes for the chicago screws. Installing is a simple matter of bolting/lock-titing the concho onto the strap after the strap is placed over the spur button, as the concho covers the slit in the spur strap. I've seen another type done where the concho has a loop back and single chicago screw. For those most guys seem to make a small separate strap of leather that's punched and slit to go over the spur button, and then has a smaller hole for the chicago screw. On the spur strap body there is a slot for the loop and a hole for the shank of the tapped chicago screw housing. To install, the concho is first pressed onto the spur strap body. The small strap is slipped over the button, slid through the loop back (binding the concho and small strap to the body of the spur strap), then secured with the chicago screw.
-
I've never tried to use a screw on concho before, but could you try finding a Robertson wood screw with the same thread pitch and shank diameter? You could cut the threads with the screw first, then follow in with the concho afterwards.
-
Neat Lac Substitute
AdamTill replied to impulse's topic in Dyes, Antiques, Stains, Glues, Waxes, Finishes and Conditioners.
I was told that quite a few guys around here are using Pledge with Future Shine floor polish as a subsitute. I gave it a go on some spur straps a week ago, and it seems to work fine. Google tells me that in Aus that product is sold as Pledge One Go. Might be worth a try. Cheers, Adam -
New Custom Saddle - ? Cinch Placement
AdamTill replied to goldpony's topic in General Saddlery Discussion
Icelandic tank owner here. When I finally finish a tree that fits my guy, I'll be using a joined/pack cinch like this: http://store.artcord...cinch-p180.aspx They work quite well on these sorts of horses. Edited to add a photo of my horse in a borrowed Harwood saddle (93 degree tree). The owner had ridden a couple of Fjords in it the year previously, and said the saddle (and cinch, by extension) fit reasonably well. It was okay for my horse, but could have used a bit more rock I think. I think he would have been a bit happier in the pack cinch, but this worked fine for the clinic in question. . Cheers, Adam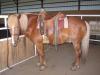
-
Don't remember the particular shot, I'm afraid (boiled brain by the end of the day), but it wouldn't have been a slide stop because there aren't furrows behind the horse. I'd imagine Richard was backing in preparation to roll him over his hocks to the right. The degree of gathering up that Richard is able to achieve is just unreal...his lateral work puts any dressage horse I've seen to shame. More like a combination of a spanish bullfighting horse and a working cowhorse. Cheers, Adam
-
Here's another good image David (linked from http://www.westernhorsereview.com/wp-content/uploads/2010/09/caldwell4721.jpg). It was taken at a clinic done by Richard Caldwell in Nanton this year (that's me in the right corner...GREAT clinic). I'd also really recommend Dr Bennett's class. I took it a few years back up here in Alberta (Ft Mcleod), and it was great to see in person muscles and structures that I only new from name before (the poas complex was especially fascinating...got some great photos). Cheers, Adam
-
How To Shape Tree Bars - Tools
AdamTill replied to AdamTill's topic in Saddle Supplies, Tools & Trees
Thanks Denise! They're just across the street from where I work, so that'd be handy to pickup, and I have a grinder that would take that disc. Thanks also to you and Rod for the info you've put on your site - it's been an invaluable resource for me so far! Cheers, Adam -
Hi folks, I recently completed my first tree, and guess what...doesn't fit anymore! Shame too, since I think it would have made a pretty saddle: Not sure if my horse has managed to get wider or fatter since I first measured him , but there's about 3/4"-1" or so of rock that needs to be in this tree that just isn't there. This one might fit when I can get some of his weight down (we've had SO much rain that it's been a losing battle this year), but really doesn't right now. Sigh. At any rate, since this one took me almost 6 months to make, I'd very much like some advice on how to properly shape bars WITHOUT it taking another six months to do. Granted, I learned lots doing this one, and a lot of the previous time was taken in figuring out the shapes required, but clearly there are some economies of time to be had. Since I live in a townhouse with a single garage, my large power toolset is relatively limited, and needs to be portable so I can make room for the truck to live indoors (car on the drive). As such, I have a 4x36" belt sander, 57" bandsaw, and dremel tool that did the majority of the work on this one. From reading I've done online, it seems a lot of folks to the large sloping cuts with a significantly larger bandsaw. That said, I've seen pictures of spokeshaves and such as well. Any helpful pointers? Thanks folks, Adam PS - hints on carving forks would be welcome as well. I suspect 15 bands for my dremel isn't the most efficient way of doing this.
-
Thanks Darcy, much obliged. On the width issue, I had thought that you had custom stirrups done for a 2.5" width. If it's just a matter of reducing the spacer, that's not a big deal. Thanks again, Adam
-
Hi Darcy, Very nice rig, I sure hope your customer was impressed. I plan to get leather for a lightweight saddle from Ken at Caledon, especially since he's local. When you mention light or medium weight, what does that translate into in terms of weight in oz or thickness in mm? How light are you comfortable getting without a special order? Curious where the narrower stirrups came from as well, if you don't mind. Thanks much, Adam PS - nice saddle there as well, Justin - hope mine come out half as nice!
-
I have an Icelandic, so I can feel your pain! I'd recommend going to someone who either does their own trees, or works with a good tree maker. The short saddle fitting zone on these types of horses can drive you a little buggy, as I'm sure you know. I borrowed a very nice Harwood-made Wade last week at a clinic, and the fellow who owned it had mentioned that he'd worked some Fjords in it when he took them in for training (saddle had full QH bars, 15.5" seat...not sure of the fork angles). It fit my Icelandic well when placed behind the shoulder, but it was so long on him that it sat well into the loin area. Horse didn't mind for a day, but I'm not sure I'd want to be sitting that far back on a regular basis. Dave Genadek (www.aboutthehorse.com) would be another good source to check out.
-
Thoughts on fiberglass trees.
AdamTill replied to Hidemechanic's topic in Saddle Supplies, Tools & Trees
Hi folks, Regarding the health concerns with epoxy, it's a good idea to be careful, but the problems aren't something that will be instantly toxic (ie, a fair amount of bioaccumulation is required). For example, hobbyists's using a little bit every few weeks may be able to take no precautions what-so-ever and get away with that, but yet I've learned that a lot of folks who set out to build a 'glass 40' sailboat won't be able to finish the 3-4 yr project due to massive allergic reactions from exposure towards the end (even with a full-body positive pressure painting-type outfit). When I work with resins I wear long sleeves, disposable gloves, and a chem-vapour safe respirator with replaceable cartridges. I'm actually more leery of spray paint then I am of epoxy, but I certainly respect it just the same. Hope that helps, Adam -
Thoughts on fiberglass trees.
AdamTill replied to Hidemechanic's topic in Saddle Supplies, Tools & Trees
Hi Ron, Actually, carbon fibre is stiff as all heck, and will shatter if flexed to any great degree...that's why it's perfect for aircraft spars, car parts etc etc. If you want something to be relatively flexible or impact resistant, then kevlar is the way to go. The huge difference in properties between carbon and kelvar is why those hybrid-woven cloths make no sense to me...the carbon will fracture long before any load is taken up by the kevlar. Pretty though. Vaccum bagging is probably the best way to apply cloth to an existing part, though it would be tricky to get the bag to conform to a built tree I'd think. I'm in the process of making a set of molds for a tree, which is how I'll do things, but can't really start until I get my shop setup after moving (another month or so). Cheers, Adam -
Thoughts on fiberglass trees.
AdamTill replied to Hidemechanic's topic in Saddle Supplies, Tools & Trees
Hi Jon, It does affect final strength, yes, so it would be prudent to do some tests beforehand. Then again, so does curing at anything other then the manufacturer's ideal temp and about 1000 other things... Cheers, Adam -
Hi folks, Where would you all recommed that someone new to saddle making pick up their first set of good quality tools? Thanks, Adam