dickf
-
Posts
442 -
Joined
-
Last visited
Content Type
Profiles
Forums
Events
Blogs
Gallery
Store
Everything posted by dickf
-

Different Leather, Dfferent Results
dickf replied to malabar's topic in Gun Holsters, Rifle Slings and Knife Sheathes
That was my first thought too. Bridle leather is still vegetable tanned leather. Does Weaver sell a variety of different leather from different sources? I thought they sold Hermann Oak exclusively. -
Thank you, Kevin! I totally agree, the Angelus line is nothing but top-tier products.
-
Thanks, BEARDOG! I use (surprise surprise) Angelus 600, painted on with the same type of foam brush.
-
Honestly, there's nothing to it. I dye the inside to all my gear black, so I do that first. Then I glue the holster, sand, bevel the edges, run the groove around the edge, then dye. To apply the dye, I use the dense foam brushes from Lowe's or Home Deport - not the super loose foam from the 20 cent brushes. I dip the brush in the bottle of dye, and paint it on until it looks like I've coated everything evenly. I let it dry, usually overnight, buff the excess (with Angelus, there's usually very little if any), then stitch, mold, etc. If you haven't used any of their dye, you don't know what you're missing. Fiebings isn't that great, and airbrushing gives little to no penetration of the dye. I used to airbrush Fiebings spirit dye before I started with Angelus stuff - never again!
-
Not at all - that cordovan brown is full strength liberally applied with a foam brush. That's the beauty of their dyes.
-
Thanks for the nice words, guys. @Abram - It's Angelus dye. They're the only ones I use anymore because of their awesome ability to penetrate deep and be even as can be all on their own. @Denster - The shark is about 3oz and I sand down the leather for the loops from 7-8oz leather.
-
I'm particularly fond of this color combination. It's cordovan brown with black shark - I think it's classy. Anyway, gun is a SA Micro 3", leather is 8 oz WC. All comments/critiques welcome. This one was my first shipped holster of the new year - Happy New Year!
-
How I Do My T-Nuts For Iwb Loops
dickf replied to jlaudio29's topic in Gun Holsters, Rifle Slings and Knife Sheathes
They always look nice when sandwiched like that, but what happens if a customer cross-threads them? It's for this reason that I make mine accessible/visible from the back side of the holster. Something to think about. -
Light Brown Dye Too Dark
dickf replied to jrvinny's topic in Gun Holsters, Rifle Slings and Knife Sheathes
My experience with light brown is a very long and crappy road. Getting the perfect even shade of brown WITHOUT an airbrush was like chasing the dragon for me. This is Feibings Saddle Tan Pro Dye on Hermann Oak leather. This was a test holster, so nevermind the wonky outer stitch line This holster was dip-dyed and before molding, was the perfect shade of brown and was nice and even. Then I got it wet... It was at this point that I swore off of Feibings dye forever and switched (almost) exclusively to Angelus products. I've never been happier. The only way I use saddle tan anymore, and I still do, is to get the very light tan color like this: To get this shade, I dilute the hell out of saddle tan dye and give it a soak. I forget the ratio off the top of my head, but I think it's something like 15:1 (yes, really). As of late, I broke down and bought some drum dyed brown and I tell you, I'll never go back. You can dye the brown leather black or keep it brown and bypass a whole step in the process. Good luck! -
+1. I emailed John Ring a very long time ago regarding this misprint in his catalog. The P-64 and Makarov are nothing alike, and 1 won't work for the other.
-
A Favor From Those With A Lcp
dickf replied to dickf's topic in Gun Holsters, Rifle Slings and Knife Sheathes
Rayban, This is perfect, thanks so much! -
A Favor From Those With A Lcp
dickf replied to dickf's topic in Gun Holsters, Rifle Slings and Knife Sheathes
@jlaudio29, I thank you for your offer. If I can't get a scan of it, I will certainly take you up on it. @Rayban, PM sent. Thank you! -
Hi all, I was wondering if someone could do me a solid... I really need a scan of a Ruger LCP blue gun or real gun. The catch is that I need it full sized @ 300 dpi/ppi. Can anyone help? Thanks!
-
New Owb For My J-Frame
dickf replied to markush's topic in Gun Holsters, Rifle Slings and Knife Sheathes
What's not to like? The leather looks to be of good quality and isn't overworked, the color is nice and even, and your edges look great! The stitch line is the only thing I'd concern myself with regrading function. I will say that I think it would be in your best interest and good form if you make this pattern for personal use only and don't start selling it like others have. If you're going to improve upon it, know why you're doing what you're doing, test the hell out of it, and sell away! -
Can I get a link, photo, or PM with the info about this press? Thanks!
-
Yeah, it's drum dyed WC leather split to 8.5oz and holstered. I needed the leather quickly, so I didn't opt for it to be refinished after splitting. The color is deep on the grain side, but is not struck through to all the way to the back. I like to dye all of my holsters black on the inside, so I probably wouldn't get it refinished in chestnut, anyway. I would, however, opt to have it done when I order some black. It's very nice leather and makes a great holster, in my opinion.
-
K-Man, thanks for the offer and compliment - I do need to get together with you some time. I'm not particularly interested in a vacuum because I'd like to be able to use the press as a small-ish clicker at some point. I'd love to see photos and/or hear what you've got - it sounds like what I'm after. @MADMAX - Thank you for the nice words! I'm using 277 top and bottom, although I swear my black thread seems slightly smaller than my white and brown thread. I use bonded nylon. The machine I'm using is a Neel's model 5, which I believe is commonly sold as other brands/names depending on who sells it to you. Ryan Neel is a great guy to do business with, though. I usually back stitch 2-3 stitches at the start and end, and always make a point to rotate my piece counter-clockwise to do it. After the backstitches are in place, I put a drop of super glue on the knot in the back and pull the knot into the middle of the leather. Once it's dry, I snip the ends and then melt them. The result is a very strong endpoint that would take a lot of deliberate force to undo. Side note: since the beginning of the year, I've been putting kind of a 'swoop' on the front mouth of the holster to accommodate crimson trace grips. Seems to be working well and adds a unique touch, I think.
-
Thank you for the kind words. I try hard, and am reasonably pleased with my results...most of the time. I think a press is on my short list. Any suggestions? @Eaglstroker - The color is the same in the 2nd and 3rd photo, believe it or not. It's all lighting - the Glock was shot sitting in the kitchen sink! The true color is between the top and the bottom. It's drum dyed chestnut brown.
-
Pancake for a Govt 1911 black on black Same pattern in brown with black thread Pancake for a G19 I find the Glocks especially challenging and it has taken several tries to get the stitch line in close. Comments/critiques welcome.
-
A Few New Items We Are Now Making
dickf replied to goodfella's topic in Gun Holsters, Rifle Slings and Knife Sheathes
I'm not knocking your leather skills, because your edges look great. I stand by my comment that a 'one size fits all' or 'most' is not an ideal way to make a holster. But you're right, it's my opinion. Have a nice day. -
A Few New Items We Are Now Making
dickf replied to goodfella's topic in Gun Holsters, Rifle Slings and Knife Sheathes
It appears as if the rivets are there to hold the holster together. A 'one size fits most' approach. For holsters, not a good route to take. -
Because it's covered with elephant and not heavily molded on the outside, it's really hard to tell without having my hands on it, but, it looks like it's an ideal distance at the rear of the trigger guard but then drops away from the gun near the curve of the guard. The line deviates away from the trigger guard at the front and then moves into the straight run for the dustcover (which also looks like a good distance). My only suggestion left on the stitch line is to correct it at the front of the guard like the drawing I posted. You can see a clear void where the line should be to follow the gun and where it is currently. The goal is to eliminate that void. Keep in mind that the trigger guard for a 1911 isn't anywhere close to the thickness of the slide. I'm not saying that my opinion is best or that it's the only way to do it, so I hope I'm not coming off that way. I'm just giving you advice that I've gleaned from experience, some of which was disappointing after putting things to hard use. I suppose it's an attempt to save you and others time, effort, and money.
-
A Very Unusual Result
dickf replied to Lobo's topic in Gun Holsters, Rifle Slings and Knife Sheathes
Honestly, that is simply stunning. I've seen the striations in horse before, but when paired with that color and that particular piece, that's definitely the most unique I've seen. Well done! On a side note, if you take your curves nice and slow with that machine you can avoid the different stitch lengths and the need to go back over stitches already laid. -
That stitch line is definitely much better, but could still be closer. Think about the profile of the gun and it's curves. The 1911's are my favorite to build because they are so thin compared to plastic guns, you can really get a tight line tucked in there. Also, I think your slots should be rounded, not squared off like that (for the same reason as outside corners). My suggestion is to forego the exotic hide at the moment and concentrate on getting the pattern absolutely right. Once you've locked it down, you can add whatever bells and whistles you want. Keep it up!

-
Second Holster Completed
dickf replied to mlapaglia's topic in Gun Holsters, Rifle Slings and Knife Sheathes
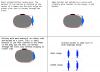
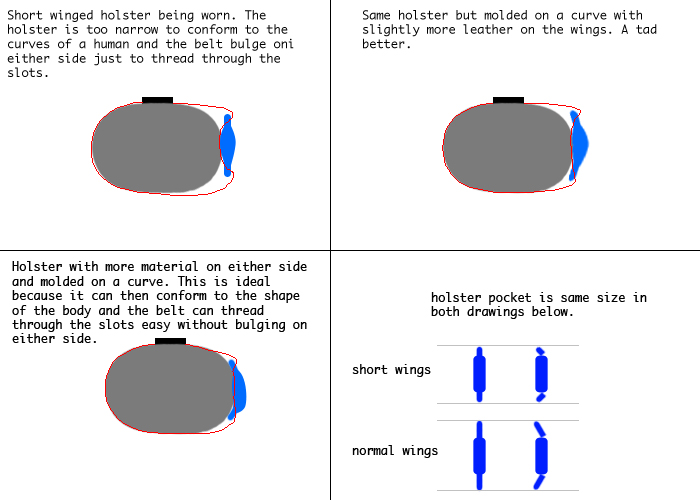
I realize I never responded... I think it looks like it was too wet because, as you said, it was molded twice and is clearly overworked. I'd be interested to see your next one, as I'm sure you've learned a lot from this one. On the subject of the 'wings' of the holster and belt slot placement: I also agree than your slots, specifically the front slot, is too close to the gun. There is no way, when looking at the profile pic (number 4 in your first post of the thread) that I could thread my gun belt through the holster. jlaudio is correct that when worn, the user's curvature of the hip combined with the tension of the belt would put too much inside pressure on the holster. This does three things that are undesirable. First, it's terribly uncomfortable and can hurt your hip bone when worn for extended periods. Second, it puts too much force on the gun in the pocket and will make it an absolute bear to draw (if you can even get the gun out). Lastly, the holster will stick out like a sore thumb because it doesn't have enough leather fore and aft to curve to the user. I submit my crappy drawing to attempt to illustrate my point. The wings are not there to solely serve the slots a place to live - they are essential in setting the platform for the holster itself and dictating it's profile on the wearer. The rear slot (which we want placed close to the trigger guard, but not too close) is responsible for helping to tuck the gun butt into the user's side. The front slot needs enough room to help the holster curve and keep the profile of the holster smooth and flowing with the contours of the body. This advice is from experience - I have holsters in the bin that can't even be drawn from, let alone threaded with a gun belt. Good luck!