


dickf
-
Posts
442 -
Joined
-
Last visited
Content Type
Profiles
Forums
Events
Blogs
Gallery
Store
Everything posted by dickf
-
To be clear, these sites are not 'storage' sites as much as they are hosting or 'sharing' sites. Most of these will take your high res photo, compress the hell out of it, and resize it to their own max resolution to keep the file size small. They are no substitution for saving your own photos in their original format on your computer. With that said, if I have a photo I want to post on forums and I know I want to keep track of it, I use Photobucket. If I have a quick photo I want to share and don't want to mess with logging in anywhere, I use TinyPic (another Photobucket service). http://photobucket.com/ http://tinypic.com/
-
 How big is the piece? Your gear looks great - that shark really adds a beautiful contrast.
 -
Its Gonna Be A Long Weekend!
dickf replied to RWP's topic in Gun Holsters, Rifle Slings and Knife Sheathes
Nothing like the 1911 platform for some serious work and fun times at the range. Here's my daily companion -
S&w J-Frame - Pancake
dickf replied to particle's topic in Gun Holsters, Rifle Slings and Knife Sheathes
I made one quite some time ago as a prototype and I scalloped the cylinder area. Mine's an IWB, but I would use the same concept in knocking up a pancake if I were tasked with it today. -
First Try With Hermann Oak Leather
dickf replied to Shooter McGavin's topic in Gun Holsters, Rifle Slings and Knife Sheathes
Looks good, Shooter! Did the holster firm up for you after molding? It almost looks like heavier leather than 7/8. -
Gun Profile Stitch Lines
dickf replied to Shooter McGavin's topic in Gun Holsters, Rifle Slings and Knife Sheathes
I use Photoshop to lay out my patterns. I scan the gun and bring it in on top of the pattern. I then use the pen tool to trace the outline on both sides. Once I have both sides as paths, I can position them precisely with the ruler tool. The distance from the guns outline will be determined by the thickness of the gun itself and the leather you're using. That's how I make every pattern I have and how I get my lines to hug the profile. -
My First Paying "customer" :)
dickf replied to CrashInBlack's topic in Gun Holsters, Rifle Slings and Knife Sheathes
I think it's a great start and really well if it's your first, second, or third. The pattern has it's flaws, though. The most obvious one, to me, is that the rear 'wing' is going to conform and bend to the curve of the users' hip but it's not going to bring the rest of the holster with it because it's independent of the holster body. So, the butt of the gun will not stay tucked in. Others have noted more clearance under the triggerguard for a better grip and I agree. I also think, but can't tell for sure, that you're covering the mag release which is a no-no. If you could get the stitch line closer where the triggerguard meets the dust cover, that would be ideal. I think after you make some adjustments to the pattern, you'll be set to move full speed ahead! -
There's a whole section on the forum that includes belts: http://leatherworker.net/forum/index.php?showforum=67
-
"No One Will Notice!"
dickf replied to particle's topic in Gun Holsters, Rifle Slings and Knife Sheathes
Man, you're never going to stitch that thing well since it's been through the oven and has bends in the wings - at least, not with the machine. I'd discount it and remake it, but that's just my .02 -
I think the key to molding is knowing when to start, regarding moisture levels, and knowing when to stop regarding detail. That happy medium usually yields some nice detail molding. A video tutorial? I'll leave that to the video tut pro
-
Thanks for the nice words, guys! @olliesrevenge - When I bought my machine, I couldn't afford a Cobra or Toro 3000. I ended up talking with Ryan Neel and bought a Model 5. It's a great little machine and has been serving me well. I would recommend it to anyone. @Particle - It would be more ideal for the loops to both move to the right - you are correct. The issue with that is, this holster sits at the perfect depth inside the waistband and has an ideal amount of forward cant. If the triggerguard loop came in, then it would obstruct the draw. If the outside loop went out, the holster would be even bigger than it already is. I'll get a shot of this holster on - perhaps it will look different. @TwinOaks - That thing is really fugly, isn't it? What did you say your address was...? It's always the most accurate one in the bunch and is usually riding on my hip around 3 o'clock - 3:30.
-
It took several tries to get the stitch line where I wanted it for this pattern. I was finding that I was usually too far away from the gun, but I'm very happy where it's at now. I just need to scoot the slight turn at the dustcover end down about 1/4". Anyway, the leather is HO, the thread is 277 top and bottom (although I really want to run some 346 through the top just to see). The gun is a Colt Combat Elite XSE and is a real sweetheart. As always, c&c is welcomed. Thanks
-
Particle, Why stain sheen and resolene? I use resolene cut with 50/50 warm water through the airbrush, force-dried with an el cheapo hairdryer. Works every time and is a dull gloss, I guess. But I think I might still have to try that Mop and Glo idea, Mike!
-
Couple Of New Holsters
dickf replied to Big O's topic in Gun Holsters, Rifle Slings and Knife Sheathes
Then don't make it. Have some standards when it comes to safety. It's not a bad thing to turn someone down because you feel their request is unsafe and potentially dangerous/deadly to themselves or others. You might prevent someone from getting hurt and your peers will respect you more for it. If it's something that you feel you must make, then spend time to refine the pattern to get things just right. With that, I'm giving you constructive criticism - it's nothing personal. You're saying that this holster, that someone is using with a loaded firearm, is meant to be hanging on the belt by that 1 little piece of leather and nothing else. This is one of the most reckless things I've seen regarding holster designs. That holster with it's loaded cargo is going to be flopping all over the place. Hopefully the user doesn't need to run or do anything else physical while wearing it. -
Couple Of New Holsters
dickf replied to Big O's topic in Gun Holsters, Rifle Slings and Knife Sheathes
I think you'll really like the way the topcoat comes out with the airbrush. It's much more even and consistent. The straps are fastened with a machine screw through the male part of the snap into a tee nut. The snaps are hard-action Line 24's. You should consider that avenger pattern and make changes as necessary. If your customer has a gun belt, I don't see how he/she will wear it using the lower slot and it also creates an unnecessary point of failure, in my opinion.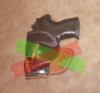
-
My First Holster.....comments Wanted
dickf replied to colt1911's topic in Gun Holsters, Rifle Slings and Knife Sheathes
Welcome aboard! Your first holster looks really great! The belt slide is a very old, yet workhorse of a pattern. I would agree with the other posters that the stitch line is much too far away from the gun and should be brought in. The leather was clearly too wet when you decided to mold it and that's why the boning isn't sharper (not to mention you weren't prepared with the right tools). The excessive wetness is also what produced all those crinkle lines that Big O was wondering about. What weight leather did you use? When you molded it, did you bend the sides in a little to mimic your hip? If you make your holster flat, when you put it on it will want to collapse. Molding on a curve combined with leather that is of adequate thickness will prevent this. The fully loaded Govt. 1911 is a heavy gun, so thin leather won't cut it. I'd recommend 8-9 oz or so for this application. Anyway, for a first try, it looks leaps and bounds better than mine! Keep it up and don't forget: we like pictures around here. -
Couple Of New Holsters
dickf replied to Big O's topic in Gun Holsters, Rifle Slings and Knife Sheathes
It could be the method that you're using to apply it. I use an airbrush with a solution of ~ 50/50 water to resolene and get a dull finish. I usually force dry the holster with a hair dryer after they've been sprayed. It looks like you might be brushing or dipping yours. I'd recommend giving the airbrush a try. This is the finish I get when I use the airbrush The western style holster isn't really my thing, but the overall design is okay. I think the stitch line should definitely be closer to the gun and the outline of the pattern should flow a little more. I think I would have also narrowed the cutout in the belt loop to the width of 1" or so. I'm unsure of the purpose of the bottom slot cut in the Beretta (I think that's what it is) holster? The lower cutout created some thin pieces that are failure points. Other than that, it looks like a solid Avenger with adequate grip clearance. Anyway, good progress - keep practicing! -
I'm also not positive what you're looking for, but this might be it: http://leatherworker...ndpost&p=121576 Is this the kind of thing you're talking about? I use Photoshop, but you can download the Gimp for free and do the same thing. http://www.gimp.org/
-
Red Or Blue Guns?
dickf replied to ShortBBL's topic in Gun Holsters, Rifle Slings and Knife Sheathes
I have only 1 red for molding purposes, and while dimensionally accurate, it's sloppy. I'd suggest to stick with the Blue Guns from Rings. -
My Best Holster So Far
dickf replied to KB8UVM's topic in Gun Holsters, Rifle Slings and Knife Sheathes
I think it looks really great. The only nit-picky thing I have would be to square off the muzzle and have it flush, but like I said, it's just a nitpicking thing on my end. I like for the leather and muzzle of the gun to be flush with each other. Well done! -
Sure you can. The username field has an id of 'username', so you target that to set the focus. It's easy and very basic. Here's what the code would look like on the page: <script type="text/javascript"> window.onload = function(){ document.getElementById("username").focus(); } </script> Of course, if you're using jquery, it's even easier (shorter): <script type="text/javascript"> $(document).ready(function(){ $('#username').focus(); }); </script> Enjoy!
-
It's a good start, but I think you should consider practicing more. Your stitch line is wavy, and really all you need to correct it is a ruler. The molding seems to be something that you did in some areas and neglected in others. The straps don't look like they're the same width, but that could be the picture. The holster also looks like it's flat as a pancake. Nobody has flat hips! I think addressing these things would help make a better product next time around, but like I said, it's a good start.
-
Thread Size And Type Question
dickf replied to Kring's topic in Gun Holsters, Rifle Slings and Knife Sheathes
I use Linhanyl bonded nylon 277 on the top and bottom, although I'm thinking about trying the setup that troop is using with the 346 on top. I like the look of fat thread on gunleather. -
My First Iwb Attempt
dickf replied to Rayban's topic in Gun Holsters, Rifle Slings and Knife Sheathes
Re-casing the leather to fit the 'on' position is something the customer or end-user would have to do because the maker is using a dummy with it in the off position. The customer is seeking the professional maker because of his abilities and his understanding of the firearm that the holster was designed for. If he (the customer) could do it himself (which could be messy if the holster is properly sealed, anyway), he would likely just make the holster himself, too. Here's the bottom line: Method 1 - Molding the holster with safety in the on position = okay to carry c&l'd or with empty chamber and safety off Method 2 - Molding the holster with safety in the off position = could result in the safety being knocked off leaving the pistol ready to fire. I don't see how this is any safer from a liability standpoint, either. Most people carry their 1911's in cond. 1, so accommodating them should be paramount. I'd rather let the customer make the decision on how they carry, but create the leather to safely accommodate both methods. Method 2 is dangerous! I carry my Combat Elite every day in c&l'd cond. 1 and would never holster it in a rig designed to 'snap in' with the safety in the off position. -
My First Iwb Attempt
dickf replied to Rayban's topic in Gun Holsters, Rifle Slings and Knife Sheathes
Because the safety would be in the on position on a C&L'd dummy, and off in your version. The safety could be switched off inadvertently by pressure/friction when holstering or drawing due to the indent in the leather, creating a potentially deadly result. It's all about the thumb safety, not the hammer. Your safety is covered by the leather of the sweat shield.

