LeatherNerd
-
Posts
138 -
Joined
-
Last visited
Recent Profile Visitors
3,221 profile views


LeatherNerd's Achievements
Member (2/4)
-

Hiding Stitches (Stitching Hidden Seams)
LeatherNerd replied to LeatherNerd's topic in How Do I Do That?
I don't have that book (yet). I have "The Art of Hand Sewing Leather". This is the method I termed the "gopher hole" method: Did you mean that? Or perhaps the slitted-and-then-slicked-down method like this? (Note: These images are Copyright © 1977-2013 Tandy Leather, used here under Fair Use Act; mods please advise if I'm out of line.) What's a speedy stitcher, and how does one get a "long enough" needle? (I suspect my assumption that needles only ever come in "the one size they come in" is about to be dispelled?) This... actually makes a lot of sense. So, stitch a box and invert it, then affix later? Actually a tube would work fine; cut one end into a flap, fold under and stitch it on first. That's the bottom of the pouch folded and affixed to the holster (but not to the pouch). Glue the tube up along the holster, and then sew the top edge of the tube where you can get at it and bam, long, hard-to-sew pouch assembled and affixed. Given that these are military issue and thus need to be mass-produced, I would be completely unsurprised if there was an assembly line process with one person making pouch tubes all day, another affixing them to the holster, a third sewing the holster closed, and a fourth affixing the closure hardware. And that's not counting the people stamping/cutting out the patterns. You know... the more I think about this the less "hell bent" I am on hiding the stitches... Thanks! Dave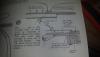
-
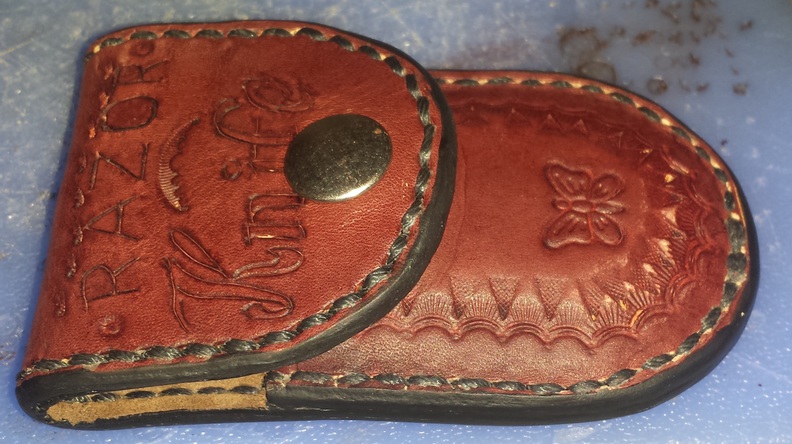
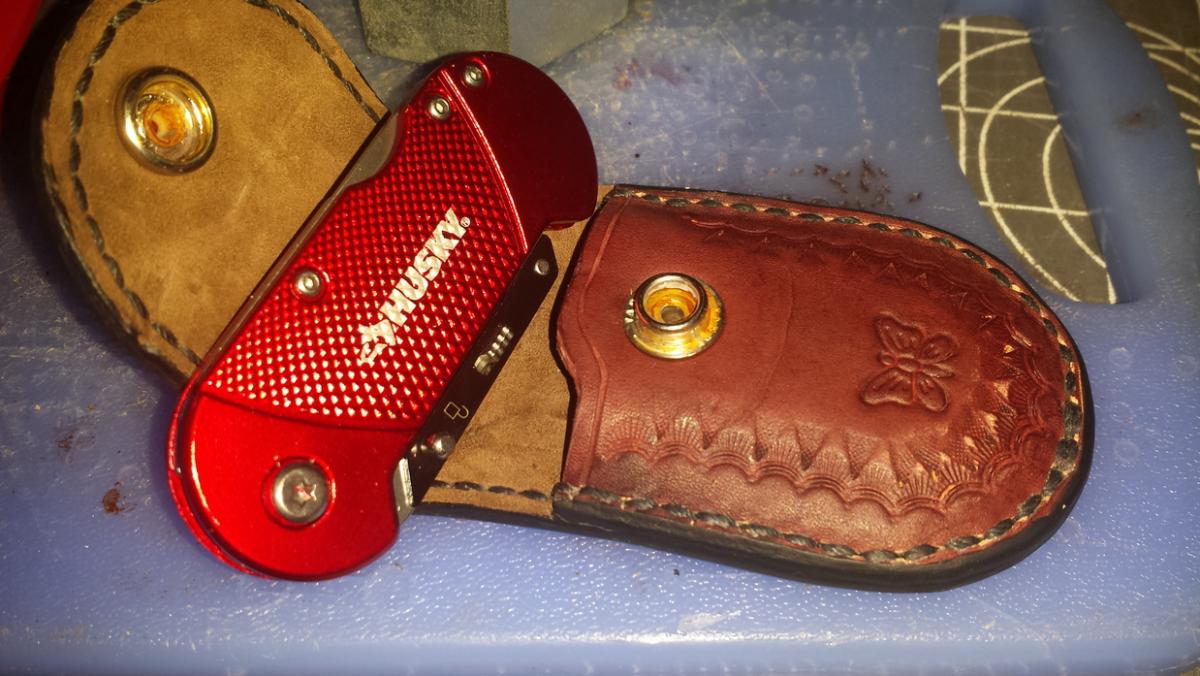
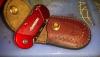
Yes, please! I attached the eyelet and stud before dunking because the main point of the lining was to cover the eyelet so it didn't scratch the knife. I did attach the cap and socket to the flap afterwards, but the piece was still sopping wet from the dunk, because I wanted the wet-form to dry in the snapped-closed position. Alternate approaches are much appreciated. I was worried about sliding an anvil inside for fear it would damage the tooling on the backside of the case. Will definitely start sealing my snaps before dunking. They're cheap Tandy nickel-plated soft steel. Fun Fact / Blooper Reel: I now have two of those knives because I ruined the first one making the case. Oh, I wrapped the knife plenty and it came through nice and dry, but I clamped the edges of the case to try to crease it into being more form-fitting. The clamping squished the handle closed AND bent it so far that once I pried it open, the lockback would not engage and the blade could not be coerced into folding back up. I flipped the handle and clamped it in reverse to remove the bow, then I slid a screwdriver into the handle and twisted. This opened the split but ALSO gouged huge divots into the handle which turned out to be VERY soft aluminum. So then I had to grab the 600 grit paper and sand the insides and outer edges... the result was a knife that opened grudgingly, tended to nick the handle when closing, and had a blade retention clip that could no longer be locked in place. They're $4.95 at Home Depot, so I picked up a replacement this morning.
-
Dwight-- THANK YOU! I glued, lined, stitched... and then DUNKED. The piece wet-formed BEAUTIFULLY. Keep in mind that I'm an amateur and this is my first sheath ever, but I absolutely LOVE it. Thank you! I'll be using this technique in the future for sure. Dave
-
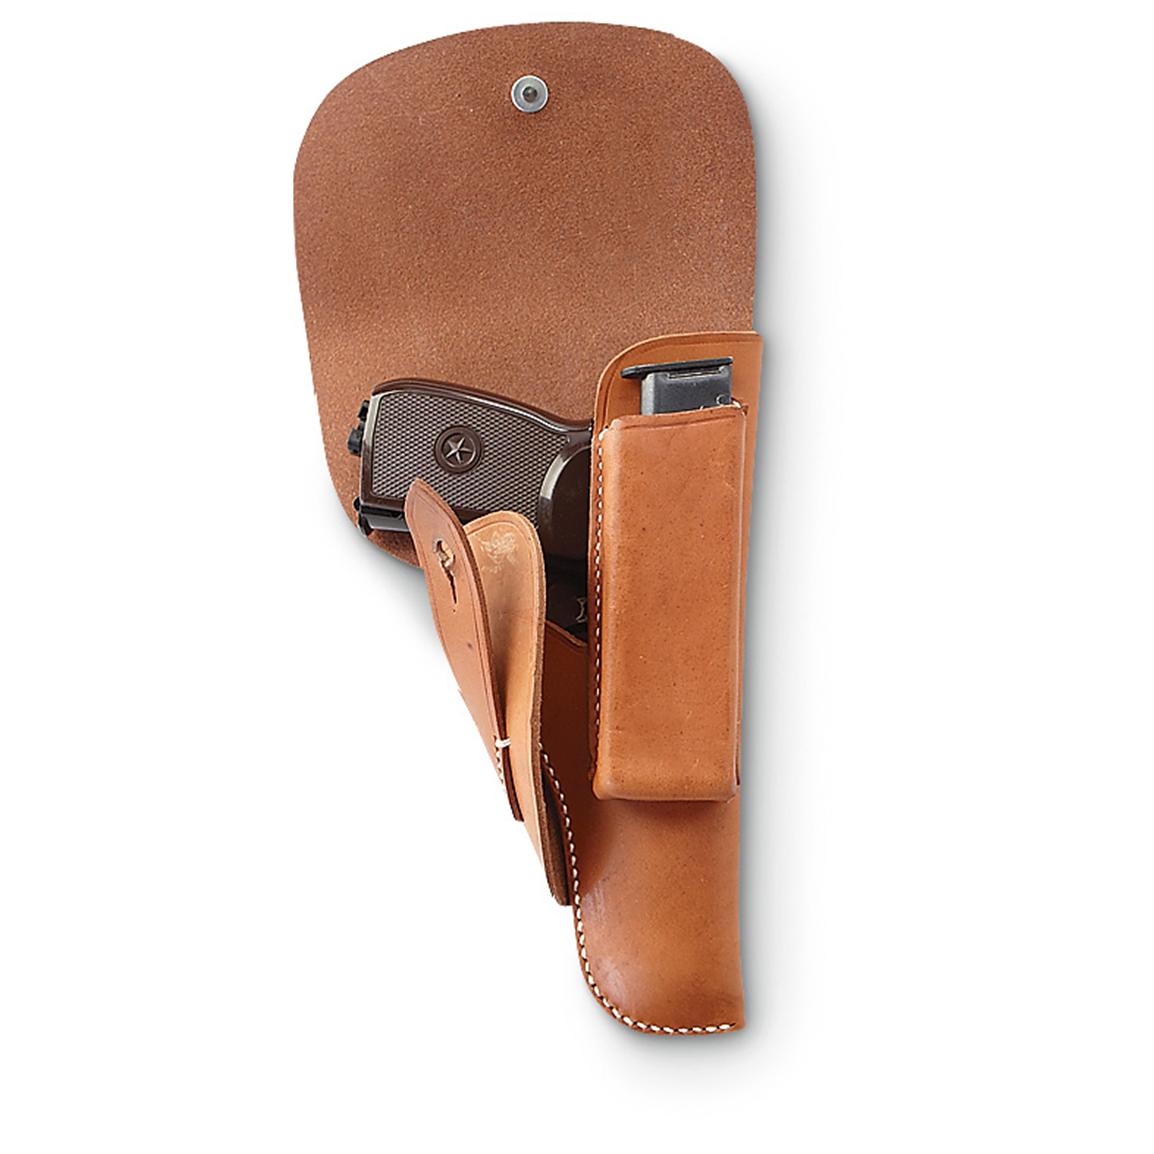
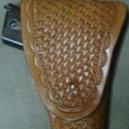
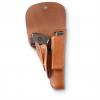
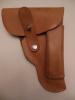
Hi All, TL;DR: Is there a non-painful way to hand-stitch a hidden seam on an article you can't just stitch and then turn inside-out? I'm musing about making a holster for my Browning Buck Mark .22 target pistol, and there's just something about WW2-style holsters that enchants me--the big foldover flap, integral mag pouch, etc. Most holsters of this style follow this generic pattern: Notably, the mag pouch is creased and then stitched quite closely to its edge, no doubt by machine. Yesterday I came across this image for a Czech Army holster, and I notice that all of the seams are tucked under: I have done a pocket or two using Ann Stohlman's trick of poking a tiny "gopher hole" in the outer layer every 10 stitches or so, so the needles can come up and through, but you keep the hole hidden by turning around and stitching right back down through it. As you get further from the gopher hole the awl and needle must pierce at ever increasing angles, so eventually you jump ahead another 10 stitches and make a new gopher hole. Right now the only way I can think to hide all of the seams is to stitch one side open-faced, then fold it over, stitch the bottom through the open side, and then gopher-hole the last side. Is there an easier way to do this? Thanks! Dave
-
AWESOME! Thank you! Yes, I'm planning to line in a similar fashion, but with Eco Flo Water-based Contact Cement. (I *think* that stays cured once dried? If not I'll grab some barge.) I was worried that getting water into the leather would be hard through the cement. Did not occur to me to wet the leather from the *outside* as well. Thank you!
-
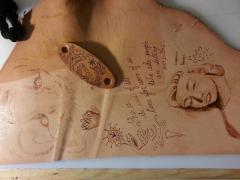
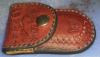
Hi All, Making a knife sheath, where you stitch the front and back together, and then the back goes up and over and folds down with a closure to connect to the front. I'd like to glue and then stitch pigskin into the sheath to line it 100%, but after than I want to wet the veg-tan leather through the pigskin so it can be wet formed by forcing the knife into the sheath to stretch it. So, is this an awesome idea or an awful one? Normally I'd just try it and learn from the experience but if the experience is "the project gets wrecked" I would be very sad. I'm confident I can wet the leather through the pigskin, but not confident I can wet it through the pigskin AND the layer of contact cement that'll be holding it on. I could glue the pigskin just at the stitching, but I worry it will pucker. Anybody have any ideas? This is mostly an aesthetic choice, but pragmatically I'm just trying to cover the back of the Line 24 snap to keep it from scratching the knife, and if worse comes to worst I can leave the grain of the leather exposed and just recess the snap. Thanks in advance! Dave
-
Does Leather Work Keep You Up At Night?
LeatherNerd replied to Redochre's topic in Leatherwork Conversation
If I can't sleep, I get out of bed. Bed is for sleep, not for lying awake. If I'm totally wrapped around the axle with leatherwork, I'll get up and go do some leatherwork. (The quieter stuff, anyway, because marriage and stuff.) Yes I have some rough mornings where I reeeaaally pay for it, but I've found that paying for it in full a few times really does motivate me to tell my brain "yes, this is fascinating, but do we really want to pay for this in the morning, or sleep now and pick this back up in the morning?" As I get older, my brain lets go more and more easily. I usually have amazing ideas in the shower the next morning because I'll have been dreaming about it all night. I often have ideas as I'm falling asleep, and then I stay awake worrying that I'll forget. I can't count how many mornings I've woken up remembering that I had a GREAT idea last night... but not what the idea itself WAS. So the next time I have an idea, I lay there, fretting that I'll lose it. The solution here is staggeringly simple: notepad and pen by the bed. Reach over, write it down, drop the pen, fall asleep. All my nighttime breakthroughs have been really weird--err, I mean highly creative--like "surfacing" the entire backside of a 3x5" piece of leather with about nine coats of edge paint to completely cover the stitching. The really hard geometric puzzles, like building a box case with multiple compartments inside it out of a single piece of leather, and figuring out how to "unfold" the box to get a flat, one-piece pattern, I generally have to be fully awake and sketching in my journal for. -
Are gloves generally a good way to get a clean resist like this? My dye jobs keep coming out all blotchy. "Ya can't fix stupid." :lol:
-
HI! I'm a novice leatherworker living in Saratoga Springs, Utah. I'm trying to learn as much as possible. Obviously I can't really offer any skilled labor (yet), but if you're working leather anywhere within a few hours of Utah Valley, I would love to come spend a day in your shop sweeping up, cleaning shop, and taking care of the annoying menial tasks that keep you from focusing on your art. I would do this just for the opportunity to generally watch the business of your business happening. If you have a few minutes now and then to show and teach, so much the better. I get out to Columbus, Ohio about once a quarter for work, and can take a day to drive out to meet you if you're within 2-4 hours' drive. Scheduling this might be I work in software so my schedule is very very flexible. I can come out any day Mon-Sat if I can schedule the time off in advance. P.S. If you have customers coming in and out of your shop, let me take this opportunity to say that I am well-groomed, bathe regularly, friendly and professional. (Hey, if I ran a store and you offered, I would ask before letting you come hang out at my shop all day!) Dave
-
Leather Heresies #1: Does Neatsfoot Oil Go Rancid?
LeatherNerd replied to LeatherNerd's topic in Getting Started
Thank you! I think the concern was that it would go rancid in the leather itself, while stored open and exposed to the elements. Then again, rancidity is usually caused by anaerobic conditions; being open to the air makes oil evaporate or tar up, not go rancid. And 50 years is a heckuva a shelf life--enough to make me consider that the customer who had some go rancid may have had something else on his leather go bad. ...OR he could have bought some poor-quality stuff. Either way Neatsfoot oil is back on the menu, and I'll be making sure to buy trusted brands like Fiebing's. This stuff goes on and then stays on for years and years, so it's probably one of the worst products to try to go cheap on. Thanks! -
Welcome! You're off to a great start. Rounding your corners smoothly will add a lot to the overall appearance of the project. I'll third what 50 years and electrathon said: use a template if you can. If you're making your holes with a diamond-hole chisel, move down to the 2-prong chisel as you go around the corner. This will give you an even curve instead of a straight shot across the corner. Beveling and burnishing the edges of your leather is an almost imperceptible change, but one that will make the whole project look much better. My very first leather project had the same kind of inch-long stitch marks on the outside of the cover. Mostly I've learned to change my designs so they won't have that, but recently I had a case that had partial stitching on the outside that was unavoidable. To make it look even, I just went ahead and stitched all the way around the edge of the cover. On the inside you can see that I'm just stitching cosmetically, but on the outside it looks like a nice even outline. Work on consistent tension when you're pulling your stitches tight. If you don't have a stitching pony, try one; you'll never believe you ever survived without one. For me the trick to consistent tension was to actually ease up a bit. I was pulling way too hard on some stitches. If you concentrate on a firm steady pull as you tighten each stitch, you'll avoid the "clumping" effect. Also going up a size in stitch spacing can save your sanity. I used to do everything at the smallest spacing because I thought it looked better. Now I've found that larger stitches done evenly look better still. That's just my opinion, though--you'd have to try it to see and if you don't like it, don't do it. Drink Coke, not Pepsi. That's not opinion, that's SCIENCE. Welcome and good luck! Can't wait to see your version 2!
-
I was in my local leather store a few weeks ago, and I asked the girl in the shop if Neatsfoot oil was made out of real Neets. Without blinking an eye, she said "Yes, but only the highest-quality stuff is 100% made from their feets." In the serious part of my visit one of the guys at the shop told me he had heard from a customer that their Neatsfoot oil had gone rancid, and that this can happen with any other kind of natural oil conditioner. Logically this made sense to me, but in practice, some of ya'll are just puttin' that stuff right on there! Are you mad?!? He recommended that I go with Aussie Conditioner because it was a beeswax-based conditioner; no mention if the oils in it were natural or not. (For all I know I could be rubbing beeswax and 10W40 motor oil into my leather goods.) So! Leather experts: does Neatsfoot oil ever go rancid? If so, can it be prevented, e.g. with regular maintenance, or perhaps applying a sealing top coat?
-
Holster For Revolver With Scope
LeatherNerd replied to Boriqua's topic in Gun Holsters, Rifle Slings and Knife Sheathes
Ha! I love it when function informs form with such style like this. I was thinking "wow, that overlay along the top of the barrel is a great stylistic addition". Only now that you've said 1/8" steel rod can I see the rounding in the leather. Very nicely executed! -
Absolutely gorgeous!
-
Forgive the heresy, but for tool slots I just can't beat the stretch of the V-word. If and when I make a "proper" tool roll (complete with a tooled mosaic all over the back, etc) I will probably use 5oz veg-tan as the backing and 2-3oz suede, or some other soft, pliant leather for the tool slots. But... yeah... if I need to add a fourth panel, I already have an 8.5"x11" piece of faux alligator ready to go, and I have just enough of the V-word left to do one last set of tool slots and coverings. I'm not young anymore... BUT I STILL NEED THE MONEY