


Bonecross
-
Posts
234 -
Joined
-
Last visited
Content Type
Profiles
Forums
Events
Blogs
Gallery
Store
Everything posted by Bonecross
-
So far everyone who sells Lepage glues sells it! I get it at Rona.
-
I get Lepage low odor contact cement in Canada and it works well.
-
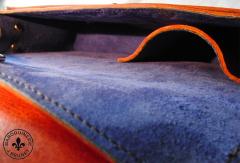
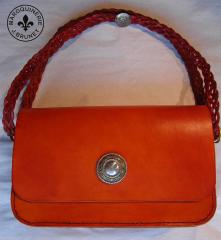
Designer Double Flap Purse (Interior Main Pocket)
Bonecross posted a gallery image in Our Leatherwork Galleries
From the album: My Creations
-
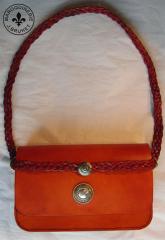
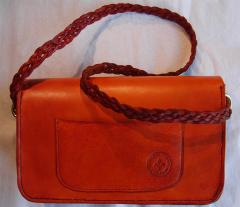
Designer Double Flap Purse (Shoulder Configuration)
Bonecross posted a gallery image in Our Leatherwork Galleries
From the album: My Creations
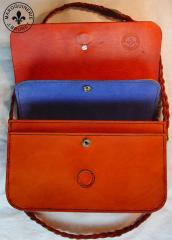
Hand crafted and stitched orange leather designer bag with blue pigskin suede lining. Configurable hand woven strap for hand/arm or shoulder carry. Main flap has a magnetic retention and secondary flap uses a snap. Solid brass D-rings, silver and gold angelfire concho on front flap and steel Diablo concho on strap. -
Designer Double Flap Purse (Partially Open)
Bonecross posted a gallery image in Our Leatherwork Galleries
From the album: My Creations
-
Designer Double Flap Purse (Hand/Arm Configuration)
Bonecross posted a gallery image in Our Leatherwork Galleries
From the album: My Creations
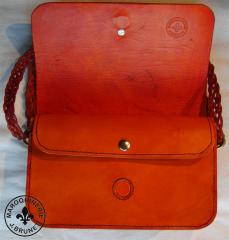
Hand crafted and stitched orange leather designer bag with blue pigskin suede lining. Configurable hand woven strap for hand/arm or shoulder carry. Main flap has a magnetic retention and secondary flap uses a snap. Solid brass D-rings, silver and gold angelfire concho on front flap and steel Diablo concho on strap. -
Designer Double Flap Purse (Fully Open)
Bonecross posted a gallery image in Our Leatherwork Galleries
From the album: My Creations
-
Designer Double Flap Purse (Back Phone Pocket)
Bonecross posted a gallery image in Our Leatherwork Galleries
From the album: My Creations
-
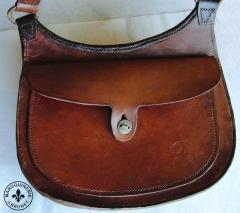
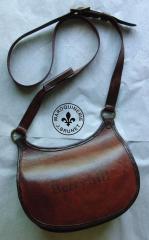
Woodland Possibles Bag (front pocket)
Bonecross commented on Bonecross's gallery image in Our Leatherwork Galleries
 The customer sent me a pic of something he found online. I basically copied the style and adapted it.
 -
Woodland Possibles Bag (rear pocket)
Bonecross commented on Bonecross's gallery image in Our Leatherwork Galleries
 Thanks!
 -
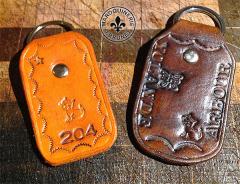
From the album: My Creations
Some key fob from scraps to change things up. Created for my neighbor who will be feeding my cat while I am away for a few days. Fun and quick projects -
From the album: My Creations
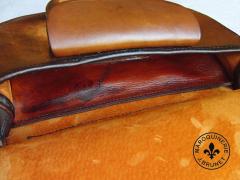
Period style woodland possibles bag for flintlock hunter. Made of hand stitched 5oz cow leather, rust colored pigskin suede and antiqued brass hardware. Light brown dye with mahogany antiquing. Gusseted sides and bound edges. Personalized for the customer (at his request). -
Woodland Possibles Bag (Insert #1 - Inserted Inside Main Pouch)
Bonecross posted a gallery image in Our Leatherwork Galleries
From the album: My Creations
-
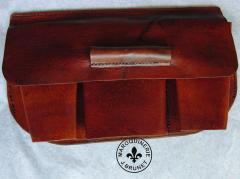
Woodland Possibles Bag (Insert #1 - Tripocket and Ball Starter Holder)
Bonecross posted a gallery image in Our Leatherwork Galleries
From the album: My Creations
Modular Insert for Woodland Possibles Bag. Three gusseted pockets with a single flap covering them. Ball starter tool holder on flap. -
From the album: My Creations
-
From the album: My Creations
-
From the album: My Creations
Leather and brass small game carrier. Paws or necks can be passed through the loops to free your hands for other tasks. -
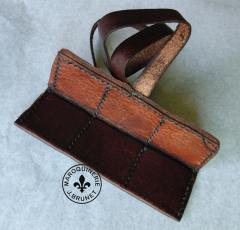
From the album: My Creations
Wallet to hold flintlock flints. -
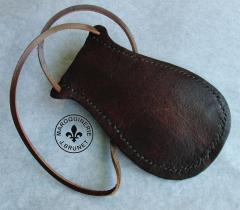
From the album: My Creations
Bag for lead balls. -
Knife Sheaths (variety)
Bonecross commented on Bonecross's gallery image in Our Leatherwork Galleries
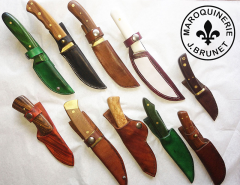 Thanks My first try at sheaths so I experimented with different styles with pieces of leather from my scrap collection. Luckily the knife maker sent me a variety of blade shapes too! The bottom left one is made with 5oz leather which was wet molded. The unique coloring was accomplished with a base of orange Fiebing's dye and streaks of dark brown dye. The streaks were done by using a piece of sheep's wool (like I always use to dye leather) but I cut the fur uneven, leaving peaks. Then I lightly brushed the dried orange leather with the dark brown to make streaks. Once dry I conditioned then sealed with Resolene. Hope my explanation makes sense!
 -
From the album: My Creations
-
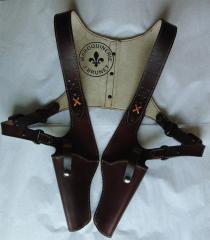
1930's Gangster Style Double Shoulder Holster
Bonecross commented on Bonecross's gallery image in Our Leatherwork Galleries
 I use PhotoShop...
 -
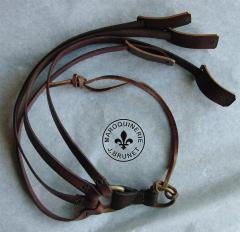
Bridle with drop noseband
Bonecross commented on Erystawi's gallery image in Gallery- Our Leatherwork
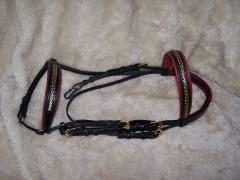 That's really nice! How did you make the woven brass part? Or is this hardware that you purchased pre-made?
 -
1930's Gangster Style Double Shoulder Holster
Bonecross commented on Bonecross's gallery image in Our Leatherwork Galleries
Thanks for your kind comment. I created the holster pattern for the 1892 Lebel using a software process. Note that a welt was added to this holster and the interior is lined. -
Ok here is the continuation then So we have a pretty dragon and the background layer that was pre-awled earlier to match the thread locations of our plug. We take a needle and pass the thread into the holes one by one. This is where leaving yourself lots of extra thread pays off! Start on one side and work your way to the opposite: See how all the thread is properly aligned, this is what you are looking for. Try to avoid getting them crossed: Now gently pull each pair of threads tight and tie a simple knot: Oooo pretty dragon right? AND NO FRIGGIN STITCHES!!! Now you can inlay this panel like you would normally to anything: a bag, piece of armor or even a Dragon saddle! Note that I am actually going to undo the knots and cut a hole behind that stone (I forgot!). This is why I use simple knots, lets me adjust or undo them if required!