

JW
-
Content Count
15 -
Joined
-
Last visited
1 Follower

Recent Profile Visitors
1,107 profile views


-
Hi BrotherRon, A cellphone camera will more than suffice, if you are using a new one that is. While the photo does depend on the camera you are using, what I find that is half the battle is the background-- making sure everything is flowing, complementing and directing the attention to the product. The holster and floral carved sleeve was taken with a DSLR camera and edited in post, bringing out some of the contrast. The valet tray on the right was taken by a cellphone camera (Samsung S7) and is not edited in any way. It is more than capable in producing the same quality photos. Actually, the ones on the left originally looked paler than the one on the right. If you are going to use a smartphone camera, you want to make sure it is a good one. Most of the flagship smartphones out there have a better camera than my old DSLR (any iPhone nowadays will work as well) Summary: Worry more about how to frame the subject, make sure you have a lot of space, and lighting options-- it will help you a lot! Hope this helped!
-
@Tugadude Thanks, the beveling really alters the look and feel of the sketch. I'm not in Hawaii, but I have a lot of family and friends out there, I appreciate the prayers. @LederRudi Thank you, the design is fairly simple to draw, it's very geometric. The only hurdle, as I think with all drawing, is getting the proportions down. @Bob Blea Thanks Bob!
-
@YinTx Thank you! @kiwican Thanks kiwi! @JD62 Thanks, I'm trying something a little out of my wheelhouse.
-
So I decided to try my hand at some more Hawaiian tooling, this time I drew the design myself. In comparison to the valet tray I did, it is minuscule. The only reason it is so irregularly shaped is because I drew for this particular piece of scrap leather. Everything here was done with a SK, 1 backgrounder, and 2 bevelers. Let me know what you guys think, thanks for checking it out.
-
Wow, thank you everybody for the kind words. @Double Daddy To me the rounded corners are more aesthetically pleasing; the square corners, in my opinion, look like wasted material. @Instinctive Yeah, that's one of the flaws in this piece, the radius following the central sunburst isn't even, and that is bugging me big time. The way the color turned out reminded me of a carved wooden surface, but I agree, if my coffee tasted like leather, something's not right. @LatigoAmigo Thank you very much, I'm certainly trying to make it better. @bullmoosepaddles Thank you, it's certainly a one-of-a-kind, I haven't seen much Hawaiian leather work. @Dun Haha, will do brah. Another Hawaiian leather project is in the works. @Tugadude No worries, everything you see in this style has a meaning, the central 'sunburst' motif is a crown, either of feathers or leaves, symbolizing royalty, and so on and so forth. It's pretty interesting the more you learn about it. @Retswerb Thanks, I was hoping for some more shading and depth where the weaving was going underneath itself, but I'll experiment more. If you wanna try a similar basket weave, using only a sk and beveler, I suggest looking up paving stone patterns, like the Herringbone ones, it makes for some good basket weave. @DJole Thank you, well, I'm not sure where it's final home will be, I just hope it will be used.
-
Hello forum, It has been a bit, and I wanted to display something I finished recently. This is a valet tray I tooled a traditional Hawaiian design on it; a good friend of mine drew the design for me. It's not perfect, but it was a definite learning curve. It is surprisingly hard to translate a complete 2D drawing, into something with a 3D feel. Lemme know what you guys think, critiques, changes, etc. I'll take them all. --JW
-
It's a pretty cool stamp, it has a slight learning curve, but his basket weave stamps are fantastic. I haven't got any other of his stamps... yet, but hopefully I will soon. He is on leatherworker.net and his name is @arbalet12. Here is the link to his Etsy shop and the stamp I showed in the pictures: https://www.etsy.com/listing/275253774/tools-for-leather-crafts-stamp-36?ref=shop_home_active_9 I got it with pretty fast shipping considering it comes from Bulgaria. Here is the other basket weave stamp I got.
-
Hey Jack, Sounds like you got a great deal, some of those pro stamps are a good snag at $7.99. I have a similar stamp, while not a Tandy one, the process is the same. You first stamp the stamp, I put a reference line for, well, reference. Then you rotate the stamp so it's oriented like the second photo, and then you stamp it. You just repeat that process until you get a nice basket weave. Hope that helped! -JW
-
 JW changed their profile photo
-
@ec2121 Thanks! It's actually Fiebings Antique Chestnut; I think it's a little less red in person. @alpha2 Thanks, I didn't mean to sound snobby or anything, I suppose it's the bane of the creator: it never looks like the way you envisioned it. I think it's just some of the curves in the scrollwork aren't... I guess, "curvy" enough. And some of the spirals where the scrollwork emanates from aren't perfectly circular.
-
Hey @Killerwork, That seems like quite the predicament, you might want to ask some of the other more experienced leather workers here, but in my experience, oiled veg tan doesn't tool very well-- you might be able to get away with a brand stamp, but a whole tooling might be out of the question. Like what @fredk said, a separate tooling 'patch' might be the easiest option, you can even add some contrast by having it a different color. I think it would be less of a hassle in the long run to just remake the holster with the proper tooling, rather than trying to experiment with an already formed, stitched, and finished holster. I hope that helps!
-
Hi forum! It's been a long while, but I figured I would post a couple pics of a holster I made recently for an XD. It was fun making it, not happy with the way the tooling came out, but the customer liked it-- I guess that's what really matters. This is the 2nd holster I made, so any feedback on the tooling or if you have a comment about it, please let me know! Thanks for viewing, -JW
-
Hey, it's me— a new member, why don't you click this and say hi!
JW replied to JW's topic in Member Gallery
@JD62 @KingsCountyLeather Thanks to both of you, and everything you see is hand done. Hand stitched, tooling, stamping, dyeing, and the photography is just with my phone-- I don't have the room or resources for anything fancy. -
Hey, it's me— a new member, why don't you click this and say hi!
JW replied to JW's topic in Member Gallery
@DJole Thanks for the welcome! Yeah, that was my first time using the Angelus Leather Dye, and on that particular piece of leather (a glazed double shoulder I believe) it didn't absorb as it should have. I wanted to have some parts of it lighter and some darker, but you can see the final result. So the splotchy parts were a combination of inexperience, bad choice of leather, and trying to layer the colors. It didn't turn out the way I envisioned it, but not terrible enough to warrant a new tooling. -
Hey, it's me— a new member, why don't you click this and say hi!
JW posted a topic in Member Gallery
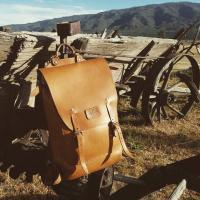
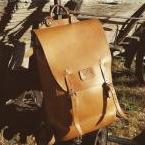
Hey, you clicked the title! Thanks for doing that. As you may have deduced, I am a new member; while I made this account awhile ago, I am just starting to get more active on this. I am a hobbyist leather worker, and hopefully I can change that and become a leather worker full-time. I have done this for about 2 years, and it’s been an amazing journey so far. I am still in college so posting pics and being super active unfortunately isn’t a luxury, but I’ll try and post when I can. I'll attach some of my old work so you know I am a human, and not a robot. Please keep in mind that I am only a beginner, so any criticism is welcomed. Thank you again for reading, and if you want to see some more recent pictures of my work, check out my Instagram: https://www.instagram.com/lowellleather/ -JW -
Hey Rossr, The reasoning behind the pointed striking surface is to 'direct' the energy more efficiently towards the stamp surface. I don't find it that it helps much, since the majority of the time, the maul/hammer slips of off the surface. Same theory would apply to a nail without a head, sure, it would direct the energy 'better', but it would increase the likelihood of missing and smashing your thumb. As to the nature of the stamp, I seem to recall the design, but it looks like either a one-off, or a heavily modified/misused production stamp-- a stamp that has had it's surface defaced. But I would lean towards the one-off theory. Thanks for sharing! -JW