


Grihm
-
Posts
82 -
Joined
-
Last visited
Content Type
Profiles
Forums
Events
Blogs
Gallery
Posts posted by Grihm
-
-
38 minutes ago, kiwican said:
Thats impressive
Thank you very much =)
-
I think it looks good. What you can do to make it pop out when you color it is to first add an alcohol color to the background. Go for a darker option than what you will use on the entire piece later on. Let´s say black background and when that´s added, you add an antique dark brown with a soft spunge or cloth. Add the antique in circles and don´t push too hard. Add layer on layer after each layer is dry. When you are satisfied, add a sealer, then oil or leatherfat and polish for a fantastic end result.
Also, you can add scratches and small nooks etc in the petals or leafs to add another layer to help with the popping out.
-
21 minutes ago, Sheilajeanne said:
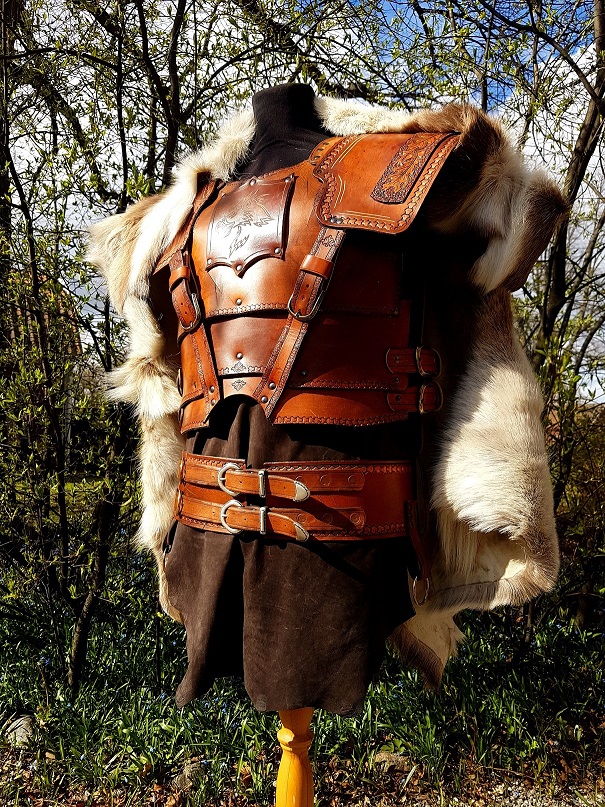
Did that include the cost of the fur? (Can't tell just what kind of critter it's from.) Made me immediately think of Eddard Stark from Game of Thrones!
And was the 900 Euros your cost, or what you charged the your customer?
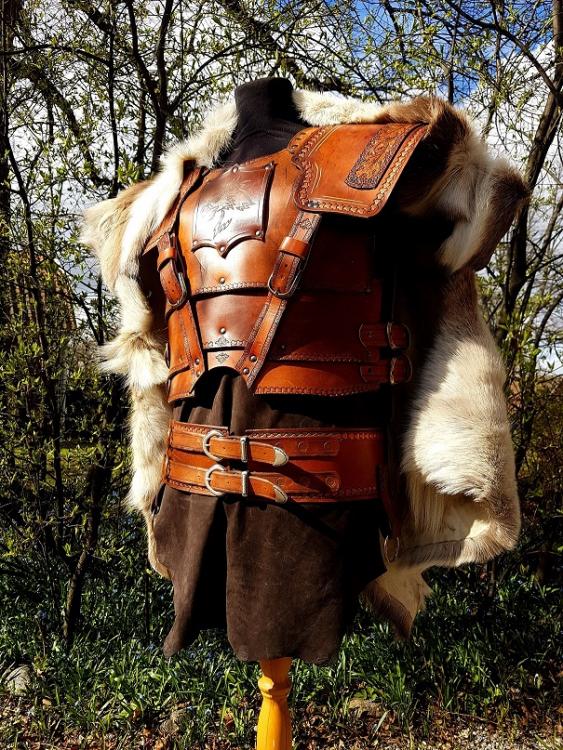
The 900 Euros did not include the fur, but It was what the customer payed for the creation of the chestpiece and the belt. One of those furs would end up at around 100 - 150 Euros ( Raindeer )
-
34 minutes ago, Sheilajeanne said:
Awesome!
It amazes me the expense and effort some people will go to for historical re-enactments and LARP! I am sure they paid a pretty penny for your gorgeous chest piece!
Thank you =)
That setup costed around 900 EURO, and since it´s in all vegetable tanned leather, a fair amount of that cost is the material. I´m about to start making historical accurate shoes and boots this winter as well so bought myself an antique shoemaker machine to go from armors to other parts of such a setup. The craft never ends to amaze oneself in how much has been lost in time, so when one finds a patters that works or you create one from scratch...the feel is incredible. Knowledge is wealth =)
-
2 minutes ago, YinTx said:
That is a lot of work! Fantastic! I like the use of the tri-weave for the border, and the battle cuts on the front. Whoever gets to use that is going to look awesome!
YinTx
Thank you Sir =) Was a good feel to hand it over to the customer, and it´s been in action once already. Next ones are going to be more historical correct and in the Viking era =)
-
Do you have a picture on how it looks now? Also, do you cut with a swivel knife first or do you bevel directly?
-
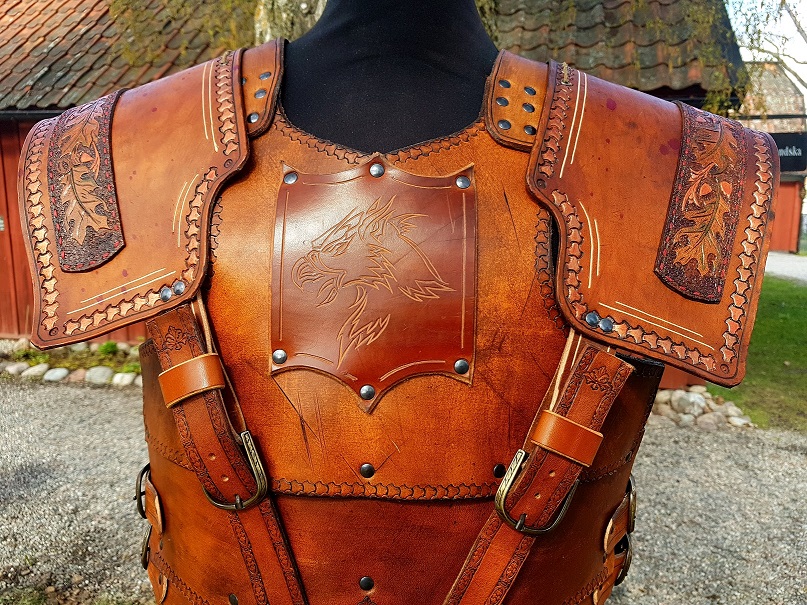
A custom order to be used in a Larp ( live action roleplaying game ) here in Sweden.
Took about 40 hours all and all.
The entire build is from Vegetable tanned leather. Patterns, colors and patina grew up throughout the build and it´s fully sealed for use outdoors in rain and the cold.

-
Hi.
I have been working with the standard Tandyleather lace tool.
https://www.tandyleather.com/en/product/craftool-lace-maker
I am not very satisfied since i feel it´s not very sturdy and i have problems making both thicker or thinner lace than from 2.5 mm thickness.
Some time age, i saw a tool made fully in metal. It looked more like a round pen sort of. That tool also seemed to be able to create round lace and not only flat.
My question is, do anyone have a tip on where to purchase another better tool?
I need it preferably to be possible to bring with me on my travels. It would be superb if it could make both flat and round lace, and of course, easy to replace or sharpen the blades in it.
-
Looks great. Very clean and precise craftsmanship, very nice color and good sewing skills. Thumbs up!
-
Hi.
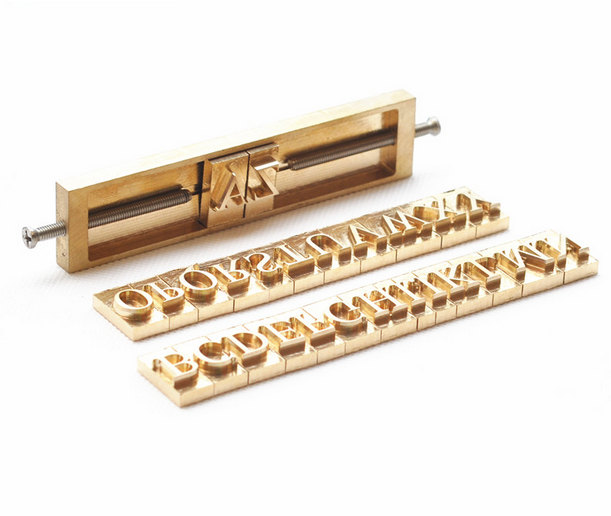
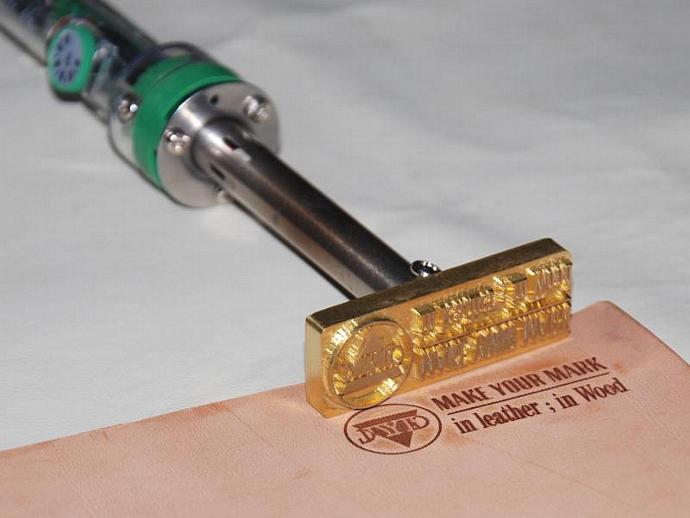
I am looking for tips on what tool to buy when it comes to making Hot stamps in leather with foil.
I have an embosser already that i can heat stamp with, but i use it mostly for cold pressing in just damp leather, so no heat used. Mainly since it´s about 100 + years old and weighs in at around 90 KG´s.
I want to get a more portable solution, one that i can fixate letters and numbers in as i see fit, and preferably one that i can bring with me on markets and fares.
The pictures i add are representations on my wishes, but part from that i have a few needs on a list.
1: No cheap knockoff version mainly for hobby or " fun trials "
2: Adjustable temperature
3: Reliable brand
4: Reasonable pricing
5: IMPORTANT - Fully compatible to stamp in vegetable tanned leather
So in short, no dollar store bargain, but nothing made from admantium and diamonds either. A solid brand that hold and works, and that can take a number of sizes in adjustable stamps.
-
20 hours ago, Barkster39 said:
Sorry I guess I should of worded that a little better. I def agree to do it all within a day or two but What I meant was that I dyed and oiled and painted them about a month ago and now a month later the paint is peeling off. But I actually think I figured it out. I just put to much oil on them! I guess more isn't better in that situation! I have been using less and the results have been much better. I am starting to look at English bridle leather now to use now but the only thing I'm not sure about is how the paint will adhere to it. Got any advice on that!?
Awesome to hear you found a solution =)
The best tip i can give is, always use vegetable tanned leather and stay far away from chrome tanned. Use as clean leather as you possibly can.
Bridle leather is already "done" when you get it, so it´s basically already sealed so to say, meaning the color would not be something i recommend to add afterwards.A link to read about bridal leather -
http://www.equusleather.co.uk/our-leathers/what-is-bridle-leather/
I would say go for raw vegetable tanned leather and do all the process yourself. The bridle leather i use is used as it is for belts etc, but i do stamp initials in it with stamp tools, and if careful enough, it works perfectly.Here is a picture of a product i handed to the customer today where i placed a leather sleave with name + phonenumber on, and the leather is bridle leather or as we call it here, basically " anonited belt leather ".

-
9 hours ago, NVLeatherWorx said:
You should be applying it with a dauber, sponges don't give you the right application surface to get a good penetration. This whole thing of using sponges for applying everything and the constant failure of researching a question before posting it (because these issues are rehashed over and over again on just about a daily basis in one place or another here) are the biggest reasons why these issues continue to plague everyone.
If you want a solid application of product then use the proper application tool:
Dye/liquid stain = dauber
Top Coat/Finish and Oil = synthetic/sheepskin pad
Antique Paste = sheepskin pad
Fine/Detail coloring = proper sized paint brush
Edge finish = modified dauber (should know how to do this)Products that get proper results:
Spirit based products give best, and most consistent, results without question. These products have been around much longer than any water-based products and have a proven track record the world over. Water-based products are just somebody's "feel good about themselves" idea of trying to make people think that they can do their part to "save the world", well, it doesn't need to be saved because there is nothing wrong with it and these products DO NOT provide a quality result (as is repeatedly addressed within this community).
If you are looking to make quality finished goods then you need to use quality raw materials and supplies to do so, trying to create quality from garbage has already been tried and has failed repeatedly, it is what we call "mass produced" and is found everywhere that our client base THINKS is out to help them better their daily lives by bringing them "value" when all they are doing is bringing them stuff that fails quickly and needs frequent replacement. A professional should be striving to bring change to that thinking by providing a product that is intended to outlast that crap that is typically purchased.
The question was more in relation to a problem i have had with bad quality antique. We bought a black antique, but when pouring it out from the bottle, the consistency was slimy and a bit rubberbandy, and not fluid as it supposed to be. The result of the color was as described in the first pic.
PS: Much appreciation for the tips of materials to use. Thumbs up!
-
On 2017-02-10 at 6:18 AM, Katlyn4jc said:
Hi y'all , kindly advise how I can paint letters engraved on veg tan leather.
thansj
Stamp them with number tools, then color them with Eco Flow antique using a sponge.
-
I would venture a guess that you waited too long. If you dyed it a month ago, it can be that it´s hardened a coating that the paint cannot stick to properly.
I would suggest you make new straps and both color, seal and oil them on the same day. Some straps i have made and just waited to the next day have felt too stiff to do proper work with, but not always. Now i always do the coloration and oil applying etc on the same day to make sure everything is sealed in and on the same layer so to say.
-
On 2017-02-09 at 6:56 PM, Vo1lok said:
Hi! First of all - sorry for my english, i know it's bad
")
So, today i saw a nice carved leather wallets, with freaking amazing dying technique. Now i can't sleep because i need to know how to get these colours. I think its not spirit dyes, seems like water based or acrylic used with some snain ot acrylic gel (i dont know), but, its so vintage, and lean, yes, its looks old, but clean. Do you have any ideas, or maybe you know this technique? Maybe you can give some advise of dye brand?..God, that's make me mad...


The way i do items like this is ( I use vegetable tanned leather )
1: Carve the pattern with a Swivel knife and hammer down the edges ( with leather tools ) where needed to shape and clean the patterns.
2: Hammer stamp the background with leather stamp tools to get the texture you want.
3: Paint the skulls or Ganesha with a leather shene " shine.
4: Apply an Eco flow Antique ( I´m guessing that the skull wallets use Dark Brown and the Ganesha is Tan ) and make circle motions with ease to apply the antique on the leather.
5: Wipe off the excess color with a dry paper towel. ( If you want a deeper effect, apply more antique on the same area again and wipe again and so on ).
6: Seal the color with a shene ( shine ) without pressing too hard ( That will remove the color and or leave you with a spotted product when dry ).
Then rinse and repeat and practice. These skills are just a matter of practice, going slow and steady and to accept that you WILL make mistakes. No one goes full success all the time.
-
Question. Do you remember if the Eco Flow felt " stringy " or " slimy " when you applied it to the sponge?
-
Looks superb. Website would be very interesting =)
-
10 minutes ago, northmount said:
Nice looking bag and Oak Leaf.
Tandy sells "Craftaids" with all sorts of carving/tooling patterns.
Tom
Thank you, and thank you for the tip as well. Much appreciated!
-
Hi.
Recently, there was a sale at a store i used a few times to buy supplies for leather crafts.
This trip, i bought ( pardon my explenation ) a plastic sheet with tracer lines on that you wet the leather and then apply it on top, roll it down so it leaves marks in the leather, and then you swivel cut it.
These are called a number of things, but stencil or tracers i am guessing is closest. I live in Sweden, and i have had little to no luck in finding more of these. Now.. a few questions.
1: Are there any special store that sell these that are of good quality and a wide arrange of patterns?
2: Can you send a picture of a custom made pattern somewhere and get it created as a plastic tracer to be re-used as many times as you want?
3: Are there any other "newer" version or better ways of transfering patterns to leather to be cut in besides this? I cannot draw for the life of me, so i really have use of these.
Here is a bag i made with this Oak leaf pattern i traced with first and then cut in. I´m still learning for the record.
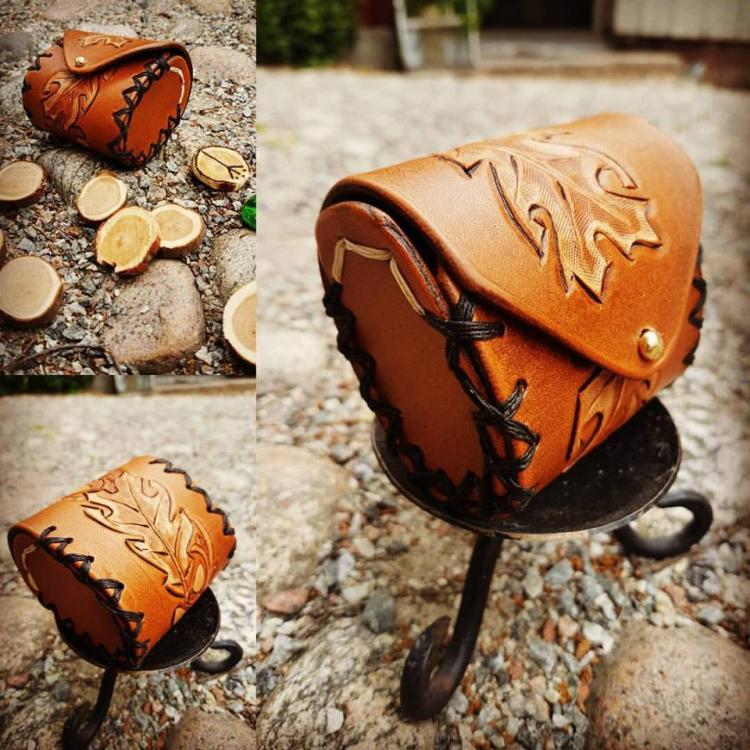
-
3 minutes ago, TwinOaks said:
Welcome to Leatherworker.net!
Thank you, it´s nice to be here.
Really tons of useful links and information so i think i will like it here =)
-
Amazing patterns and color choices. Really massive yet nimble work. Would love to get those stamps for my own workshop. Again..amazing color choice =)
-
3 minutes ago, Rohn said:
Thanks for the answer, I appreciate it.
You are most welcome!
-
Hello all.
My name is Johan and i am a leathercrafter from Sweden.
We just opened up a store where we sell custon orders and products already made in the lines of fantasy, larps, cosplay and more.
We are a group of friends that have learned from each other so basically all our knowledge is handed down in between us all.
I found this froum when i was searching for tips and links on different tecniques and ways to engrave etc. Looking forward to seeing lot´s of interesting andf beautiful work and to bind new contacts and friends.
Best regards
Johan
-
4 minutes ago, Rohn said:
Looks like you did a fine job. What are the dimensions?
Thank you =)
The bag is about 7.8 inches left side to right side and about 2-3 inches deep. Height around 4 inches. Suiteble for placing on a belt or if ordered on a bike handle.
I think i got the meassurements correct. I´m used to cm and such


Help with tooling
in Floral and Sheridan Carving
Posted
That looks very good and the details in the pattern helps it pop out. Good background coloring and a good smooth surface. Stay on it =) It looks really good.