


clivel
-
Posts
25 -
Joined
-
Last visited
Content Type
Profiles
Forums
Events
Blogs
Gallery
Posts posted by clivel
-
-
If you are in Canada it is probably more cost effective to try and buy locally. You don't mention where you are, but in the Vancouver area I regularly use Lonsdale Leather or the Tandy in Surrey where the staff are really helpful.
Both do mail order, probably far cheaper than shipping from the US, but if you are elsewhere in Canada it would be a good idea to scout out local shops.
Firstly I prefer to support local with my dollar rather than the likes of Amazon and secondly the staff and even other customers are a fantastic resource.
Clive
-
Going back 40 odd years to my student days, when I spent a few months working in a tannery, my recollection is that nubuck was the result of a mechanical process that buffs the grain side of the leather. I don't recall that any special tanning process was used, but I think they mostly used chrome tanned.
The buffing machine consisted of a metal wheel about the size of a car tyre with a smooth surface. One of my jobs was to refresh the surface of the wheel. It was coated with an appropriate glue, and then slowly rotated by hand while emery powder was sprinkled on it forming an even coating. For nubuck, a fine grade of emery would have been used. Once dry, the wheel was rotated at high speed vertically at 90 degrees to the operator. There was a wooden platten in front of the wheel controlled by a pedal which pressed the leather draped over the platten against the wheel.
If your trunk is 150 years old, then it most certainly cannot be nubuck, which to the best of my knowledge originated in the 20th century. More likely it is 'split', the bottom layer of leather after the tanned hide is split. This is rougher than either nubuck or suede. Suede is simply buffed split.
Clive
-
Another South African here, originally from Pretoria I moved to Cape Town after finishing varsity and then a few years later moved to Vancouver Canada where I still reside.
When I was a student I had a weekend/holiday job at a tannery called Mountain View Tannery on the outskirts of Pretoria. Unfortunately at the time my mind was focused on girls not leather. My job mainly involved machinery maintenance, but looking back I wish I had taken more interest in the leather and its production as well.
As for biltong, I make my own
")
I made a biltong box a few years ago out of a plastic tote, some dowels a 25w incandescent light bulb to warm and dry the air. And a small fan - it is the air movement that dries the meat.
First picture is with the lid off, the second with it filled with the marinated meat. Paper towel on the bottom catches the dripping marinade.
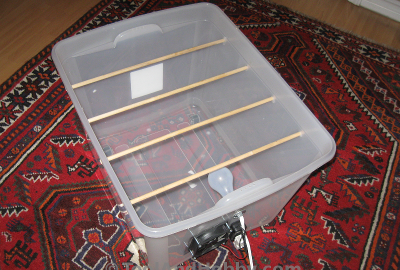
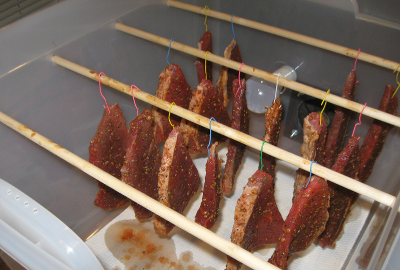
The only problem with it is that my family eats it faster than I can make it !
And all my Canadian friends who have tried it agree, that jerky is but a poor imitation.Clive
-
Thanks Sheilajeanne,
The link to the bonus pattern was really helpful, although it only shows the flap this is a good starting point for creating a pattern.I had considered buying the kit, but as I want to stitch the bag rather than lace it, the kit would only serve as an expensive pattern, especially as this is likely a one off.
Clive -
On 01/06/2012 at 10:22 AM, Phatdaddy said:
Dasher - Tandy Pattern I made these for my 4yo at the time and her best friend also 4. Ironically they have the same initial too.
Kevin
I realise that this is a very old thread, but I am planning on making a little bag for my granddaughter, something along the lines of the Tandy Dasher. So I was hoping that someone might have a pattern available for something similar. Unfortunately this link posted by Phatdaddy is no longer active.
Thanks,
Clive -
jdm0515,
After seeing my portfolio an acquaintance has talked me into making him the identical portfolio but only in a different colour. I will keep the points you suggest in mind.Thanks for the advice,
Clive -
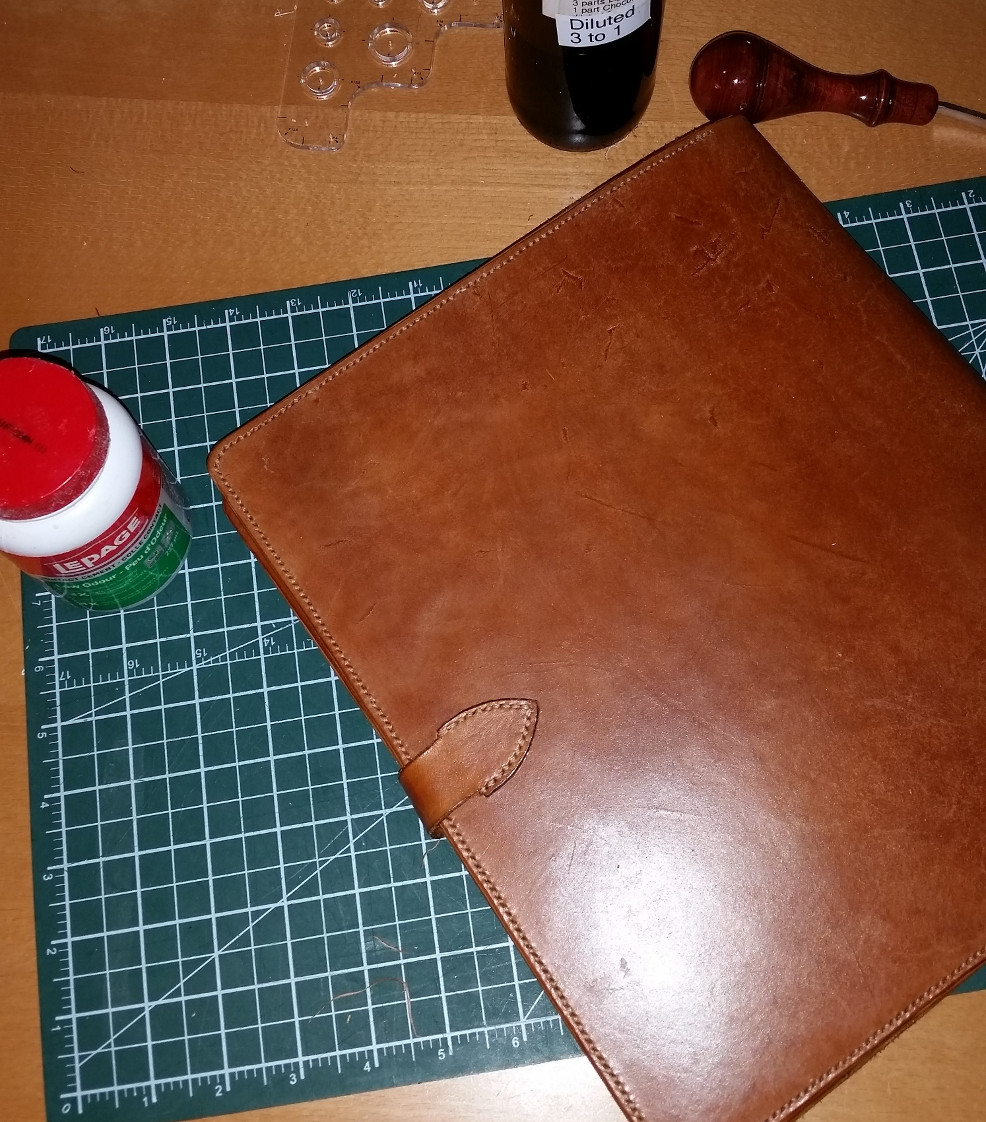
My newly completed letter sized portfolio.

For the most part I am very happy with how it turned out, but the one problem I have been having is finishing off the edges. I used "LePage low odour contact cement" to assemble the portfolio prior to stitching, but I am having problems finishing the edges where the glue has bled.
The procedure I followed is sand the edges, dampen and burnish with a wooden burnisher, sand again, damp and burnish again. I then dye the edges, and once the dye has dried, I follow with Tokonole burnished with a piece of canvas. The edges turn out exactly how I would like them except for the parts where glue has been exposed leaving rubbery rough patches.I am sure I am not the only one who has experienced this problem, what do other do to prevent if from happening?
Any advice would be appreciated,
Thanks,
Clive
-
If you search for leather on eBay India in the tools category you will find lots of Indian suppliers.
-
Hi Keith,
If you have access to Al Stohlman's "The Art of Making Leather Cases" Volume 2, he gives instruction for making a manicure case on page 106.
HIs books, despite the dated look of many of the projects, are a mine of useful project ideas and sound construction techniques.Clive
-
First step would be to remove the background, there are a number of tutorials on the web, for example this one: How to remove the background from an image using the Gimp There are often multiple different ways to accomplish the same thing, so it may be worth your while to search Youtube for other tutorials.
Once you have gone through the exercise of removing the background, you should be familiar with layers, so after having removed the background, the next step is to add a transparent layer for the new background. Once you have added the layer, then move it below the layer containing the object, it can then either be filled with a solid colour, or with another image. Once that is done, in order to create the reflection, it is necessary to duplicate the layer containing the object. Flip the duplicated layer vertically for the reflection. Select a rectangle around the flipped object and drag it into position below the object. While it is selected, use the "Blend Tool" to apply a graduated transparency mask.
Clive
-
3 hours ago, Sheilajeanne said:
Thanks, Biker. Since I'm in Canada, I'll just buy it at the Tandy store the next time I'm closeby. The exchange rate right now ain't good!
Being in Canada I have more or less given up on Amazon.ca, even with the exchange rates and shipping it is almost always significantly cheaper to order from Amazon.com. And if you spend more than US$25 on books, shipping is free. In this case however with your Elite membership, Tandy would be your best bet.
Clive -
Thanks for the great advice Mattsbagger and bland. I think that I'll stick with belly until I have more experience.
Clive -
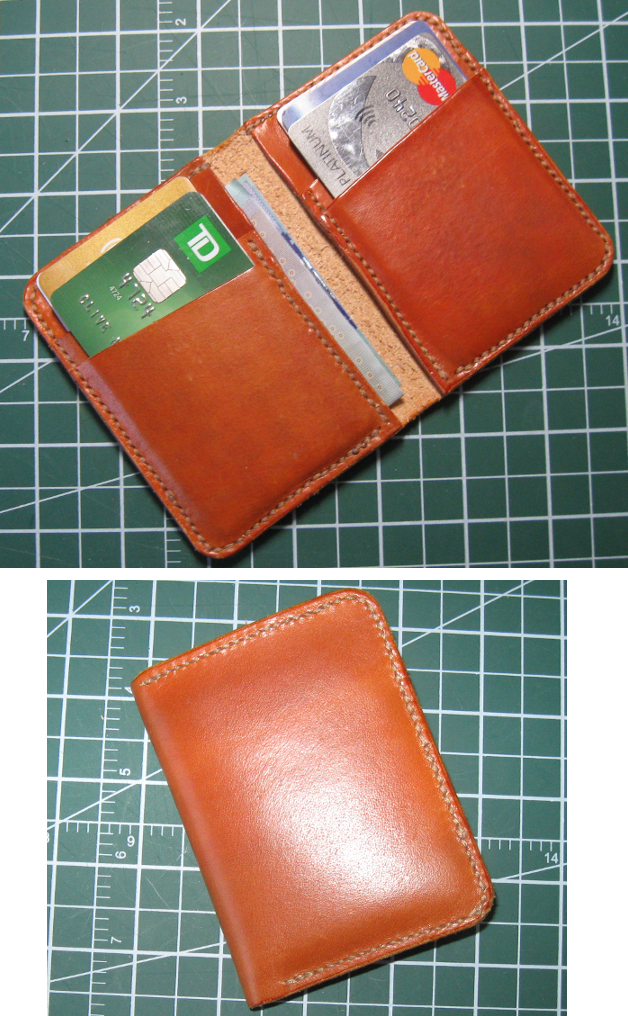
I completed my first project a few weeks ago, a small wallet I could slip into my front pocket. I am fairly pleased with how it turned out, although the stitching did go a little funny in a few places.
As this was mainly to be a learning experience I used the cheapest leather I could find at a local store - veg tan bellies. For the outside I used 1.6mm and 1.2mm for the inner card holder sleeves.
I dyed the leather with fiebing's light brown diluted 5 to 1 with rubbing alcohol, rubbed in using a piece of an old t-shirt. It took a couple of coats to get the depth of colour I wanted. I then followed up by polishing with a few coats of a wax/oil mixture.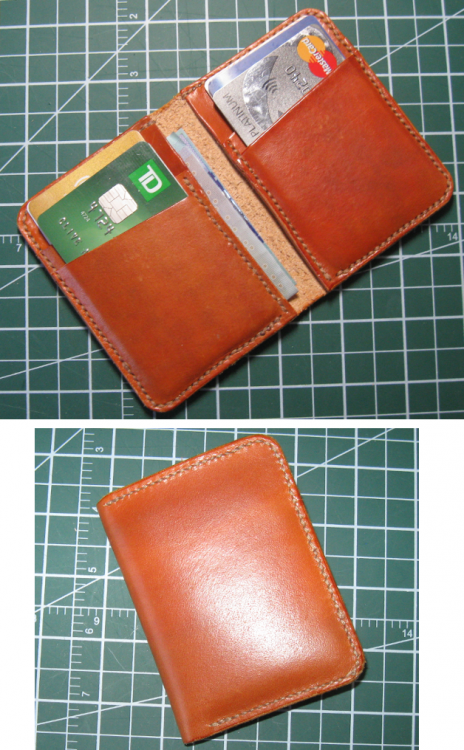
To me the finish looks quite good, even though the leather was described as low quality by the store clerk, and other than the rather furry flesh side, I am not too sure why he it is low quality. Which brings me to a question, I am ready for my next project, a more complicated wallet for a family member, bearing in mind that I am not going to tool it, what reason would there be for me not to continue with the belly and if not, what leather should I try instead.
Thanks,
Clive -
Thanks everyone for the great advice - plenty of options to experiment with over the weekend. I am using the diamond style chisels.
Clive -
YinTx and Mattsbagger,
Thanks for some great advice, unfortunately I will have to wait until the weekend before I have a chance to try out your suggestions.I am using 3mm pitch Japanese diamond irons followed by a Kyoshin Elle "small" stitching awl from leathercrafttools.com with John James size 4 needles and 0.8mm Tiger thread.
Clive
-
Johnv474,
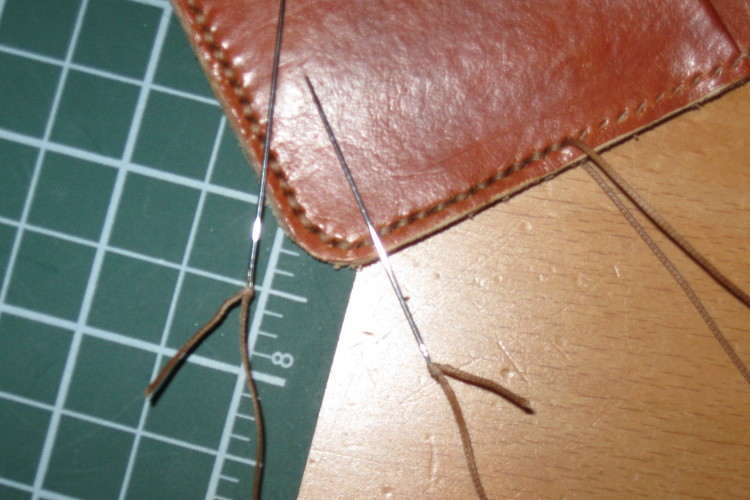
Thanks very much for the response. I probably didn't really explain it well, but I do "lock the thread" exactly as you describe which I hoped was visible in the first photo. What happens however, is that as I sew the part of the thread that is pierced is pushed along until it touches the needle forming a knot against the needle as can be seen in the second photo.I have tried using a larger awl, this helps somewhat, but I am still having problems with this. Any advice would be appreciated.
Thanks,
Clive -
Al Stohlman's books are invaluable, especially the stitching book, however nothing beats a real life teacher. Unfortunately we don't all have the luxury of sufficient time, money or even availability of classes, instead however YouTube offers an excellent alternative.
There are hundreds of leather working videos on YouTube, of the ones I watched, I found Nigel Armitage https://www.youtube.com/user/Nordicbadger/videos and Ian Atkinson https://www.youtube.com/user/satansbarber/videos the most helpful.
Both have made loads of videos, so it is only too easy to get distracted, so make sure to scroll through their videos to find the introductory ones. I found Nigel's Saddle Stitch in Detail and Ian's Hand stitching leather particularly useful. Ian also has a Top 25 recommended tools video which is also very helpful.Clive
-
I am a complete beginner so take what I say with a pinch of salt.
I was also having problems with piercing the thread with the second needle until I followed the advice given by Al Stohlman in his sewing book of simultaneously pulling the first thread with the left hand while sliding the second needle through with the right hand. For a better description, please refer to step 11 on page 11 of his book if you have it handy.
Clive -
8 hours ago, ChriJ said:
What was his method of sharpening them?
Chris
I asked Jeremiah for permission to repost his email to me here, he hasn't yet responded, but I can't see that he would have any objections to me posting his sharpening instructions, so here is what he wrote:
So lets get started with the inevitable maintenance of any and all cutting tools, no matter who makes them. I would have to guess that there are small burrs on the top side of the tool. ( top side of these tools is that side looking back at you during use.
Lets begin with a sort of daily maintenance schedule for edgers on the bench. Sharp tools need to be stropped or another term may be polished.
So, I keep a small strip of board on my bench with assorted leather strips glued down on top the board. Each leather strip changes in its width and height with different radius over the top, which faces you when its being used. I charge or load each strip with a high polish type compound, something like a red rouge or a white diamond compound. By holding the edger in its “too be used” position, dragging it backwards along the top of the strip that best matches the radius of the bottom of the tool you will be honing/polishing those internal cutting edges.
Think about having a second board and strips, but on this one we charge each strip with a powdered grit of say 600 grit, we would use this for more material removal/sharpening, followed by the board above used to polish that final cutting edge.
Now any time that you are sharpening and or honing a tool, there will be a tiny wire burr forms on the upper edge of the tool- that’s the edge facing you remember.
So now, use the honing board, turn the tool upside down and drag that upper crook and cutting edge of the tool side ways along the largest radius strip- this will wipe off that tiny wire burr.
You should be ready to go after that.
Charge your boards every month or so too keep them fresh and doing their job. I strop/hone my edgers some everyday, just like my knives.
If you are edging wet or damp leathers, when done wipe those tools off, keep them dry. Veg tan leathers have a certain degree of acidity in them, however minor, it will micro etch those fragile cutting edges making you struggle even harder. -
Hi Nigel,
Thanks very much for the advice. I didn't have too much success raising the leather, even though I made sure that the blade was fully engaged with the edge, it still didn't cut well. I suspect though that it really is just a matter of sharpening the blades in accordance with Jeremiah's instructions. I will also try some thicker leather as you suggest.Thanks,
Clive -
BikerMutt,
Thanks for the suggestion, I have contacted Jeremiah Watt who replied with a very useful email on the care and sharpening of these tools.
I feel that his reply would be useful to others, so I have emailed him for permission to include it in this thread.Clive
-
Just getting started in leather work I first spent some time devouring youtube videos which is where I came across Nigel's review of these edgers. Being reasonably priced they looked ideal for a beginner so I ordered a set in late November.
My first opportunity to try the edgers was a few weeks ago when I made my first item a wallet. I struggled to get a decent edges, but put it down to poor technique and thought not much further about it. Getting ready for my next project I decided to spend some time trying to get a decent edge on the leather, but I just can't seem to get the edgers to cut. I don't have a great selection of leather to experiment with right now, just some 1.6mm veg tan, I have tried both the size 0 and size 1 blades on it and all they seem to do is skirt across the surface of the leather, rounding it but not cutting.
Watching Nigel's video it all seems so easy so I am wondering if it is the tools, the leather or me. I am not keen to send them back until I have tried another edger to make sure it is the tools, especially as it involves international shipping. So I was looking for ideas or a recommendation for another reasonably priced edger I could try?
Thanks,
Clive -
I am busy making my first item, a wallet. As I expected this to be mostly a learning exercise I chose the cheapest leather I could find, some veg tanned belly. For the outside I used 1.6mm (4 oz) and for the inner card holder sleeves 1.2mm (3 oz).
As I had never saddle stitched before I spent some time on youtube. After watching Ian Atkinson's stitching video I decided that using Japanese diamond pricking irons to punch all the way through would be far easier initially than also learning to use the awl at the same time. Learning to use an awl could then come later once I had the stitching basics.I made a stitching pony while waiting for the items I had ordered online to arrive. I had ordered 3mm irons and a small stitching awl from LeatherCraftTools.com and I also bought some John James size 4 needles and some 0.8mm Ritza 25 thread. The first photo shows the wallet punched ready to stitch and the needles threaded and locked along with the pricking iron and awl.
However, even though I made sure to punch all the way through, the holes on the back side closed up almost completely once I withdrew the pricking iron so I ended up having to use the awl anyway. Could that be because of the leather I am using, or what else would cause the holes to close?
Stitching was not easy, even after using the awl on each hole and immediately inserting the needle, it took a fair amount of force to get the needle through. Which leads to my next problem, as can be seen in the second photo. The knot behind the needle slowly closed up, and even though I stopped periodically to try and open the knot, the knot eventually closed up completely causing a lump behind the needle and the only way I could finish my stitching was by using a pair of pliers to pull the needle through.
So how do I prevent the knot from closing, or am I using the wrong combination of thread size, leather thickness, hole spacing, awl size? Any help would be appreciated.
Thanks,
Clive

-
Many years ago, in my late teens, I spent a few months working in a tannery doing various odd jobs. One of my tasks was to make up batches of dubbin, this was rubbed deeply into the veg tanned sides with stout brushes, buffed to a shine and then sold as "harness leather".
Unfortunately at the time my mind was focused on girls not leather, looking back I wish I had taken more interest in the job itself. From what I do remember the dubbin was mixed up in a 44 gallon drum - equal quantities by weight of two waxes were added to the drum, beeswax being the one, and carnauba or paraffin wax the other (I can't recall which) and then whale oil measured by the bucket. I don't remember the exact ratios but I think that was about an equal quantity of oil to wax. A high pressure steam wand was placed into the drum, the steam valve opened, and after a few minutes the action of the steam would melt the wax while at the same time thoroughly mixing the ingredients which once cooled had the consistency of Vaseline.
Needless to say whale oil is no longer obtainable, Now days this would have to be substituted by something else. I would have thought that something like neatsfoot oil would be a possibility but not if it is as detrimental to leather as unicornleather says, so perhaps then cod liver or even olive oil could be suitable?
Clive
A bunch of books.
in Show Off!!
Posted
A free pattern for a discbound leather notebook cover can be found here free disk bound leather portfolio pdf pattern scroll down to the bottom of the page to download the pattern.
This makes use of the cheapest Staples cover, which consists of two sheets of plastic, these are folded back on each other and are then slid into a pocket, this gives two advantages.
Firstly, one does not have to cut the multiple holes required for the disks, and secondly one does not have those huge, butt ugly discs sticking out the back of the notebook spine.
Clive