


.jpg.2e6365e784dd7e789906ec8a3615d7df.jpg)
AndrewWR
-
Posts
85 -
Joined
-
Last visited
AndrewWR's Achievements
Member (2/4)
-
Thanks for all the positive vibes. I just hope she loves it.
-
This is a birthday present for my girlfriend. It's made of Sedgwick 1900 collection red leather which is a less glossy finish than their bridle hide. its 2.5 - 3 mm thick. Lining is pig suede, all the hardware is brass and its all held together with about 3000 hand stitches. the bag is about 10 inches across by 8" high. The main compartment is 2". The design is similar to one made by Burberry but horseshoe shaped purses are common enough. There is one main compartment, an internal front slip pocket and an external rear slip pocket, all suede lined. The fastener is a Chinese made alternative to a Loxx fastener and, having used both, I consider these solid brass ones to be far better quality than the German made ones. I like Conway buckles for strap adjustment because they're low profile and don't bite into the strap.
.jpg.00677d956128ff4037e47237d266e235.jpg)
.jpg.29eafee2d84c4606682773db2695848f.jpg)
.jpg.c9a589239e85f47691bc22752e4c1921.jpg)
.jpg.00005f22cfb961b7e150a0fd074e9e6e.jpg)
.jpg.5202b28860ebcc8ed4bbb61fbb90b40a.jpg)
.jpg.9286efe37d12b4d934f9a0ceb020cc39.jpg)
.jpg.4b61d7c4f182cc48357b8032440ec711.jpg)
-
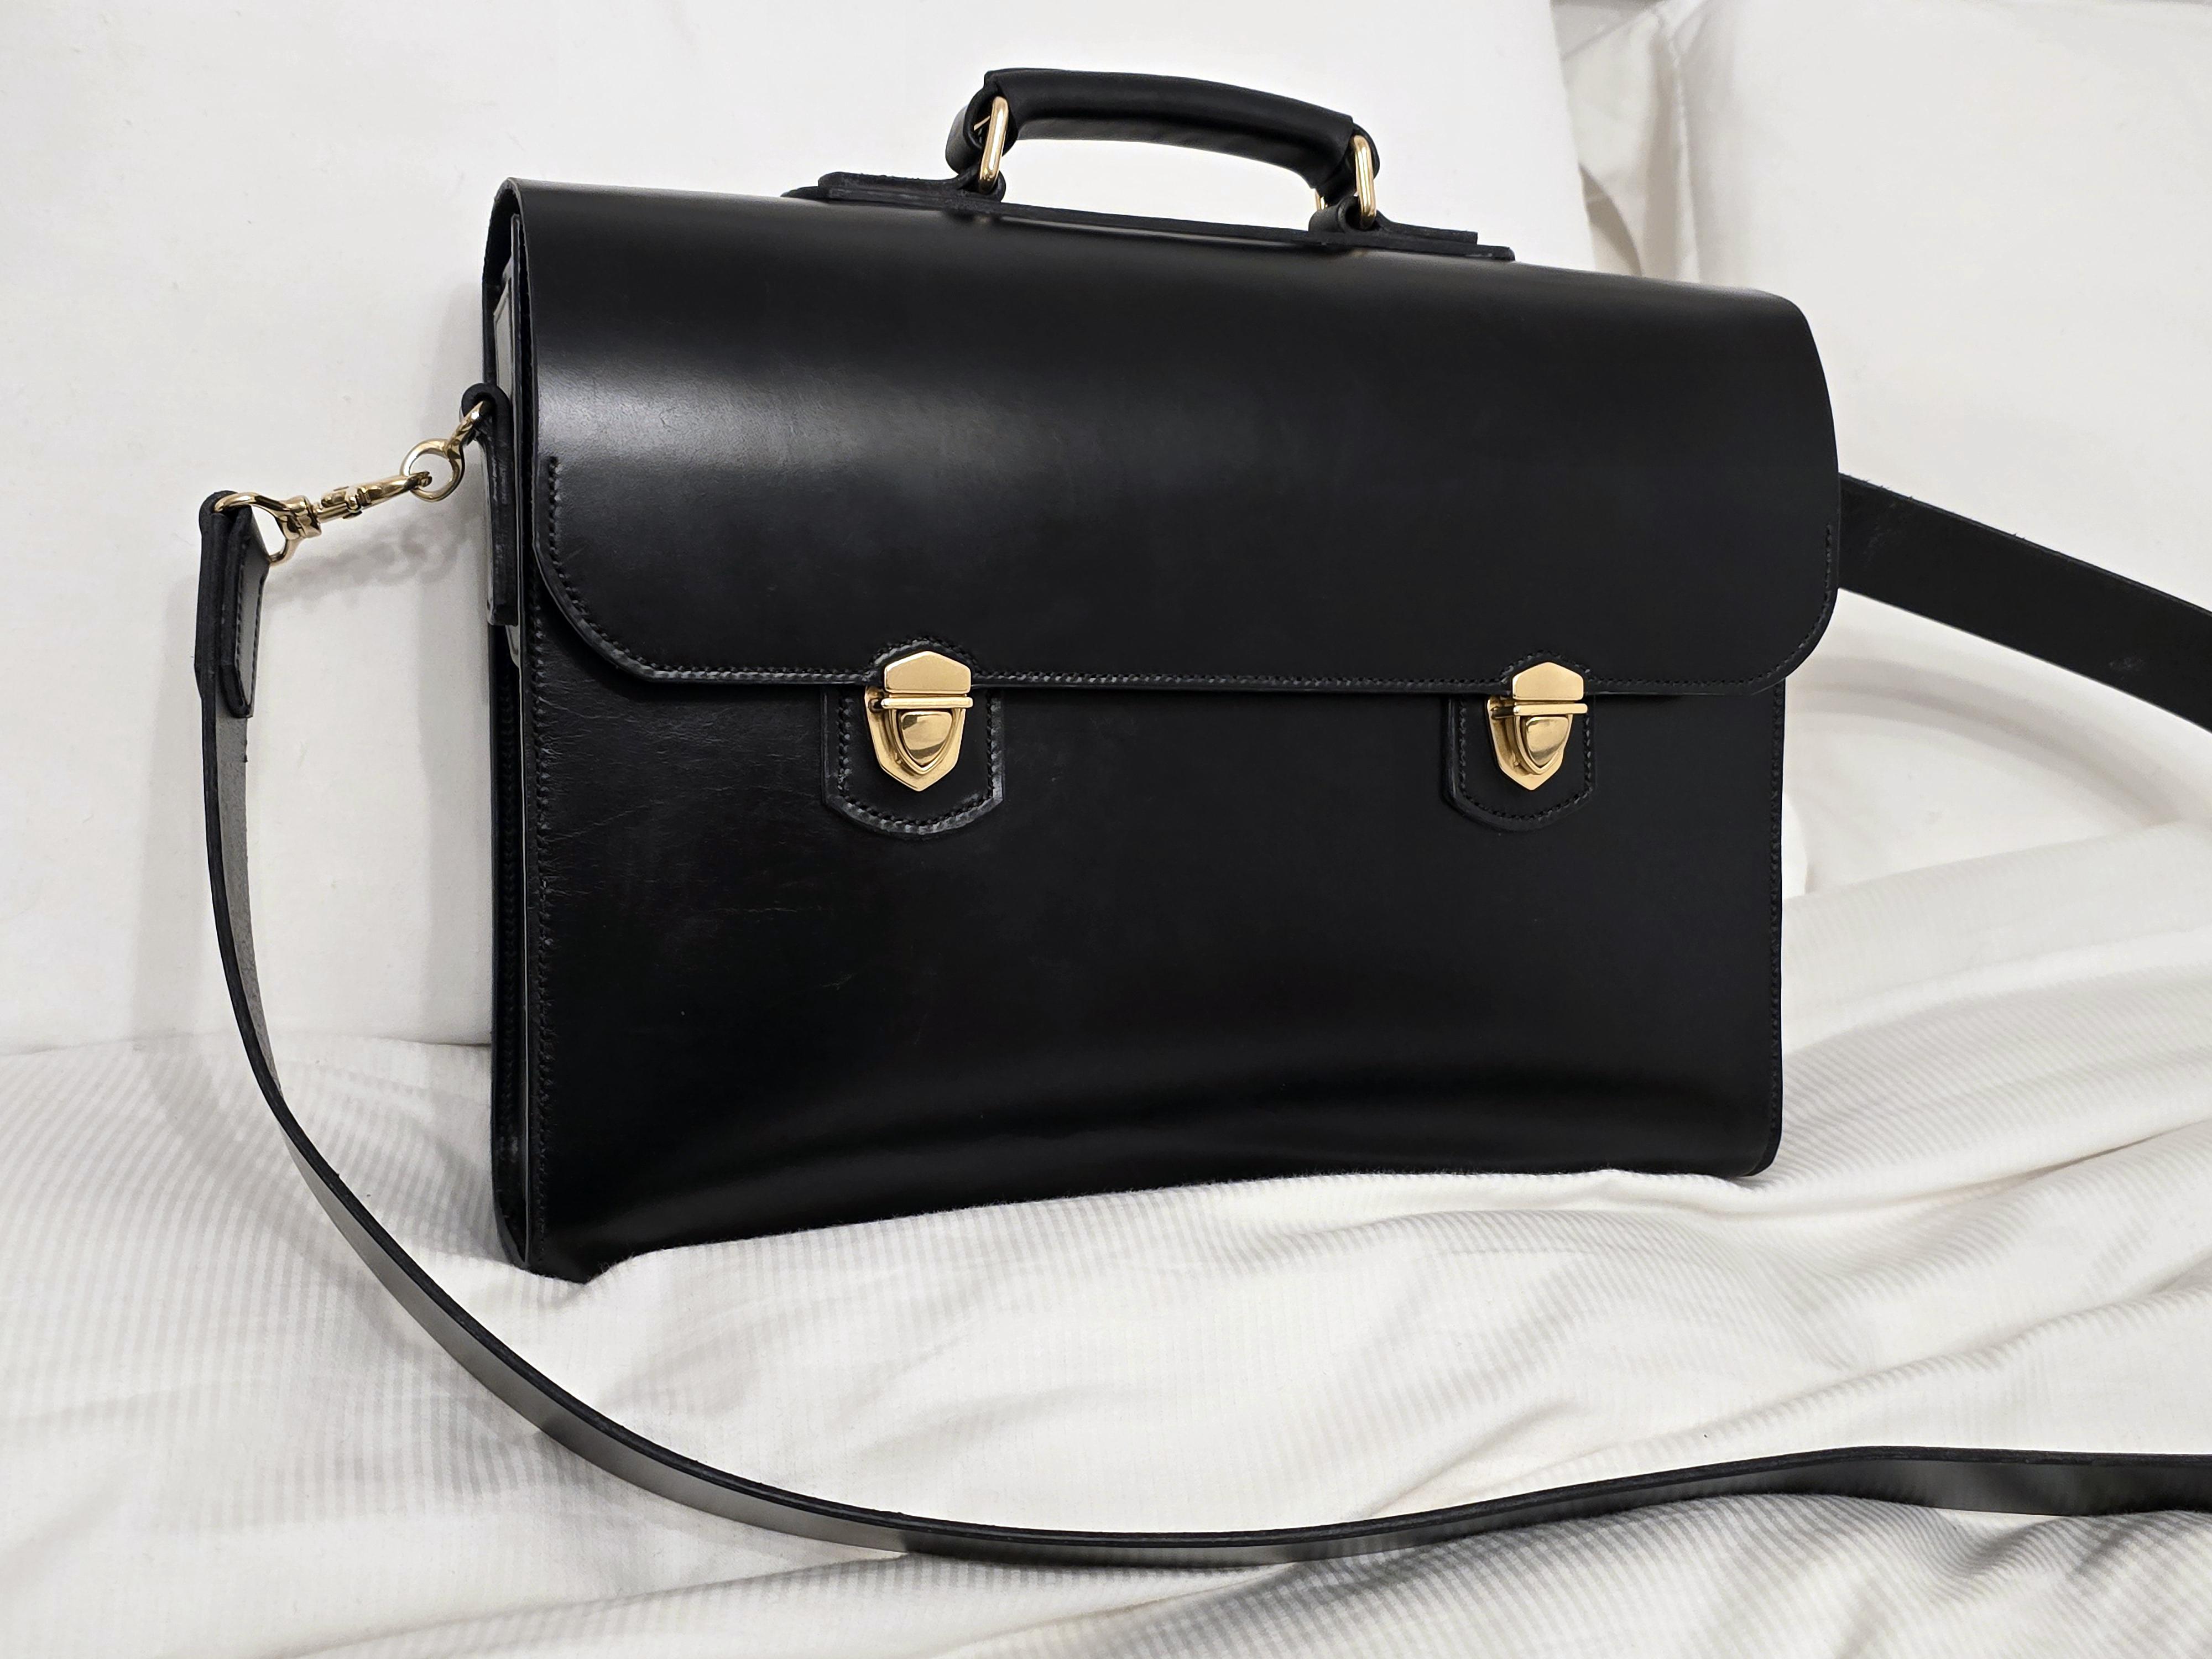
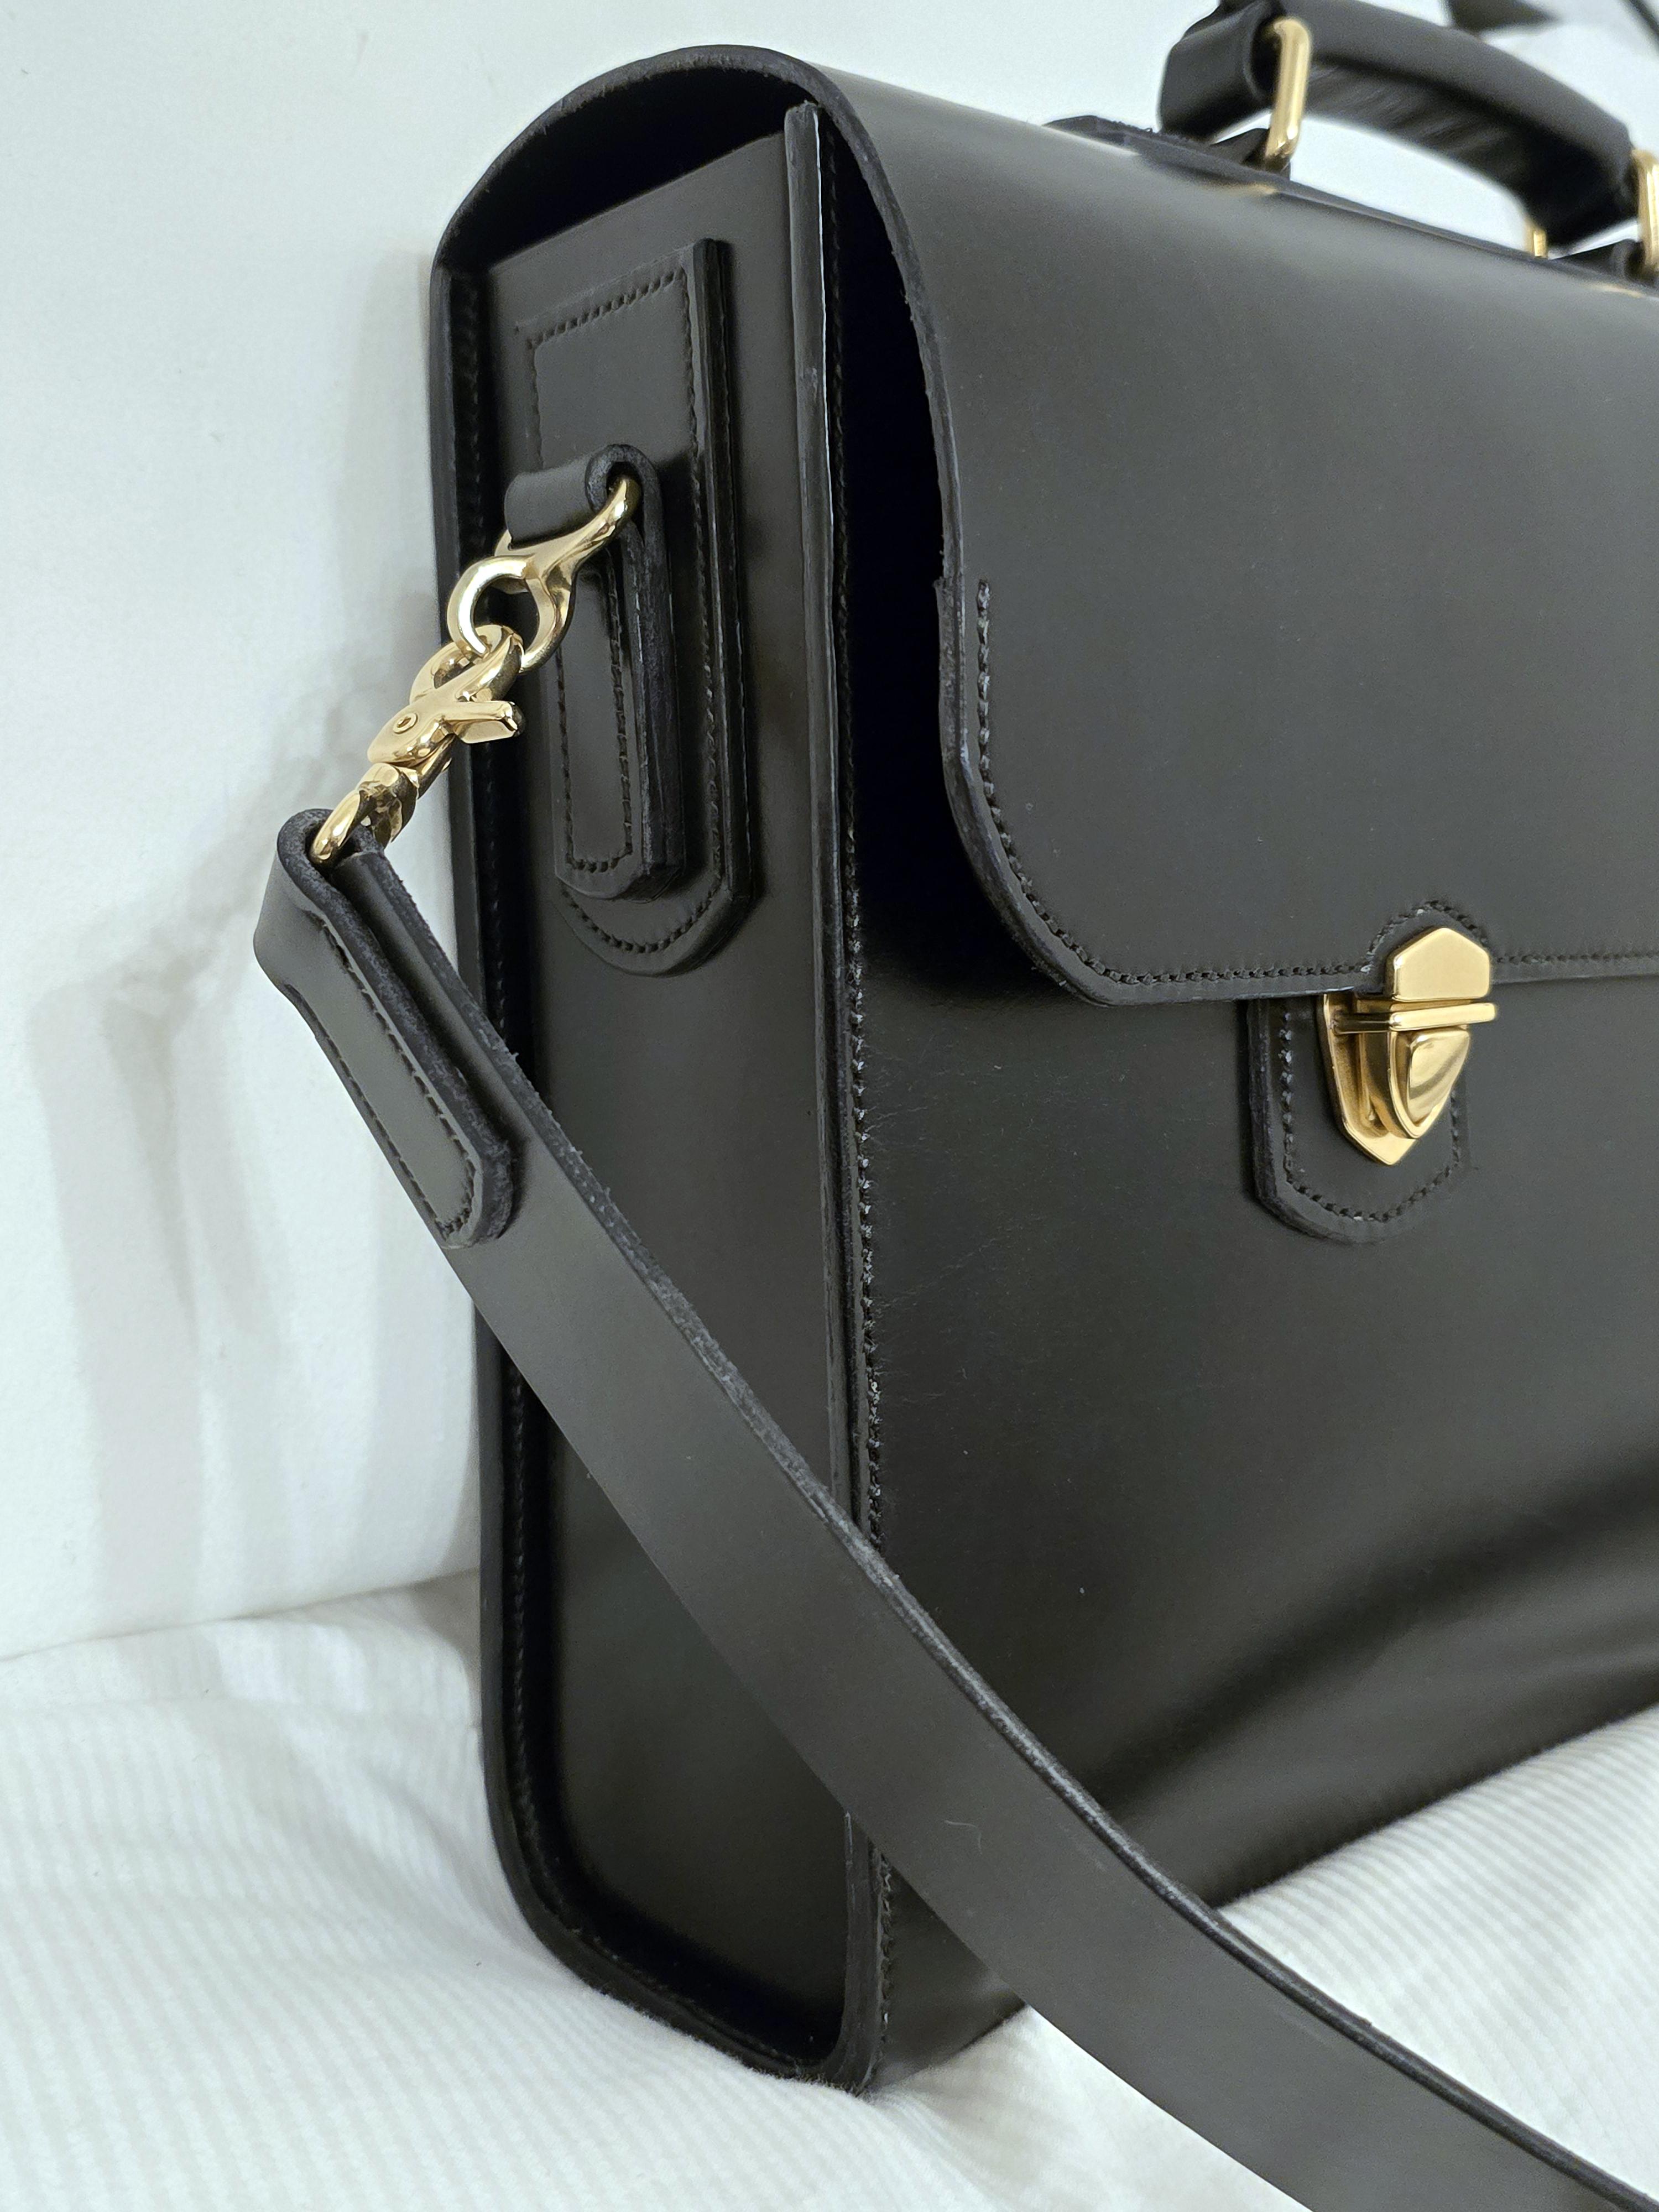
Just 3 layers. The extra layer serves three purposes: I sewed the loops to it, not too worried if the stitching on the back was perfectly straight, then sewed the sub-assembly to the end of the bag. Sewing through only two layers its easy to get the seams straight on both sides. The second purpose is extra rigidity, worth having since I wear such bags cross-body so the strain on those loops is diagonal and the end of the bag could deform. The third purpose is as a spacer to make sure the brass fittings don't rub the edge of the flap. All in all, those extra bits of leather are doing a lot of work. I could probably claim a fourth purpose: Aesthetics, because I really like the look of it, but that's subjective.
-
OK, so I started a few days ago with pre-cutting and wet moulding a couple of pieces but the build of this bag started this morning about 8ish (its December 25th). A bit over 12 hours work later and... I figure there is still some burnishing to do when I get some daylight but I'm pretty happy with the outcome and it sure as heck beats the traditional activity of trying to set a new personal best for carbs consumption. I couldn't get a photo of the inside because it just looked like a black hole but it's a single compartment in unlined bridle hide. The style is very much like an offering on Tool & Hide's website (Canadian bag maker) but a bit bigger (250mm x 360mm x 100mm vs 230mm x 330mm x80mm). The hardware is obviously solid brass and the stitching is all by hand. Wishing you all the very best for what's left of the holidays and a happy an d healthy new year.
-
Gottaay I prefer the recessed nut: Cleaner lines. Another great job of turning too.
-
Nice work on the molding. Maybe nice with a matching leather wrap to replace the red plastic sleeving?
-
The button was a ready made one spare from a leather upholstery project.(Not posted here because it's not really leatherwork if the only tool you need is a stapler) The cord is 3mm round leather thonging I had in stock. All the leather was pre-dyed.
-
Not humidors, Jack. The pale box is my collection of EDC penknives and the darker one is a shoeshine valet box. Good try... but no cigar :-)
-
A nubuck version of the traditional velvet smoking cap. Bridle hide trim and goat skin lining. Where the traditional design is round, I took the time to make a more anatomically accurate acrylic template (with my handheld CNC router and a sheet of 10mm plastic) and wet formed the top to roll the edge over. This project was really just a test for the template. This is the SVG file of the 61cm hat outline I reverse engineered from careful measurements of my favourite fedora. Hat outline.svg
.thumb.jpg.850be77efe17f57e21888dd69756136d.jpg)
.thumb.jpg.23e57891620abb25663e4320aa69aeb2.jpg)
.thumb.jpg.e9ebdb76be77fb13e524c471a52ab4ac.jpg)
-
Loving the way the curves intersect the grid to produce such eyecatching patterns. With you on the not standing it on end issue too. I usually use one of my shot filled weight bags to plonk it on. It stay where I leave it then.
-
Thanks to all for their support. @327Fed, Yep. Red on purple is much less obvious, especially when it dries.
-
Just finished a workshop apron for myself. Ths is primarily as body armour when woodworking, not for the relatively danger free pastime of leather working. The main material is 3-4mm thich bull hide with a nubuck, brushed finish. The trim and strapwork are bridle hide for contrast. The hardware is stainless steel. The straps are temporary, adjustable ones but, once I've settled on the exact length I want, I'll make sewn on, fixed length ones and lose the conwy buckles. I settled on the crossover strap design because it negates any need for a waist belt. The apron drapes naturally around the body. This leather isn't very stiff but its probably heavier than most people would use for this unless, like me, they've been hit by a kickback off a tablesaw. Not the most exciting leatherwork project but practical.
.thumb.jpg.24a8743ae97d98647750a48e1d8d23b8.jpg)
.thumb.jpg.5b1e8a558e81a1eae5fc331a2d61d152.jpg)
-
Just finished making a new strap cutter. For some reason I can't fathom, every strap cutter I looked at has a stickie-uppie blade that lies in wait for unwary fingers. Having cut myself once, I learned - quickly. No, I didn't learn to handle sharp tools with proper caution (I do that anyway, mostly). I learned to redesign the tool to be a wee bit safer. Not a world changing invention, to be sure, but a magnetically attached blade guard makes me happy. I'm easily pleased, obviously. The wood is purple heart so that's its natural colour and I think it really works well with brass fittings. Apart from being an attrctive wood, purple heart is one of the toughest, hardest, densest woods you can still getr in quantity. Its about 60% stronger than hickory and almost as dense as lignum vitae, so very practical for tools. Merry Christmas to you all.
.thumb.jpg.478e4731e420351331a17af2cd5cc690.jpg)
.thumb.jpg.63c5b4f93acce93d6bab693ece062d49.jpg)
-
Just a thought but I'd wet mould a piece of reasonably stiff hide over some plastic tubes (using them only as a former) then trim it to be a snug fit and not glue or stitch it in. It may be an advantage to be able to take it out if your daughter ever wants to. I've made an assumption that she's not usoing broadhead arrows, since we don't do boy hunting in the British Isles and broadheads just wreck targets. If that's so, basic target points wont snag or dislodge a push-fit insert.
-
Ok, so this stays off-topic because, in addition to a leather sheath, I've machined a carbon scabbard that has the capacity for IWB or invert (under arm) carry.
.thumb.jpg.1acbb0bd8fc442d8490cf68b64d01917.jpg)
.thumb.jpg.e5d377cb4eae87f99d84ccb7b8c36259.jpg)
.thumb.jpg.4ed1dbae8dada980d06392d599329b6e.jpg)
.jpg.0e12a160c171683acd37d0508ea5602c.jpg)
.jpg.f1c49d1640578cdb889eff424ceb9d1a.jpg)
.jpg.15addebe31a28b714424c0b68098da50.jpg)
.jpg.56ad0ea1feea4f2072c06d23edc27bd8.jpg)
.jpg.9d0edb4a2997e972d438afc7fb06dc30.jpg)
.jpg.f533944edd911b8401864704aefa60f5.jpg)
.jpg.9ad6814e5ad2d7226ebeddc6a8cdf81b.jpg)
.jpg.384db569d86a68e54c8fe751f87a229e.jpg)
.jpg.745e7472521233ccd5170f021e9354ca.jpg)