


Mocivnik
-
Content Count
270 -
Joined
-
Last visited
Posts posted by Mocivnik
-
-
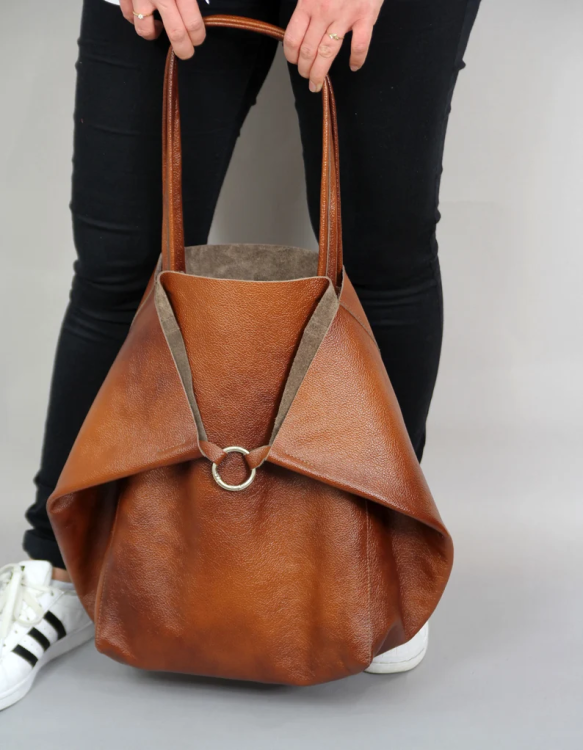
16 hours ago, Mablung said:Skive the edges well and you can probably keep the seam bulk to a minimum.
That doesn't seam (pun intended) to be much of a problem.
I'm more concerned about creating a pattern for this bag. Gives me shivers to even start.
-
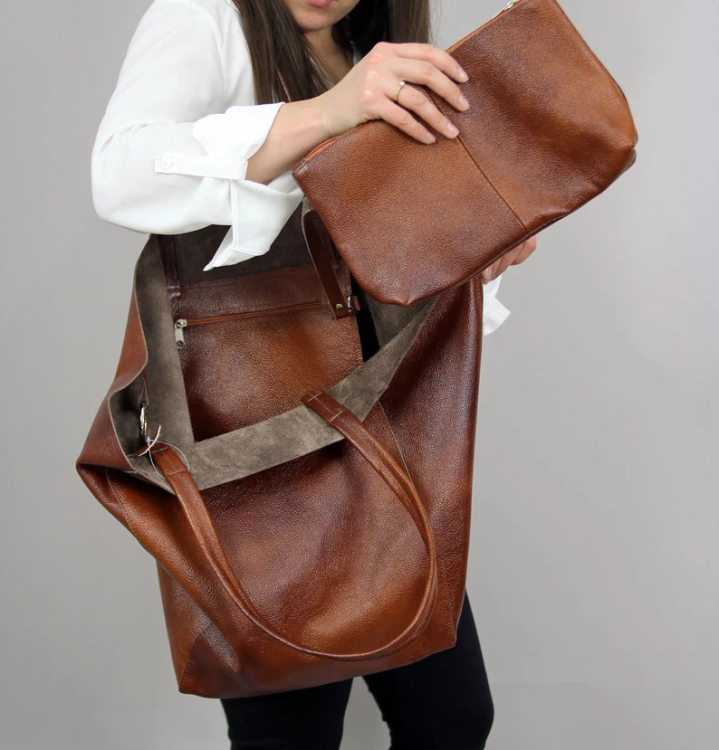
20 hours ago, Mablung said:That’s going to depend significantly on what leather you use and what weight. That bag looks like pretty thin chrome tan, with a very shiny finish to it. Probably no more than 2/3 or 3/4 oz stuff. I’ll bet the leather is skived at the side cutouts to avoid creating bulk.
Vegetable tanned calfskin leather, 1.3-1.6mm thick (3-4 oz.).
-
On 11/30/2023 at 8:57 PM, Mablung said:Looks like it's just four panels with two functioning as gussets and underlapped with the front and back panel. My guess is you can replicate the proportions by cutting four equal-sized rectangles and underlapping the edges, and pick the dimensions the missus would find useful. I thought about doing something similar for a tote bag I'm making my mom for Christmas, but I decided my leather (~5 oz. S.B. Foote chrome tan boot leather) would be too bulky to make attractive overlapped seams.
Thought of it aswell, but just can't figure out the cutouts on the side, without looking too robust.
Trying to get "about" the right pattern, before I can even modify it.
-
3 minutes ago, Simplejack1985 said:I gave up on all that I just bevel and that ad depth with a shader and a leaf liner then decorative cuts
Well, i would too, but unfortunally, I dont have that kind of artistic touch to just add depth freely by feeling.
-
1 minute ago, Mablung said:A lot of the Craftaid sheets will show you where to use what tool. There are also YouTube tutorials that show how to do it, including tool order. Others have done oak leaves and shown their tools, on here. In fact, I think one of the tutorials pinned in the carving forum is for an oak leaf.
Thank you for your reply.
I tried to google and search youtube for videos/tutorials, but either i gave up too fast (and I did some research) or I just missed mostly of them.
Would you be so kind to paste the link to it? It seems, I cannot find it though..
-
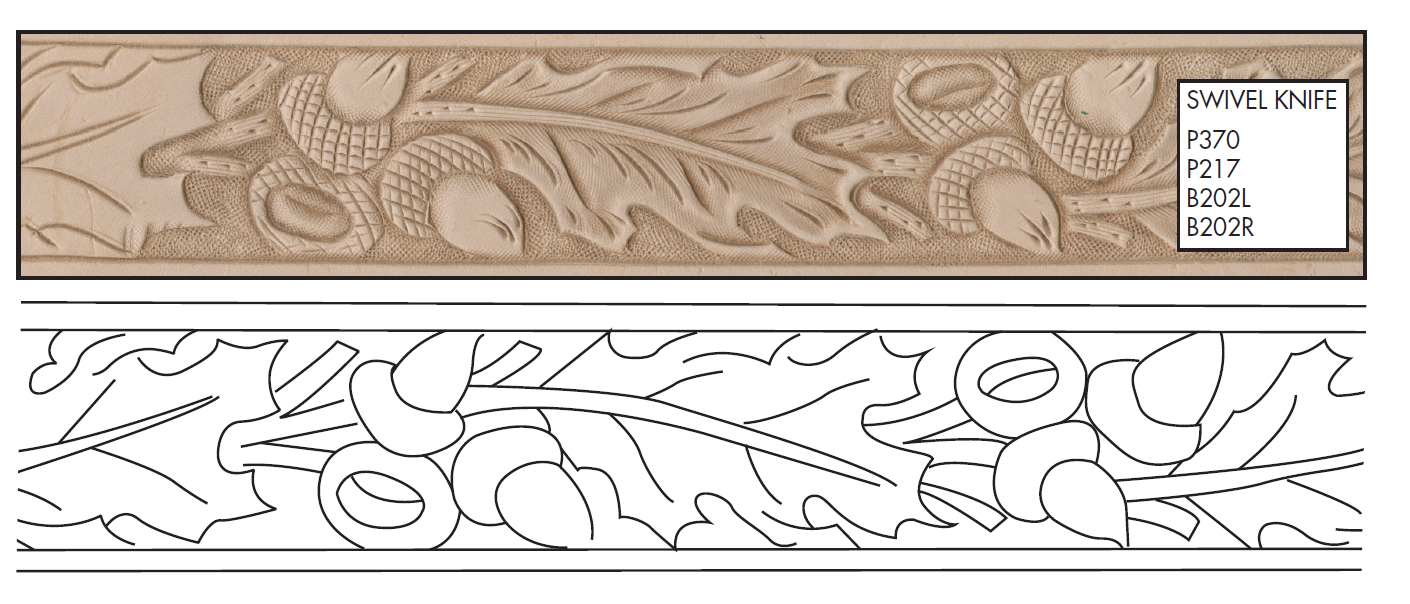
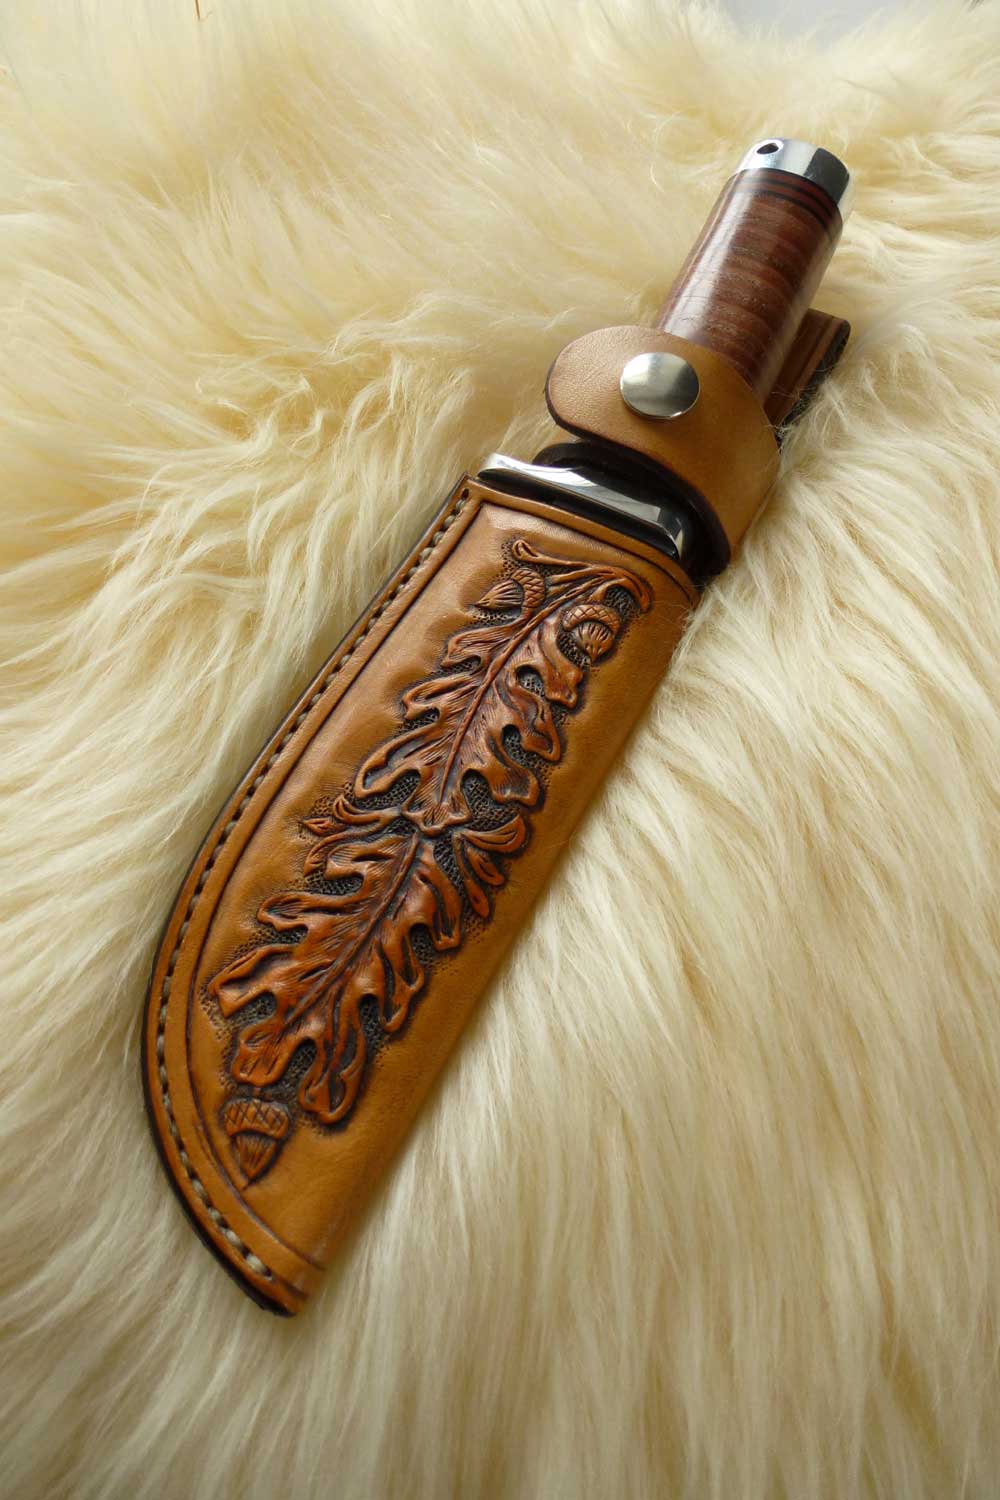
So, I think I came to the step in my leathercrafting journey, where I can "afford" to start carving. My first (and most common I believe) idea is carving oak leaves on knife sheaths.
There isn't much to add, there are a lot of things about carving oak leaves on the internet, but I cannot find THE ONE tutorial, that would take me to final product.
Now, I have two things: Tandy's "BELT STRIP TIP SHEET by GEORGE HURST" where there's an oak leaf, which is a good pattern, but doesn't show where to use which stamp and list of stamps, that I own (list will be lower in this post). And since I'm completely new to using any stamps, beside pattern stamps, its difficult for me to even start.
Is there a pattern for this kind of oak leaf and acorn, that has:
0. List of tools needed (this one has it)
1. Order for use of tools
2. Where to use which tool (preferably with ones, that I have)

List of stamps that I have:
701001
A104
BW1
BW2
BW3
BW4
B803
B936
B701
B60
C431
C431
D444S
D447S
D616
E684
F916
G508
G548
M887T
P217
S706
U851
V407
V407
X510S
X595
Z-X511
-
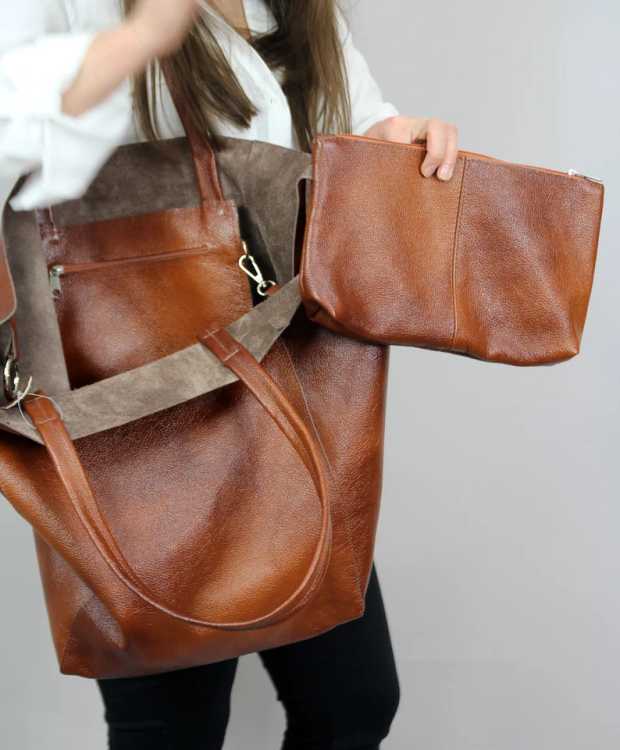
So, as I got only a few photos to make certain bag (for the missus), does anyone have a pattern simmilar to this bag perhaps? Or can give me a hint or two on how to make a pattern for this kind of a bag?
Appriciate any help.

-
5 hours ago, SpruceMoose said:The news is that Canada is passing new laws on VOC's and fiebings smaller bottles will no longer be available in Canada, only large production containers(1 gallon and up). I haven't seen a statement by Fiebings but here's the article and a link to the new/updated Canadian regulations: https://www.zelistore.com/en-ca/blogs/news/new-voc
Okay, might be slightly annoying, but im glad noone knows anything :D i cant really remember, where I've read it, but I remember people were "stocking on dies" and just to be on the safe side, I asked others aswell. Thanks all for the information!
-
Somewhere I've read, that Fiebings being discontinued to work since 31.12.2023. Anyone knows anything about this, is this the real deal or just gimmick?
-
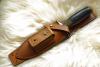
On 5/17/2013 at 12:39 AM, Geronimo said:Hello,
I want to show you some of my latest Leatherworks. My latest sheath was made for my old and rare Smith&Wesson Survival Bowie. I love these typical Randall-Style Sheaths...so I have tried to do it in the same way. The second one is a sheath for a very nice Blackjack. I hope you will enjoy it. Sorry for the horrible english- my name is Danny and I am coming from northern germany.
Very nicely done!
But I got a question: How do you finish all 3 layers of knife sheath on first picture' How do you finish welt (as it's got holes at the bottom) the same way as top and bottom layer? -
-
3 hours ago, Tugadude said:Wow, OK, sorry I said anything.
It is clear that even with the best of intentions, my words are either in vain or mistaken by some as attacks.
And so it goes.
Based on the general reactions, in the future I'll just keep my opinions to myself. They clearly aren't hitting the mark that I intended.
Last thing I want to do is create even more division. So this is the last I'll say on the issue and I don't currently plan on participating much. If and when I can provide some helpful information, I'll continue to do that.
If I sound a little "butt hurt" I guess it's because I am and I'm not afraid to admit it.
And so it goes.
That cut-out didnt apply to all comments.
-
Well, I believe this thread turned wrong turn somewhere very soon, as it wasn't an idea to either discuss copyrights either copy the original author.
I am well aware, that there are some things/ways, that people spent a lot of time to understand/make/achieve and include a lot of anger, dissapointment and failure. But as long as I can see the "How do I do that" on Leatherwork board, I feel free to ask things as such, because I also asked which dye should I use for my leather projects (years ago, when I joined this forum). Well, I got the reply that Fiebings pro dye works best. Now, was either that a copy because I use same technique as someone else? Or is asking on how to do these funky shaped edges a simple asking for a direction?
If anyone does know how to do that and doesn't want to share this "from God hidden secret", I'm totally fine with it. It's every person's right. It's can be taken as sacred trick from Penn & Teller, I get it. But instead of receiving a lecture on "how not to copy anyone" I'd rather skip that tutorial.
Now, back on topic:
-I wasn't able to talk to the leathercrafter, who did that, becuase he has no information to reach, neither lives in my country.
-I don't want to copy that, I'm 80% interested in this as "how the hell is that even possible" and 20% on "oh yeah, I might use it someday" on some project. Depends also on many many other factors, but that's not the topic.
-I got already my own edge work (not a big deal, but it's slightly more round than everyone else's I believe), so I don't need an inspiration for that. I'm searching for more and more creative ways on how to "decorate/finish off" items as many options availible.
-
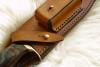
2 hours ago, RockyAussie said:I don't see this as all that hard to think out. To show respect to the maker I ask you ...what if the welt area was not burnished at all and perhaps folded instead? In your specialty it says Holsters so the bottom pic with the knife beside the sheath should not be that much of a mystery I would have thought. I hope that is enough for you to see how.
Well, that didnt help much about the welt, since it's not folded (if I got you right), but it was (probably) tied up?
And about the bottom pic: not sure what you thought a mystery for me was, but it's the "extruded" leather near the edge of the holster. Not sure if you looked at it.
1 hour ago, Handstitched said:Its pretty darn clever, however its made . Very effective. But one word that passed through my mind, briefly, was ' filigree' .
So love the textured surface on the sheath, top right & centre left. My Mother once taught pottery, one of the techniques of applying a texture to wet clay was to use natural materials, pine cones, tree leaves, tree bark etc. anything that has a rough surface. A similar technique could be applied to wet leather.
Love em !!

HS
Exactly. Love it. I was considering of using ropes, straps, leather belts etc. But can't come up with simmilar effect tho. Was wondering if anyone ever made it before..
1 hour ago, chuck123wapati said:once dry your leather edge would be worked just like wood cut ,file, sand then burnish it. Pretty cool effects indeed. just glue up some scrap and try it out.
My intensions are such. But I was hoping on some tips before I even start to try it out.
-
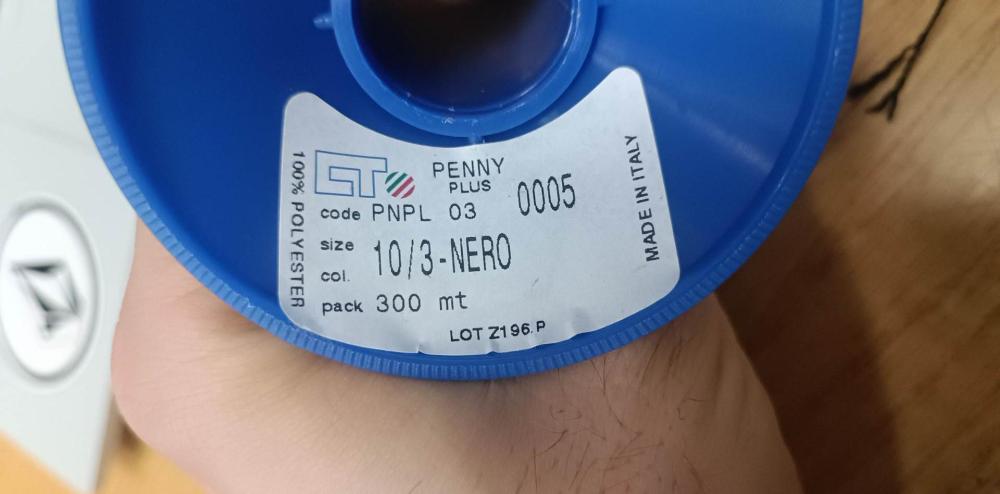
14 minutes ago, kgg said:The thread according to the label and their website ( https://www.ctpoint.it/en/products/twisted-yarns/penny/ ) is a polyester 3 ply thread. I have a feeling it is not a bonded polyester just a twisted polyester.
Glad you figured out the problem.
kgg
I couldnt find their website, thanks for it. But it's penny plus, it's this one:
https://www.ctpoint.it/en/products/twisted-yarns/penny-plus/
-
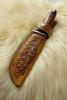
How is possible to do 2 things here:
i) burnish edges then "mold" them? As seen small black sheath on the top. To me, it looks like it was done with some sort of string or thread and that it was tied down from left to the right...anyone knows anything better? On the brown sheath on red background, it's even more diverse, so I'm confused on how THAT was done..

ii) How it's done that "carving" on leather on lower pictures? It's like leather have different depth, but not cut out, rather pressed in? Although, this guy is making different shapes every time, I kinda doubt he makes specific tool for each sheath..
Any help would be appriciated!

-
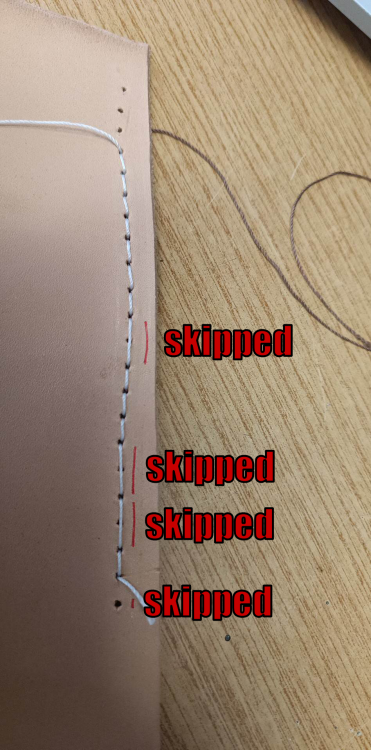
9 hours ago, Wizcrafts said:Add more foot pressure to hold down the leather to stop skipping stitches. You can rub out the foot tracks later. But, I would move up to a #25/200 needle first. I recommend a Schmetz S point needle.
I watched your video and suggest that you tighten the two screws on the shuttle race all the way down, then back them off about 1/2 turn each. This will let the shuttle move outwards as the thick thread goes around the bobbin case. You don't want too much or too little clearance.
YES!! THIS SOLVED 99% OF THE PROBLEM.
I wasn't aware, that the foot pressure needs to be higher so the machine doesnt skip the stitch. Here's the product now, i've only had 1-2 skips during the red area. (those big blobs are burnt thread, so the stitch stay together)
I've also spent quite some time for setting pressure on top 2 screws (top of the machine, nr.1 and nr.2) and both screws under the bobbin (left for pressure, right screw for fixing it). IDK how they are set now, but the machine is working and I'm nearly 100% satisfied.
ALSO, the needle I'm currently using is 180, and there is 0% of difference between 180 and 200. It just skips 1-2 stitches per 50 stitches and I'm quite OK with this.I'm a bit bothered about seeing a knot in the hole (that brown ball), but I hope somehow will be solved this one day aswell.
Thanks everyone for help, it means a lot to me. And if anyone knows how to solve 1-2 missed stitches per 50 stitches, I'm more that thrilled to find out
")
-
23 hours ago, Dwight said:I'm not an expert on the Boss . . . but I found a trick that I always use when I'm changing needles . . . and doing it . . . mine doesn't skip stitches.
First . . . make sure that the needle will slide easily back and forth on a piece of your thread about 18 to 24 inches long. Hold the string . . . one end in each hand . . . and tilt the string by moving one hand up or down . . . that needle should not hesitate . . . but slip down the slanted string like the state highway patrol was after it.
THEN . . . put your needle up in the slot . . . again making sure the long slot is to your left . . . away from the main part of the machine.
LAST . . . take a regular sewing needle . . . one you would sew a button back on your shirt with . . . put the tip of it in the thread hole of the Boss needle . . . and make sure it points exactly 180 degrees away from the main machine body.
My vision has not always let me see how I have my needle by itself . . . so I devised this little trick . . . works EVERY time . . . if I do it right.
If that does not work . . . send an email to Tippmann . . . and tell them to give it to Ben . . . I've taken my machine up to him . . . he has sat it on his desk . . . and it works like a super champ every time when he gets done with it.
May God bless,
Dwight
Hello Dwight,
I changed needles from 180 to 200 and back, but didn't help at all tho. Now: Needle flew easily on even a shorter piece of string, I did that trick already.
The needle was looking away from the machine, ALTHOUGH it was a bit tilted, maybe for like 15 degrees, so I fixed that, THANK YOU.
I would actually like to give my boss to the company back for a week just to make sure it will work for next decade..But still might send an email for details and buying center Presser Foot (i really hate the STAMP that tippmann does on leather and leaves deep markings).
22 hours ago, kgg said:My take would be:
i) The thread size 10 is the same as V277 and for that you need 200 (#25) needle.
ii) The needle being a 180 (#24) is good for V207 (15) thread but in thick tough sticky stuff it would be better to use V138 (#20) thread.
iii) The thread sliding through the eye of the needle is only one part of the equation. The needle also has to make a hole large enough to allow the thread not to be caught by the material to allow it to form the loop properly so it is caught by the hook.
iv) The needle seems slightly twisted and the @Dwight detail would definitely help with needle alignment. If the needle is twisted one way or the other the top thread being caught by the hook maybe a problem.
v) It maybe the photo but are you using a proper leather point needle it appears the tip is round which would be used in fabric.
vi) A good thread to needle size chart can be found at https://www.tolindsewmach.com/thread-chart.html
vii) If the material is tough or thick or sticky you are probably going to have to move up a needle size from what's is being recommended.
kgg
i) So, I was always wondering about the thread, what it is, but I never got much on the data, since I got it shipped from Italy. Here's the sticker, that's on the bottom of the thread:
ii) I believe that V138 (#20) thread isn't availible for me. I would somehow prefer using different threads aswell, but local leathershop doesn't offer much of a choice tbh. It's pretty bad down here about leathercrafting in general.
iii) I understand, and I believe, this wasnt much of a problem, I believe there's enough space in the groove for the thread.
iv) Needle aligned.
v) Yes, the needles are pointy ones (7x3), not the dull ones. They are properly sharp and can very easily hurt you.
vii) I've used 180 and 200 needle, same effect tho. Im using either 2.4mm (6oz) or 3.6mm (9oz) veg tan leather for the 99% of the time on my machine.
-
So, my machine didnt sew for months now so I set it aside. Now, when I got projects (thanks God, not in a rush!) for the machine, I decided to either make it work or sell it. Depends on time/cost.
So, the problems were/are:
-skipping stitches,
-when the needle was exiting leather (way out), the needle jumped up front,
-clenching and clogging thread.
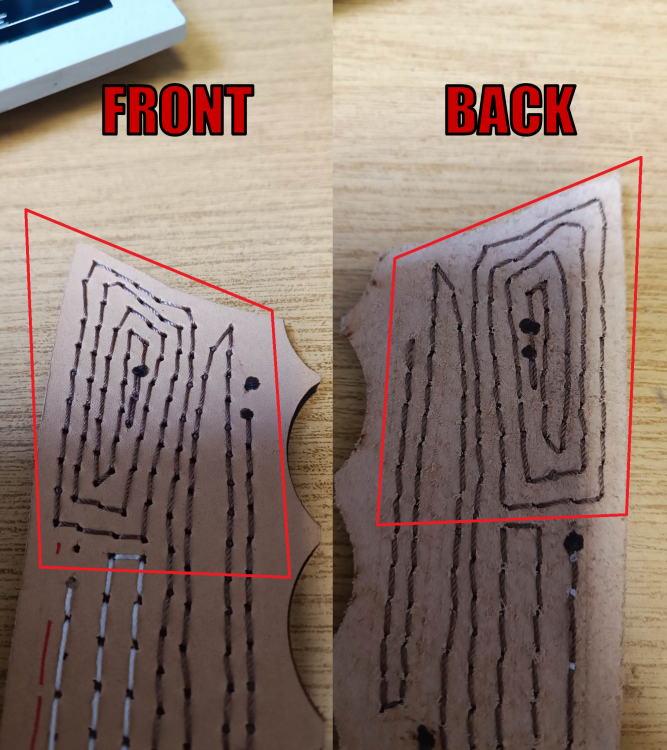
Now, I opened the machine up, cleaned and oiled up a bit some parts, put it back together, and it's working better, but I still have some problems with skipping stitches. I think I set the timing correct (please se first two pictures), I did it by Tippmann Tutorial on how to set timing correct.
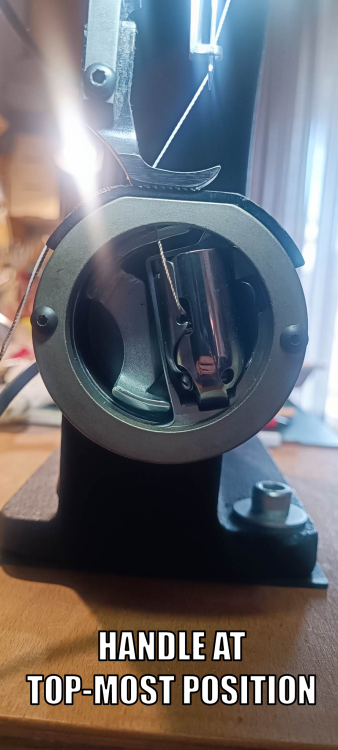
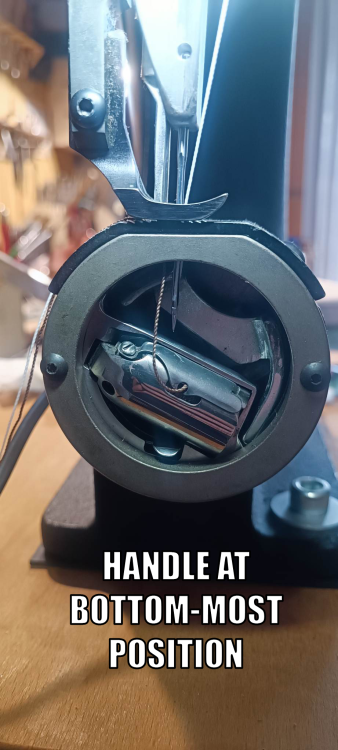
I've read about the possible issues, why the machine is skipping stitches, but I'd say so:
-I think timing is OK. If not, please let me know what's wrong, I believe it's seen on 1st and 2nd picture.
-the needle is 180,
-the thread is /10 (European size, it's the thickest I can get, but i think US size would be simmilar to 246). It's polyester. The needle slides freely on the thread, if I hold it with both hands and needle hangs through the hole on it.
-Needle is oriented as such, that the vertical U-groove is pointing AWAY from the machine,
-Needle is new,
-Tension on presser foot: no idea how strong it should be, but I try to keep it slightly lighter, so it doesn't damage leather much (although, still skipps stitches even if I "add or take" the pressure)
Now, this is the "new" outcome.
Also, the bobbin is having a bit too much space. Am I missing a part in here or is that normal?
Link to IMGUR for the video on how much space there is around the bobbin.
If anyone has idea of what I'm doing wrong, I'd be very grateful.
-
Those are hell of an advices, but the thing is, she aint my gf :D
-
nope, dont have any. Neither it's white, so...hardly can do anything about it.
-
Tried warm water, warm water + detergent, zippo lighter fluid...nothing works at all. Im slowly giving up.
-
On 3/11/2023 at 7:10 AM, nylonRigging said:wow .. Acetone I would think be a little hot for nylon/poly weave . ( me ) I would recommend what I have cleaned a lot of Nylon gear and Para Gear fabric for stain, using Naptha/ Zippo Lighter Fluid . I have even had good luck even removing Black Creosote off of Nylon rip-stop fabric with it .
.Yeah, that's why I used acetone on swab and on small piece at the edge, so I wouldn't ruin it whole.
Never heard of Naptha, but I have some Zippo lighter fluid at home, resting. Deff. will try (swab test at first for sure). Also, a bit concerned of how to get rid of the odor smell?
On 3/11/2023 at 8:24 AM, Klara said:Have you tried soap and water? Just saying, because sometimes we forget the easiest things...
Well, ofcourse....I forgot about the easiest thing
 Deff. will try today!
On 3/11/2023 at 8:37 AM, Handstitched said:
Deff. will try today!
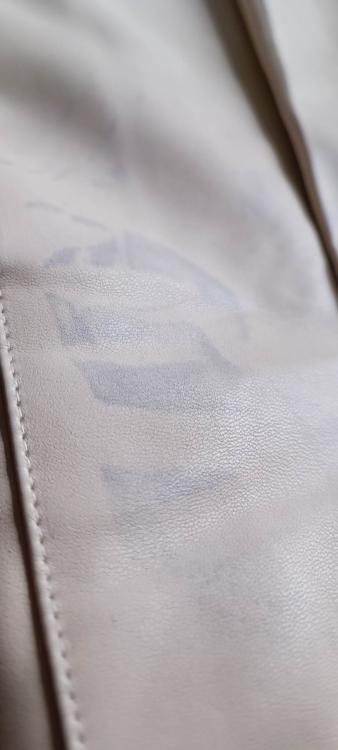
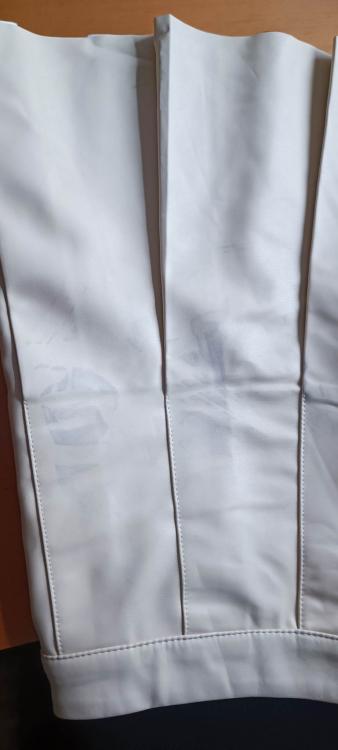
On 3/11/2023 at 8:37 AM, Handstitched said:Is it just me , or does that ' ink stain' look like a foot print??
What was it resting against in the closet?
Thought of it, but I think it's not. It was supposed to be resting against some trousers/jacket, no idea what exactly. I asked, but was told "some other clothes".
On 3/11/2023 at 6:24 PM, fredk said:You could be correct
Was the mark on the skirt when bought and not noticed? I know that has happened with other people I know. Even I have bought something and not noticed a fault with it untill later
Asked aswell, she said no. And it's been too long already so she could return it to the store, so that's the reason I got involved into this.
-
So I got this girl, who brought me brand new skirt she bought, and got stained "without doing anything". Her statement was, that she just folded it over a coathanger and store it in the closet, when she wanted to take it off, it was stained like this.
Now my question: what are those stains and how am I supposed to remove them?
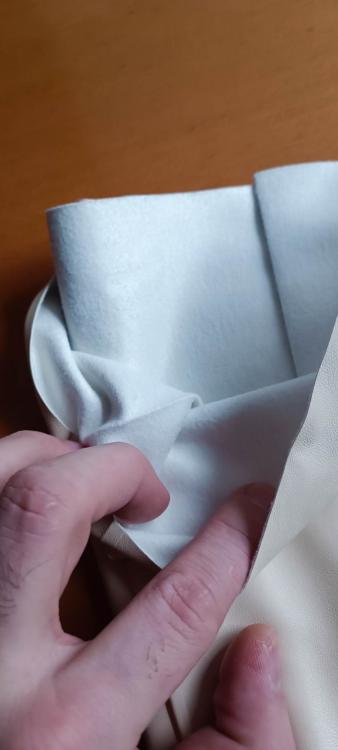
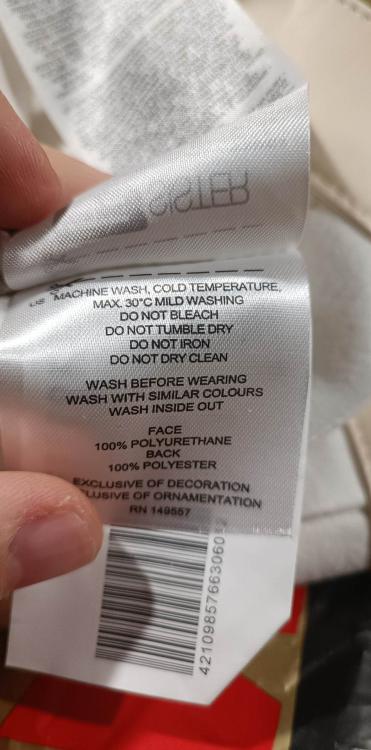
Material is faux leather (face-dirty: polyurethane, inside is polyester).
I tried: isopropanol, 70% alcohol, acetone. First two did nothing, while acetone made a huge mess (thank got I tried on a small piece at the edge).


Bianchi shoulder holster # X-2100 “PHANTOM”
in Gun Holsters, Rifle Slings and Knife Sheathes
Posted · Report reply
Here's Sam Andrew's tutorial on it. Might help.