MtlBiker
-
Posts
850 -
Joined
-
Last visited
Content Type
Profiles
Forums
Events
Blogs
Gallery
Store
Everything posted by MtlBiker
-
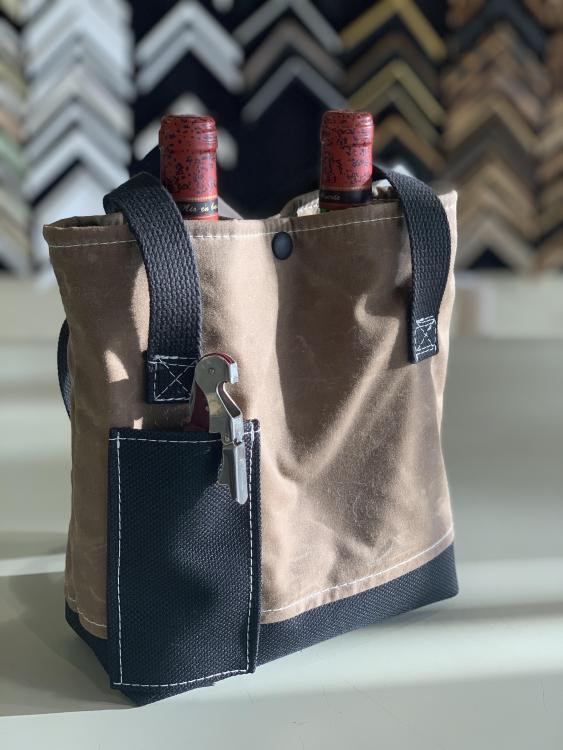
The only suggestion I have for your wine tote is to add something to prevent the bottles from knocking together. Here's a wine tote I made using waxed canvas and cordura with a felt inner lining and padded bottom. I use a simple (line 20) snap to keep the bottles separate. I'm not quite sure what you're asking about "...without having to download file". If you are attaching a photo to your message, you are UPloading (not downloading) the message and photo. If you have your photo on your computer, just use the paperclip icon at the bottom of the editor to add your photo. If your photo is hosted on another site (Smugmug, etc.) you'll need to add a little code around the URL for your photo. As I said, I'm not quite clear on what you're asking, but if you try again we will do our best to help.
-

Rotating Hook installation.... Consew RB206-5
MtlBiker replied to MtlBiker's topic in Leather Sewing Machines
That spreadsheet is terrific! Thank you! Did you make it? Thanks for sharing. I do have the machine back in working order now and it's been a learning experience. Next time will be much easier. -
Rotating Hook installation.... Consew RB206-5
MtlBiker replied to MtlBiker's topic in Leather Sewing Machines
Thanks again! I've got it working now. It was my first time with those parts disassembled and I really wasn't sure what I was doing or how things should line up. A couple of frustrating hours later, all is good again. Cheers! -
Rotating Hook installation.... Consew RB206-5
MtlBiker replied to MtlBiker's topic in Leather Sewing Machines
Good idea to turn the first stitch or two using the handwheel. The linked video doesn't really help me as I don't need to disassemble so much because I'm not removing the needle bar. And the parts look somewhat different from the 206RB-5 that I have... might have been some changes from the 206RB-2 in the video. I'll try your suggestion about needle bar bottom dead center and then hook with point at top dead center. Should the hook just fit right in easily when in that position? Thanks! -
I'm kinda lost with this... My Consew 206RB-5 jammed up and the safety mechanism didn't kick in. I couldn't turn the handwheel a full rotation. It looked like something had happened to the rotating hook. I think I must not have had the bobbin basket/holder properly inserted. I had a look at a Juki video about how to clear a jam on the rotating hook and I tried to follow along and I got the hook removed, cleaned it (although there didn't appear to be anything there to clean) and I can't figure out how to reinsert it. Is there a particular orientation of the hook? Should it just pop back in? Is there a trick? (I've got the hook supporting plate and thread release finger removed. I'd removed the three little screws on the clip that hold the hook in place.) I searched Youtube for help on this but didn't find an answer. Maybe I used the wrong search terms. Any help would be most appreciated. Thanks.
-
Just a little follow-up..... I cut some templates out of the PLUGGHAST material and it cuts very easily. I did the straight sections with a utility knife and the curves on my scroll saw (because I find it easier to follow a curve with it). And last night I cut a bunch of fabric using the template to cut against with my rotary cutter. I found my 60mm cutter worked better than my 45mm. Worked like a charm! With just a little care, I didn't cut into the template with the rotary cutter. Much more durable than paper, card stock or even matboard. For me that material is a winner.
-
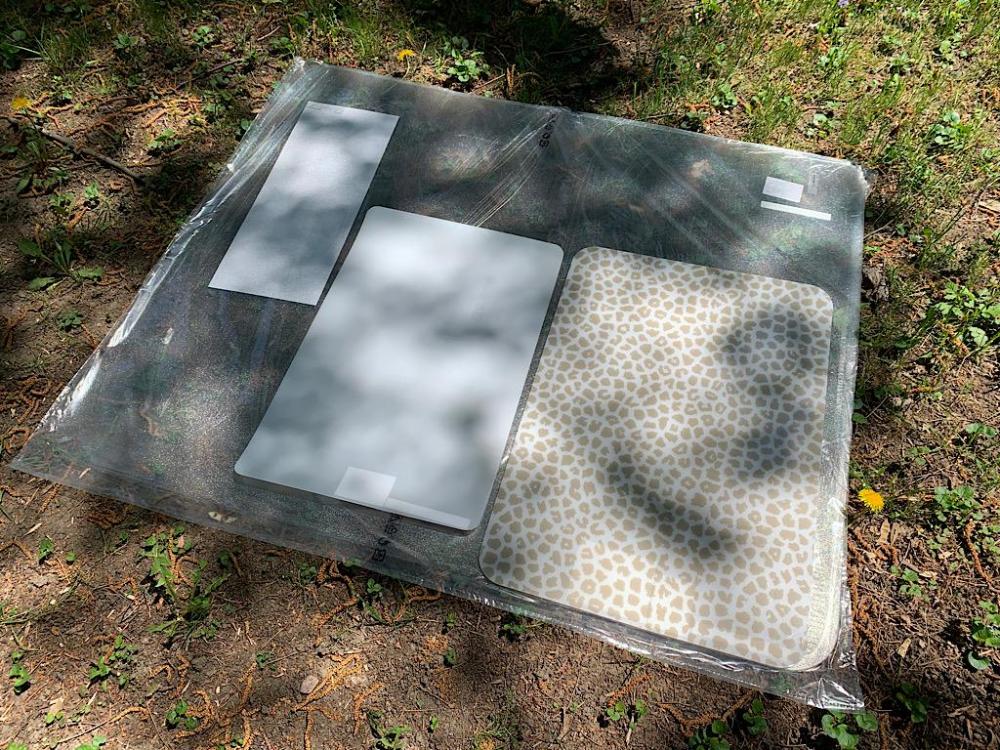
Back from my shopping trip to Ikea... I bought three different mats, and I think two of them would work well for making templates I can cut against, while the third one, largest and most expensive I suspect won't work. It's made from LD PE (Low Densitity Polyethylene) and I'd tried cutting another piece of that I had last week, and found it splintered/shattered when cutting. So I doubt it will work. But I'll try. Here's what I bought: KOLON - 39 1/2" x 47" - 1.75mm thick - $29.99 - made from LDPE - probably will shatter/splinter when cutting SKVALLA - 15" x 23" - 1.6mm thick - $4.99 - unknown flexible plastic of some kind, think it will cut well. PLUGGHAST - 17 3/4" x 25 1/2" - 2.5mm thick - $5.99 - unknown flexible plastic, with a pattern and less transparent than the others (All prices Canadian dollars.) I think the PLUGGHAST is going to turn out the best for making templates. Thicker, most likely fairly easy to cut to shape, but I'll be cutting them all tomorrow to see how they work. Here's what the pieces look like: The big one is the KOLON, at the right with the pattern is PLUGGHAST and center is SKVALLA. The smaller white rectangle at the upper left is just the stuck on label on the other side. By the way, the KOLON floor protector mat has very small bumps on the bottom side, I guess to keep it from shifting on a carpet. I don't think those would be a problem but it could always be used with the bumps face up on the fabric. Just don't think it will cut well.
-
I'm using 1/8" masonite but it's smooth on both sides. I haven't seen (here in Canada) masonite with a patterned back. I always put weights on my template before cutting my material and as long as I'm careful, the template doesn't move out of place.
-
Problem is, I live in Canada. Ordering from the US involves shipping, customs, time.... So I know exactly what you're talking about. But unlike you, I'm lucky that Ikea is actually along my route to work and only about 15 minutes away. I should be there in a couple of hours.
-
I have both those options available to me, but I'm hoping that my scroll saw with special blades for plastics would work. And I have no problem heat treating the edges for smoothness. I'm going to experiment. The biggest advantage I see of using these products over the masonite is some level of transparency. So far most of my sewing projects are using fabrics instead of leather (but I'm slowly moving to leather) and being able to see the pattern on the fabric for better positioning of the template would be an advantage. Cheers!
-
Hi Erhan, I see that was your first post on this board... Welcome!!!! Thank you for the additional information on those Ikea products. Both are still sounding interesting to me and I'll probably buy one of each tomorrow when I go to Ikea. Both are supposed to be in stock. I agree that laser cutting would be ideal, but I've never dealt with any company that does it, and I wouldn't know where to start. It would certainly cost more than my other options although if I was doing really large quantities, it would probably be better. Most likely I would be cutting the material on my scroll saw... I have different blades, including a couple specially for plastics, and I could always heat treat the edges for smoothness. In any case, I'll report here with my impressions and results. Cheers!
-
I'm planning a visit to Ikea tomorrow morning. I'll buy one of each if I think they're suitable and will report back here.
-
That's interesting Klara... Thanks! It's in stock at my local store and I'll probably go and check it out tomorrow. I'll also look at the floor protector mat they have. I'll bet one (or both) of those things would work for me. And they're not expensive. I really would have never thought of checking Ikea for this kind of thing. This board is great!
-
Thanks. That looks good and the price is certainly more than reasonable. Do you ever use a rotary cutter against that material? Is it fairly resistant or does it cut too easily? Unfortunately, I'm in Canada and ordering a sheet or two to test from Springfield becomes difficult and quite expensive.
-
If they confused centimeters with millimeters, the thing would be HUGE!!!! Ten times bigger than the 16.9" x 23.6" that the mm spec converts to. Looks like they've REALLY screwed up! In any case, I'm not going to buy one without seeing it first, regardless of what size it turns out to be. The Ikea one looks like it would be perfect and I can go and actually see one before buying. And even if I buy it with curbside pickup (paying their extra $5 charge for that service) it's still cheaper than Staples. Not much of a risk IMHO. I'll probably do that as it looks like it would be perfect for what I want. Cheers!
-
I'm sure I can learn the software easily... I'm a heavy Illustrator and PhotoShop user and am comfortable with computers and software. But I don't want to waste money on a 3D printer that will possibly need replacing in a few months of use, nor can I justify at present the cost of a much more decent printer that will last me a few years. But I'd really love to have one, and probably will have one in the future.
-
Thanks Sheilajeanne! The one sold by Ikea seems like a much better deal, and Staples.ca is a lot more expensive. The Walmart one may or may not have bumps on the bottom to keep it from sliding on the carpet and unfortunately it's only sold online and not in the stores. So you can't check it out before buying. And I'm sure there's something wrong with their description of the product also, as the stated "430 x 600 mm" size is only 16.9" x 23.6" and from the photos of the product it sure looks like it's much bigger than that. You'd have to have a pretty small chair for one of those!
-
Great idea! I found that product on the Canadian (in English instead of Danish) Ikea site. It looks like it might work. I hadn't thought of that because all the chair mats I've seen so far have a bumpy (almost like little points) on the bottom to keep the mat from sliding on carpet. I'll have to determine whether it's smooth or not but it really might work well. And it's really not expensive at all. $40 (Cdn) for a piece about 47" x 40". More than masonite but reasonable, with the advantage of being see through. Thank you!
-
You may be right about the weight indicating that it must be more than one, but it does say "each" and "Package quantity 1". And the other crazy thing (not that I'm tempted to buy it) is that it says it's restricted for sale in "CA QC" meaning that here in Quebec Canada it's not available. Weird.
-
I'd never heard of that product before... thanks for mentioning it. I just did a search, and it's REAL EXPENSIVE (compared to the masonite I'd been using). Marsh Oil Stencil Board in Canada. By comparison, I can buy a 4' x 8' sheet of masonite (some suppliers call it hardboard) for only $15.
-
Well, I've used heavy poster board, matboard, etc. and it's fine if as you say, you trace around them and not cut against them. But... since Covid I've made over 250 3-layer masks (which have been selling very well for me) and using a masonite template and cutting against it with my rotary cutter is SO FAST that I can have the fabric cut out much faster than it takes to trace around and then cut. A fraction of the time. And that makes a huge difference when you're doing 10+ at a time. And I always use cardstock for my initial pattern and only switch to masonite once I've finalized my design and want to produce many of the same. I guess it all depends on how many of an item you need to make and how quickly.
-
Really? A $200 3D printer (I'd love to get one!) is probably limited to even smaller areas than the dollar store cutting boards I've used and those are too small. But other than that, the cutting boards work really quite well and are super economical. The biggest cutting board I've found is only about 10" x 15". I need at least 15" x 15 and hopefully even larger. When I last looked into 3D printers, I thought they would cost a whole heck of a lot more than that for a model that would produce the size I want. But... I'm really tempted to get a 3D printer. Is there anything you suggest or something I should look for or avoid? I don't need a fretsaw as I have a super scroll saw that works really well. What kind of "thin 3 ply" are you talking about? What material? Thanks!
-
I've often used those cutting boards from a dollar store, but for many of my patterns they are too small. I'm looking for something that will work for larger patterns.
-
I'm having a hard time figuring out what kind of material to use for making reusable templates. Cardboard, matboard, etc. are just too flimsy and when I'm trying to cut my leather/fabric with a rotary cutter they are too easy to cut. I've tried 1/4" masonite which I cut using a scroll saw and that's much better than cardboard, but it's harder to cut and fairly expensive. The plastic place mats from the dollar store do seem to work better than cardboard but they're not large enough for some of my patterns and I also wish the place mats would be a bit thicker. Ideally it would be some kind of clear plastic, at least 1/8" thick that would let me see the fabric through it (so I could better utilize the designs on the fabric) but I haven't found anything yet. Plexi / acrylic is even more expensive than the masonite and at least one that I've tried seems to splinter when I cut it. So, what do you suggest as a material for making templates, and where do you get it? Thanks!
-
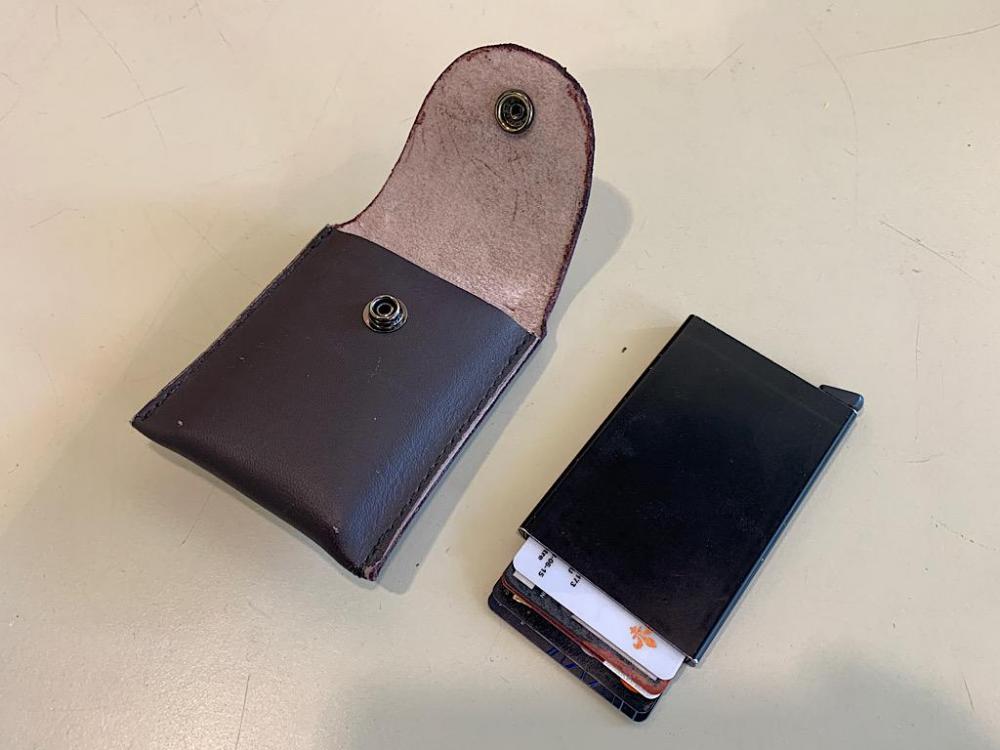
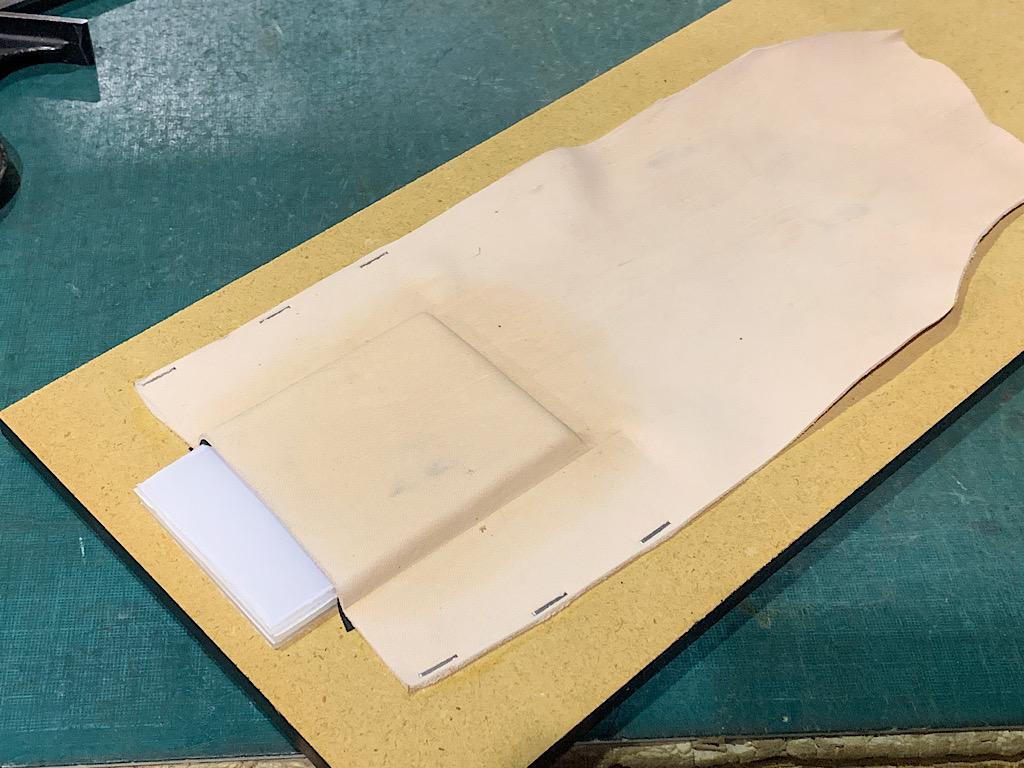
I received my 4-6 oz veg tan leather and have started my first moulded pouch project. I'll show you what I've got so far and outline the steps I plan to follow in order to finish it. You guys have been really helpful and this beginner certainly appreciates that. My idea is that the finished pouch will be black, with a 2-3 oz already finished black leather lining that will hide the stitching (or rivets) for the back belt loop as well as the inside of the snap on the front fact. I'm hoping you could tell me if my proposed steps are correct (and in the correct order)... 1) I've soaked my leather and put it onto my form with weights to dry. I had the lining leather and the veg tan together with the flesh sides facing each other. It's now about 30 hours and the leather is still not completely dry but the form looks good to me. 2) I'll take the pieces apart once dry and cut both leathers to the right size, leaving my proposed 1/4" seam allowance, and then install the belt loop on the back and the front snap closure. 3) Dye all pieces black 4) Install the belt loop and front snap closure 5) Use contact cement and glue the inner lining piece to the outer. 6) Stitch all around, with the front bottom folded up to form the pouch 7) Finish the edges (not sure how yet) The first photo shows my veg tan leather on the form, still drying. The second photo shows what I'm putting into the pouch (rfi-shielded metal credit card holder) and my first attempt at making a leather pouch for this. I used finished leather that I didn't form and didn't use a lining. Pretty amateurish I know, but ya gotta start somewhere. Thanks for any help.