-
Posts
37 -
Joined
-
Last visited
Content Type
Profiles
Forums
Events
Blogs
Gallery
Store
Everything posted by rlevine
-
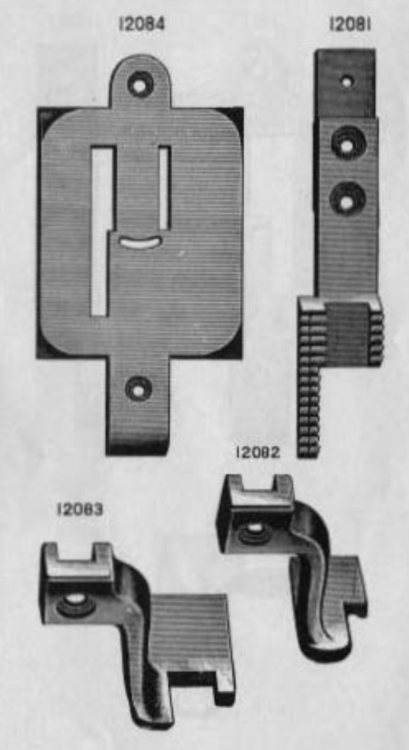
This is a _very_ long shot, but I'm always optimistic. Can anyone suggest leads on a set of up-the-arm needle plate, feed dog and presser foot for a Singer 11-16 or 11-26? I have an 11-26 that I'd like to run as an up-the-arm zigzag. (Yes, I do have some queries out to parts jobbers, but you folks often come up with great ideas I didn't think of!) Part numbers are: 12081 feed dog 12082 half-coverage presser foot 12083 full-coverage presser foot 12084 - needle plate Parts-list picture attached. Thanks! Rick
-

Singer 153W102 feed eccentric troubleshooting
rlevine replied to rlevine's topic in Leather Sewing Machines
Understood, thanks. Yes, it's a separate casting, and could be moved. I'm reluctant to do that, as it would require cutting the paint to separate the pieces. The current paint is pretty old, looking at the wear patterns, so it's been running with the mis-alignment for some time. Rick -
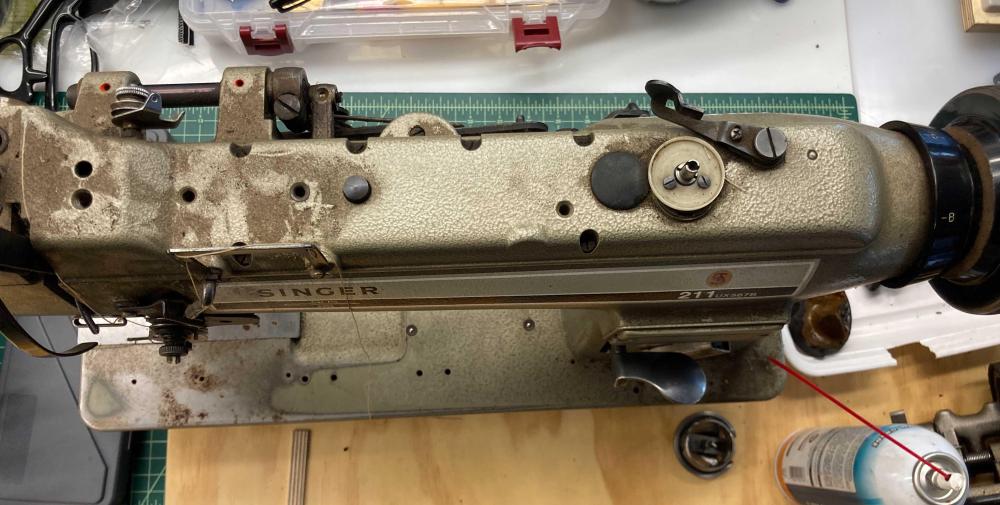
Thanks to you both! In this case, Bob nailed it: it has a bobbin winder on the top of the machine. It's a 211UX567B. (Not sure what the "X" indicates!) Rick ***
-
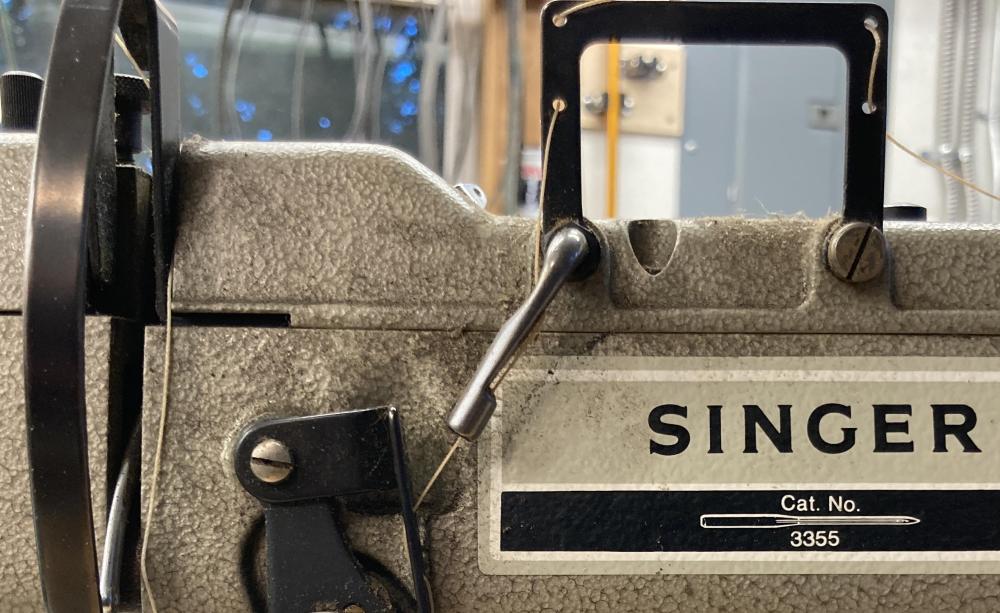
I'm curious about the rectangular upper thread guide this Singer 211U has instead of a thread pin. Can anyone tell me what it does? It doesn't appear in any of the parts lists or docs I've seen, but this is the second machine I've seen with it. This machine was running 138 poly thread in a tarp shop, so I'd assume it just provides more upper tension, but I'm curious. Thanks! Rick ***
-

Singer 153W102 feed eccentric troubleshooting
rlevine replied to rlevine's topic in Leather Sewing Machines
Thanks @kgg! Ya, there are no perfect options. I suspect it'll be impossible to find a replacement arm shaft, and the odds of the rear bushing having a matching wobble are pretty good. I didn't think to check the arm shaft and the rear bushing for issues when I had it stripped down. The issue is only perceivable when I turn the machine by hand. Running on a motor, it sews and sounds fine. Compared to the shape it was in when I started, it's a decent machine. So your last suggestion is probably the best. Run it until it has a problem, and look to swap it for a better machine. (Which was my intent to begin with!) One quick question: what did you mean by "reline the casing?" I haven't heard that before. Thanks again! Rick -

Singer 153W102 feed eccentric troubleshooting
rlevine replied to rlevine's topic in Leather Sewing Machines
I think that's it, @kgg. *sigh* Dial indicator says it's out by ~.008" See the video, below. (My pencil-handling skills didn't show it up, but a mag base + cast iron work wonders.) So what's the group wisdom on wonky shafts? A quick perusal of the usual sources doesn't come up with a replacement part, no surprise. If it was a drill press, I'd take the spindle to a local machine shop to true up, and they could get it to within a thou or so. What's acceptable for a sewing machine? Will it run for a long time, gradually making the eccentric a tad bit convex? It sews well enough. It'll eat at me, tho. What are people's opinions about selling it? My ethical bump won't let me hide it. Do I need to just gift it to a relative I don't like? Thanks, folks. Rick *** -
Heh. Two. I followed @DonInReno's advice and just searched for the unspellable "escutcheon pin" and found brass pins. I like the Singer rosette heads, but it occurred to me that they may use a rosette striker to set them, rather than having pins with rosette heads. (Thanks Don!) Rick
-
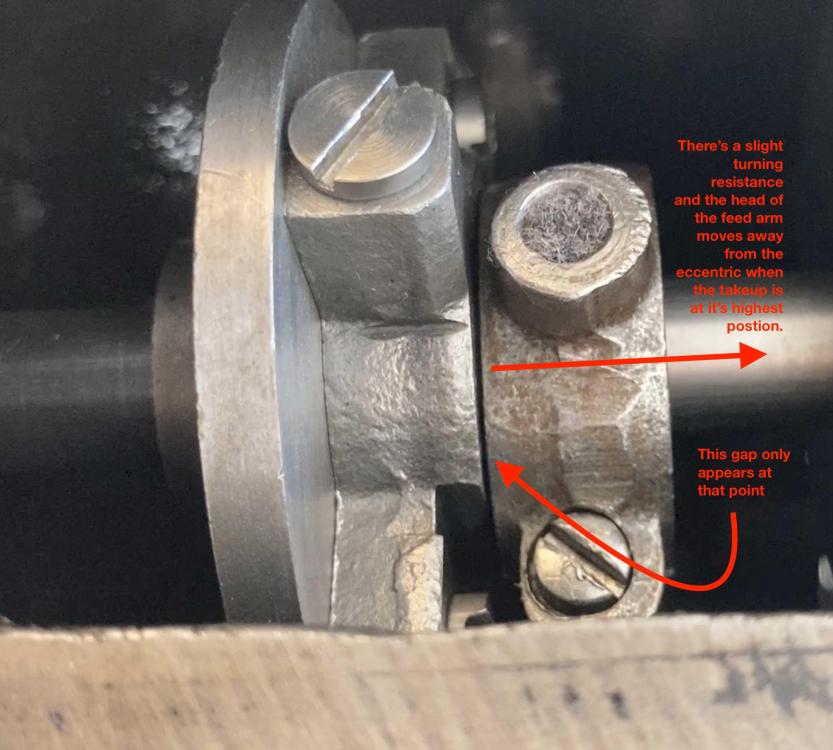
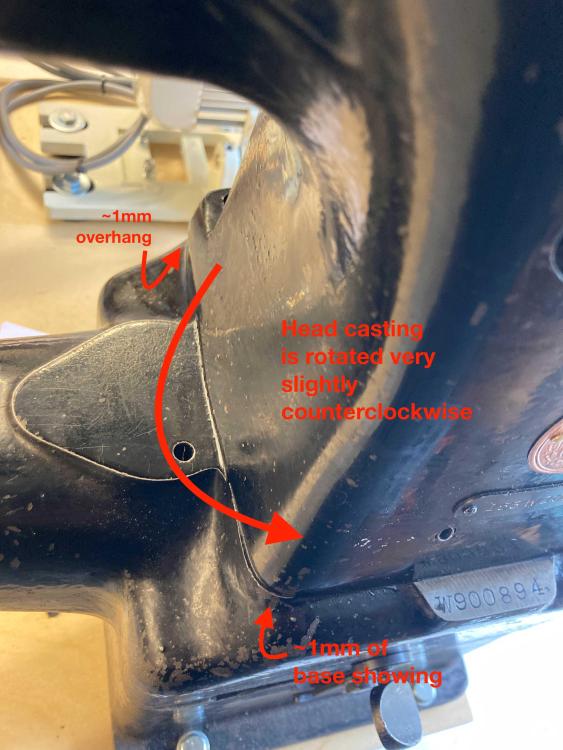
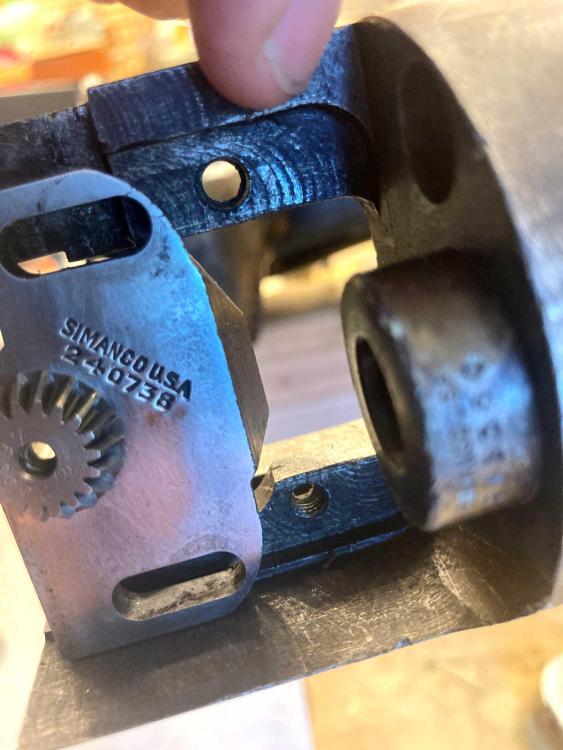
This might be an oddball question, but I'm not sure if I should worry about this, and if so, how I fix it. I've rebuilt an early 1940's vintage Singer 153W102 needle feed cylinder arm. I've been sewing on the machine, and it stitches well on the cordura I'm feeding it. But. When I turn the machine by hand, there's a slight resistance that coincides with the thread take-up lever reaching it's highest point. Also at that point, the head of the feed driving arm moves slightly away from the feed eccentric. Considering the shape the machine was in when I started, it's a small thing, but I don't like the turning resistance. (The gap between the feed arm and eccentric was much larger when I got the machine!) The resistance doesn't go away when I disconnect the belt or remove the needle rock frame, so it's something to do with the feed drive. One thought I had was to try moving the lower bushing for the feed arm slightly towards the needle, but I wouldn't think the position of that bushing would cause this kind of intermittent issue. One other observation that might be relevant is that the arm casting is very slightly rotated counterclockwise with respect to the base. It's obviously been that way for a long time, as it was repainted at some point after the arm was misaligned. Some pictures attached and a video linked. In the video, I pause when the thread take-up is at the top, and rock back and forth through that point. (And the audio in the video is awful! With the camera so close to machine, it sounds like a starter motor. It's actually pretty quiet. Thanks in advance for any suggestions. Rick
-

153W102 questions: needle choice, feed reg spindle length
rlevine replied to rlevine's topic in Leather Sewing Machines
@CowboyBob, thanks for the info, and pointer to the manual. (And apologies it's taken me so long to reply; work on the machine got preempted by life. *sigh*) Thanks for pointing me back to the manual. I was working on getting the feed dog eccentric in sync, and didn't realize I had undone the spindle position. Rick -
It's a trivial thing, and doesn't at all make a machine work better, but I'd appreciate any pointers for sourcing rosette-headed pins for replacing a Singer badge. My plan A is just filing down some copper rivets, but I'd love to find real ones. (Yeah, I'm easily amused.) Thanks! Rick
-

Help on Singer 153 stripped hook saddle screw hole?
rlevine replied to rlevine's topic in Leather Sewing Machines
Thanks @DonInReno! Great suggestions, and good feedback on helicoils. You opened up a new rabbit hole for me; adjustable dies. I've never used one, didn't know they existed. Split rounds, two-piece rectangular ones like Little Giant. Fun! Amen to the nastiness of cutting oil. When I moved into my current shop, the prior owner left some in a jar. The jar was out of sight under a bench, tipped over, and had a verrry slooow leak, a drop or two a day into some cardboard. Took me months to figure out where the stench was coming from! Rick -

Help on Singer 153 stripped hook saddle screw hole?
rlevine replied to rlevine's topic in Leather Sewing Machines
Thanks for the pointers; that's useful info. Now I just need a project that will justify the tool set cost! Rick -
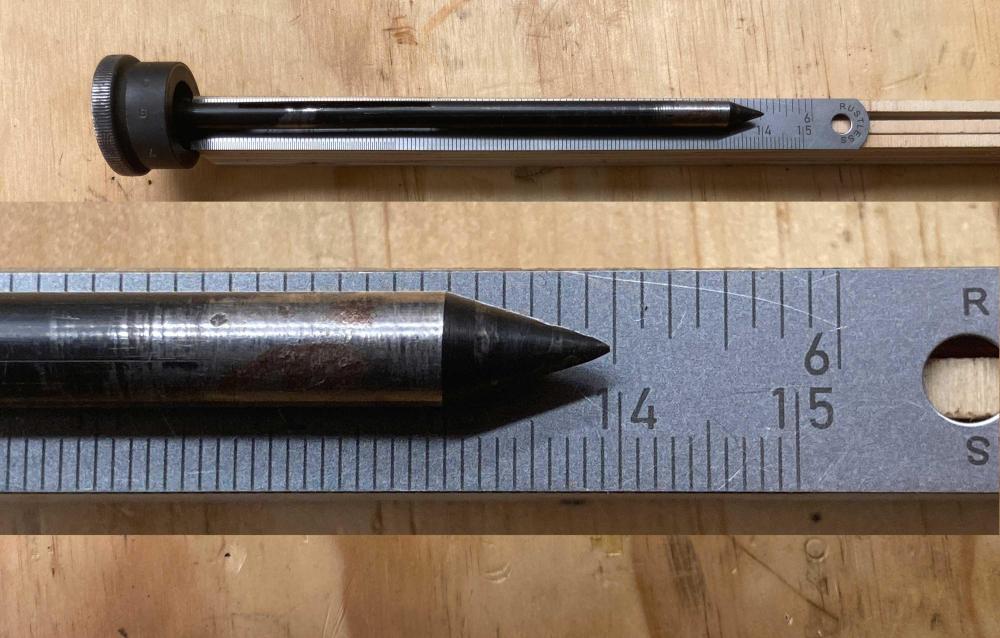
I've just finished disassembling/reassembling a Singer 153W102 for bag work, and have some some random questions. First, many thanks to folks here for the snippets of information they've contributed over the years. The forum has been an invaluable source for me, as a newbie, as I've puzzled out how machines should work and how mine do or don't. For the 153W, @Uwe's insights and videos on the 153W102 feed length bits and on Singer safety clutches generally, and Eric/@gottaknow's video on safety clutches and his precise description of setting timing when there's lash in the hook gears all helped me tackle this rehab. (I haven't seen recent postings from Eric; I do hope he's still around and kicking!) Three questions: Is there any rationale for setting up the machine with 135x17 vs 135x7 needles? This one came with a 135x17, and when I set it up I put it back to the Singer-suggested 135x7, as the nice needle bar engravings were there for the shorter needles. I use both on other machines in the shop, so there's no scarcity argument to be made. The only possible reason I see is that I have one presser foot that has a higher hinge hump, and it'll collide with the needle bar when the foot is lifted and needle bar height is set up for the 135x7. Likewise, what's the functional difference between single row and double row feed dogs? I have both, and both plates, but I think the double was the original. And last, could anyone with one of the machines that has a functioning stitch length mechanism please measure the length of their feed regulating spindle for me? On mine, the spindle threads are intact, but I think the spindle might have been shortened from its original length. I can get barely get to 3mm (no longer than 9/in) and I'm wondering if the issue is that the spindle doesn't push in far enough to rotate the eccentric past that length. (I know I can lock the eccentric at a longer stitch length, but I'm trying to make it work as intended.) The spindle on mine has just shy of 140mm of shaft exposed past the knob shoulder. Pics attached. Thanks! Rick
-

Help on Singer 153 stripped hook saddle screw hole?
rlevine replied to rlevine's topic in Leather Sewing Machines
Thanks for the great ideas! I hadn't seen time-serts before; looks like they have smaller inserts than I remember from using helicoils. They're a bit spendy for this problem, but interesting. In this case, it wasn't as bad as I feared. The hole is deeper than the screw, and singer used a fairly thick washer under the bolt head. Removing the washer allowed threads to catch and hold. I could do the same thing by thinning the ear on the saddle, but once I realized there were healthy threads beyond the end of the screw, losing the washer was the easiest fix. -
I've been looking for a small cylinder arm machine for bag work and found a Singer 153W102 (needle feed ) in ok shape for not too much money. It was badly set up by a prior owner, but I did not find too many surprises as I took it apart. However... I just discovered that one of the hook saddle screw holes in the casting is stripped. Dealing with threaded casting holes is new to me. Can anyone suggest first aid techniques? The screws are healthy, they measure 13/64-32-ish, and the slot in the hook saddle is 7/32" wide. Thanks! Rick
-

78-1 Singer Model 78-1. Bought frozen to get sewing.
rlevine replied to AlamoJoe2002's topic in Leather Sewing Machines
Another vote for Evaporust. A few caveats when using it: There may be some etching or metal removal, contrary to expectations that part size isn't changed. That expectation is almost always met, but realize that if the part is rusted, the oxidation is consuming the metal of the part surface. Chelating the oxide and removing it takes something away. In most situations you won't be able to tell or it won't matter, as tolerances in most parts will still be within a useful range. (And yes, Virginia, Evaporust is a chelating solution. Molasses has a chelating effect but it's sloooow. Chelating agents will _stop_ when the oxide is converted. Acids and electrolysis will remove unoxidized metal and don't stop. Electrolysis can deal with severe rust that's too much for Evaporust, but takes time to set up and needs to be watched, so the result should be worth the time.) Always submerge parts completely, if you're leaving a part in Evaporust for any amount of time. There can be a visible line left on a part at the liquid/air boundary. I've seen both black chelated residue at the line, with none above, or actual etching on some metals. Both can be a pain to recover from. Evaporust will usually leave painted surfaces alone, unless the finish can absorb it or there is oxidation under the paint at the edges. Test it first. Japanned finishes may not like it. Don't leave parts in the juice for more than an hour or two without checking on them. They'll probably be fine, but I'll miss submerging a part fully, or there will be some galvanized stuff that I missed, so rescuing them sooner rather than later is always nice. The temptation is to take the parts from the Evaporust container and drop them into water to clean them off. Don't; they'll turn black. Clean them one by one. (Returning the parts to the Evaporust will remove most of the black, at least enough to make you think you ducked a bullet.) Don't throw away the used solution. The counter to the complaints about price are that the stuff can last for years if decanted back into its bottle or kept in a sealed tub. I'll throw in some of the techniques I use when working on machines, since I couldn't find much advice in one place when I started trying to resurrect rusty things. (And yes, these are only my opinions, and what I've found that works for me. YMMV.) I keep some 600-grit wet/dray paper handy when using Evaporust; having a sheet flat on a surface using Evaporust as a lubricant can quickly clean up flat surfaces on parts, and small pieces of paper can be used for cleaning up non-flat bits. A few pieces end up in the tub, and I'll just grab one as I pull parts out. Ace hardware sells small brass wire brushes in 3-packs. I'll pretty much kill one for a machine restoration. Small screwdrivers and probes and a stack of micro-fiber cloths are my go-to's for cleaning parts. I have a particular liking for Wiha's 3.5mm flat screwdrivers, so there are lots of them scattered around machines in the shop, and I usually end up using one to clean and remove parts. (Yes, I'm disrespecting the tools. But they work.) For general degreasing and cleaning, since I don't like working with kerosine, I use Rustoleum's Krud Kutter, either straight from the spray bottle, or cut 50/50 with water in a tub. Again, brass wire brushes or a small bristle brush. Krud Kutter will affect some painted or japanned finishes. Test it, don't let the concentrate sit on paint. Rustoleum's rust converter is great for a wipe-down to remove flash rust on parts, but it's vicious, poisonous stuff that doesn't stop working until it's rinsed. The better alternative I've found is to pull a part from the Evaporust, clean it up, wipe it down if it's small or rinse in warm water and wipe, and then put it in a tray with a piece of paper towel in the bottom and hit the parts with a quick shot of LPS1 lubricant to displace any water and keep them shiny until I get back to them. Johnson's paste wax is a decent treatment for exposed metal surfaces that need to be slippy for fabric or other processes that don't like oil or grease. Never, never, never use microcrystalline wax, as it can't be removed without serious abrasion or hot xylene, which you don't want to deal with. Get some good screwdrivers, or grind your cheap ones to improve them. A Chapman set is a great start, or look for electrician's tools; for some reason they're often hollow ground. Again, only my $0.02, but I wish had some cogent advice about this stuff when I started taking machines apart. -
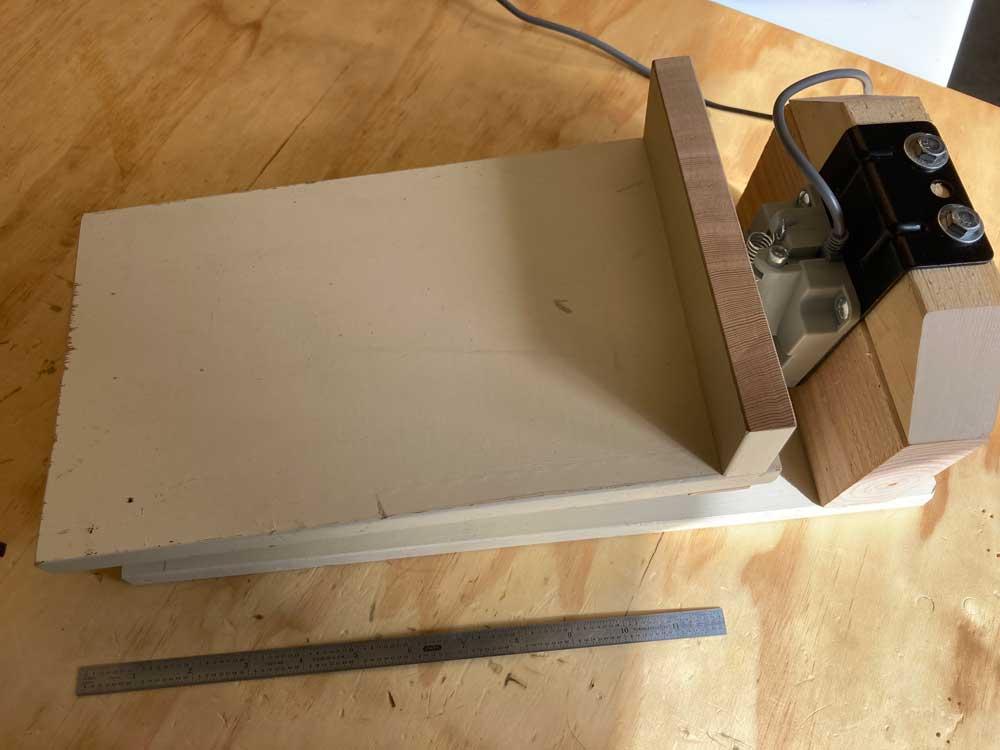
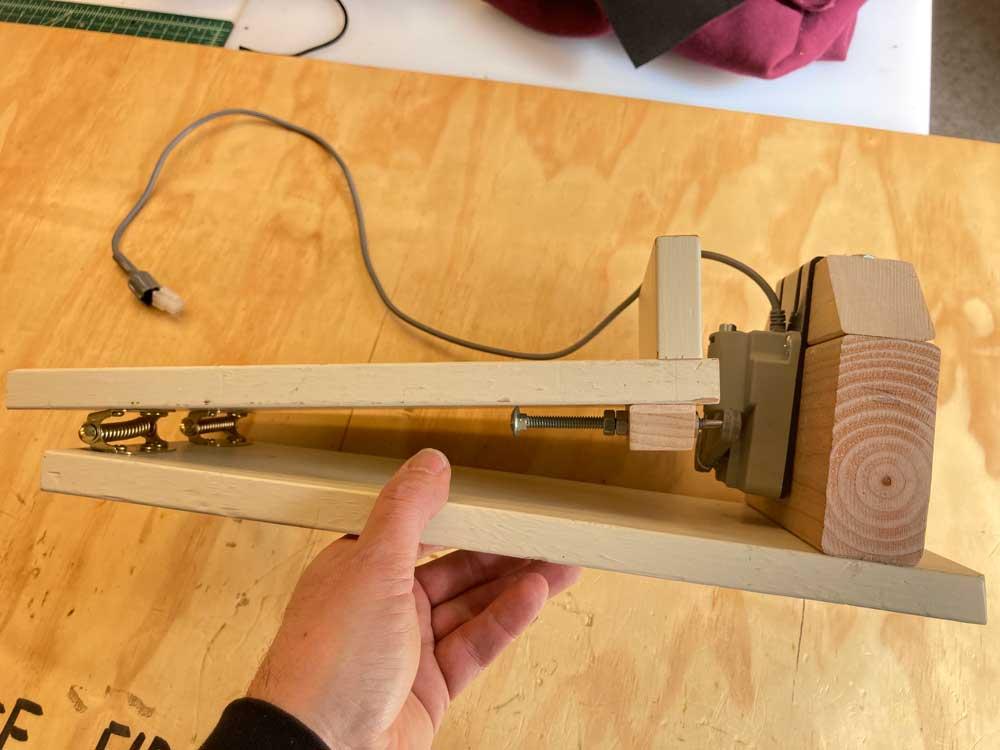
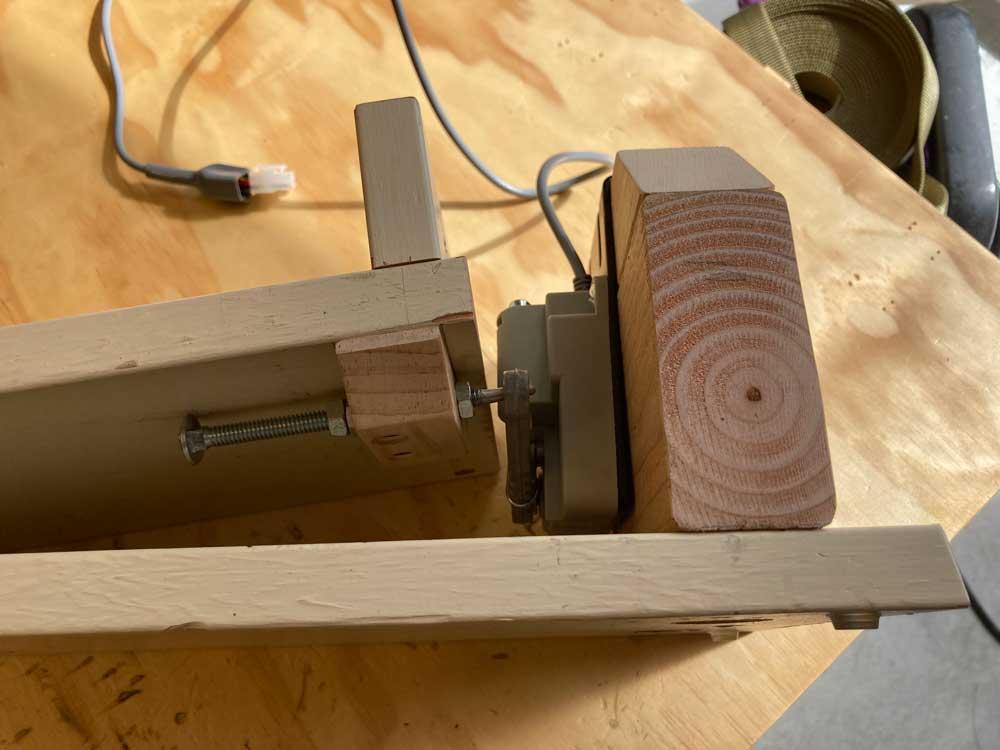
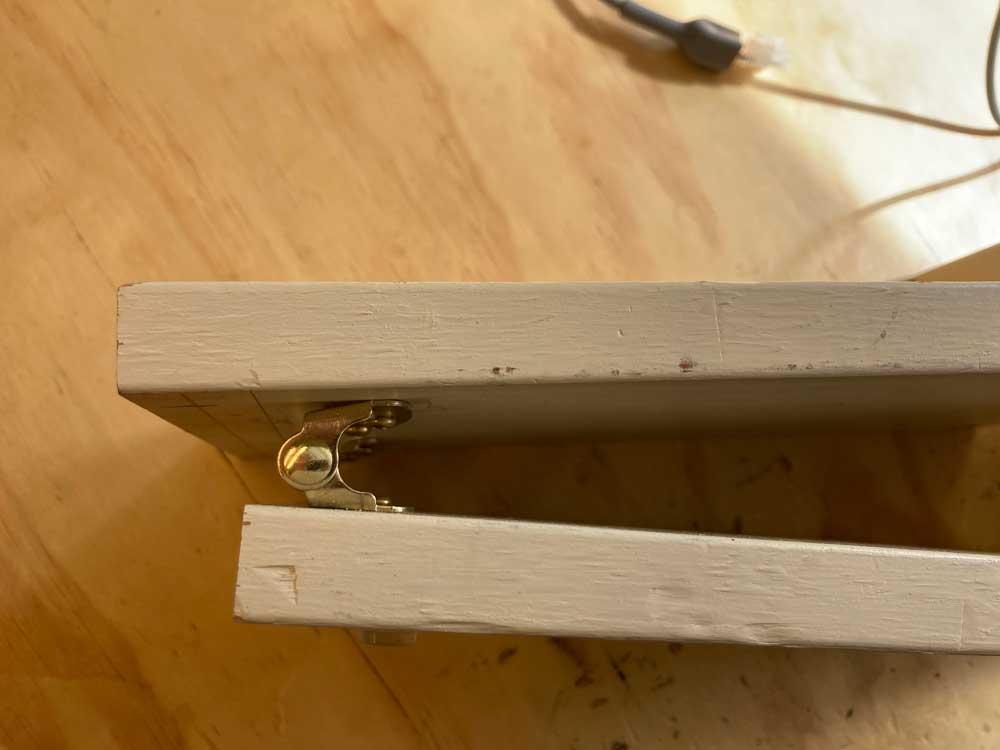
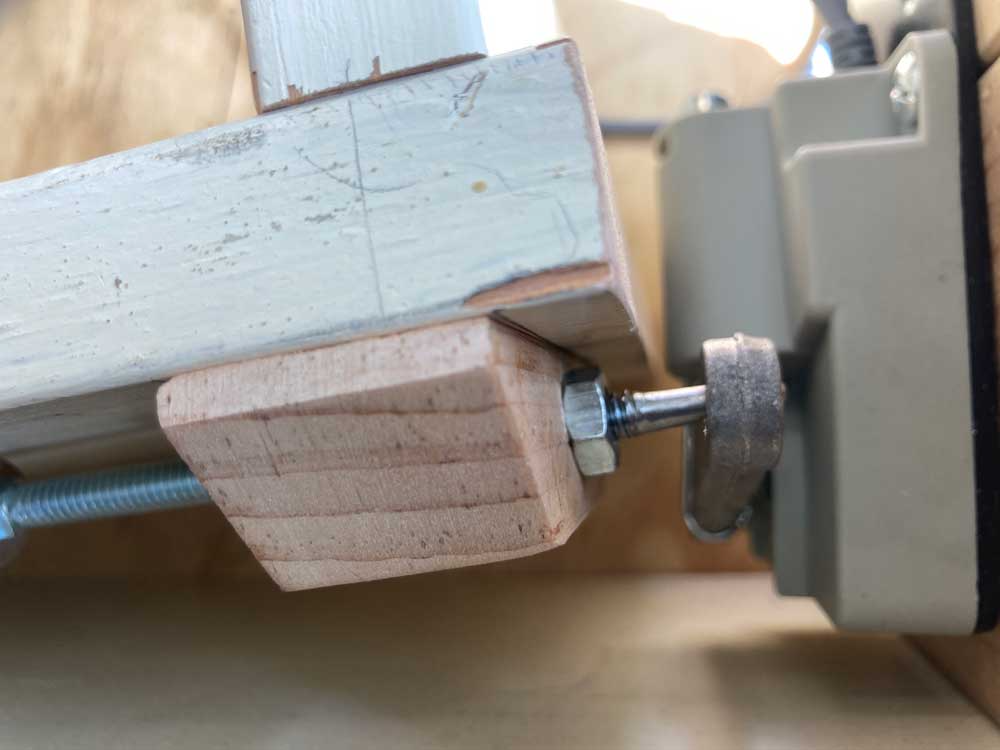
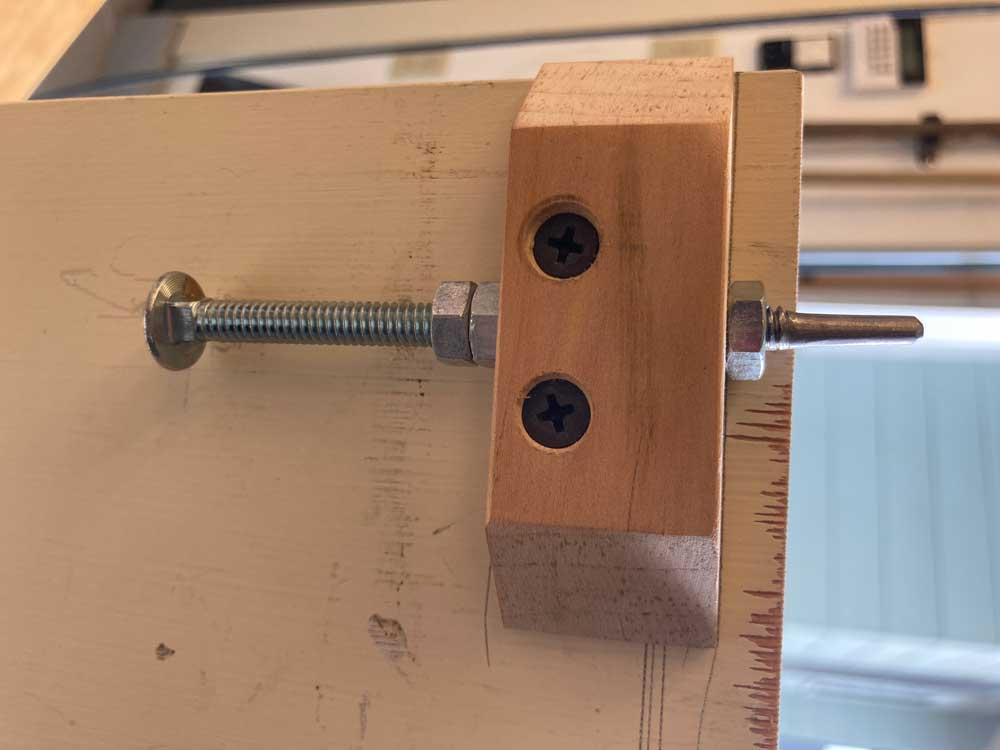
One of my projects this week was making a foot pedal for the Merrow edger I'm rehabbing. Similar issues: it has to be mostly portable, as the machine is running on a desktop slab, rather than a real table. And, I also discovered that the servo pedal switch is doing some pulse width tricks to control the motor, so the best I can do is lengthen the wire! Here's the result, from scrap wood and random parts. Only push-down, no heeling needed for the serger. I wanted some kick protection for the switch, and didn't have real ball-joint parts for the connection, so I cobbled together a link from a stove bolt.
-
Sergers are different beasts. No need to be allergic to clutch motors for them. I have the equivalent 5-thread Wilcox-GIbbs Pegasus machine sitting in front of me, and even with a 4" pulley on the motor, 2" on the serger, it goes from very slow to very fast quite smoothly, without much need for feathering. If you're lucky, it was either drained, or still has a full, liquid oil sump. With the motor and table, depending on your market, you should be able to get at least $500 for a 5-thread machine, more if you're patient. If it's in a serger table (ie flip-up top, cutout and dropped platform for the machine) the table will take work to use for anything else. Clean it up, throw 5 cones of thread on it for a demo, and it'll sell.
-

Can anyone help me with a running a 3-phase Juki at home?
rlevine replied to williaty's topic in Leather Sewing Machines
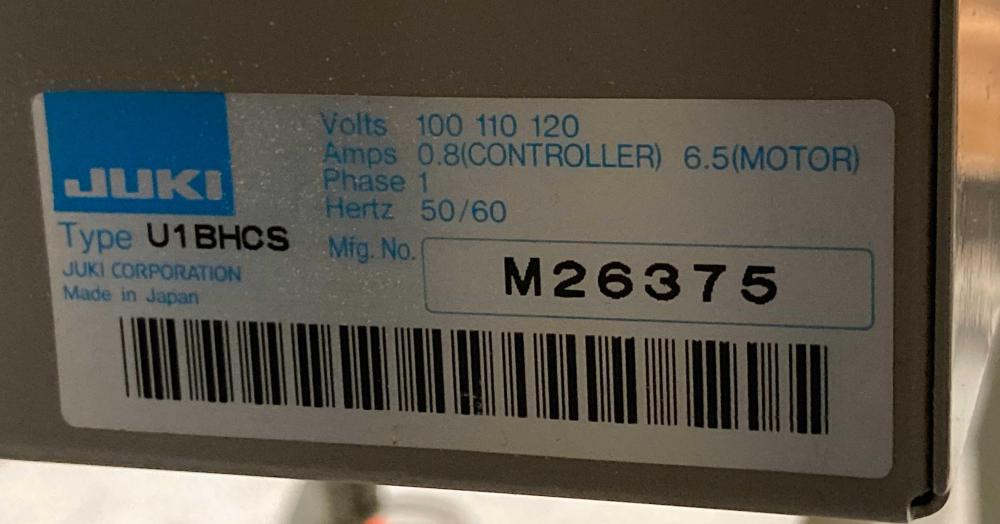
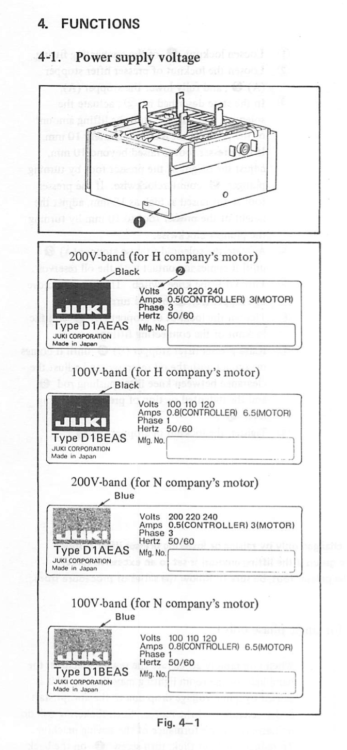
I'd suggest getting the engineer manual for the control system. That's an SC-120 control panel, pdf is here: https://www.supsew.com/download/Juki/Juki SC-20, -120, -220, -320 Engineer’s Manual.pdf Look on the left side, rear corner of the control box for the power rating, don't go by the number of wires in the power cord. The motor plates all state the DC voltages supplied by the controller, and all the machines have 250v fuses. For me, the reason to keep the original controller has been the automatic trimmer. Mine is a DLN-5410-6 heavy, and for bag work, it's a joy. Attached are a snap of my rating plate, and the illustration from the manual showing the variants. -
Thanks folks! Apologies for the delay in answering. I accidentally plowed through a vislon zipper, and had to retime before I could experiment more, and did some other tuning as well. @nylonRigging, it was definitely not an optical illusion! I wish! @RockyAussie, thanks for the presser foot tension suggestion. I think backing off both tension adjustments did the trick. I wasn't paying enough attention to foot pressure. I also tried winding bobbins with less tension, and I think the resulting reduction in bottom tension helped not pull as much. Thanks also for the trick of peening the tabs on the outer feet! I always check to level the outer foot before I lock it down, but easing in the tabs makes changes a bit easier. Nice catch on the sloppy back foot on the video - eagle eye to spot that in the middle of a random movie! Rick
-
Thanks, @trash treasure. Ya, I’ve tried multiple feet; it seems like it’s consistent across the feet I’ve tried. And I’ve swapped feed dogs, with no change. I’m running smooth-bottomed feet, and serrated dogs. Rick
-
Hi folks, I think I need a basic theory lesson about what affects feed tracking for a compound machine. I have a Tacsew 206RB look-alike that I've brought back from dead; it sews very well. The only issue that I'd still love to fix is that it feeds slightly to one side. If I angle anything I'm feeding a couple of degrees to the left, it sews perfectly straight. I've experimented with all the usual suspects: timed the needle to the presser feet, adjusted the foot timing and height, rotated the presser foot bar slightly, replaced the dogs and feed plate, angled the feed dogs slightly one way or another, tried angling the inner foot slightly, tried reducing or increasing tension to see if stitches might pull it to the side, and probably some other experiments I'm not remembering. But it still tracks consistently to the same side; the feed isn't parallel to the visual landmarks on the machine. I've added some tape indicators, and again, it sews dead straight if I just angle the feed. I'm running TKT 69 bonded nylon thread in canvas and leather, and it behaves the same for both. Anyone up for providing some tips on what affects feed tracking? @Uwe, @RockyAussie, @DonInReno? Or just tell me to live with it? Thanks! Rick
-

Suggestions for mitigating eccentric needle bar hole
rlevine replied to rlevine's topic in Leather Sewing Machines
Hmm. On further experimentation, I might be able to get away with rotating the needle bar 180 degrees. Any reason not to? The thread guide cut into the needle bar might work less well, but any other downside? -
Any thoughts on how to live with an eccentric hole in a needle bar? Here's a quick video of the issue. The needle should be fairly close to the feed wheel (which is what makes the machine very useful) but in this case, if I tighten the needle screw, the needle shifts left far enough so that it's being deflected to the right by the feed wheel. It'll sew a bit, but any slight tugging to the left will cause it to hit the wheel. In the video, the needle screw is *not* tightened. I'd replace the needle bar, but it's a Singer 110W125 and the part seems to be unobtainium. Two possibilities: Does anyone know of a compatible needle bar to swap in? Or, is there a (reasonable) way to kludge the bar to keep the needle straighter? I've not tried a toothpick, nor have I dropped some solder into the hole. Thanks!
-
,,,and the upper/lower coupling is a drive shaft, not a belt.


