


johnnydb
-
Posts
136 -
Joined
-
Last visited
Content Type
Profiles
Forums
Events
Blogs
Gallery
Posts posted by johnnydb
-
-
56 minutes ago, chuck123wapati said:
Thats why i haven't trimmed the main roller shaft yet lol. was actually thinking about a hand crank. it would be easy to power it
I have a one stall garage lol, i spend most of my time moving the few tools i have back and forth lol, wood working, knife making, welding and auto repair take turns. I'm afraid at my age a lathe and mill are just dreams for me, but i can do some small stuff on my wood lathe, made ferules out of 45 shells the other day for some hand tools.
A bunch of decent tabletop CNC mills are getting to be within budget too....
Just saying....
-
On 7/13/2022 at 7:49 AM, chuck123wapati said:
Thank you, I hear that! I think its human nature to want to create. I come from a family that has always made /built /created in some form. Mom an excellent seamstress, dad a mechanic always with more time than money lol always enforced our creative nature. i cant afford a quality built one and wont buy a chinamo brand piece of junk that i would have to re build anyway lol.
A lathe and mill would be friggin awesome!!!!!!!
See, now the electrician in me wants to add gears and a motor to your skiver and make it do all the work of putting the leather through the blade....
But then that means I have to go through the complicated math for designing, cutting and mounting gears (keyways and etc)so I get the speed correct....for the appropriate torque needed to do it well. Because I'm definitely lazy just like you...ha ha ha.
I'm thinking that a one horse DC motor and....
However....if you watch and look around there's a bunch of very old lathes and verticle mills (in great shape) that can be had for very little $ but they are going to require some heavy lifting, Rigging, installation, and hauling...which usually is the larger expense in these things. If you have room in a workshop..
I'm thinking that my house needs to be around 1200 square feet but my workshop needs at least 4000 Sq feet.
-
Very very cool....
And I know that a lot of people won't understand the "why" of such things.
Like why I want to spend a couple of grand on a machinists mill, another couple thousand on a machinists lathe...just so I can make a clock because I didn't like the price they wanted for the clock I liked. (I got started in leather because I wanted a particular tool bag made a particular way and couldn't find one)
But everyone has their own way of going about doing things.
And necessity is the mother of all invention.
-
The only thing not mentioned is the decorative stitching....like crossover stitches that put little "x" all down a seam or the "baseball" type stitch thT makes little "v" out of the stitches....
Then there's decorative edge stitches that produce nice edges to your work. (Usually done with sinew but not always)
Again....all a matter of taste. Style. Functionality.
Kinda like the question:
What flavor of bread is best for a ham sandwich?
It's all a matter of taste....just done whine about the mayo, mustard or cheese.
-
41 minutes ago, Campleathergoods said:
Hi Johnny,
for this video I wanted to make it as close to the instructions as possible for use of the company, I have a second pair I will be building where I will be adding all of my personal touches, including some edge beveling. And to answer your question they do have a Hightop "boot style" that is what I will be making next.
attached is the link to their patterns: https://www.sneakerkit.eu/c-3526931/patterns/
I look forward to seeing all the finishing touches that can be had making these....like maybe some sort of fabric lining (for breath ability) or some edging for the ankle instead of raw leather.
All sorts of possibilities in mind.
-
Cool build....
Not much in the way of skiving the leather....I'm assuming that you are wearing these sneakers. Is that something that you wished that you had done for the tongue or not?
I'm guessing that it would depend upon the thickness of leather as well.
I'm wondering if they have boots....
But great video!
-
Each piece is always a learning experience....and a new way to invent the wheel.
It takes about 20 times of doing the same item repeatedly to get it finally done right....well to my satisfaction at least. But usually by that point I'm bored with making it and move on to something else.
Yeah, I'm never satisfied either.
But your work looks great to me. Nice stitching, tooling and dyeing.
-
I like hats and have been thinking about doing one. I like this one too. I haven't decided on which one to start.
-
Depending upon how much you like the finish on your bicycle....
I'd use pressure sensitive adhesive velcro hook and loop. One part in my leather one the other glued to the bicycle.
Maybe use some contact cement that you let dry to secure the bottle straps to keep it from sliding into the pedals.
Just some suggestions. Otherwise it's a great job for a first round, wet-formed project. Round is frustrating in a LOT of ways.
-
The machine is the cheapest part of the equation. The letters start at about the price of the machine itself and you will need several sets of them. At a minimum a double letter set just to get started.
I've used inexpensive steel letter sets set up on an inverted clothes iron to get heated and clamped wooden blocks on the leather piece (marked) to make my gold foil lettering as often as I've used it. (Fairly infrequently)
The foil machines are fine for mass producing repeated lettering. Like a set of a dozen identical pieces. Otherwise it just isn't really cost effective.
Usually it's just someone's name...not something that difficult to do once.
The heated iron rollers that can emboss a repeating pattern in gold foil on a piece....that one is a fine purchase. ,(like a desk blotter, leather table, or leather box) You can usually get that to pay for itself rather quickly.
Just my thoughts. Your mileage may vary.
-
16 hours ago, Matt S said:
As others have said, having more than a fathom of thread "in hand" at any one time leads to increased issues with tangling, unravelling, having to rewax the thread periodically, fraying and discolouration. I've done it, it's doable, but not my preferred way of working. Doubled-up stitches at changeover isn't hugely noticeable IMHO, are "honest" artefacts of how the item was manufactured, and it's often possible to hide them. On shorter belts it's also possible to start at the point of the belt with /two/ fathoms of thread. Pierce the centre hole and pull both threads through so they're crossing over equally, then start sewing down one side of the belt with the ends of opposite threads. Once you've reached the end start again at the point with the second pair of ends and sew towards the buckle. Of course this requires being able to sew equally neatly both towards and away from you.
I've been hearing this a long time. Ron Edwards touches on how the idea probably became common, with saddlers directly comparing seams machined with skinny, slippery, stretchy synthetic thread (for light articles, rugs etc.) against chunky linen saddle- or back-stitched seams (for heavy and working articles) in the second half of the 20th century. I suspect also there's some mixup between lock-stitched seams and chain-stitched (which definitely do just "zip up" when you pull the right thread).
Without meaning to sound rude or confrontational, how much experience do you have with threads broken on stitched leather articles? I ask as I used to believe the same thing. Now, with the experience of examining hundreds of such broken threads (through accident, wear or deliberate cutting) I can tell you it doesn't work like that.
It is my experience (through direct study and asking the experience of professional leather tradespeople) that a "correctly" saddle stitched seam sewn in a decent thread with a grabby/hardening coad (not bloody beeswax or candle wax) /might/ be stronger than a lock-stitched seam... but I see precious little of that being done these days! For almost all practical purposes, when compared apples-for-apples, lock-stitch machine sewing is at least just as strong and durable as imperfectly sewn saddle stitching. I've handled plenty of items where one or more threads has been cut by wear or accident. Some (like the shaft tugs which hang above my desk) have the surface portions of both threads entirely worn away, yet are still solid. Similarly I've had to pick out plenty of machine-sewn work, that simply had to be cut and pulled out one or two stitches at a time -- same as saddle stitched. Others, saddle stitched even 100+years ago in linen thread, will disappear as soon as one of the stitches parts ways. The real difference in "staying power" in these cases is from tight holes (just big enough to admit the threads before they close back up, which is best achieved with a sharp awl immediately before each stitch, or failing that the smallest leather-point machine needle that will work), tight stitches, thread (preferably linen) saturated with proper drying stickywax (hardball or polymerising liquid), and a design that minimises reliance just on the thread to hold the thing together.On my tool bag I have some broken stitches right in the middle of a seam. (Too many construction sites where my bag takes abuse)
And unless you look...you can't find them. But as you say it's just heavy wear and abuse that caused the stitches to break. But the bag is holding up great.
I've seen plenty of leather tool pouches not hold up so well when the stitching begins to fail.
-
Hand stitching is much much sturdier than machine stitching....if one day a stitch breaks from wear the thing doesn't come apart on you. It's just a broken stitch.
As such I don't do a lot of overlapping stitches when hand sewing and usually tie them off on the backside when I have to. Might even start exactly where I left off too...depending on the item and expected wear and visibility. Don't put a start/stop point on a end piece of a strap....plan it for a foot back. Also avoid the shoulder area where it might get felt by the hand.
And yeah...a stitching horse helps with the 6 foot long threads. (It's as far as my arms extend)
-
On one hand my hobbies provide all kinds of gifts for others and a level of sanity for me to occupy my time.
But then at times they make me wonder if I could be a focus of that television show "Hoarders".
It's a very delicate balance.
-
30 minutes ago, Sheilajeanne said:
Johnny - had to show you this:

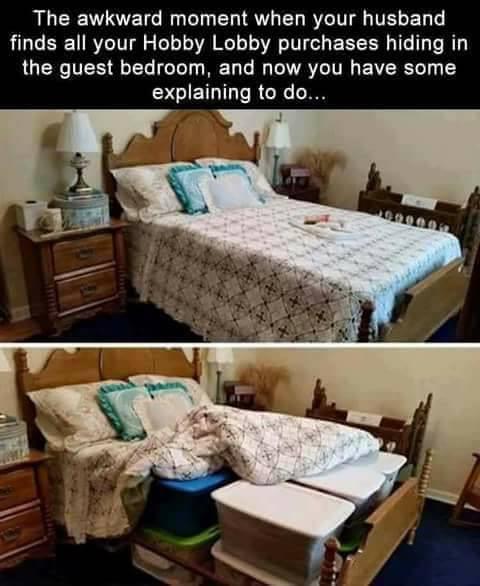
Okay....
I have to admit that I'm really liking that idea. Our closets are not containing the totes anymore.
I like leather crafting a lot...but also woodwork...and as a recovering chef I have a LOT....and I do mean a LOT of cooking utensils and gadgets and dishes.
On top of this I'm trying to start a bakery coffee shop which will eventually have a coffee roaster and patisserie shop for custom chocolates. That all stemming from my annual gifts of cookies and chocolate truffles I give every year as Christmas presents.
But I also enjoy charcuterie arts with sausages and kielbasa....
But I need to make bread and danish and croissants. I have five gallon buckets of flour and 22lb bags of fine chocolate filling workspace in my kitchen. And when cookie/candy season is afoot....I make over 1,000 cookies and 1500 pieces of fine chocolate truffles every year. (Whitmans ain't got nothing on me)
Nevermind the gingerbread neighborhoods of houses I provide children to decorate each year.
My wife does knitting and sewing and papercrafting and professional writing/editing....and helps with packaging the treats for Christmas every year.
She also is a schoolteacher at heart and does child crafts with our nieces every year...from fairy necklaces to I'm not exactly sure.
She is about to start with stained glass windows....I guess I'll need to make some fine frames for each one.
-
I too have many craft hobbies.
And they have a real ability to take over the house. However, my wife has her own list of crafts and hobbies as well. And there isn't a lot of crossover except for just a tiny bit here and there.
So we both had to do something...and the solution was tote boxes. We can have as many craft tote boxes as big as needed to hold our materials while we are not working with them. Otherwise they are allowed to and do take over the whole house while we are in the midst of a project.
Our new counter height dining room table (which i made) is an extension of our constant crafting by both of us.
-
3 hours ago, crazytailorlady said:
Hi everyone,
Lately I've been considering making a leather holder for a small bottle as I need one for my bicycle and I want leather to match the seat. But when I was looking through the Stohlman book I've seen that such a project requires the use of a curved awl and curved needles. Now, I know I can curve needles on my own and I could attempt the same for an awl but I'm always in tool shortage and supply is difficult. My question is, is this the only way to do such "curved" leather projects or is there a method I'm unaware of?
Curved needles and awls are nice...but truthfully I've never gotten the hang of them.
If you are making a standard bicycle water bottle holder for drinking while going down the road that attaches to the frame....
You really don't need curved awls and needles.
I'm unfamiliar with the pattern but I am familiar with the bottle and setup.
Personally I'd use veg tanned framing of the piece that was wet molded to the shape and then glue on chrome tanned and make a visible seam in the veg tan. Don't forget the attachment straps....and I'm unsure about using snaps vs buckles vs velcro. It's gotta fit snug to keep from slipping.
Have fun!
Sounds like a great project!
-
It's awesome work.
No doubt about that.
If I were you, I'd repeat it several times....
Then try creating an oil finish. Where you take neatsfoot oil and a small amount of regular Fiebings dye (not pro dye) and mix them. Something like 97% oil to 3% dye. Subsequent coats makes it darker...wait for each coat to dry before adding another.
Or maybe like others have suggested with the acrylic paints.
Or maybe slightly adjusting and decorating the flap to become a hat for the gentleman you so wonderfully created.
I think you are on to something...the next ones will be much much faster to make and have better finishes...even though you have done a superb job on this one. I can see this selling well. Give it a shot...you got the talent.
-
Balancing marketing with the business model is a never ending battle.
The small, cheap stuff brings in as much as the high dollar masterpieces. Often more.
Nobody takes a lot of pride in the cheap offerings. They come from scrap leather, they have no heavy labor or thought put into them...but they pay the bills just as well as the nice pieces.
But there's a positive in all of the cheap stuff...it is a product that the average person can afford to purchase. And if it has your unique branding on it...it is a form of advertising.
Gucci makes both high dollar handbags and low dollar Keychains...it doesn't hurt their feelings. The Keychain gets associated with the high dollar handbags because of the label. The handbag isn't devalued by the Keychain either.
-
There's a thing with market saturation and craftsmanship.
Not everyone can afford custom leather goods just like they can't afford to eat at your city's finest restaurants. People want to eat at fancy restaurants but can only afford McDonald's valu menu items.
Then on top of this...we seem to have a plethora of people producing hand crafted leather goods...all bidding on a small group of people who can afford (if they wished to) their items.
This is where craftsmanship and marketing and balance between labor costs and price comes into play.
Price points matter or they don't. Mass marketing price points matter. Small volume artist pieces, the price point is not important...quality matters. But style matters in the small volume pieces too. And just because it is of sufficient quality to last decades...it will be tossed out like the rest of last year's fashions.
And if your piece you are selling is last years fashion accessory....just saying.
I happen to like quality and timeless pieces...ones that tell a story.
-
After looking at the progression of your stitching I now realize that I need to work on rounding my corners as well.
Nice work!
-
Thank you...might try this. I haven't been able to do anything yet I've been so busy trying to get this bakery off the ground.
-
Shame about losing the branding and barb wire scratches. Because that would have given it a very unique look for such great work.
I wanna see more pics when you finish?
Are you going to do a resolene finish or some other sealant to protect the dye?
-
Chasing better hand stitching is a lifetime affair for me.
Of course we want better always to the point that our stitches look like a machine did them...
But people aren't machines.
And those tiny flaws are what create the hand made look. If course you can't bungle it...but a good job of hand stitching adds value to a product. It doesn't detract even if you feel like your stitching needs improvement.
I think that you are doing great. Keep it up. Keep the angles and order the same every time and they will look great. I just had a frustrating time with a baseball stitch myself...But it did ok in the end.
Wait until you start doing the stitching that you use as part of the adornment. Then you will get really frustrated...I know I do. Just relax and have fun.
-
11 hours ago, tsunkasapa said:
You never want to 'slather' anything with NFO. I would clean it with a quality saddle soap, then if it is still dry, a very light wipe of NFO might be in order. Or a quality reconditioner.
Thank you... this sounds like a good idea.
Swivel knife recommendations?
in Floral and Sheridan Carving
Posted
I'm going to agree completely about any swivel knife first being sharpened before it will be useful.
I got one and started carving on some cased leather and knew instantly that it was in rough shape right out of the box.
I then spent several hours regrinding the edge and then putting a true razor-sharp edge that will shave a tough beard close. It takes a stone progression through surgical black Arkansas stones and a strop with jewlers Rouge or better.
Then it finally was fine to cut with. Tool sharpening is a completely different skill set....but the polished edge is worth it.
Because you don't want to start and stop a cut changing angles or direction when you do. It will look bad when you pound it out. Only the sharpest razors will do what you want...then you can focus on the art instead of the knife.