.jpg.d60258221c476480a6e073a8805645bb.jpg)


deboardp
-
Posts
189 -
Joined
-
Last visited
Content Type
Profiles
Forums
Events
Blogs
Gallery
Store
Everything posted by deboardp
-
thank you! You've opened up a new world for me, the world of rubber soles. I'll work in a visit to a cobbler soon. apparently there's a hundred of them within an hour of my apartment. I studied sandals 50 years ago, and then again this past year and a half, and I haven't changed my mind about sandals. Both times, I came up with the same conclusions, which are that 1) sandals made by a size pattern ignore the specific skeletal architecture of the individual, instead opting for a one pattern fits all. Usually this pattern of straps results in the toes being pinched together, and general discomfort if not pain, that does not stop after the sandal is broken in. Also almost all straps made in a commercial sandal are non-adjustable. If the straps are made of leather, the leather will stretch out and the sandal will fit poorly. Because of this, I resolved 50 years ago, and maintain this resolve today, to only make custom sandals. The major bones have to be marked on the foot tracing, which are the big ball, the little ball, and both inner and outer ankle bones. The straps need to encompass both balls in front, and be below both ankle bones in the back. That's for my design, which has nothing between the toes and is created so that the wearer can wear socks. I also resolved that every strap has to be 100% adjustable by the wearer, to either loosen or tighten each strap. When I look at commercial sandals, I usually shudder at the thought of buying and wearing such a cheap, ill-fitting piece of junk. It's a little like being robbed, actually. I looked at the link you sent, to the Greek sandals. Sheesh, what a waste of effort to build those things! If there wasn't the Mediterranean Sea right there, and the sun shining, nobody would buy those things. And the prices! Wow. So high! I won't change my design until I've worn this first pair and get some real feedback to my feet. While wearing them I'll make the second pair with thinner mid- and bottom-soles. Hopefully I'll find a microcell that will satisfy me. I'll try what I have on hand first, despite not knowing exactly what it is, except that it's pure gum rubber. I'll use the heels I have, too, just to see if they work. the cork is a good idea. I'll think about if I can incorporate it. I want my sandals to last a couple or three decades, and the cork might not be appropriate.

-
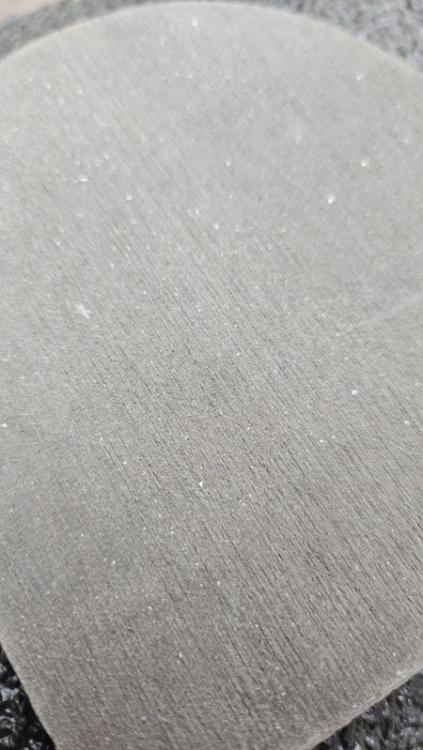
It is thick. but not as thick as what I made 50 years ago. I don't remember exactly what I bought, but I know the bottom was bend, and it was thicker than the top, which I have no idea what it might have been. A snatch-out-of-the-air-guess would be 12 ounce shoulder for the top and 14 ounce bend for the bottom, and 7/8 ounce horse hide for the straps. 12 and 14 is 26 ounces total. This current sandal is 10 ounce shoulder and 15.5 ounces of veg tan for straps and lower soles, for a total of 25.5 ounces. Because the sandal is so stiff - and that's without the rubber and heel - I will keep the shoulder for the top and move to two layers of 6 ounce luxury veg tan for the straps and two lower soles, for a total of 22 ounces total, or 3/8" (rather than existing 7/16"). It's not much thinner, but two lower soles are luxury veg tan, a supple leather, as opposed the Hermann Oak craftsman veg tan, which is firm. It might make the sandal more supple and less stiff. I guess we shall find out! I'm keeping the top at 10 oz because when I tug on the strap to tighten the front strap, I don't want the topsole to bulge away from the midsole. I want it to be the most durable sole. The mid-, bottom- and gum-soles will add plenty of stiffness, putting the overall thickness at exactly 1/2".
-
Sheesh... I guess I shoulda run a search for cobblers near me. It's probably a good idea to visit one, or call first, ask if he would be willing to show me what he uses for sole rubber. Cordwainer???
-
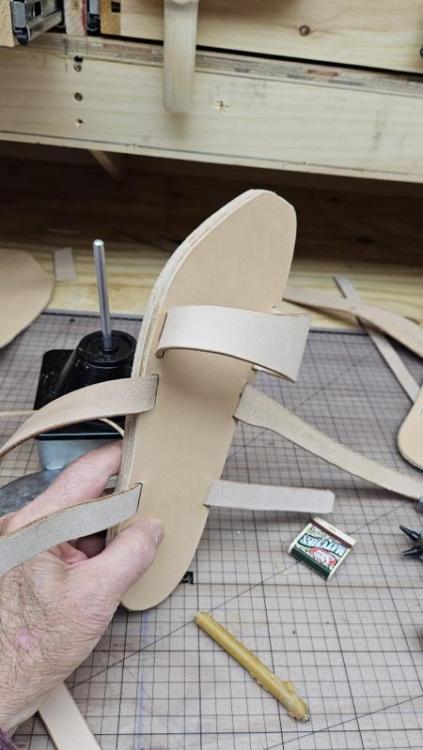
@Tastech I thought you'd like to see this. I'm working through mishaps and thread tension and drive belt tension issues with my Cobra Class 26 sewing machine, and managed to finish sewing the left sandal of my prototype pair. I used a creaser on the topsole and fed the sandal through the machine, without an edge guide. I followed the crease. I also made marks with my blunt all around the straps. The results are one ugly sandal. I intend to change a few things. First, I'll sand the sandal edge and use the roller guide for an even edge stitch. Second, I've already adjusted the stitch length so stitches per inch increases from 6 to 8.5. It is a tighter stitch and it compresses the leather more, because it has less leather to hold together, per stitch. Also, the top thread is snug to the leather rather than laying on top of it. And thirdly, I think I will use a single stitch line to reinforce the slots, and square corners, not rounded. I'll also try to be neater. For the second pair I make , I'm going to use a 6/7 ounce luxury veg tan that I got from Horween. Since my straps are now significantly wider than the 1/2" straps I used to use, I think this will add to comfort, ease of adjusting that front strap, and a slightly lighter shoe. Presenting, drum roll .... "The Oogly" PS I'll move that single stitch line closer to the strap, to hold it down tighter. You know, on the foot side of the strap.
-
We don't have cobblers in the states as far as I know. There's a shop that makes custom shoes but I doubt that they do repairs. Their stuff looks made for millionaires. I expected that someone would ask me if I'd kindly take my scruffy self down the road, and please don't touch the shoes! Although quite perfect looking, they also looked too stiff to be comfortable. When I was a competitive road racer in my 30's during the foot race craze in the 70's here in the states, I used Shoe Goo to build up my Nike Elite racing shoes at the heel. Great stuff. I still have a half full tube in my survival gear.
-
Not so, not so! I'll look them up, read the specs, find out what you consider proper sole rubber. I have a sheet of gum rubber, 1/8" , thick, that I'll use on my first pair, the prototype. When I do get to it, I'll use two coats of Barge, just to see if the rubber will stay on.
-
From the side...

-
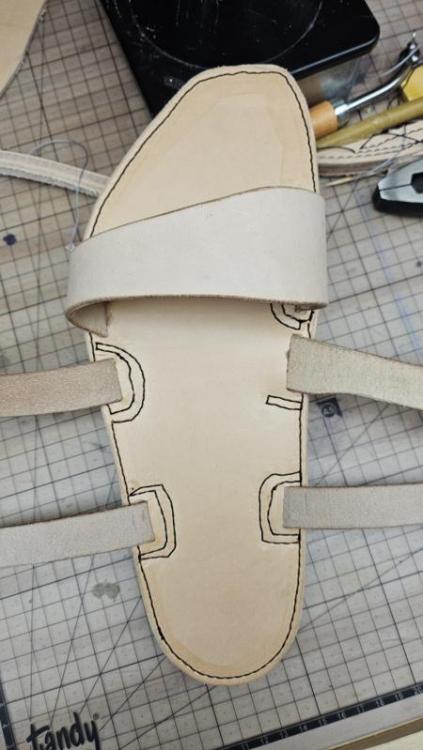
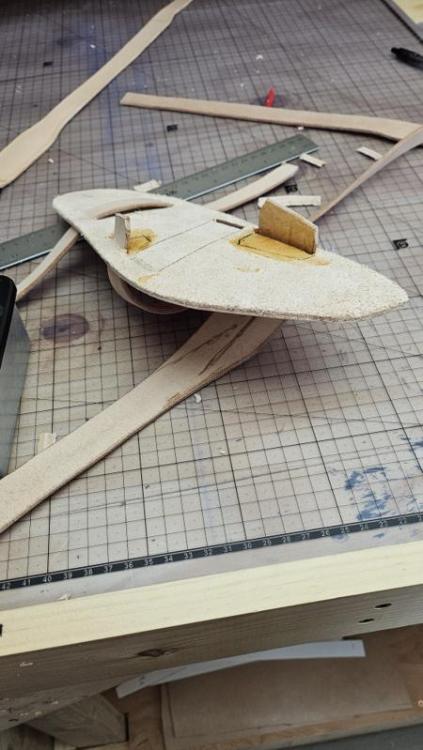
This is the sandal that's ready to stitch. I wet the edge all around so it would take a crease better. I'll stitch in the crease, no machine guide. I used the heavy awl to make crease lines around the straps to reinforce the slot areas. The water stained the leather and I'm hoping that the grease will overshadow that. Two of the slots look too big in the pic but that's because the strap is loosened. The straps have two reductions in it. It goes from 1-7/8" to 1-1/16" to 13/16". Snugging the strap will fill those slots.

-
The gum rubber is visible in the above picture. This is the backside of the heel, which has been roughed up with a fine striation
-
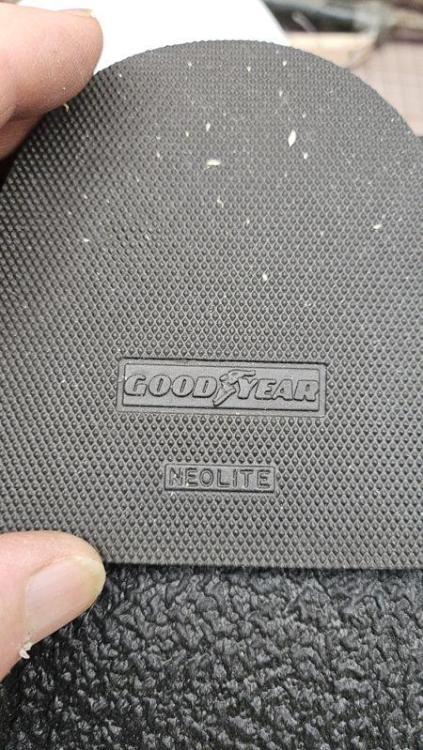
This is good news! Can I bother you for links? For the Renia Colle de Colange? I couldn't find the receipt for the other Renia product I have. For the cobbler who sells(you) sole rubber? I couldn't find the receipt for the gum rubber I have, either. Is it crepe your talking about? I'd prefer something thinner and harder. I also bought some I bought a sheet of gum rubber last year and have built my first sandal. I'm ready to stitch the three layers of leather. I'm still pondering a heel of tougher rubber as I'm assuming the heel will wear the fastest. I did buy some Goodyear Neolite heels in various weights and would like to use the thinnest one I have, 12 iron, for the heel. I hadn't made a decision on it because I didn't know how to glue it on. On the side of the heel it says 17/18 (my gauge confirms 17.5 ounces), 12I, W-4103, and SSI. This is a stiff piece of rubber. The gum is flexible. The tri- layer leather soles are stiff, too. I had been concerned that the wearer would feel gravel through them but now I doubt that. Now I'm concerned that they will be too stiff to be comfortable but also think they might loosen up, especially if I hand stuff some grease into the topsole. All three layers are 7/8 ounce, as well as the straps. All are firm HO veg tan except the straps and midsole which are Tandy utility grade veg tan, a very nice side, only $129!
-
I'll use the barge. I bought a twin fan window unit, reversible air flow, and put it in the shop window, blowing out, and I open a window in another room.
-
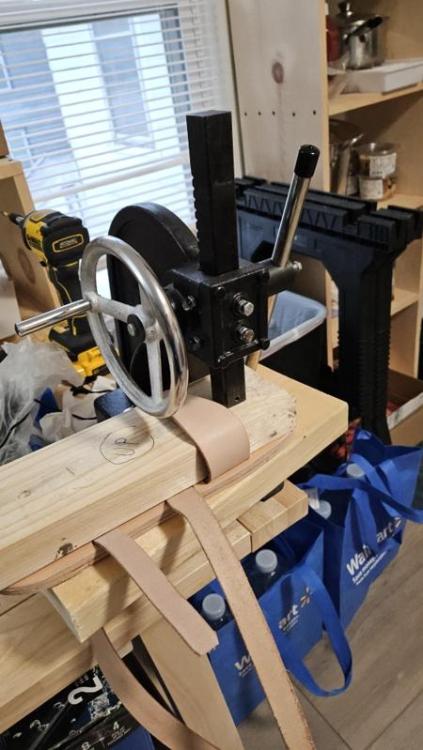
The one ton press
-
This first pair is for me, and I'm treating it as a learning experience, to figure out the real life application of all the leatherworking techniques I've studied this past year and a half, especially for this design, which is a slight development of my basic sandal making skills from 50 years ago. The big difference is that I'm using three thin layers instead of two thick ones, and I'm adding professional finishes, not to mention the industrial sewing machine from Cobra. 50 years ago there was a guy in Maine making the top sandal in the northeast, and there was a shop in downtown Amherst, MA, making the #2 sandal, and I was making a decent but rough sandal behind those two. Now nobody makes them! Actually there are a few, but not like during the wild hippy Era.
-
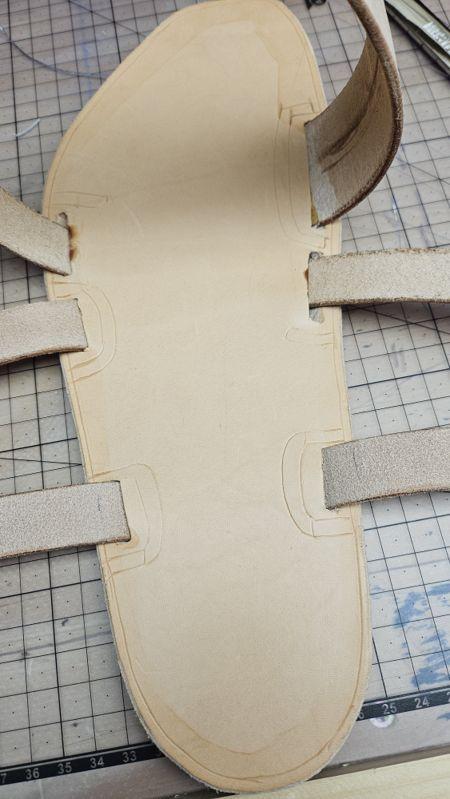
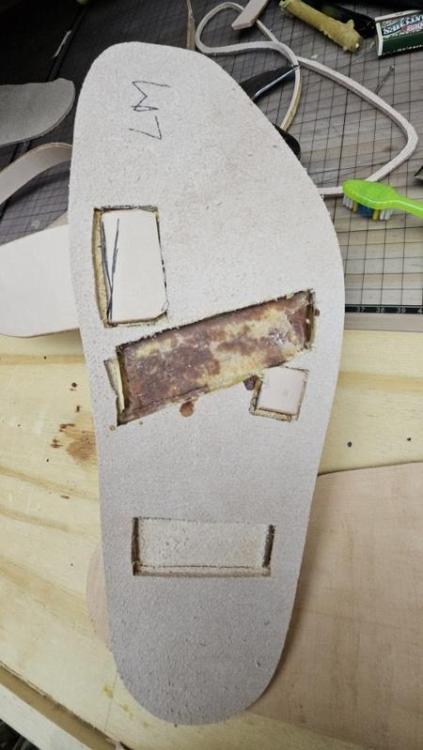
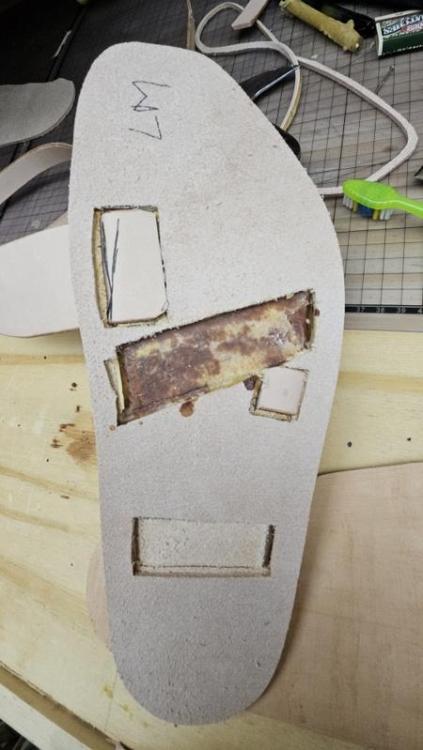
I found out this is wrong, at least the wide side of the front strap. It doesn't grab the knuckle with that angle. It flares away from the foot, creating a gap. I cut the glued and pressed joint with my round knife and reset it at a simple 90 degrees. The Barge tore the leather apart when I tried to separate that glue joint so I basically skived the glue off the leather strap. The pic shows my ink line of the original position. I'm still figuring out my procedure to make sandals in 2024, with operations I didn't use in 1970-1978. The work is therefore a bit sloppy. It's visible in this Pic how I had to remove leather from the slots because the midsole stretched during rough up. Sloppy!! Actually, what's visible is how the channels have a bit of a gap on the heel side of the channels, from the midsole being stretched lengthwise.
-
Today I'll sand the three layer edge, burnish it, mark a stitch line, and see if I can follow it. I wonder if I should wet the leather before stitching so the thread sinks in a little below the surface of the grain. Or maybe do the greasing of the leather.

-
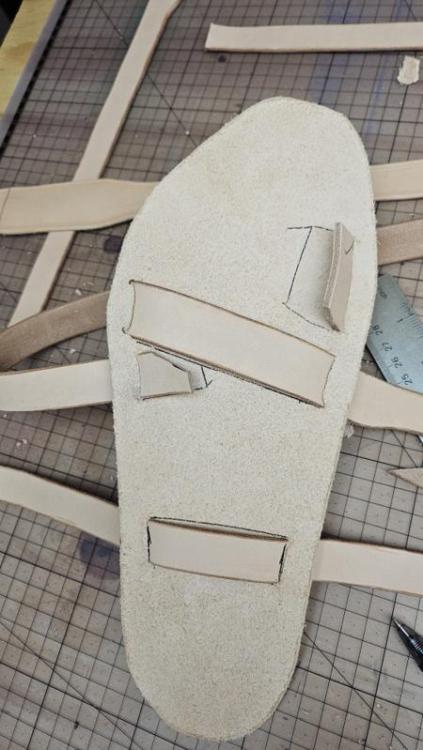
One shoe, three soles, all 7/8 oz veg tan. To and bottom are firm Hermann Oak, the center is more supple veg tan for straps cuts from belt of the side for the midsole (channel sole). This is the glued soles ready for positioning against the alignment brads. I messed up the channel sole. I roughed up the grain side after I had cut the channels out, and the length of the sole stretched, the straps and channels were slightly misaligned and it took delicate knife work to remove more leather from the channel so the straps would fit.

-
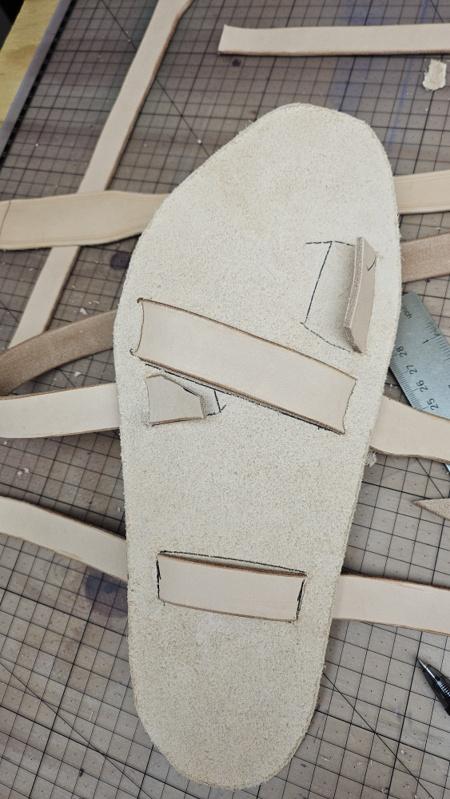
The dark brown is melted wax on the flesh side of the topsole, after I glued the middle onto it. I'm not sure it's a good idea to do that. I rubbed a candle end on the other contact surface. It takes up too much space in the channel. I'll see how it behaves after I grease it up.
-
I used it on my kitchen knife and the results were that the process was quick, simple, and extraordinary. Never had that knife that sharp, and the effort was minimal, as well as the time. In other news, now that I have and can make them sharp, I can work on building footwear. Yesterday I worked 5 hours in the shop. I cut, made channels, waxed, glued, pressed. Today I plan to sand, burnish, and sew.

-
I noticed that there was no burr when I checked. To me that means I'm not losing that bit of metal. That's okay with me. These knives are not cheap. Plus that trim knife is now sharp enough to cut leather in tight places, so I'm happy with this method and will advance to the finer stones now.
-
Others say the same as you, including my friend @chuck123wapati, who is never wrong, haha. However, I worked on my head and trim knives just a little, using the drag away from the stone method, and I noticed that it's quicker and it made both knives noticeably sharper. I never got to the second stone or the second strop. I finished my slots and am gluing the strap dead ends. The little trim knife cuts more precisely with tiny back and forth motions, otherwise if I just exert pressure, it can cut beyond the slot. Woops.
-
Uh, sheesh, it looks like I've been doing it all wrong. I just watched a video by Kevin and Denny of Springfield Leather Company. Denny is an old saddle maker. The video is about how to sharpen a head knife, aka round knife. He says that a circular motion is alternating between making sharp and making dull, that the motion cannot be pushing the knife edge into the stone, because that dulls the knife. It has to be all pulling the edge away from the stone. He shows how. click here to see Kevin owns SLC, Denny works there. My poor head knife! I'm headed to the stones and strops and see what I can do with these two knives of mine. (I have another round knife, from TAndy, soft steel, I prefer the custom one, of better steel, and harder to sharpen. But then, I've been doing it wrong the whole time... Sheesh!
-
It wasn't difficult for me. I worked with hand tools as a high-end remodel/repair contractor for 30 years before the diseases associated with herbicide exposure disabled me 20 years ago. I have a sensitive touch with tools. I can push my round knife through 7/8 ounce leather easily. I'd like to get that trim knife to do the same. Talk about frighteningly sharp. I learned how to sharpen a scythe back in 2014 when I rented a room on a farm. I was allowed a section of it to make a garden, but it had 3' of grass on it. There was an old scythe laying around. I got permission to sharpen it, and I watched some YouTube videos on the subject, bought the rounded scythe anvil to stretch the blade out. Simply making contact with the blade could cut through skin. After it was sharp, I cleared the grass, cutting it at ground level with the strokes I learned from the videos. It was quite satisfying! Since I've had my shop, my pocket knives are razor sharp. My round knife is sharper than a razor (I think), definitely sharper than my pocket knives. I give it way more attention. It could be sharper, though, because I haven't used anything but the coarse stone and black rouge strop for a couple months. Time to get back to basics... use the other stones and strops... I do like a wicked sharp knife...
-
I've been doing circles, not cutting into the stone. I did it with the round knife, removing the burr on both sides with circles, then moving to finer stone. I have no idea how I can do a round knife like that. It has infinite points to cut into the stone! I have to retire. Tomorrow!
-
Intuitively I want to clean the burr off by sliding the knife across the stone edge first, to pull the burr off. Is that how it's cleaned off?
-
Thanks for taking the time to write all that out. That's the exact procedure I used to sharpen my custom round knife, made of a special hard steel. I have three stones in a triangle holder and four leather strops, black and green Rouge. My round knife has the mirror finishes. I forgot the procedure for this new knife. My memory doesn't work well. I'll go back to it. I'll also return to the original angle of the knife edge and just follow the procedure, although I'm afraid I scuffed up that bright finish on the unshakable part. Woops.