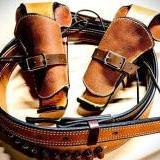
Brooks125 Report post Posted February 19 I was commissioned to make sponsor gifts for the local Ducks Unlimited Banquet. I was asked for suggestions and I came up with some of the usuals ... drink coasters or dresser valets with the DU logo stamped in. My contact suggested these shot gun holsters. In working up the prototype, I impressed even myself with 2 things: 1 - I picked the right material - 12/13 Bridle stock. No dying. No edging and it looks good. (The prototype has some VERY rough edges, but that was by design) 2 - It seems I got the pattern down on the first try, which is not typical for these odd projects. One note, they use a LOT of material and the design doesn't lend itself well to yield. I got 9 out of the first side of leather. The order is for 20 units! This should be fun, and I'm hoping will expand my product base a little, as well. Quote Share this post Link to post Share on other sites
MarshalWill Report post Posted February 19 Those look good. Are they designed to hold a box of shells? No edge beveling, no dying, just cut out and assemble. Nice design idea. Quote Share this post Link to post Share on other sites
DieselTech Report post Posted February 19 Looks good! So does item that hold a box of shotgun shells? Thanks. Quote Share this post Link to post Share on other sites
MarshalWill Report post Posted February 19 I don't see a logo on them anywhere. Will that get imprinted afterwards? Quote Share this post Link to post Share on other sites
Brooks125 Report post Posted February 19 No logo yet, still waiting on them to get the stamp. It holds the shotgun at your side. It's not particularly original, as I've seen them in the past and very early on, I tried to imitate them. This turned out much better. Quote Share this post Link to post Share on other sites
purplefox66 Report post Posted February 19 24 minutes ago, Brooks125 said: No logo yet, still waiting on them to get the stamp. It holds the shotgun at your side. It's not particularly original, as I've seen them in the past and very early on, I tried to imitate them. This turned out much better. That's a beautiful piece of wood on the shotgun what is the shotgun. Quote Share this post Link to post Share on other sites
TomE Report post Posted February 19 (edited) If I may suggest finishing and sealing the edges for outdoor use. This will help repel dirt and moisture to improve wear. I use mostly bridle leather for tack. It is a bit trickier to burnish than plain veg tan because the fibers are stuffed with fats and oils. You can get a fairly smooth edge by burnishing without sanding. My process is to bevel the edge then lightly wet it with water. I apply a small amount of saddle soap with a finger - just enough to feel it starting to get slick. Too much water or saddle soap will decrease the amount of dye absorbed in the subsequent step. I use a power burnishing wheel but canvas also works well to make the first pass. I then dye the edge with Pro dye or a 50:50 mix of Pro dye and Martin's Edge Solution. Once the dye soaks in I add a little saddle soap and burnish again. Gum tragacanth also works at this stage instead of saddle soap, but GT will seal the edge so you can't apply more dye if needed. Martin's Edge Solution creates a firm edge that is not sealed. I burnish before and after dyeing because it's easier to apply the edge dye evenly on a smooth edge. I usually finish by sealing the edge with beeswax applied with a heated edge iron. I let the wax harden for several hours before buffing with a soap cloth. This makes a serviceable edge for horse tack. I avoid acrylic finishes so the tack can be cleaned and conditioned as needed. Edited February 19 by TomE Quote Share this post Link to post Share on other sites
fredk Report post Posted February 19 That chap needs a heavier gauge belt. Its bending and twisting Quote Share this post Link to post Share on other sites
Brooks125 Report post Posted February 19 1 hour ago, TomE said: If I may suggest finishing and sealing the edges for outdoor use. This will help repel dirt and moisture to improve wear. I use mostly bridle leather for tack. It is a bit trickier to burnish than plain veg tan because the fibers are stuffed with fats and oils. You can get a fairly smooth edge by burnishing without sanding. My process is to bevel the edge then lightly wet it with water. I apply a small amount of saddle soap with a finger - just enough to feel it starting to get slick. Too much water or saddle soap will decrease the amount of dye absorbed in the subsequent step. I use a power burnishing wheel but canvas also works well to make the first pass. I then dye the edge with Pro dye or a 50:50 mix of Pro dye and Martin's Edge Solution. Once the dye soaks in I add a little saddle soap and burnish again. Gum tragacanth also works at this stage instead of saddle soap, but GT will seal the edge so you can't apply more dye if needed. Martin's Edge Solution creates a firm edge that is not sealed. I burnish before and after dyeing because it's easier to apply the edge dye evenly on a smooth edge. I usually finish by sealing the edge with beeswax applied with a heated edge iron. I let the wax harden for several hours before buffing with a soap cloth. This makes a serviceable edge for horse tack. I avoid acrylic finishes so the tack can be cleaned and conditioned as needed. Thanks Tom. I will try that. It is good that I have plenty of scrap and the sanding did seem a bit "frayed". I'll try your version, or some close approximation - Thanks! 1 hour ago, fredk said: That chap needs a heavier gauge belt. Its bending and twisting No kidding. I'm often amazed at what some people will publish in their product shots. Quote Share this post Link to post Share on other sites
MarshalWill Report post Posted February 19 4 hours ago, Brooks125 said: No logo yet, still waiting on them to get the stamp. It holds the shotgun at your side. It's not particularly original, as I've seen them in the past and very early on, I tried to imitate them. This turned out much better. Well, that's certainly an interesting item. I haven't seen one before. But, I'm not in the duck crowd, either. Looking forward to seeing the final finished ones. Quote Share this post Link to post Share on other sites
TomE Report post Posted February 20 (edited) 3 hours ago, Brooks125 said: Thanks Tom. I will try that. It is good that I have plenty of scrap and the sanding did seem a bit "frayed". I'll try your version, or some close approximation - Thanks After struggling for several years with burnishing bridle leather I’ve learned a key is to get the right amount of moisture and friction when burnishing and not overheating with a power burnisher. When in doubt, burnishing with canvas is a good approach. My favorite dye applicator is a small block of Magic Eraser held in a clothespin. Holds a lot of dye without dripping. Edited February 20 by TomE Quote Share this post Link to post Share on other sites
MarshalWill Report post Posted February 20 I know several who use canvas to burnish their leather edges. It works great as long as you get the right amount of moisture and friction, as TomE mentioned. I personally use a piece of cotton fire hose but that stuff is a little scarce these days. If I didn't have that, I'd use canvas myself. Quote Share this post Link to post Share on other sites
bladegrinder Report post Posted February 20 That looks great, I’ve seen those used for bows too. Quote Share this post Link to post Share on other sites
Brooks125 Report post Posted March 5 On 2/19/2024 at 2:18 PM, TomE said: If I may suggest finishing and sealing the edges for outdoor use. This will help repel dirt and moisture to improve wear. I use mostly bridle leather for tack. It is a bit trickier to burnish than plain veg tan because the fibers are stuffed with fats and oils. You can get a fairly smooth edge by burnishing without sanding. My process is to bevel the edge then lightly wet it with water. I apply a small amount of saddle soap with a finger - just enough to feel it starting to get slick. Too much water or saddle soap will decrease the amount of dye absorbed in the subsequent step. I use a power burnishing wheel but canvas also works well to make the first pass. I then dye the edge with Pro dye or a 50:50 mix of Pro dye and Martin's Edge Solution. Once the dye soaks in I add a little saddle soap and burnish again. Gum tragacanth also works at this stage instead of saddle soap, but GT will seal the edge so you can't apply more dye if needed. Martin's Edge Solution creates a firm edge that is not sealed. I burnish before and after dyeing because it's easier to apply the edge dye evenly on a smooth edge. I usually finish by sealing the edge with beeswax applied with a heated edge iron. I let the wax harden for several hours before buffing with a soap cloth. This makes a serviceable edge for horse tack. I avoid acrylic finishes so the tack can be cleaned and conditioned as needed. Tom E for the win. Nice edges and looks good. I'm fortunate to have a burnishing wheel attached to my drill press, since this is a "production run"-type order. The local DU was able to get a nice 3" wide brass stamp, which I was able to use on a few things, but it really sets this project off nicely. Side note: this project uses a LOT of material. At $30/pc, it really just covers material and I'm donating the labor. I get about 8-9 pcs per side of bridle leather in 12-13oz. Thanks for the input, everyone! Quote Share this post Link to post Share on other sites
Brooks125 Report post Posted March 5 ... as a bonus, I used the rounds produced from the 2" punch to make these "coins". Since I have use of the stamp, I made about 50 or so. Any idea what use they might have, other than they just look cool? I suggested some type of "challenge coins" for the club, but I dunno. (That bridle is fun to cut and stamp!) Quote Share this post Link to post Share on other sites
MarshalWill Report post Posted March 5 4 hours ago, Brooks125 said: Tom E for the win. Nice edges and looks good. I'm fortunate to have a burnishing wheel attached to my drill press, since this is a "production run"-type order. The local DU was able to get a nice 3" wide brass stamp, which I was able to use on a few things, but it really sets this project off nicely. Side note: this project uses a LOT of material. At $30/pc, it really just covers material and I'm donating the labor. I get about 8-9 pcs per side of bridle leather in 12-13oz. Thanks for the input, everyone! That came out really good. The stamp really makes them special. The rounds look nice, too. There must be something you can use them for. Even if it's just key fobs or something simple like that. Quote Share this post Link to post Share on other sites