Members Red Cent Posted March 31, 2014 Members Report Posted March 31, 2014 Quote https://www.facebook.com/redcentcustomleather?ref=bookmarks http://www.redcentcustomleather.com/
Members dakotawolf Posted March 31, 2014 Members Report Posted March 31, 2014 Beautiful burnishing on the outside edges. What is your inspiration for the design? Quote "An unarmed man can only flee from evil, and evil is not overcome by fleeing from it."-Col. Jeff Cooper
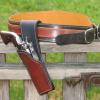
Members Colt Hammerless Posted March 31, 2014 Members Report Posted March 31, 2014 Neat Red Cent. I'm going to build a cross draw for my friend's Sig 226 for when he's hiking. He was concerned with scratching the gun and I was just today thinking that I'll probably bring the leather up just as you have there. Is this for you or a customer? Wondering what conditions it's expected to be carried in that would call for that treatment. Hiking? Standing at a workbench, and constantly banging the shooter into stuff? Paul Quote
Members LTC Posted March 31, 2014 Members Report Posted March 31, 2014 this same thread is posted seven times...lol Quote
Members tallhorse89 Posted March 31, 2014 Members Report Posted March 31, 2014 this same thread is posted seven times...lol kind of ironic considering the thread title lol Quote
Members Red Cent Posted March 31, 2014 Author Members Report Posted March 31, 2014 What tha!!! The site refused my post and told me I couldn't do that a few times. I tried one more time, took a potty break, and came back to this. Sheezz! Well anyway, the design just came to me. Saves inside of coats and jackets. I used to destroy the inside of my suit coat. That Commander and a National Match tore holes until I deburred the sights. One could mold the outside "ear" to lay in closer and not much printing would be seen. Thanks about the burnishing. I take pride in a good edge. Quote https://www.facebook.com/redcentcustomleather?ref=bookmarks http://www.redcentcustomleather.com/
Members doubleh Posted March 31, 2014 Members Report Posted March 31, 2014 What tha!!! The site refused my post and told me I couldn't do that a few times. I tried one more time, took a potty break, and came back to this. Sheezz! Well anyway, the design just came to me. Saves inside of coats and jackets. I used to destroy the inside of my suit coat. That Commander and a National Match tore holes until I deburred the sights. One could mold the outside "ear" to lay in closer and not much printing would be seen. Thanks about the burnishing. I take pride in a good edge. I like it---a lot. A good edge is just as important as any other aspect of a leather project. Maybe more so. I don't care how good your tooling or stamping or sewing is, if the edge isn't up to snuff it ruins the whole thing. Quote
Members Eaglestroker Posted March 31, 2014 Members Report Posted March 31, 2014 I've seen a lot of Roy Baker pancakes, with only the front covering the side/sights etc before sweat shields were popular. It's something you don't see as much of but folks who want it definitely understand why. Nice work Quote
Members Red Cent Posted March 31, 2014 Author Members Report Posted March 31, 2014 Thank you. Quote https://www.facebook.com/redcentcustomleather?ref=bookmarks http://www.redcentcustomleather.com/
Members MDH Leatherworks Posted April 1, 2014 Members Report Posted April 1, 2014 Red Cent , what is your process on your edges? Great holster and great edges! Quote


Recommended Posts
Join the conversation
You can post now and register later. If you have an account, sign in now to post with your account.
Note: Your post will require moderator approval before it will be visible.