Members Red Cent Posted August 7, 2014 Members Report Posted August 7, 2014 They all told me I could buy patterns but I would have to make my own some time. I used a quilting half circle helper : http://1.bp.blogspot.com/_2ssunQr1FDY/S0LB5h22UAI/AAAAAAAADqc/JGKHLn6sJ_s/s1600-h/Cutting+Circle+Templates+from+Freezer+Paper.jpg and drew the lines with a pencil oh so lightly. And no one better say "Yeah, it looks like it". Quote https://www.facebook.com/redcentcustomleather?ref=bookmarks http://www.redcentcustomleather.com/
Members Eaglestroker Posted August 7, 2014 Members Report Posted August 7, 2014 I've yet to master that, yours looks very nice! Quote
Members Steve75 Posted August 7, 2014 Members Report Posted August 7, 2014 Nicely executed. Quote Steve "No man is above the law and no man is below it; nor do we ask any man's permission when we ask him to obey it." Theodore Roosevelt
Members Treed Posted August 7, 2014 Members Report Posted August 7, 2014 Looks great Quote Bobby Rose Rock'n R custom holsters
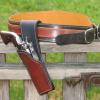
Members Red Cent Posted August 7, 2014 Author Members Report Posted August 7, 2014 Thank you. Now the holster. Quote https://www.facebook.com/redcentcustomleather?ref=bookmarks http://www.redcentcustomleather.com/
Members Dwight Posted August 8, 2014 Members Report Posted August 8, 2014 Looks good, . . . but then again, . . . I'm partial, . . . always did like that design. May God bless, Dwight Quote If you can breathe, . . . thank God. If you can read, . . . thank a teacher. If you are reading this in English, . . . thank a veteran. www.dwightsgunleather.com
Members Sorefingers Posted August 8, 2014 Members Report Posted August 8, 2014 Really cool. Look forward to seeing the holster. I have been looking at the paterns created by black river laser for that stitching pattern but have yet to purchase. Anyone on this thread have any experience with those? I have heard good things but still on the fence. Quote
Members Red Cent Posted August 8, 2014 Author Members Report Posted August 8, 2014 It is really not hard to do with the quilting device or something similar. Draw two parallel lines. These lines represent how tall the ellipse and the diamond will be. Divide the two lines in half with another parallel line. This where everything "crosses". At some point on the bottom establish a point/mark. With the guide, all you do is line up two "points" in the groove of the circle chosen.. The point/mark established and the top groove of the circle on the top line. Hint: the biggest circle works best. With your pencil, start at the "point" and follow the groove (left or right) up to the top line and as you come over the top stop at the halfway line. At this point you have drawn one quarter of a diamond and one half of an ellipse. If you use a slender sharp pencil, stacked tolerances will happen. This will make your points come out a little off. Keep your pencil against one side (outer side of the grove or the inside of the groove) of the groove when ever you draw. This will help some. The circle I use is 10" in diameter. Quote https://www.facebook.com/redcentcustomleather?ref=bookmarks http://www.redcentcustomleather.com/
Chief31794 Posted August 9, 2014 Report Posted August 9, 2014 It is really not hard to do with the quilting device or something similar. Draw two parallel lines. These lines represent how tall the ellipse and the diamond will be. Divide the two lines in half with another parallel line. This where everything "crosses". At some point on the bottom establish a point/mark. With the guide, all you do is line up two "points" in the groove of the circle chosen.. The point/mark established and the top groove of the circle on the top line. Hint: the biggest circle works best. With your pencil, start at the "point" and follow the groove (left or right) up to the top line and as you come over the top stop at the halfway line. At this point you have drawn one quarter of a diamond and one half of an ellipse. If you use a slender sharp pencil, stacked tolerances will happen. This will make your points come out a little off. Keep your pencil against one side (outer side of the grove or the inside of the groove) of the groove when ever you draw. This will help some. The circle I use is 10" in diameter. Looks really good, nice work. Chief Quote "Life's too short to carry ugly leather"


Recommended Posts
Join the conversation
You can post now and register later. If you have an account, sign in now to post with your account.
Note: Your post will require moderator approval before it will be visible.