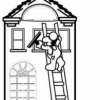
JLSleather Report post Posted March 7, 2017 Quick pic of teh problem here. When the holster lays flat, or held in the hand, slips in and out just fine. But the harder the front 'wing' is cranked in, the more the site channel collapses, causing front site drag. "Breaking it in" only serve to make the problem worse. The pic above illustrates what is happening when the holster is curved to fit the waist. The smaller the waist, the tighter the radius, and the more bow in the holster. And the more site drag. Looking down on a G43, right hand holster. Quote Share this post Link to post Share on other sites
longun45 Report post Posted March 7, 2017 (edited) This would be a recurring problem with any pancake holster. I can see 2 fixes. Sew in a sight channel or mold it in. So with the sight channel molded in it should be ok? I have noticed at gun shows there are very few really skinny people out there. I post some pick of my results later in the week. Some good - Some not so great. And thank you again for the pattern. Edited March 7, 2017 by longun45 Quote Share this post Link to post Share on other sites
JLSleather Report post Posted March 7, 2017 (edited) 19 minutes ago, longun45 said: So with the sight channel molded in it should be ok? No. It is teh molded site channel which collapses, causing the bind. The further you bend the front in, the more the bind. But this is not a problem with ANY pancake holster, ... not an issue at all if teh back is flat, or close to flat. Edited March 7, 2017 by JLSleather Quote Share this post Link to post Share on other sites
longun45 Report post Posted March 7, 2017 With a reinforcement panel most of the molding takes place in the back. A dowel rod to open the sight channel, and with a good arc built into the molding process, would you be able to mitigate that? I ask as I am starting to build these and want to get it right. Quote Share this post Link to post Share on other sites
JLSleather Report post Posted March 7, 2017 When making 'pancake" holsters with seam down the front, adding a 'panel' on the front does nothing to help with this. The thing is, you can pull it (stretch it) from slot to slot much as you like, and there's no problem. But when you start curving it (like when you tighten the belt) then this "molding in the back" becomes compressed (has to go somewhere). Since the front is pulled tighter on the belt, the inside can't bow out, then the only place the back can go is INTO the site channel (closing it). If on the other hand, you make the holster with a flatter back (longer piece in front) much of this is eliminated (there's less leather to bunch up in the channel). So, ideally, make the outside piece longer, and THEN reinforce it, so that the original curve is maintained... and the tension in the firearm is then the same on or off the belt (or way close). Lots of people would like to ignore this, since it does make it a bit more involved making the pattern. You are correct that a sewn in sight channel would "fix" that, provided you have room to do that. Most of the time, the response is to move the belt slots further out from the firearm (farther apart from each other) so the inward flex stress is less. But then, you trade some room on your belt and some concealment. Quote Share this post Link to post Share on other sites
Josh Ashman Report post Posted March 8, 2017 Technically I agree with most all of this. At the same time, based on my personal experience and in my opinion the "real world effect" is a whole lot of nothing. Yes, a pancake holster made completely even will pinch the sight when the "wings" are folded in. If you flex some curve into the wings when you mold the holster I think you mitigate it to some extent. Leather also stretches and compresses to an amazing degree. It will do so while you build with it and it will do so long after you're done making whatever it is you're making. I build my pancake holsters even and put some curve into them when I form them. When they are new they are tight, if they are on the belt on a narrow person they will be even tighter. Depending where they were cut from, the characteristics of the leather and how much coffee I had before I sewed the holster up I can generally shake the holster upside down with a loaded gun (not one in the chamber, no safety lectures please). After a few years of every day use they are much looser and need to come out of daily rotation The pictures below show a curved pancake evenly molded and formed in a slight curve. The 2nd pic is the same holster being moved upside down holding the real gun. And the 3rd pic is me with what used to be my EDC pistol and holster I built for it. It was tight when new and it loosened up over several years to the point that I no longer use it that much because it's a little loose. My 2 cents, which is worth exactly what it cost, is if you have any doubts about a holster pattern you want to try, build yourself one and wear it for a while then you'll know how that design will work. All these discussions about how molded leather will behave down to the 1/16 and 1/32 don't take into account the very nature of what leather is. As an example take a 6" length of 1" wide strap cut from 8 oz. leather and a bowl of warm water. Dunk the leather in the water for a minute and you can turn that 6" length into a 6-1/2" length without any trouble. You can also turn it into a 5-1/2" length. You can also turn a straight cut strap into a curved strap. Work it a little and dunk some more and you can turn a slight curve into a semi circle, or even a full circle. Have a great day folks! Quote Share this post Link to post Share on other sites
carguy4471 Report post Posted March 8, 2017 So.... Given the stretch-ability of leather, would it be safe to assume that when wet molding a 50/50 pancake, you could pre-stretch the front of the holster by bending it? Thus possibly preventing the binding issues?? Question asked by a complete rookie so keep that in mind. Quote Share this post Link to post Share on other sites
Josh Ashman Report post Posted March 8, 2017 Carguy, in my opinion, yes. I respect that others may have different answers. Based on my experience in building that exact type of holster and not having any trouble with binding, especially binding that got worse as the holster became more broken in. However, the best way for you to know for sure what you think about it is to build yourself a holster and see how it works for you. Josh Quote Share this post Link to post Share on other sites
JLSleather Report post Posted March 8, 2017 59 minutes ago, Josh Ashman said: if they are on the belt on a narrow person they will be even tighter... After a few years of every day use they are much looser and need to come out of daily rotation ...and it loosened up over several years to the point that I no longer use it that much because it's a little loose. Up front -- I do pay attention when Josh posts something. I got no problem standin' in the middle of main street and telling folks if you need some well-made leather, you might call Josh (which I have done as recently as last week). Never met the guy --- this is BECAUSE OF THE WORK he presents. Now to include the comments here from Josh AND from Duane... it's true that leather has a 'stretch-ability'. Obviously. And some forming of the leather in the making is kinda the point of holster making. In fact, if you make the holster tight, and then form (stretch) it around (so that the front and channel area is the part doing the stretching) then you are - of a sort - making a holster slightly longer on the "face" side (by stretching the outer but not the inner). But the bind I'm referring to comes more from the leather's tendency not to contract back. I mean, if it 'came back' then there'd be no reason for it to get loose and need replacing The point here, before it became a crazed rant (somehow ) was to say that a "pancake" holster (what I sometimes call a '50/50') does not fit a small guy and a big guy the same way - and a dowel shoved down the front won't change that. Somebody probably busy laying out [yet another] video about this by now . But the idea is a simple one. Take a belt, or anything else with two layers of leather. Bend it 20° -- no problem. Bend it 45°, now it's wrinkling on the inside (the outside is stretching).. because the leather is being compressed and has nowhere to go (the outside layer prevents it from moving out of the way of the force). Now, when you bend it back the other way to straight, the grain is disturbed on the OUTside, because it's now been stretched longer than before (not so good at "snapping back"). This may be a better pic. This was made for a Glock 43.. fit a guy with a 38" waist like a glove. But when the guy with the 30" waist used it... ya git this here... This obviously had been made with a "sight channel", but when 'cranked' on a slim boy's waist, the channel collapsed on teh site, actually causing the problem it was intended to solve. Again, it fit his buddy (38") just fine. Quote Share this post Link to post Share on other sites
carguy4471 Report post Posted March 8, 2017 So the biggest question, what are the methods used by the many established and great holster gurus here to dodge the "bind" when making a 50/50 pancake holster? I know first hand the issue, one of my first holsters turned into a vice when worn with a belt. It was not letting go. Had to insert some material on the side of the slide and re-moisten the holster to stretch it a bit. Salvaged it, turned out ok-ish. Since then I've simply cranked the front and back of the holster down (bent them) while wet to stretch the outside panel, in doing so it would lose some definition and depression in the trigger guard so they need to be gone over while stretching the panel while wet to maintain definition. I admit I have no earthly idea if that's the correct way or if it was absolutely daft. It did however work. The holsters since tighten up a bit on a belt, but do not turn into a vise. I'd be delighted to hear how others prevent the "vise" but maintain good retention on a belt. Since I use a poor mans vacuum press I was thinking about making a curved jig for the backside of the holster. Quote Share this post Link to post Share on other sites
JLSleather Report post Posted March 8, 2017 1 minute ago, carguy4471 said: I was thinking about making a curved jig for the backside of the holster. See, now yer on to sumthin' there. If it's already curved, then curving it won't harm nuthin' - that is the idea. This can be done by moving teh slots out wider from the firearm (the most common, I think), or better yet by shortening the inside panel so you don't get that 'buckle', or by lengthening the outside panel so it 'forms', instead of "crushes".. Quote Share this post Link to post Share on other sites
carguy4471 Report post Posted March 8, 2017 My first thought was to thread a belt and wrap it around my thigh while boning the holster, then tossing it into the vacuum again. It seemed to work ok-ish. I certainly didn't get the vice effect. I think though I am going to try adding just a wee bit to the length to the outside panel and see how that goes. If I use the same pattern on the back and effectively put the added length in between the center stitch lines on the outside panel, that should make it simple. Quote Share this post Link to post Share on other sites
JLSleather Report post Posted March 8, 2017 (edited) Won't that make it loose? I mean, if it fits, and then you add, that sounds like "loose" BUT, if a guy added to the front, and took from teh back, the same amount.... see kin i find a picture... or make one Edited March 8, 2017 by JLSleather Quote Share this post Link to post Share on other sites
billybopp Report post Posted March 8, 2017 It seems to me that if the customer is ordering holster and belt, easy peasy. If you've met the customer, not all that hard to make a good estimate. But how do you tactfully ask an online or phone customer "Just how fat are you, anyway?" ... Particularly if you're dealing with a female customer? Quote Share this post Link to post Share on other sites
carguy4471 Report post Posted March 8, 2017 1 hour ago, JLSleather said: Won't that make it loose? I mean, if it fits, and then you add, that sounds like "loose" BUT, if a guy added to the front, and took from teh back, the same amount.... see kin i find a picture... or make one I see what you're saying here. But if you add to the front and leave the back alone, would the front just "mold" more of the firearm when you wet form it?? I'm asking because I really have no clue. I'm just guessing. Quote Share this post Link to post Share on other sites
JLSleather Report post Posted March 8, 2017 If teh front is "longer" (or wider, depending on how you view it) then it should "mold more of the firearm". But this is the trouble... the inside now has nowhere to go, and compresses. Like any other "path of least resistance" situation, the leather will "smoosh" into teh open space (spelled s i t e c h a n n e l) before it will compress fibers. Quote Share this post Link to post Share on other sites
JimTimber Report post Posted March 8, 2017 "In order to form the best possible concealment contour and weapon fit, we need to know your waist size and position of carry." After all, you wouldn't buy a custom suit that was sold as S/M/L/XL. The tailor uses the actual dimensions the garment is made to fit. Something people also don't seem to pay much attention to is where on the waist the holster is going. A 4:30 carry is going to have a different radius (a compound radius at that), than someone who wears at 3 O'clock, even if they're the same size/shape otherwise. Carguy, the issue is that a 50/50 pancake holster is a crappy design and you need to allow for the dimensions of the weapon to fill the holster if you don't make the seam cause equal tension inside to outside. With 50/50's, you have the seam that follows the shape of the gun responsible for the tension, and then you crank the ears down to hold your pants up and the outside panel of the holster becomes lashed to the gun and it's too tight, while simultaneously folding the inside panel at the corners causing a pinch. It's super easy to make, and people seem to buy them (why, I don't know), so they remain popular. The unequal sided holster that looks like a pancake is a much better design. You'll need to place your stitches carefully as the belt tension will not impact retention nearly as much. Going back to the very first post; leather holsters need to be broken in. That's how they work. If you have a perfect draw the first time you use it, it's going to loosen up too quickly and will need to be shrunk at a later date (if that's even possible with your finishing techniques). Quote Share this post Link to post Share on other sites
JLSleather Report post Posted March 8, 2017 2 minutes ago, JimTimber said: folding the inside panel at the corners causing a pinch. Exactly my point. 3 minutes ago, JimTimber said: lster that looks like a pancake is a much better design. ...as the belt tension will not impact retention nearly as much This right here. Quote Share this post Link to post Share on other sites
carguy4471 Report post Posted March 8, 2017 7 minutes ago, JLSleather said: the inside now has nowhere to go, and compresses This made the light bulb go off. So, if I'm picturing this in my head correctly.... If I use a wonderfully made symmetrical pattern provided by, say JLS leather via the web, and wanted an unequal sided holster I could add a wee bit to the outside, subtract a wee bit from the inside and then cut my leather. When glued, it should already bend a bit in a curve because of the difference. I could use the same stitch lines when measure from the outside edge as the add/subtract happened in between the stitch lines. Sound 'bout right? What would one use for a "wee bit"?? Quote Share this post Link to post Share on other sites
Mattsbagger Report post Posted March 8, 2017 5 minutes ago, carguy4471 said: This made the light bulb go off. So, if I'm picturing this in my head correctly.... If I use a wonderfully made symmetrical pattern provided by, say JLS leather via the web, and wanted an unequal sided holster I could add a wee bit to the outside, subtract a wee bit from the inside and then cut my leather. When glued, it should already bend a bit in a curve because of the difference. I could use the same stitch lines when measure from the outside edge as the add/subtract happened in between the stitch lines. Sound 'bout right? What would one use for a "wee bit"?? I've done it with a 1/4 inch. Quote Share this post Link to post Share on other sites
JLSleather Report post Posted March 8, 2017 (edited) That JLS guy aint that bright, I think! Original idea is, those patterns would work 'as is', but are intended to be a 'base line' for folks customizing their own. I can't remember how many times I've seen listings for "custom" holsters, made with that guy's patterns. TIP: If 100 of us use the same leather and the same pattern to make a holster for the same gun, it's no longer "custom"! BUT if a guy was to see that a pattern gave a stitch "allowance", then he/she could put that amount into the holster whereever they want it to "suit". I thought that long conversation about HOW they are made laid that out? Perhaps simpler version... say a guy making hisself a belt.. outa multiple pieces. If you measure 38 around, then a guy could do that with two 19". Or, a guy could use a 24 and a 14 ... etc... and still add up to something that fits snugly.. just change where the seam is. MUCH the same way, aguycould take a "50/50" pancake, cut out tehtop of the front "wing", and quickly turn it into a basic IWB by adding loops. Edited March 8, 2017 by JLSleather Quote Share this post Link to post Share on other sites
JimTimber Report post Posted March 8, 2017 If you have the gun, you can make your own pattern loosely based on the pancake pattern you already have. 50/50's shrink front to back when the gun is inserted. That causes half the width to pull from the fore and half the aft of the two panels. When you make an unequal sided sandwich, you aren't pulling in from the front/back, but rather following around the outside of the gun. Quote Share this post Link to post Share on other sites
rickdroid Report post Posted March 8, 2017 7 minutes ago, JimTimber said: the issue is that a 50/50 pancake holster is a crappy design OK, virgin here when it comes to making holsters so someone please educate me. What is a 50/50 pancake holster? This term is used often here but I am not able to find an explanation of what it is. While I think that I know what is being discussed it would sure be nice to really understand. Why is it a crappy design? Quote Share this post Link to post Share on other sites
JLSleather Report post Posted March 8, 2017 (edited) 15 minutes ago, JLSleather said: MUCH the same way, aguycould take a "50/50" pancake, cut out tehtop of the front "wing", and quickly turn it into a basic IWB by adding loop AND, aguycould take that same basic "50/50" pancake, CUT IT on the front stitch line, and hold it up to a mirror, turning it into a basic "avenger" style holster for the same gun. http://www.jlsleather.com/wp-content/uploads/2016/07/AvengerLayout.pdf Edited March 8, 2017 by JLSleather Quote Share this post Link to post Share on other sites
JimTimber Report post Posted March 8, 2017 50/50 pancake is the traditional "stitched right down the middle" holster. It's got mirror image halves that are sewn together and starts life flat as a pancake. It's a crappy design because of all the problems associated with it in use. It doesn't fit the same if you crank your belt down, or loosen your belt up. It's not elegant at all. And they're just easy to make and sell quick to make a buck. Quote Share this post Link to post Share on other sites