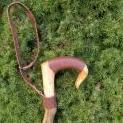
Members rodneywt1180b Posted November 9, 2018 Members Report Posted November 9, 2018 What's it been? A few weeks, a month, or even longer since I posted my last cane with a leather handle? Anyway, at that time YinTx mentioned commissioning one for his dad and after talking back and forth we decided I would do the wood and he would do the leather. So the collaboration began. Things have been moving slowly along since then. YinTx sent me a goody bag full of veg tan of different weights and brands along with a couple of tooled pieces to practice with and we decided on a shank and a handle style for the cane. This wasn't all the choices but the picture does show the one he chose. The left hand stick is a nice rustic black walnut sucker with a very small and even taper at the top and some nice knots in the bottom for a bit of character. We're still working on the final wood choices for the handle but it will be a Fritz style similar in shape to this one. Right now the hold up is on my end. I have three handles I'm currently finishing but with the weather getting colder it's taking forever to build up a good shine. YinTx can't do a whole lot on his end until that part is done so he knows how big his tooling area is. We're almost literally sitting around watching paint dry. While I've been waiting on that I've started practicing wet forming with the pieces of veg tan YinTx sent me, mostly trying to figure out what works for this application and what doesn't. At this point it's mostly what doesn't work. Here's my first completed wet formed handle. The cane is a one piece cane made from a dead oak branch. I decided this was a good practice piece because of the nearly round handle. Honestly I think it could have been done without wet forming. The leather is Tandy 9 oz. veg tan. I chose the thicker leather because the branch making the grip was a little small so it needed something thick. I skived the front and back edges down to get rid of the pig in a blanket effect and stitched the leather on wet with 1.4 mm Tiger thread. After I thought I had things trimmed to fit I tried pressing a decorative line about 1/8" from the front and back edges and next to the stitch line. The more I look at my stitching the less I like it. I have to get over the idea of using the stitching chisel I have as anything more than a spacing device for my stitch holes. A round awl is much better for this kind of work. Stitching the leather while wet was a mistake too. It stretched the already too-big holes and even tore one a bit. I also had to re-work the stitches closest to the shank and messed that up. Lesson learned. That pretty much brings things up to date for now. More later. Quote
Rockoboy Posted November 9, 2018 Report Posted November 9, 2018 The finished product looks great until a close examination of the thread. Just a little wonky there. Would your overall job come out better if the leather was 1.5 - 3.0mm smaller? It appears the join is a little squashed up. At the end of the day, still a great job that I would have no problem carrying if I needed a cane. Quote Kindest regards Brian "Whether you think you can or whether you think you can't, you are right" Henry Ford Machines: Singer 201p, Kennedy, Singer 31K20, Singer 66K16 ("boat anchor" condition), Protex TY8B Cylinder Arm (Consew 227r copy), Unbranded Walking Foot (Sailrite LSV-1 copy)
Members battlemunky Posted November 9, 2018 Members Report Posted November 9, 2018 Pretty cool aside from the stitching. I can't wait to see the final version and love the collaborative nature of the effort. Y'all are awesome! Quote
Members rodneywt1180b Posted November 9, 2018 Author Members Report Posted November 9, 2018 The leather squashed up more at the ends. On the end farthest from the shank I think it was because I put too much tension on the thread. At the end closest to the shank I think it was a combination of the leather being thinner, wet and my not trimming it correctly (I thought it was until I got to the end) to fit before I punched the holes. I ended up trimming the leather and re-punching the last 3 or 4 holes on one side because it didn't fit tightly enough. It was a good learning experience so not a total waste. I should be able to avoid at least a few of the mistakes I made on the next one. I'm inclined to set this one aside and replace the leather at some point. The original leather will make a good pattern anyway. Quote
Members YinTx Posted November 9, 2018 Members Report Posted November 9, 2018 For the first go round, looks pretty good - I like it, and bonus with learning how to use the veg tan. Every version will get better and better. For sure will need to know sizes for patterns, although I suppose it changes for every piece of wood. I still haven't decided what to tool into the final version, so no rush! YinTx Quote YinTx https://www.instagram.com/lanasia_2017/ https://www.youtube.com/playlist?list=PLK6HvLWuZTzjt3MbR0Yhcj_WIQIvchezo
Members rodneywt1180b Posted November 9, 2018 Author Members Report Posted November 9, 2018 That's good about no rush because the walnut is still soaking up the oil like a sponge. Quote
Members rodneywt1180b Posted November 12, 2018 Author Members Report Posted November 12, 2018 The walnut handle is beginning to develop a sort of blotchy shine in places. I'm hoping it will be ready in a couple of days. The maple and oak handles are pretty much done. I started wet forming some 7oz Tandy veg tan several days ago and finally got up enough nerve to start sewing it on. That's how it looked when YinTx saw it last. Out of the clamps. It's not a great fit at this point, particularly at the bottom where I couldn't clamp it close enough to form around the shank. It is at least more disposed to taking the shape of the handle though. Here I've skived the back edge to about 1/2 it's thickness and am starting to shape the front. The front edge is skived. When wrapping leather around compound curves like the front of the cane your cut lines are anything but straight. Continued. Quote
Members rodneywt1180b Posted November 12, 2018 Author Members Report Posted November 12, 2018 I was getting an error earlier for too much data/file size on my pictures earlier so I'm trying again. I forgot to mention in my last post that the cane I'm using is just a straight grained maple handle and alder shank that I put together so I could practice my leather work before tackling the real thing on YinTx's cane. I figured it's better to make my mistakes where it doesn't matter. I'm cutting and sewing this one dry. I'm also punching my holes with a round awl not much bigger than my needles. I have to use pliers to pull the needle and thread through the leather. In the above picture I've pretty well got the front trimmed and ready to sew. The tape is just helping to hold things for the picture. I've got the front sewn. Since I don't know exactly how the back is going to line up yet I'm leaving the bottom untrimmed for now. My stitches are about 1/4" apart and about 3/16" away from the seam (eyeballed, not actually measured). I'm starting to sew the back portion now. This is where I've stopped for the night. I didn't glue this leather down and I'm starting to get a little bit of slack where I stopped. There's a small bobble in my cut line right in the corner too. As I work the slack out I'm hoping I can trim more of it away. The leather, even after molding it, is not wanting to get tight against the wood in that inside corner under the handle. I may end up rethinking things a bit to get it tight. Glue would help but I don't want to glue this one down. Quote
Members rodneywt1180b Posted November 16, 2018 Author Members Report Posted November 16, 2018 I actually finished this Monday. Then I got sick with a fever and nasty headache and haven't really had the energy to do anything until today. I'm doing better. I finished sewing it, wrapped a piece of painter' tape around it to get a somewhat straight line and trimmed the bottom. A few learned lessons. There's a bit of bagginess between the wood and leather. Contact cement would help immensely with that. Wet leather is extremely fragile. Just look at it wrong and you'll leave a dent where you don't want it. Next piece I'll trim closer to the finished size and shape, pad it with foam and wrap elastic around it to form the leather. I'm hoping the foam will equalize the pressure of the elastic enough that it doesn't dent. The clamps didn't work great. Oh yeah, I'll also make sure I trim my nails. YinTx and I need to figure out what to do with the area where the two pieces meet. Right now it's wide open. Maybe butt them up and call it good, maybe sew them, maybe something else. Skiving the bottom edge may not be necessary. On this piece I didn't skive the bottom edge. In the future one solution (untried) might be to stop a few stitches and holes short, trim to length then take it off, skive and burnish or whatever edge treatment is appropriate, then put it on for real. That would allow the stitch lines to stay even. The walnut is still soaking up oil like a sponge. I've lost track of how many coats it's taken so far. Quote
Members ScoobyNewbie Posted November 16, 2018 Members Report Posted November 16, 2018 It’s gonna be beautiful. Quote


Recommended Posts
Join the conversation
You can post now and register later. If you have an account, sign in now to post with your account.
Note: Your post will require moderator approval before it will be visible.