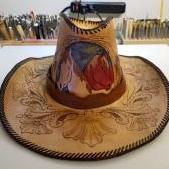
Members VYO Posted December 31, 2018 Members Report Posted December 31, 2018 Hi, I use Sepici veg tan leather and on the project I a question on I used Feibings Buckskin leather dye. I've done this same combination before many times and I've never had trouble with this kind of discoloration/staining. I cut the holster pieces, dye them buckskin and then assemble them. Once assembled I wet the inside of the pocket top. As soon as I get it wet enough, when the wetness comes through to the outside I get reddish stains. They aren't always in the same place and they happen before I insert the multitool in the holster to shape it. The photo is the third I tried today and I tried not to get the top piece as wet on the inside but as you can see in the photo there are places that the moisture soaked through to the outside. As mentioned I've done this many times with Sepici leather and Feibings buckskin dye and this has never happened before. The only difference today is a started using a new hide. Any ideas what could be causing the discoloration/staining? I haven't changed my process so I'm stumped as to what could be happening. Any insight appreciated. Thank you in advance! Quote CB 3200, Consew P1206RB, Craftool Pro burnisher, 3000mw desktop laser engraver, PointZero Dual Action Airbrush, Psuedo regad, HF 20 ton clicker, Silhouette Cameo and Cricut
Members Ragingstallion Posted January 1, 2019 Members Report Posted January 1, 2019 if the only thing new, including areas you work in, then it is a default in the leather, most likely in the tanning process. Quote
Members VYO Posted January 1, 2019 Author Members Report Posted January 1, 2019 Ok, thank you. I'll contact my supplier and see if they will replace the side. Quote CB 3200, Consew P1206RB, Craftool Pro burnisher, 3000mw desktop laser engraver, PointZero Dual Action Airbrush, Psuedo regad, HF 20 ton clicker, Silhouette Cameo and Cricut
Members ScoobyNewbie Posted January 1, 2019 Members Report Posted January 1, 2019 Could it be red rot? Quote
Members VYO Posted January 1, 2019 Author Members Report Posted January 1, 2019 Hrm, I'd never heard of that so I looked it up. I live in a place with super low humidity. The supplier I buy from has a fairly high turnover I think, so probably not from being old. I store it at room temperature. I did some experimenting tonight and I will be testing again tomorrow but on a piece of leather I tested tonight it looks like where the highest concentration of dye is, is where the red shows up after wetting from the flesh side. You can see in the photo the outermost edges is where I applied less dye and the darker area where I applied the most. This is after the leather has mostly dried out after wetting. I remembered also that besides the new side I also got in a shipment of new daubers. Tomorrow I'll try applying with a rag and see if there is a difference. Also I'll try a lighter coating of dye. It almost seems like a chemical reaction maybe something like what I read about red rot. Maybe something in the tanning of this lot of leather went haywire. In one of the tries I did today it manifested as red dots almost pitty looking. Thanks for answering! It gave me some other things to think about. Quote CB 3200, Consew P1206RB, Craftool Pro burnisher, 3000mw desktop laser engraver, PointZero Dual Action Airbrush, Psuedo regad, HF 20 ton clicker, Silhouette Cameo and Cricut
Members spurdude101 Posted January 1, 2019 Members Report Posted January 1, 2019 I always worry about this, so I mold first let dry overnight then assemble glue, then dye, sew last, trim excess , finish edges Quote
Members VYO Posted January 1, 2019 Author Members Report Posted January 1, 2019 I'll try that today too because in my test last night, which you can't see in the photo I wetted the section just above where the dye is to see if the leather discolored where they was no dye. There is no visible sign that I did anything to that area. Thanks for the suggestion! Quote CB 3200, Consew P1206RB, Craftool Pro burnisher, 3000mw desktop laser engraver, PointZero Dual Action Airbrush, Psuedo regad, HF 20 ton clicker, Silhouette Cameo and Cricut
bikermutt07 Posted January 1, 2019 Report Posted January 1, 2019 Leather is pretty much a crap shoot in my book. Anything can show up taking into consideration just how many hands have touched before you get it. My worst run ins were with Tandy vegtan. Unless I dipped it full strength in a dark color there was no getting the color even. Drove me nuts. I just won't buy any tooling stuff from them anymore. Quote I'm not paying 80 bucks for a belt!!! It's a strip of leather. How hard could it be? 4 years and 3 grand later.... I have a belt I can finally live with. Stitching is like gravy, it's only great if you make it every day. From Texas but in Bossier City, Louisiana.
Members VYO Posted January 1, 2019 Author Members Report Posted January 1, 2019 I've had pretty good luck with Sepici tooling leather up until now and I'm still not sure whether it's the leather or a chemical reaction from the dye and new daubers combined with this particular side. I bought the new daubers from a different supplier. But, I have no idea which of the constants is causing the issue yet. After I finish some tests today I might have a better clue I hope so I can avoid this issue. At least my customer is being patient about waiting while I sort this out. I get the Sepici from Maverick Leather. They're great and normally Sepici is great. Sepici is wonderful for tooling even down to 3oz. I've been using it for about a year now. When I first started I was getting Hermann Oak from Springfield and that was ok too. From what I remember Hermann Oak is a little darker in color than Sepici. One reason I like Sepici is because I get a better truer color when dyeing in colors other than the brown shades - blue, pink, purple, etc. They're about the same cost. Quote CB 3200, Consew P1206RB, Craftool Pro burnisher, 3000mw desktop laser engraver, PointZero Dual Action Airbrush, Psuedo regad, HF 20 ton clicker, Silhouette Cameo and Cricut
bikermutt07 Posted January 1, 2019 Report Posted January 1, 2019 Did you think about just approaching the client with a mahogany version? My guess is it's something in or on the leather. Quote I'm not paying 80 bucks for a belt!!! It's a strip of leather. How hard could it be? 4 years and 3 grand later.... I have a belt I can finally live with. Stitching is like gravy, it's only great if you make it every day. From Texas but in Bossier City, Louisiana.


Recommended Posts
Join the conversation
You can post now and register later. If you have an account, sign in now to post with your account.
Note: Your post will require moderator approval before it will be visible.