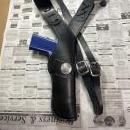
Eric51767 Report post Posted March 2, 2020 So, after hours of meticulous work I have two problems with this holster. It was separating at the welt. I added a second stitch line, which fixed the problem and looks good on the front, but like shit on the back. It was an after thought, If it had been laid out in advance like the rest of the stitch lines it wouldn't look like that. This was just an experiment. There is no customer waiting on it. I wanted to see what the cross would look like and I was curious to see if I could keep white stitching white. They look good and other then that extra line I'm happy with the stitching. All stitched by hand. The thing that turns this into something I can't even give to one of my sons, is the last step. The snap on the retention strap. The longest snaps I have been able to find are Line 24 with a 5/16 post. Too short to pass thru an 7-9 oz shell and lining. There has to be snaps with a longer post????? I was soooo happy with this until about an hour ago. Quote Share this post Link to post Share on other sites
Stetson912 Report post Posted March 2, 2020 Well, that's frustrating. But, I have had that problem before as well. What I did, depending on how much more room you need, is I took a spade bit the size of my snap and drilled out the depth I needed. If you have a french skive you can do much the same thing. Basically the idea is to cut away a circle of leather just wide enough that your snap sets lower than it would. And, if you are worried about the line coming up, stitch around the snap. Unfortunately 7/16 I think is as long as they get. You could try and separate the layers and set the snap between the layers as well. But you wouldn't be able to use the cap part, just the flat base post for both sides of the snap. Anywho, hope my experience with your frustration helps a bit Quote Share this post Link to post Share on other sites
Handstitched Report post Posted March 2, 2020 The holster looks great. But to answer your question, I use long stem press studs on pretty much every thing. They go through up to 5mm in thickness. They are available . HS Quote Share this post Link to post Share on other sites
Handstitched Report post Posted March 2, 2020 Another trick I have used, is dampen the area, and using the ball on a ball pein hammer, ' indent / thin out the leather, like thinning out a piece of steak . Its pretty crude, but it has worked for me in the past, but try it on some scrap first. I've been down this path before, spend hours making a nice belt only for the press studs to be too short. HS Quote Share this post Link to post Share on other sites
Bert51 Report post Posted March 2, 2020 I found that some Marine supply stores have long post snaps, but they where only 1/4 inch. Maybe they may have longer? Bert Quote Share this post Link to post Share on other sites
Dwight Report post Posted March 2, 2020 (edited) The way I would beat that rap, . . . cut the stitches, . . . separate the layers, . . . put the snap only on the piece that will allow it to make contact with the other side of the snap. Re-stitch the piece, . . . it should work like a champ. It would also totally remove the possibility of the strap scratching the weapon as it is drawn from the holster. May God bless, Dwight Edited March 2, 2020 by Dwight Quote Share this post Link to post Share on other sites
jimi Report post Posted March 2, 2020 What about a tommy button, you know, the screw in ones with the ball on the post? Quote Share this post Link to post Share on other sites