-
Posts
159 -
Joined
-
Last visited
Content Type
Profiles
Forums
Events
Blogs
Gallery
Store
Everything posted by DoubleKCustomLeathercraft
-
Can someone explain to me why a back (double bend) would cost more than a side of the same tannery and grade? A quick search on Google states the back cut is a more consistent piece with less waste like the belt section of a side. Then proceeds to magically repeat that statement in a couple different ways. The bend is cut out of a side, so why would a side be less expensive or lower quality if they're graded the same?
-
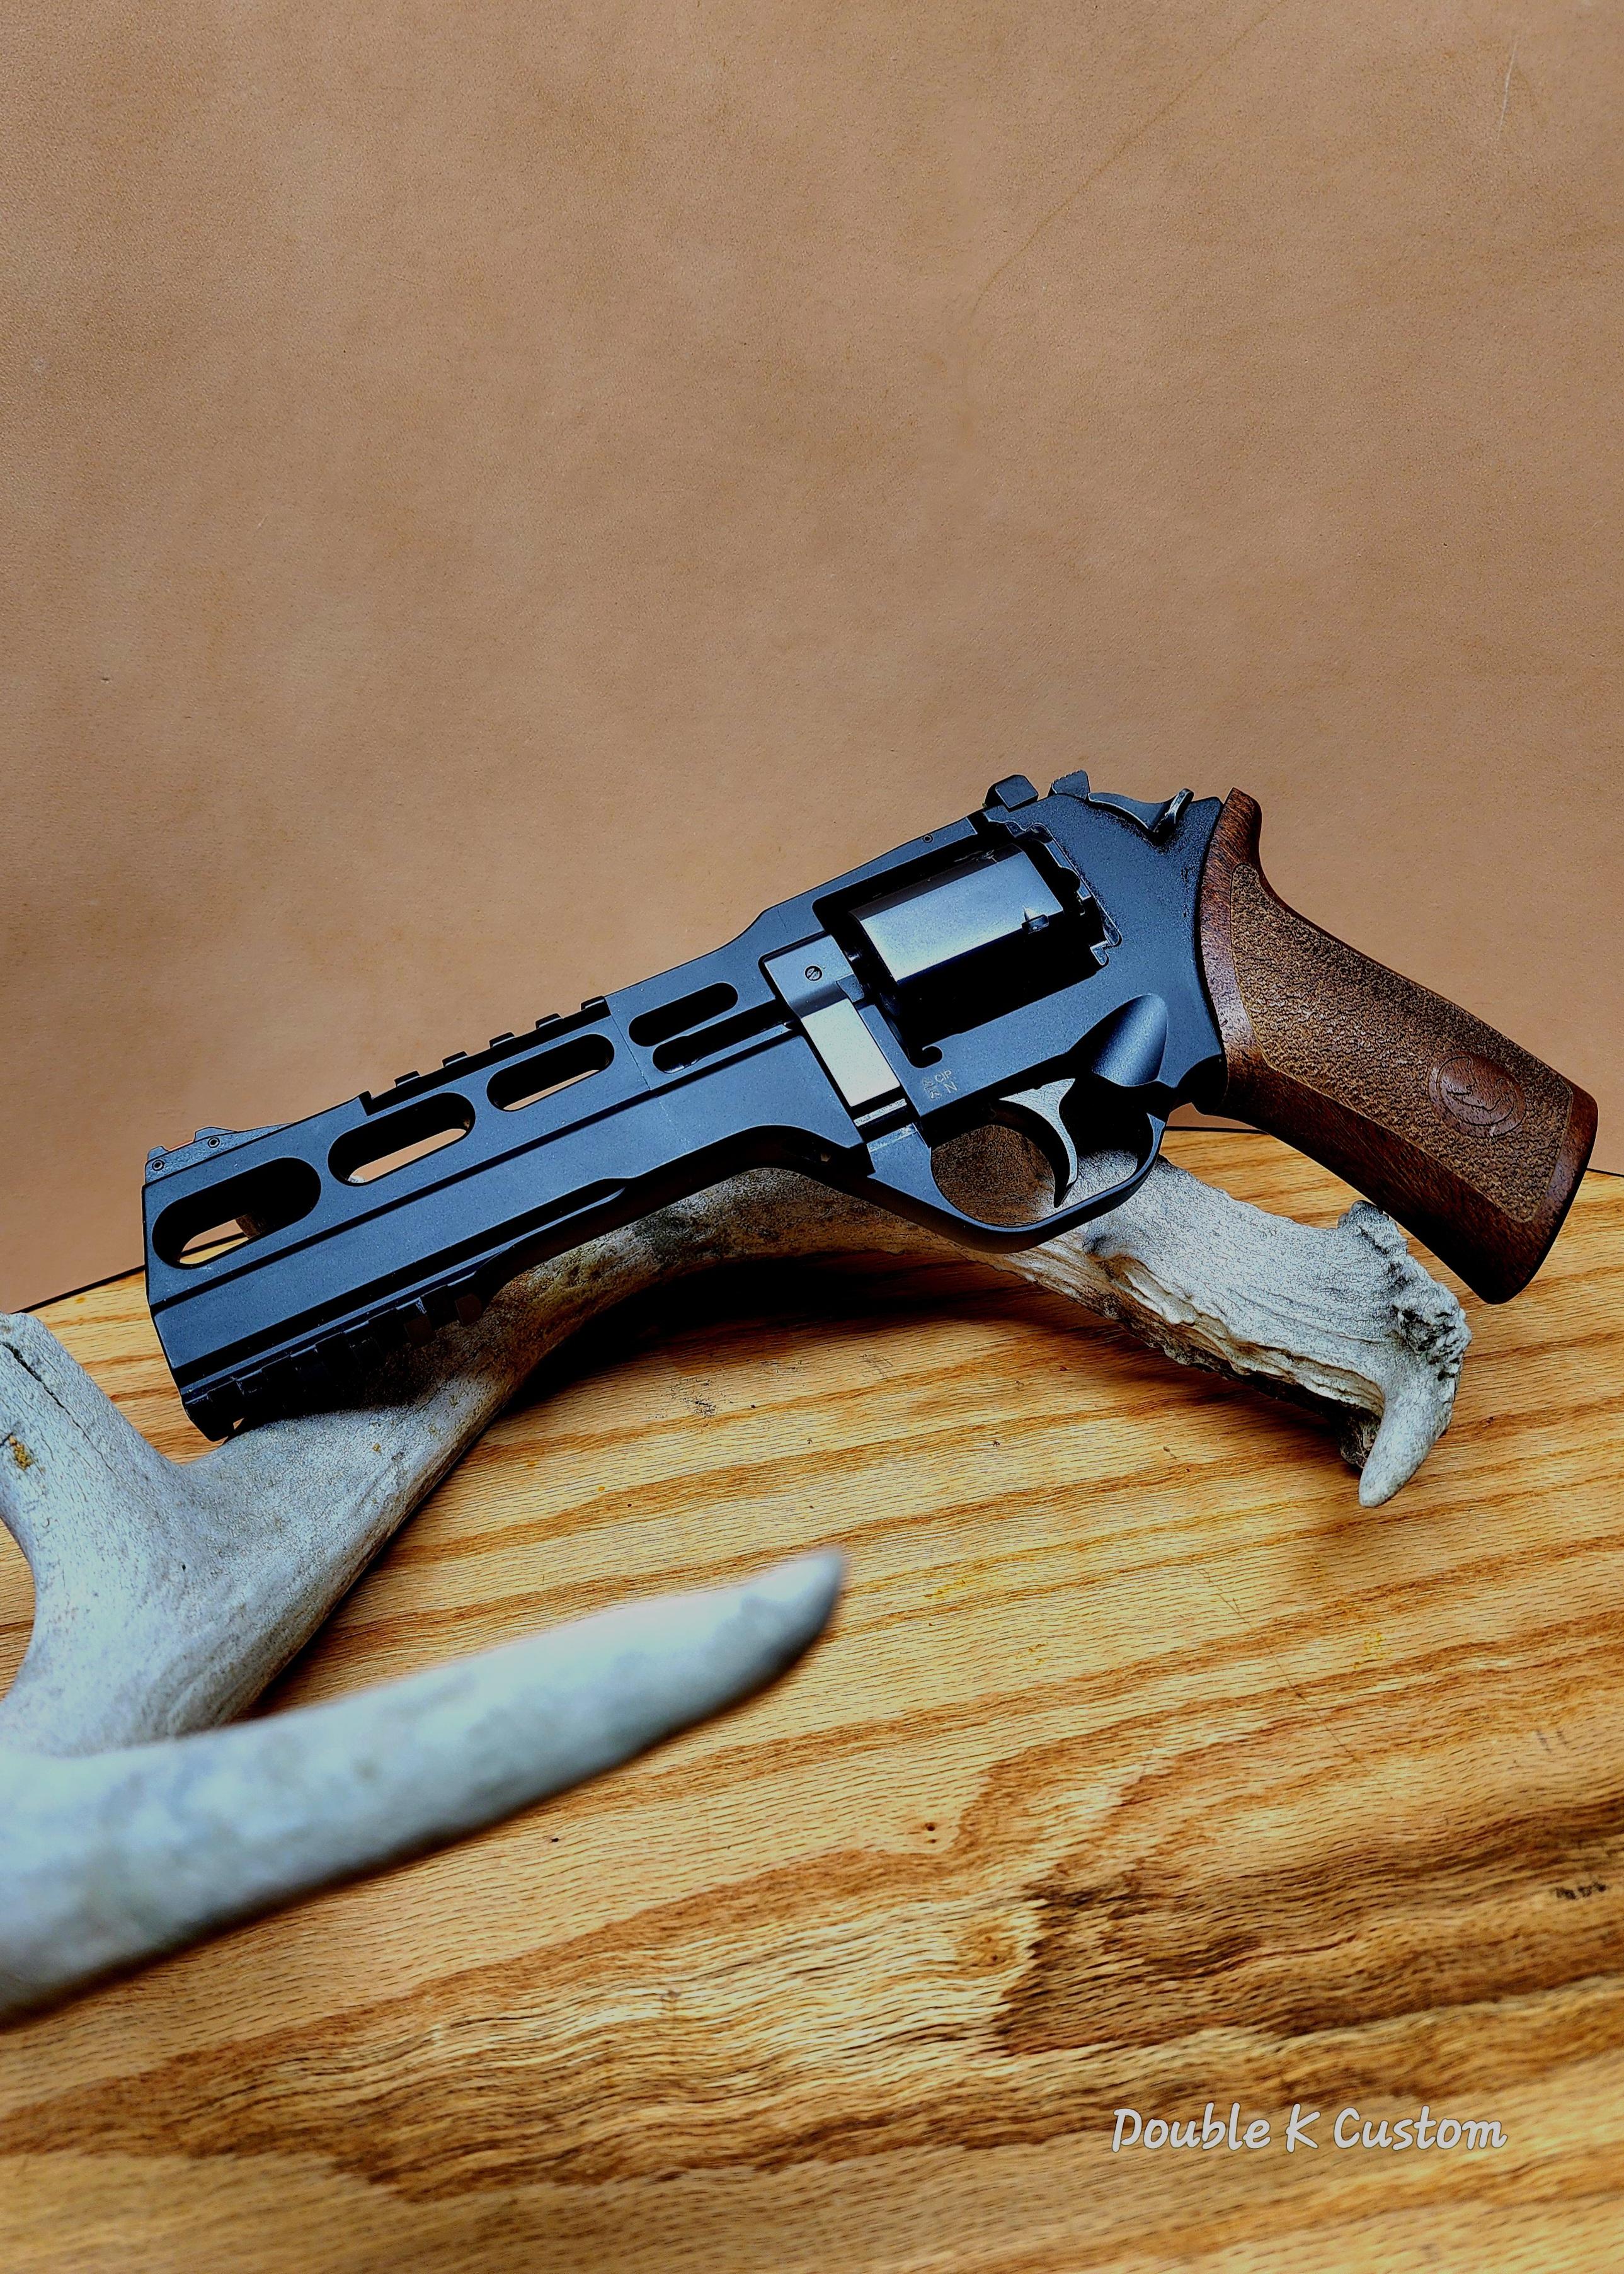
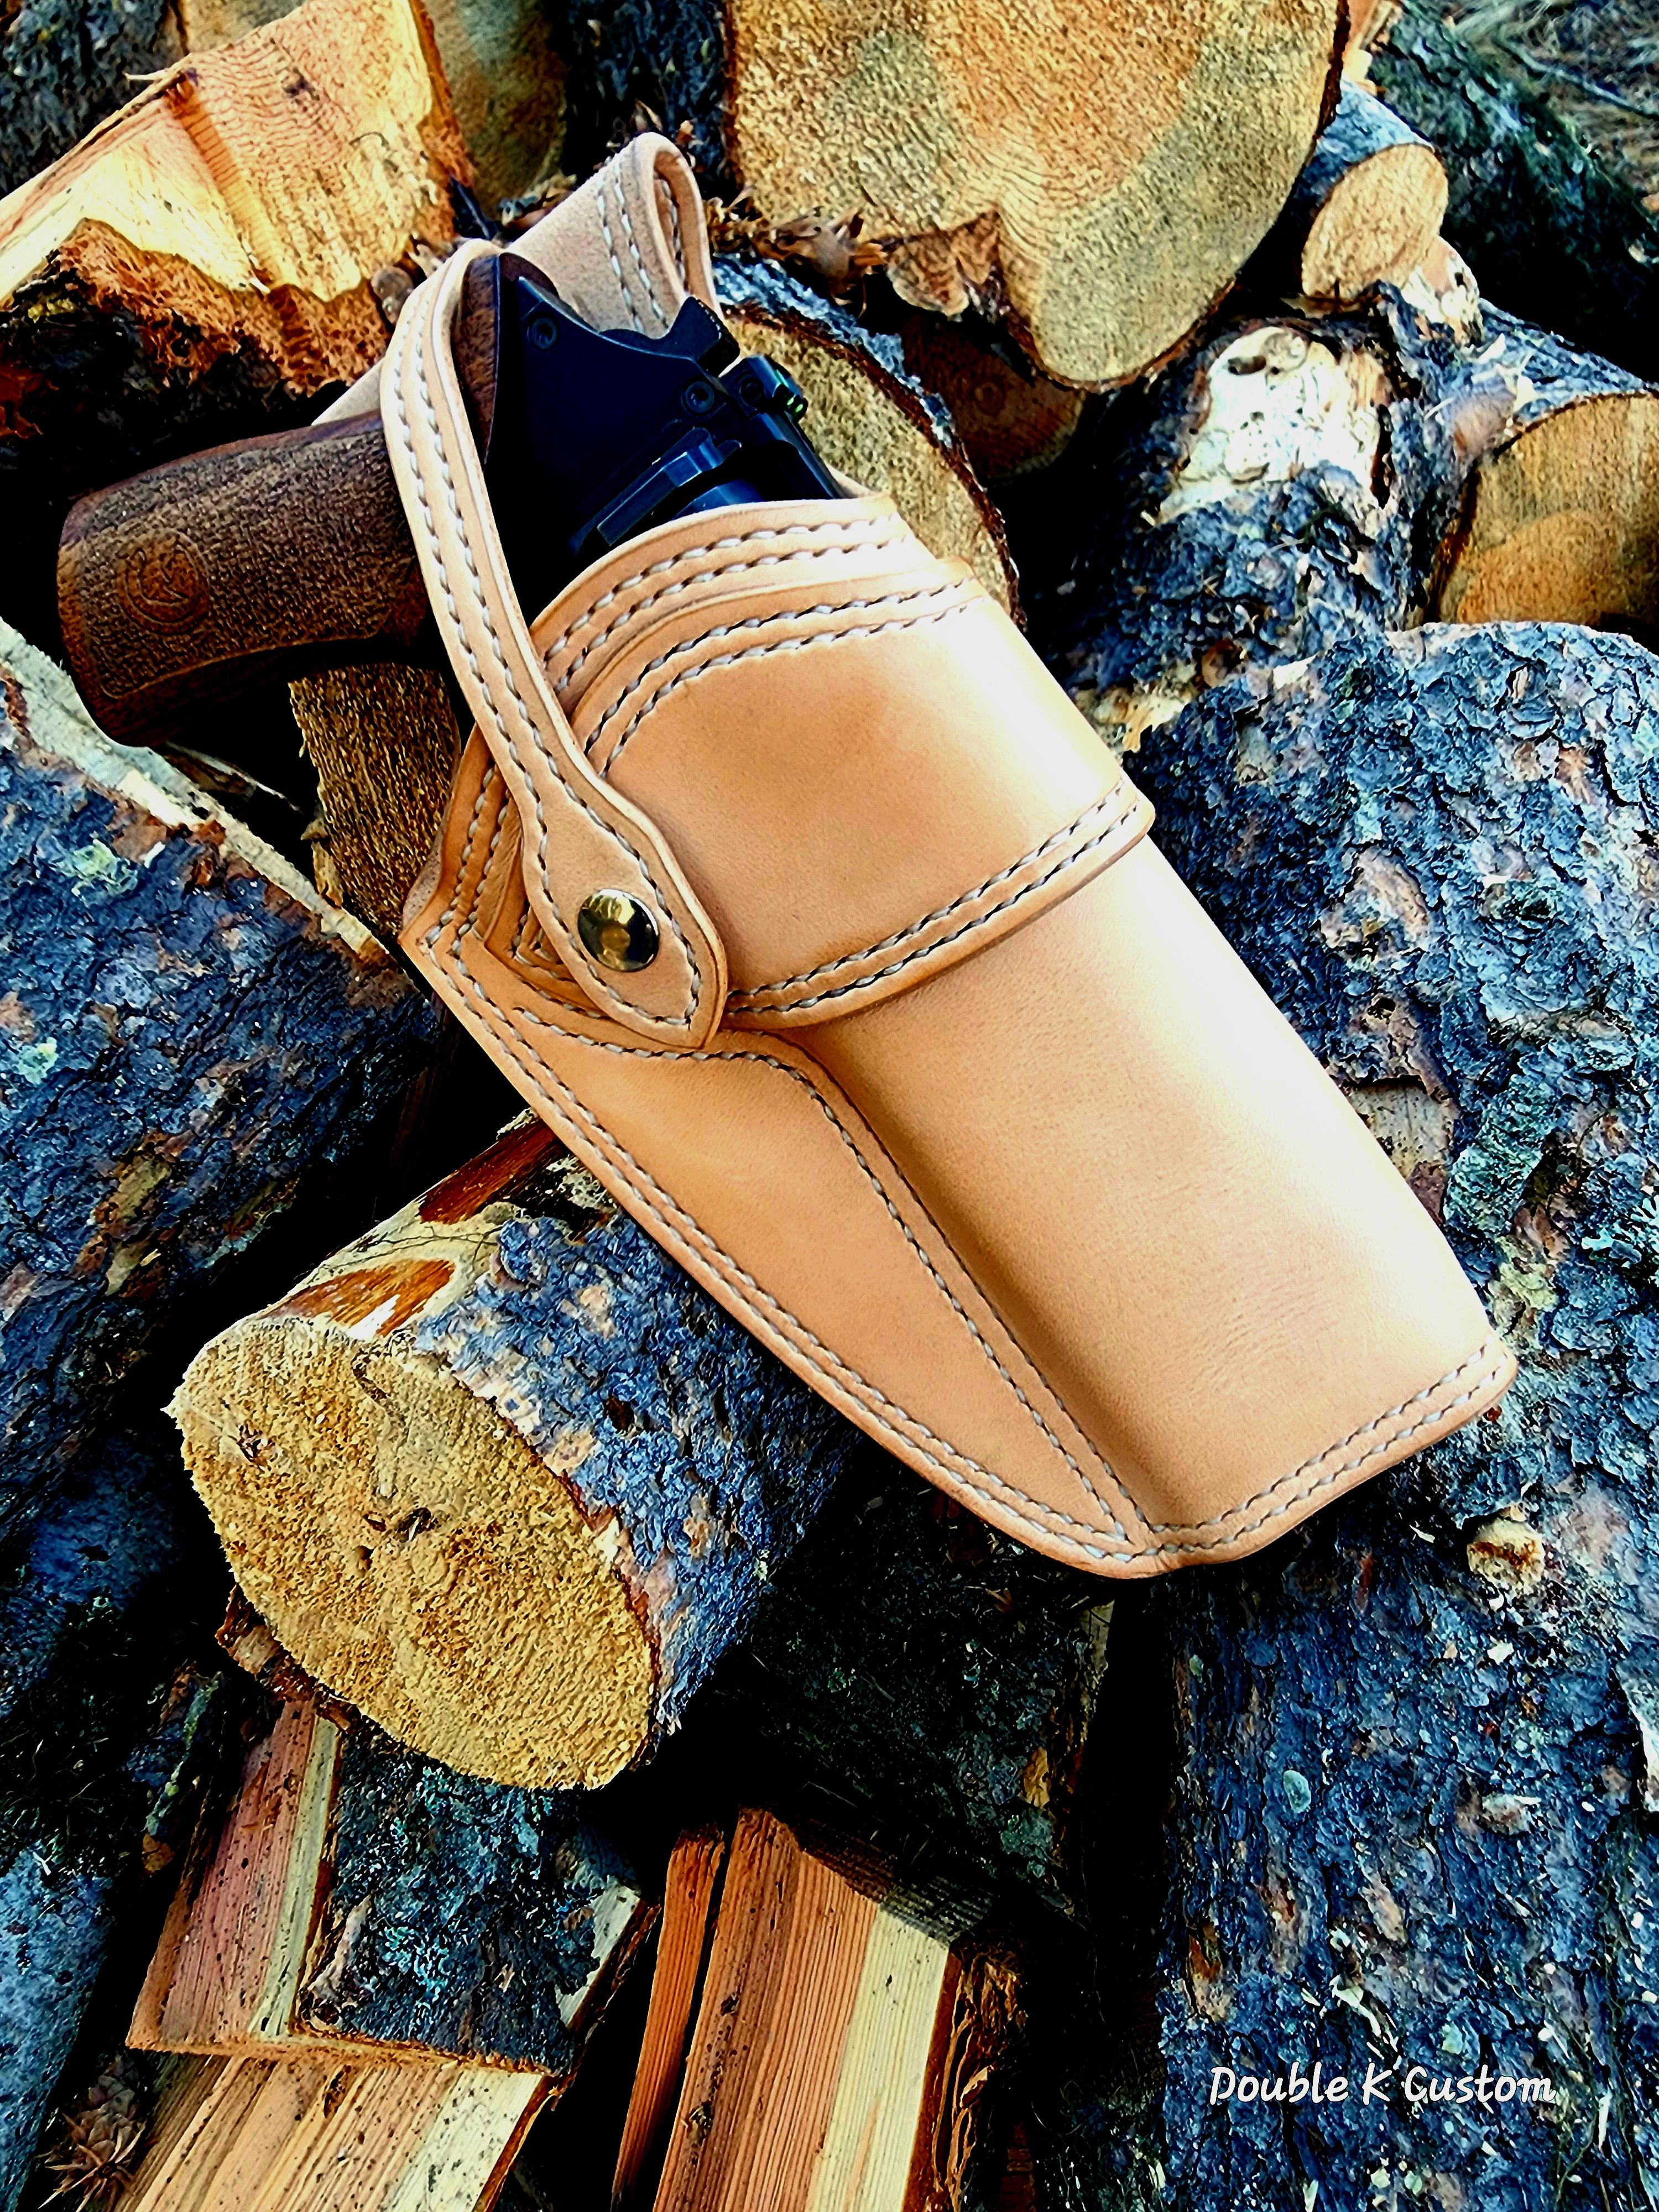
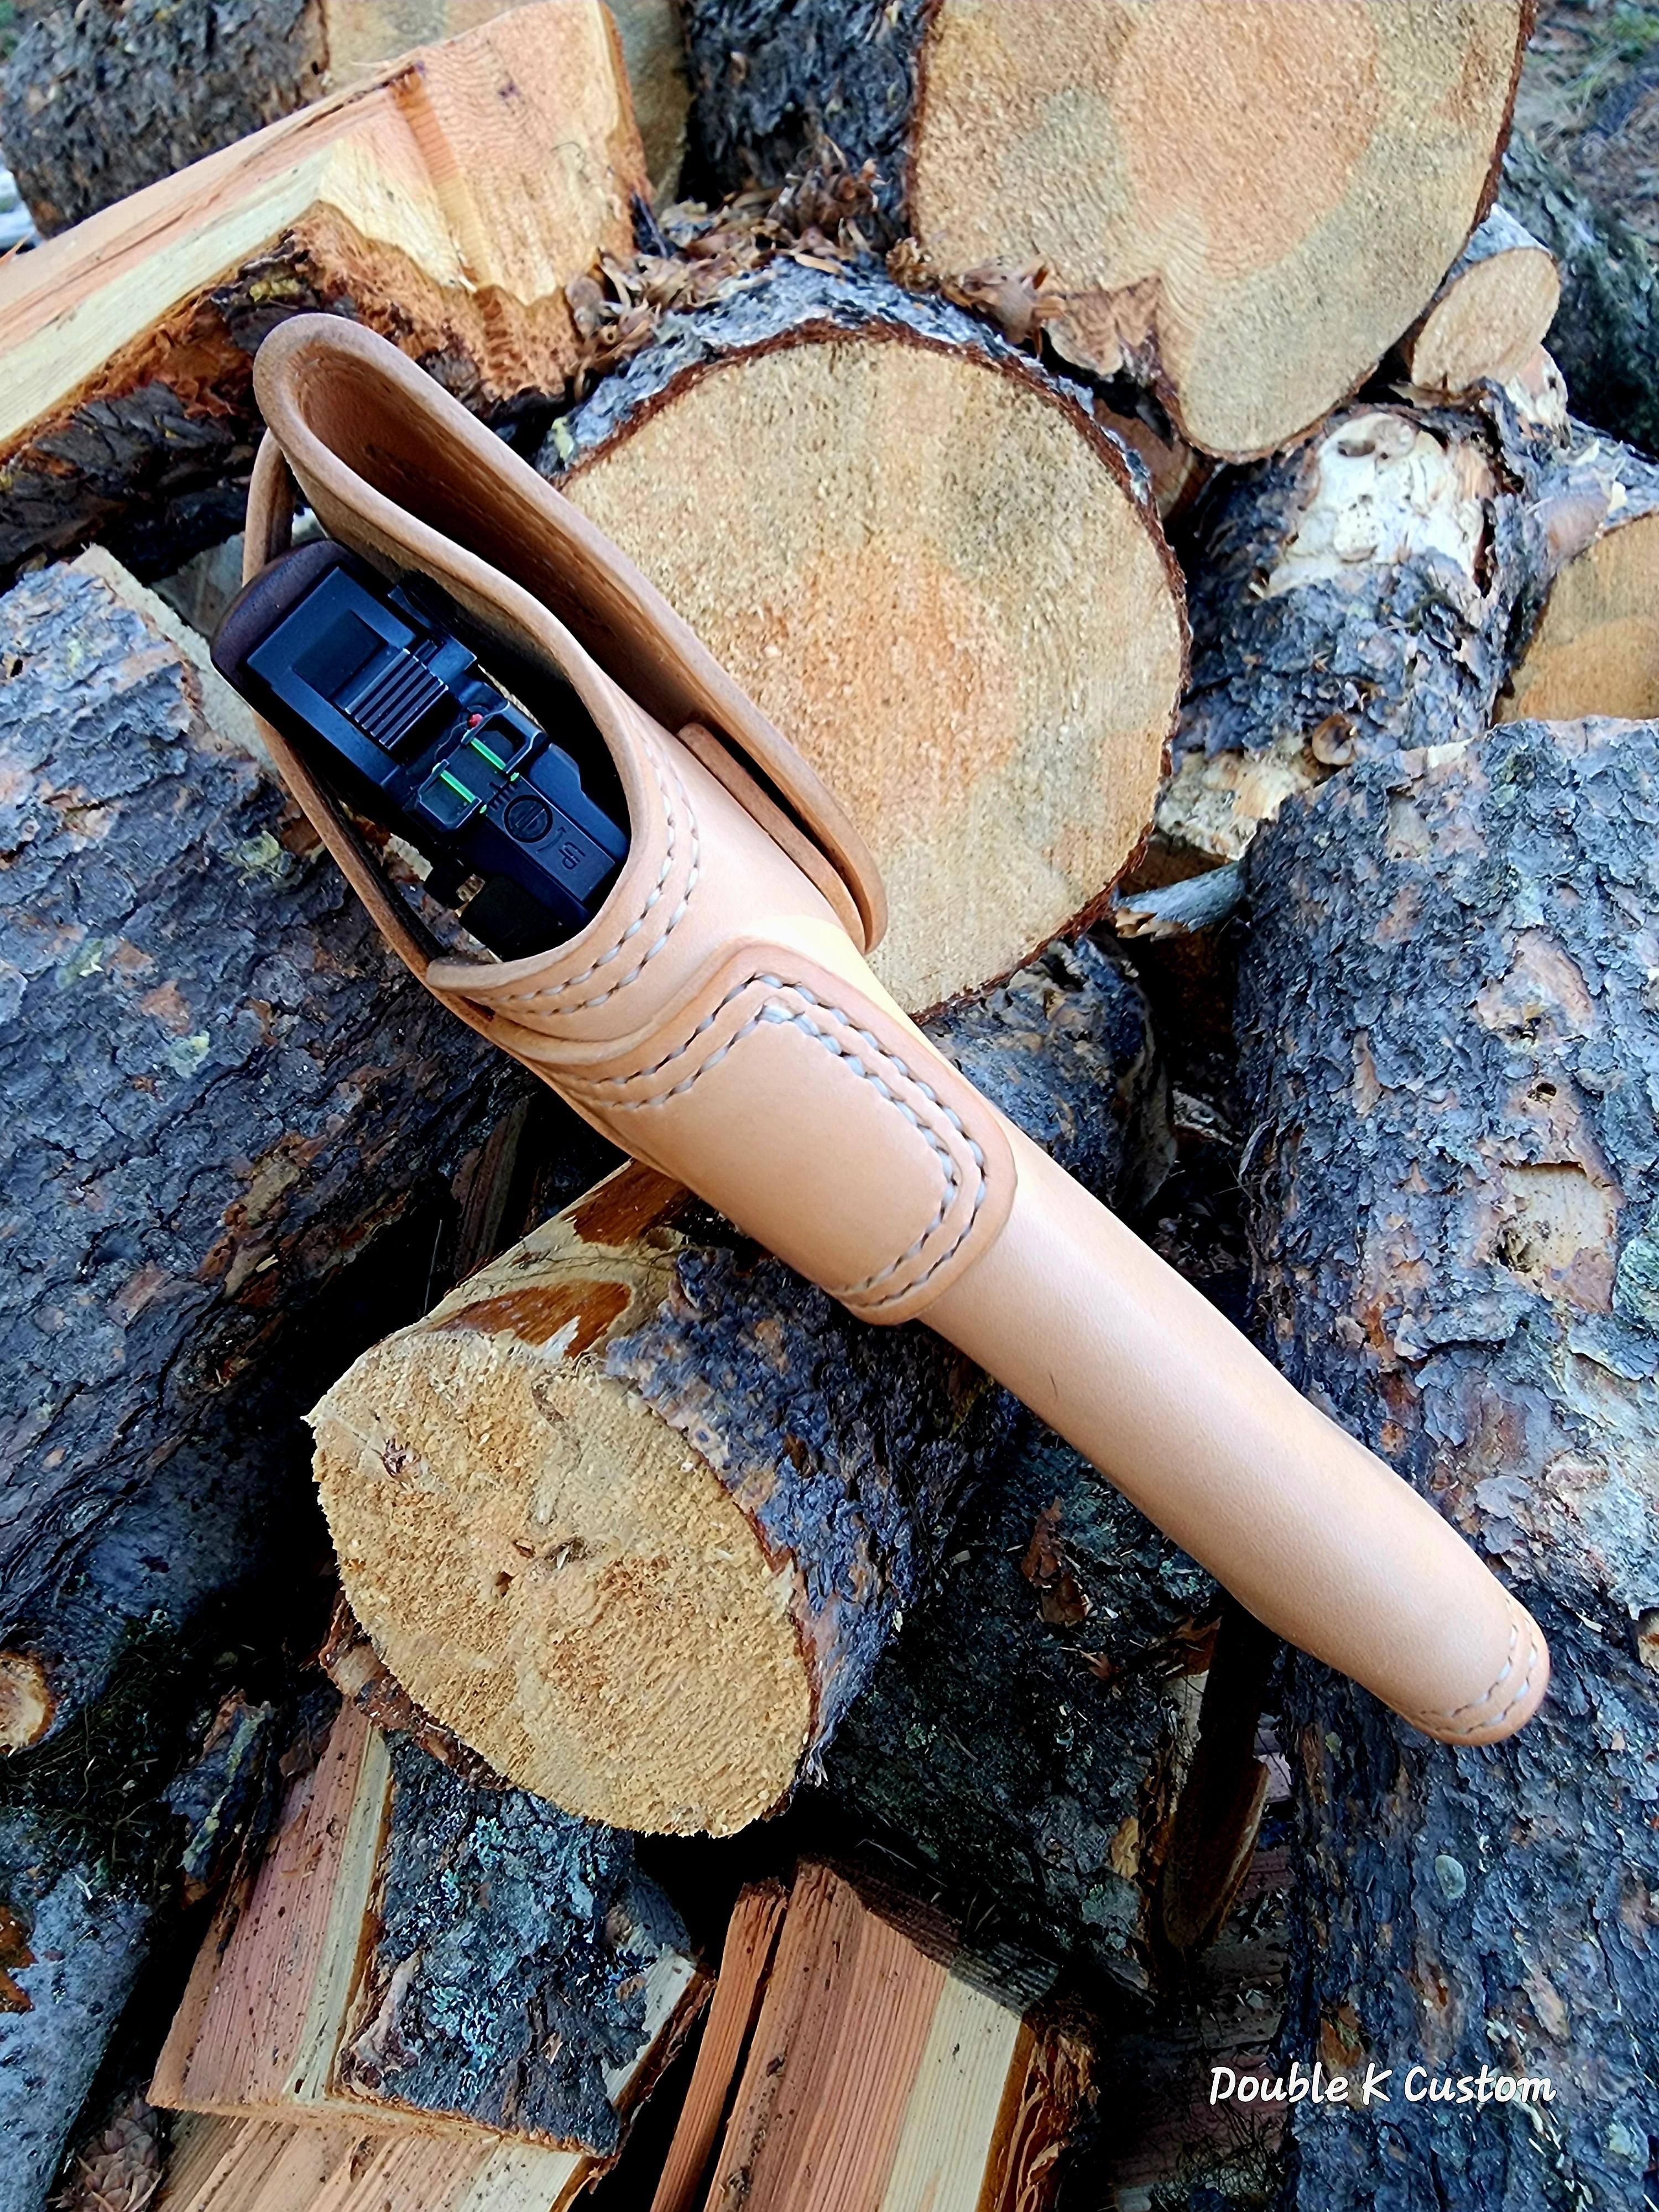
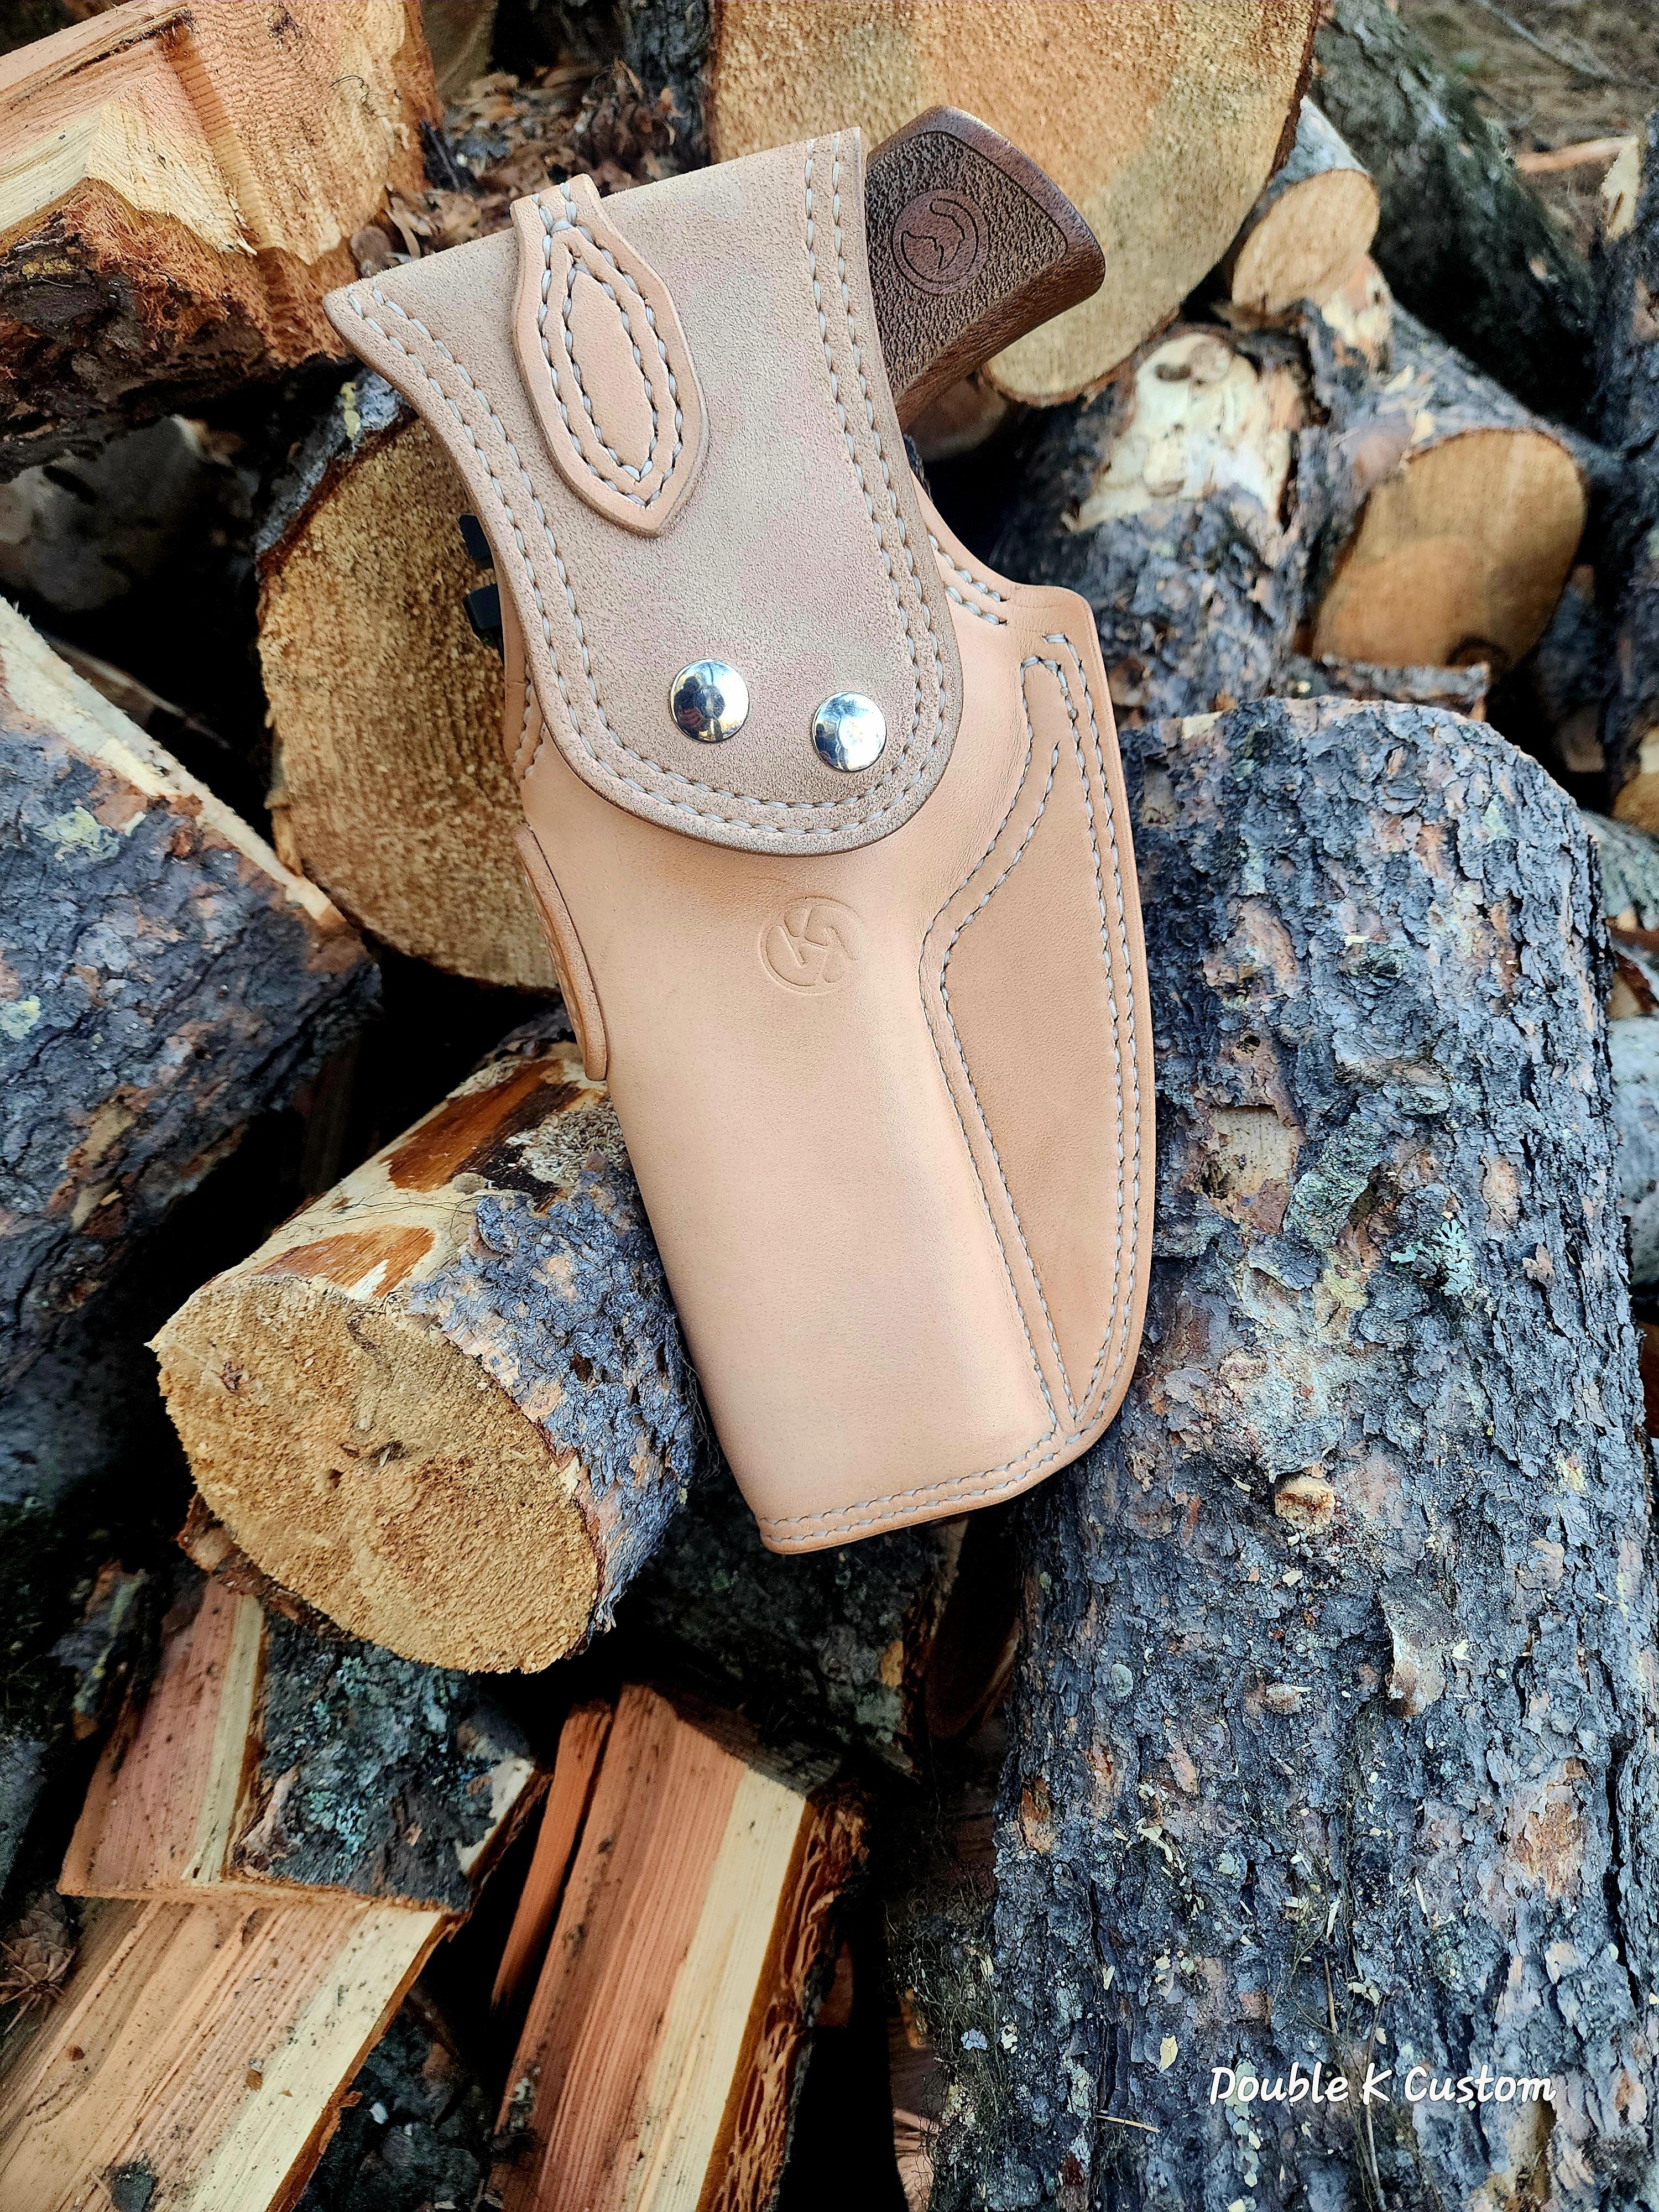
Well this build was interesting. I had a client meet up and request a "cowboy" style drop holster for a Chiappa Rhino 60DS. Ya the revolver with the barrel in the wrong location. So it started with a phone call. The client explained to me that he had gone into a custom leather shop in town to have the work done, but they don't do holsters. Ok, sounds normal right? But... He wasn't just looking for the holster, but for a compete western rig. *Me in my head: Ya I make that too. But I didn't say anything about it. I just sent him a picture of one of my favorite rigs I've made. I decided to just roll with it. Got him a quote ready and met up in town to pick up the handgun. I asked if he wanted any tooling or stamping and he said he preferred it to be plain. I then offered to double stitch to give it a more robust look and he was all in for that. *Me in my head: I'm still confused at why I'm making a holster for a belt that doesn't exist, from a shop that doesn't pick up the phone or return calls. A day later I tried to lock down a dye color with the client. He said leave it unfinished and I'll have the (other) shop dye and match everything. I them informed him that it we went this route, the stitching will take on any dye they use. That it would be better to come up with a plan between all 3 of us (the shop, client and myself). He insisted an keeping it unfinished. So I rolled with it. *Me in my head still confused. At this point, I'm not making holster for the client anymore. I have no problems with client expectations. They're always happy with what I make. I'm making this holster for my competition knowing full well there will be seasoned eyes on every single stitch, snap setting, blemish etc... So I just roll with it. So now my work sits in a shop, one light coat of oil after wet forming, creme colored stitching and no finish to protect that clean natural leather from dirty or oily hands. It is what it is, just roll with it. All that matters is my client is very happy with how the holster came out. He'll send me some pics of the finished work when the other shop gets his belt done. Just roll with it lol
-
.thumb.jpg.327685d8c1787fa894323fed9a6b2dac.jpg)
It's been a minute since I've posted anything
DoubleKCustomLeathercraft posted a topic in Show Off!!
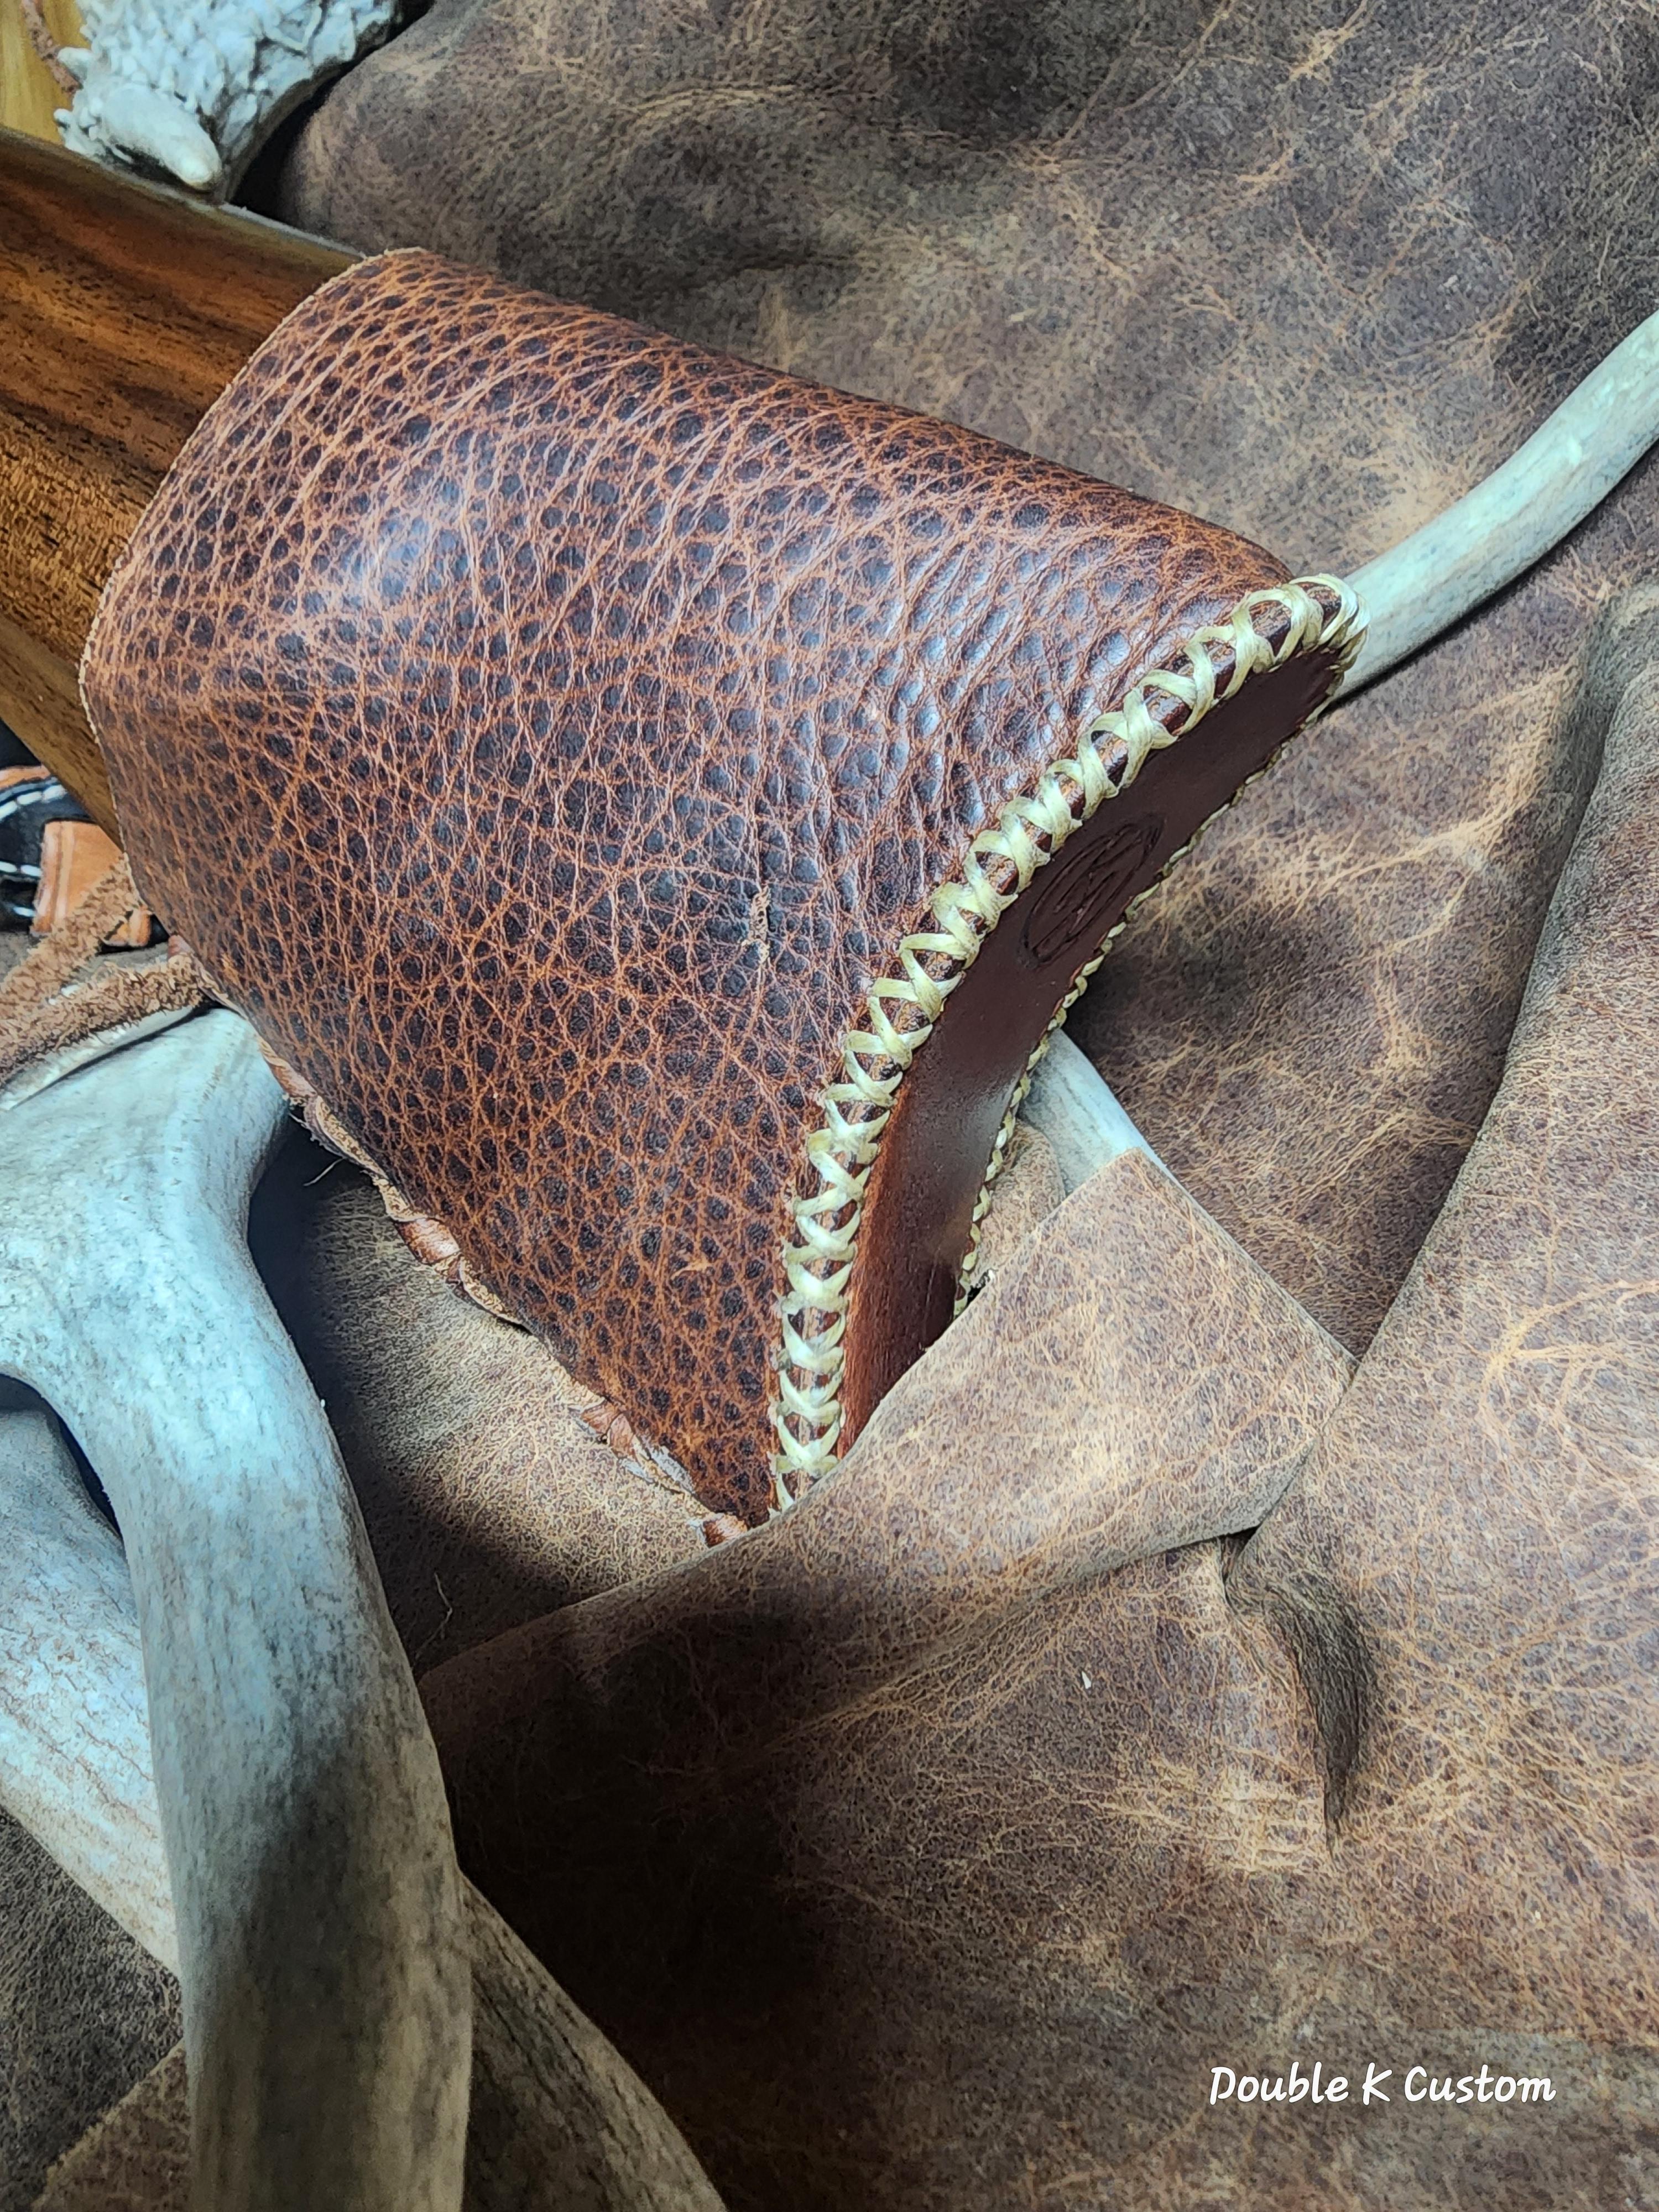
Well, I haven't necessarily been busy with orders, but I'm plugging away. This winter we got hot with a very heavy wind storm that knocked trees down across the entire state. I went 118 hours without power at the home, no worries about my shop, it's all off grid. With that December storm came a lot of cleanup, that I'm still working on. Several trees came down or were hung up on the property. With my back fused, I can't get as much done at a time as I once did so it's taken awhile. I've also been focusing more on building my brand on Instagram. I first started making short videos, but my memory got eaten up pretty fast. Then put in the time for editing only to have to start all over just before exporting. It drains me mentally, and takes way more time than I expected. My videos have turned into reels of the process through photos and description authorized an occasional hyperlapse. Meanwhile I have made a couple things, and have some orders on the bench to work on. I've got a couple dog collars to make, a cartridge belt, and possibly a new 1911 holster design. First though, a custom bison recoil pad and sleeve for a sharps style bp rifle. This is the 8th or 9th recoil pad and sleeve I've made for this client. I use a high density foam, cut and shape to fit the cresent shoulder mount. Yes I'm calling it a mount because of the brass kicking you're butt. I glue that to veg tan so it'll hold the shape well. The client likes the traditional look so I use sinew thread with a classic x stitch. It's then laces up with a strip of the same bison leather for a tight fit that won't slip. I'll post the latest holster on a new topic. It's got a strange story to go along with it. -
.thumb.jpg.327685d8c1787fa894323fed9a6b2dac.jpg)
Happy Christmas 2025
DoubleKCustomLeathercraft replied to Handstitched's topic in All About Us and Off Topic
Merry Christmas to you and yours, and everyone here. -
.thumb.jpg.327685d8c1787fa894323fed9a6b2dac.jpg)
Desert bighorn holster is finished
DoubleKCustomLeathercraft replied to DoubleKCustomLeathercraft's topic in Show Off!!
Thanks chuck. I'm happy, the client is even happier. It's a win- 15 replies
-
- desert bighorn
- holster
-
(and 1 more)
Tagged with:
-
The frame completes it.
-
.thumb.jpg.327685d8c1787fa894323fed9a6b2dac.jpg)
Desert bighorn holster is finished
DoubleKCustomLeathercraft replied to DoubleKCustomLeathercraft's topic in Show Off!!
Mclark Thanks. Yes the knot is for the hammer spur strap. I don't have a picture of the back and the pattern is from "the hand of God" pack, (3:10 to yuma) but modified a little to fit a regular belt instead of a gun fighter belt. It's stitched instead of folding over and into a "Mexican style" loop. My client has no desire to have a full rig, he just wanted the holster. So I trimmed some of the extra bulk off to make it more comfortable on a standard belt.- 15 replies
-
- desert bighorn
- holster
-
(and 1 more)
Tagged with:
-
Wow. Thanks for all the advice here. I still have to process everything I just read, but I've got and ideas of what to do from everyone.
- 4 replies
-
- marketing
- social media
-
(and 3 more)
Tagged with:
-
.thumb.jpg.327685d8c1787fa894323fed9a6b2dac.jpg)
Tandy gun holster pattern wanted
DoubleKCustomLeathercraft replied to Wildwest2029leathercraft's topic in Resources
Have you tried Tandy's website under recourses? They have a lot of their patterns available for free download. Along with so many other things. -
I know I'm way behind on this because I'm stubborn and have been opposed to social media since the days of MySpace. I do use YouTube as a learning source (how I learned this craft) and some entertainment of course. The local market is a little stale right now and highly dependent on tourists. Tourist season is pretty much wrapped up and all the snow birds are flocking south for the winter (FL, AZ, TX). I've come to realize that I am missing out on free advertising to 2 (IG) to 2.5 (YT) billion people. I really have no clue what to do or how to present my work on platforms such as Instagram. Ican make short videos on the process like I see everyone else doing, but what would stand out? Does anyone have any tips, tricks or techniques to build an IG page that would attract more business? What kind of posts or reels work best for leathercraft? And the algorithm? My IG page @doublekcustomleather I've been signed up to LinkedIn forever it seems, and have grown a decent sized network. So I decided to start writing weekly posts with images to hopefully promote my brand. I can't seem to keep them short and engaging. Although I did get more interest from my second post. These two, and maybe YouTube are all I would consider using. My problem is I really don't know how to engage these platforms, or how to utilize the algorithm for selling custom leather products. There are plenty of YouTube videos on business, selling and building a following on IG, but it's all premade products. I am a made to order business and don't have an inventory of products. I'm just hoping some of y'all might have some advise to share See.... I'm long winded.
- 4 replies
-
- marketing
- social media
-
(and 3 more)
Tagged with:
-
Fancy rims on a pinto, with a banging stereo system! Haha Nice work.
-
.thumb.jpg.327685d8c1787fa894323fed9a6b2dac.jpg)
Desert bighorn holster is finished
DoubleKCustomLeathercraft replied to DoubleKCustomLeathercraft's topic in Show Off!!
Doesn't bother me at all. The line art for the holster is in my previous post in showoff. I put a watermark on it, but not to where it distorts the image. Respect for asking. Thanks Thank you everyone. I appreciate the kind words, it helps keep me motivated to create more.- 15 replies
-
- desert bighorn
- holster
-
(and 1 more)
Tagged with:
-
.thumb.jpg.327685d8c1787fa894323fed9a6b2dac.jpg)
Desert bighorn holster
DoubleKCustomLeathercraft replied to DoubleKCustomLeathercraft's topic in Show Off!!
-
This is a follow up to my previous post explaining how I drew the pattern for this carving. And a few other things. I did add a toe plug on this to help retain its shape for years. My client specifically said, "I would like you to have artistic freedom on this, and I would like to be surprised" direct quote. I chose the bighorn because of their resilience and strength. They live a rugged lifestyle that represents the wild west. I chose the desert bighorn because it's headed to CA and they're one of two native species too the state. Hermann oak holster tan 9/10 from weaver. Feibings pro dye light brown Feibings antique finish dark brown, with no resist to darken the leather a bit for a more medium brown Feibings leather balm atom wax finish Ritza tiger thread 1.0 cream saddle stitched Tokenol edge burnish Weaver's Water Buffalo lining, and hammer spur strap (for strand round braid)
- 15 replies
-
- desert bighorn
- holster
-
(and 1 more)
Tagged with:
-
.thumb.jpg.327685d8c1787fa894323fed9a6b2dac.jpg)
Desert bighorn holster
DoubleKCustomLeathercraft replied to DoubleKCustomLeathercraft's topic in Show Off!!
I literally just put the final coat of leather balm on it. I'll take some pictures tomorrow before it gets shipped out so I can get em posted. Ya, I'm pretty happy with this one. The bighorn sheep is one of those animals. They're big, bold, strong animals that seem to demand respect with just a side eyed glance. They way they survive defines what rugged really means. -
.thumb.jpg.327685d8c1787fa894323fed9a6b2dac.jpg)
Removing double sided tape glue residue?
DoubleKCustomLeathercraft replied to memhave's topic in How Do I Do That?
Get some deglazer. But I don't think anything will work. It's not really a residue issue but a slight pulling of the grain. If you can't find anything that works, and this would be my last choice. You could sand the whole face with fine sandpaper, 600-1000grit, very lightly. Then take some tokenol and burnish the surface smooth. I've never had any success remove the tape marks, but I've never had them right in the middle of the piece either. Good luck, and let us know if anything worked. -
.thumb.jpg.327685d8c1787fa894323fed9a6b2dac.jpg)
Desert bighorn holster
DoubleKCustomLeathercraft replied to DoubleKCustomLeathercraft's topic in Show Off!!
Thanks guys. I'm just about done with it, but had to put things in hold so I could get things done at home before this show storm showed up. It's killing pretty sweet though. -
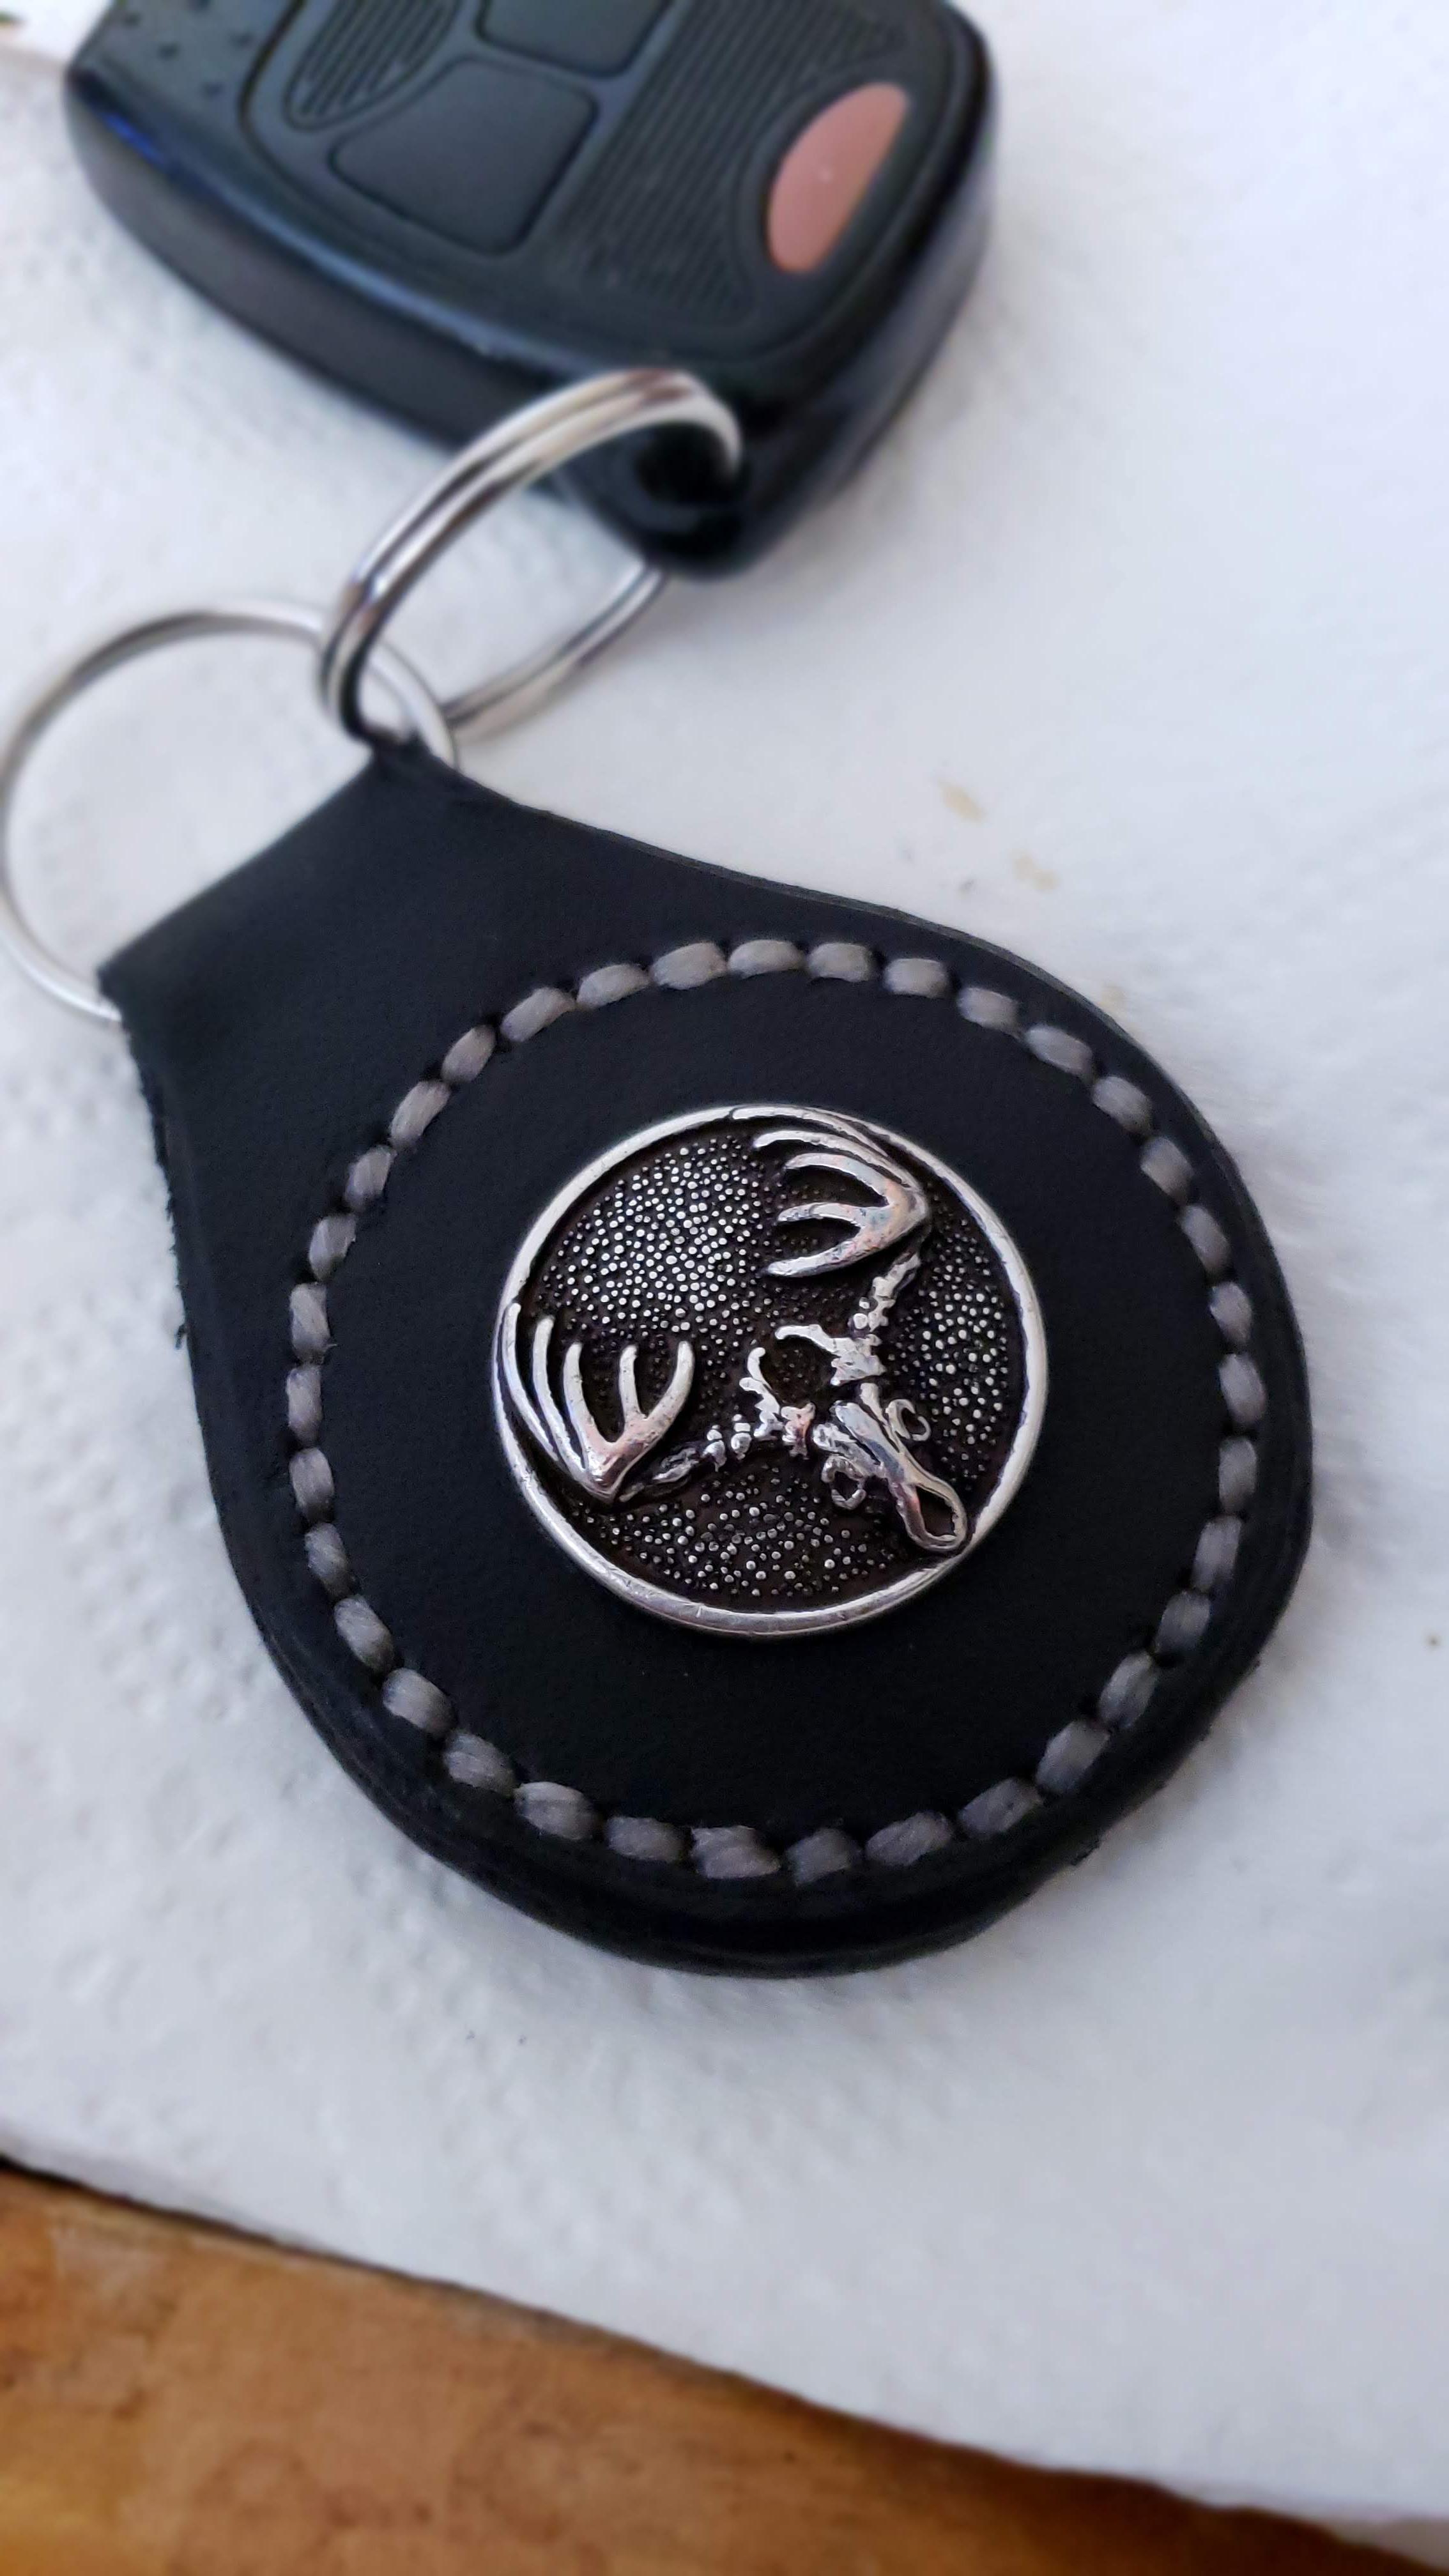
I had a belt from Nacona leather.... maybe 20 years ago. It was leather with camo inlay and these 2 deer skull conchos. I kept them. Base this Keychain for my best friend and intended to make one for myself, but somehow my dad got it, and lost it. I really like the concho. I have a bit of a concho collection fetish and want to add this back into it. I have spent countless hours looking, tried contacting nacona and have come up completely empty handed. If anyone knows where, or if they're available I would appreciate the information. Thanks
-
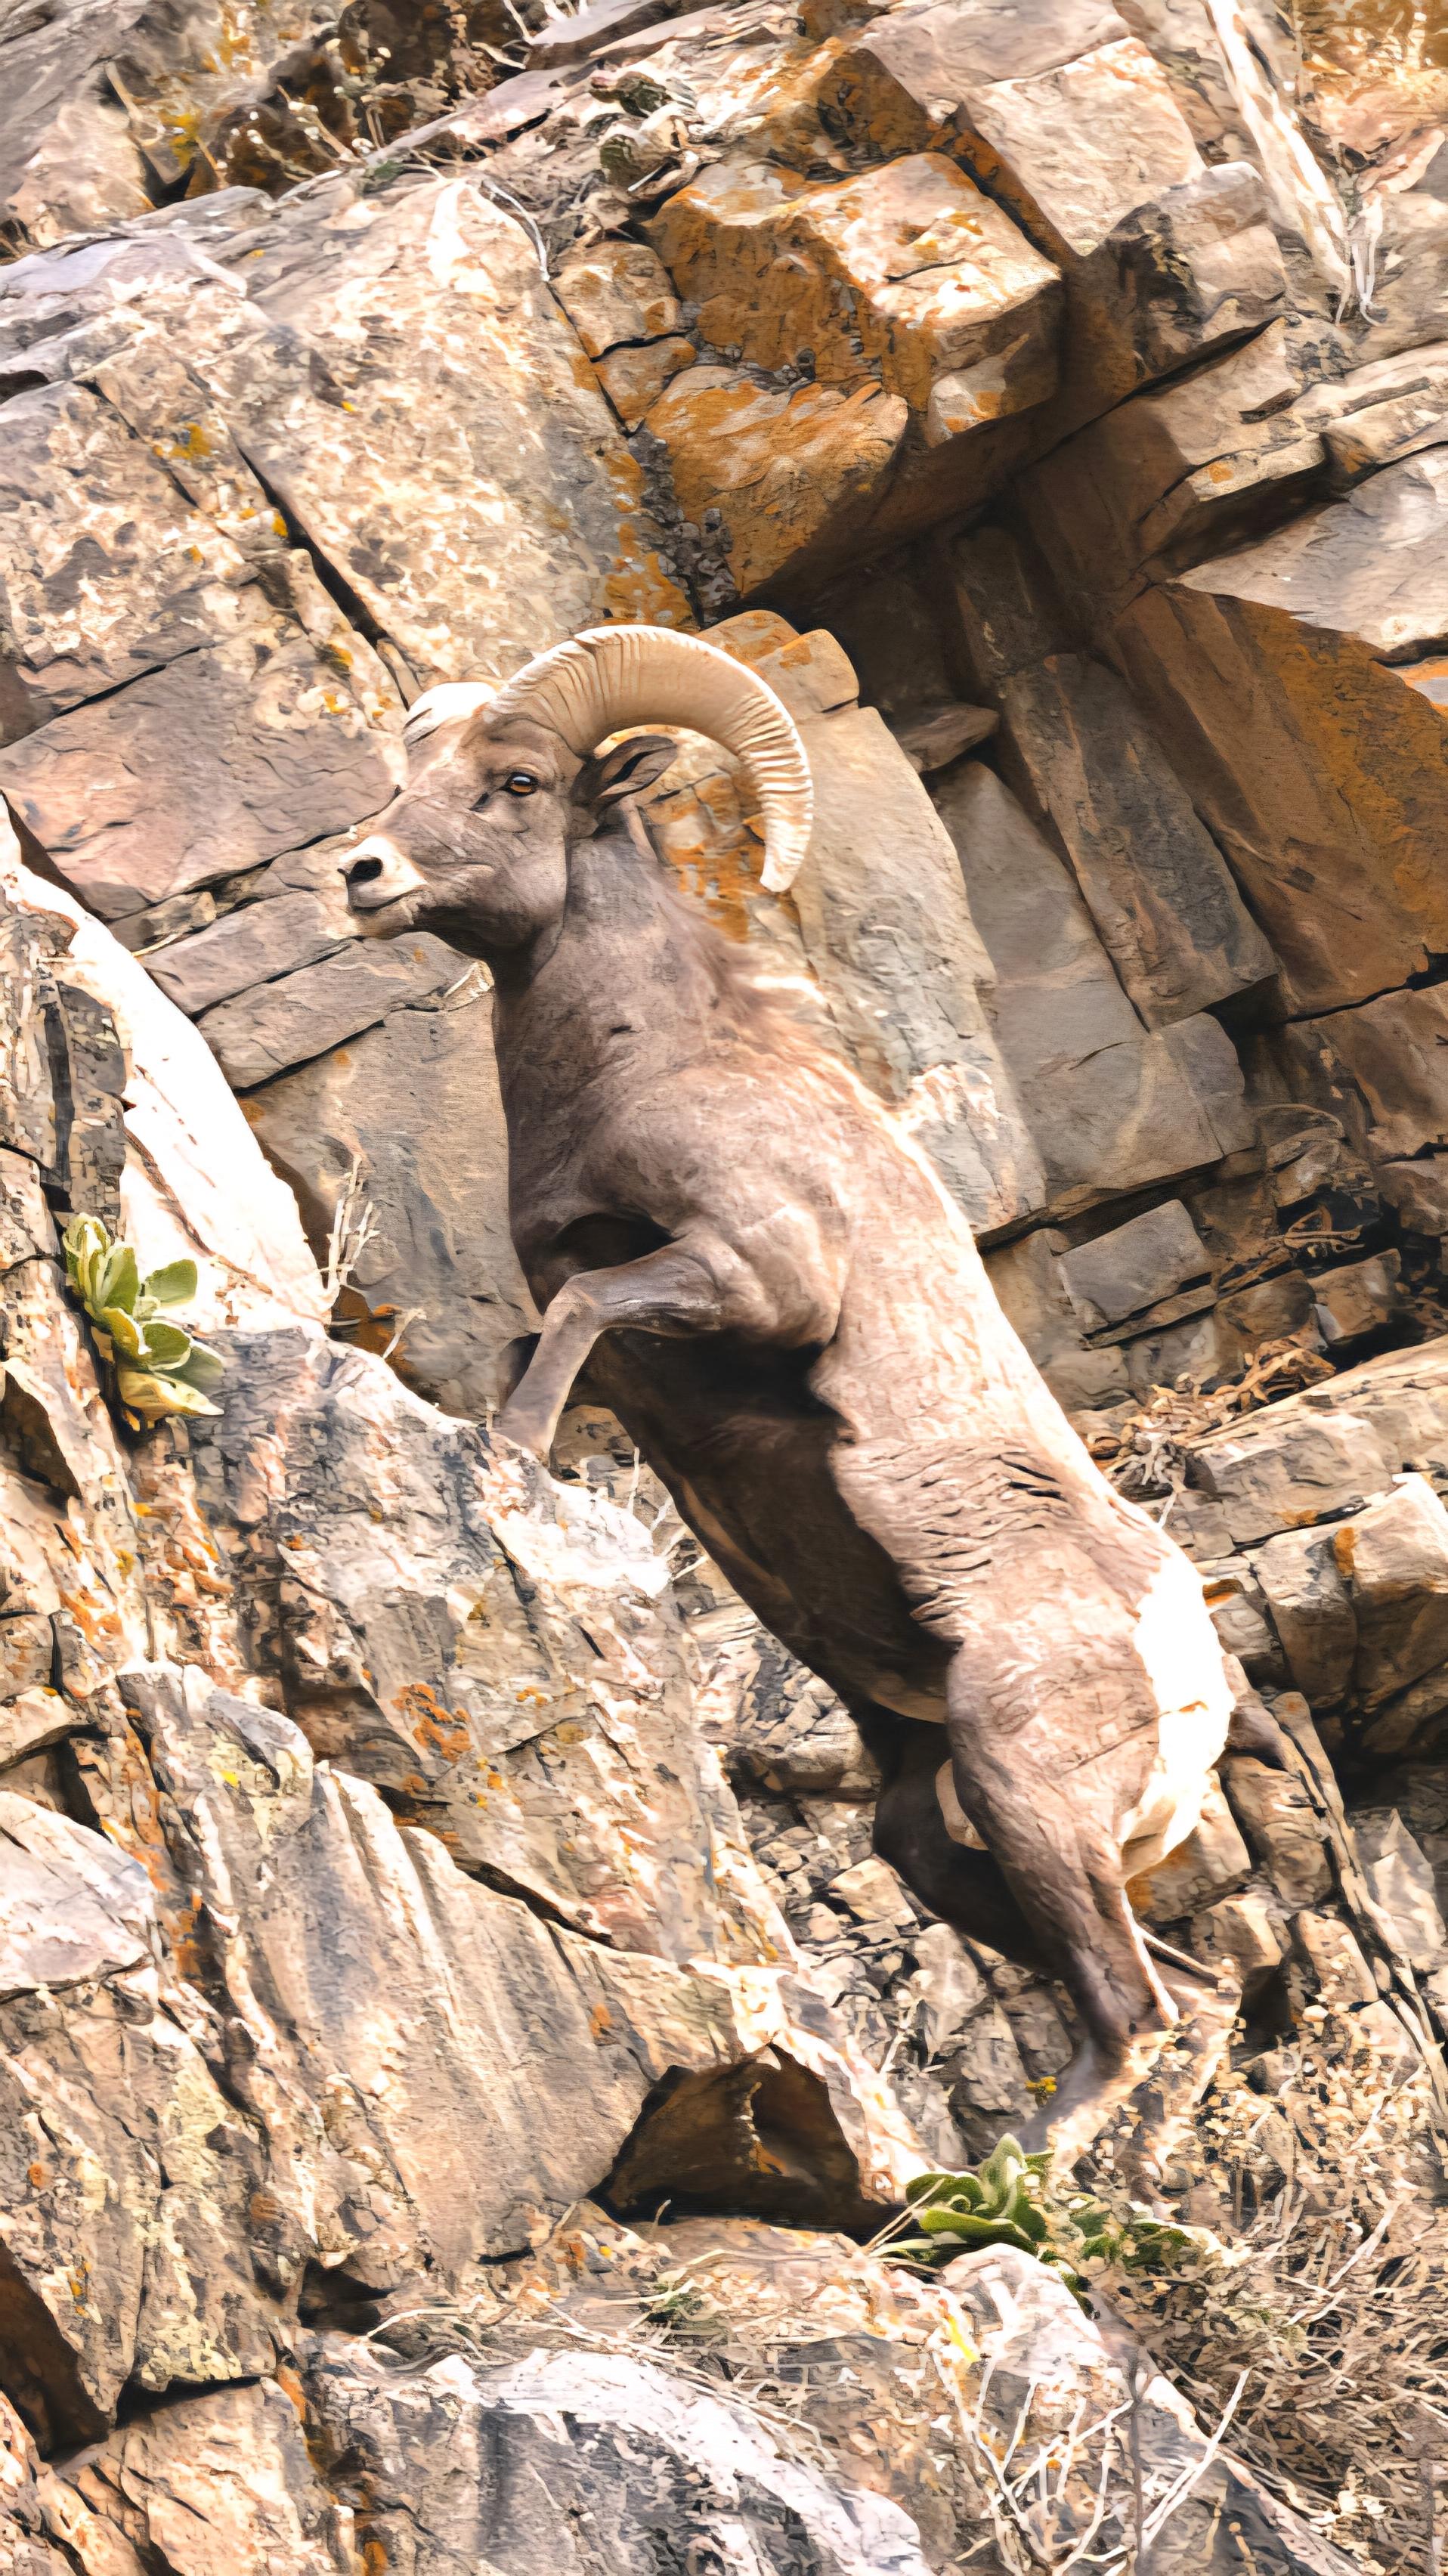
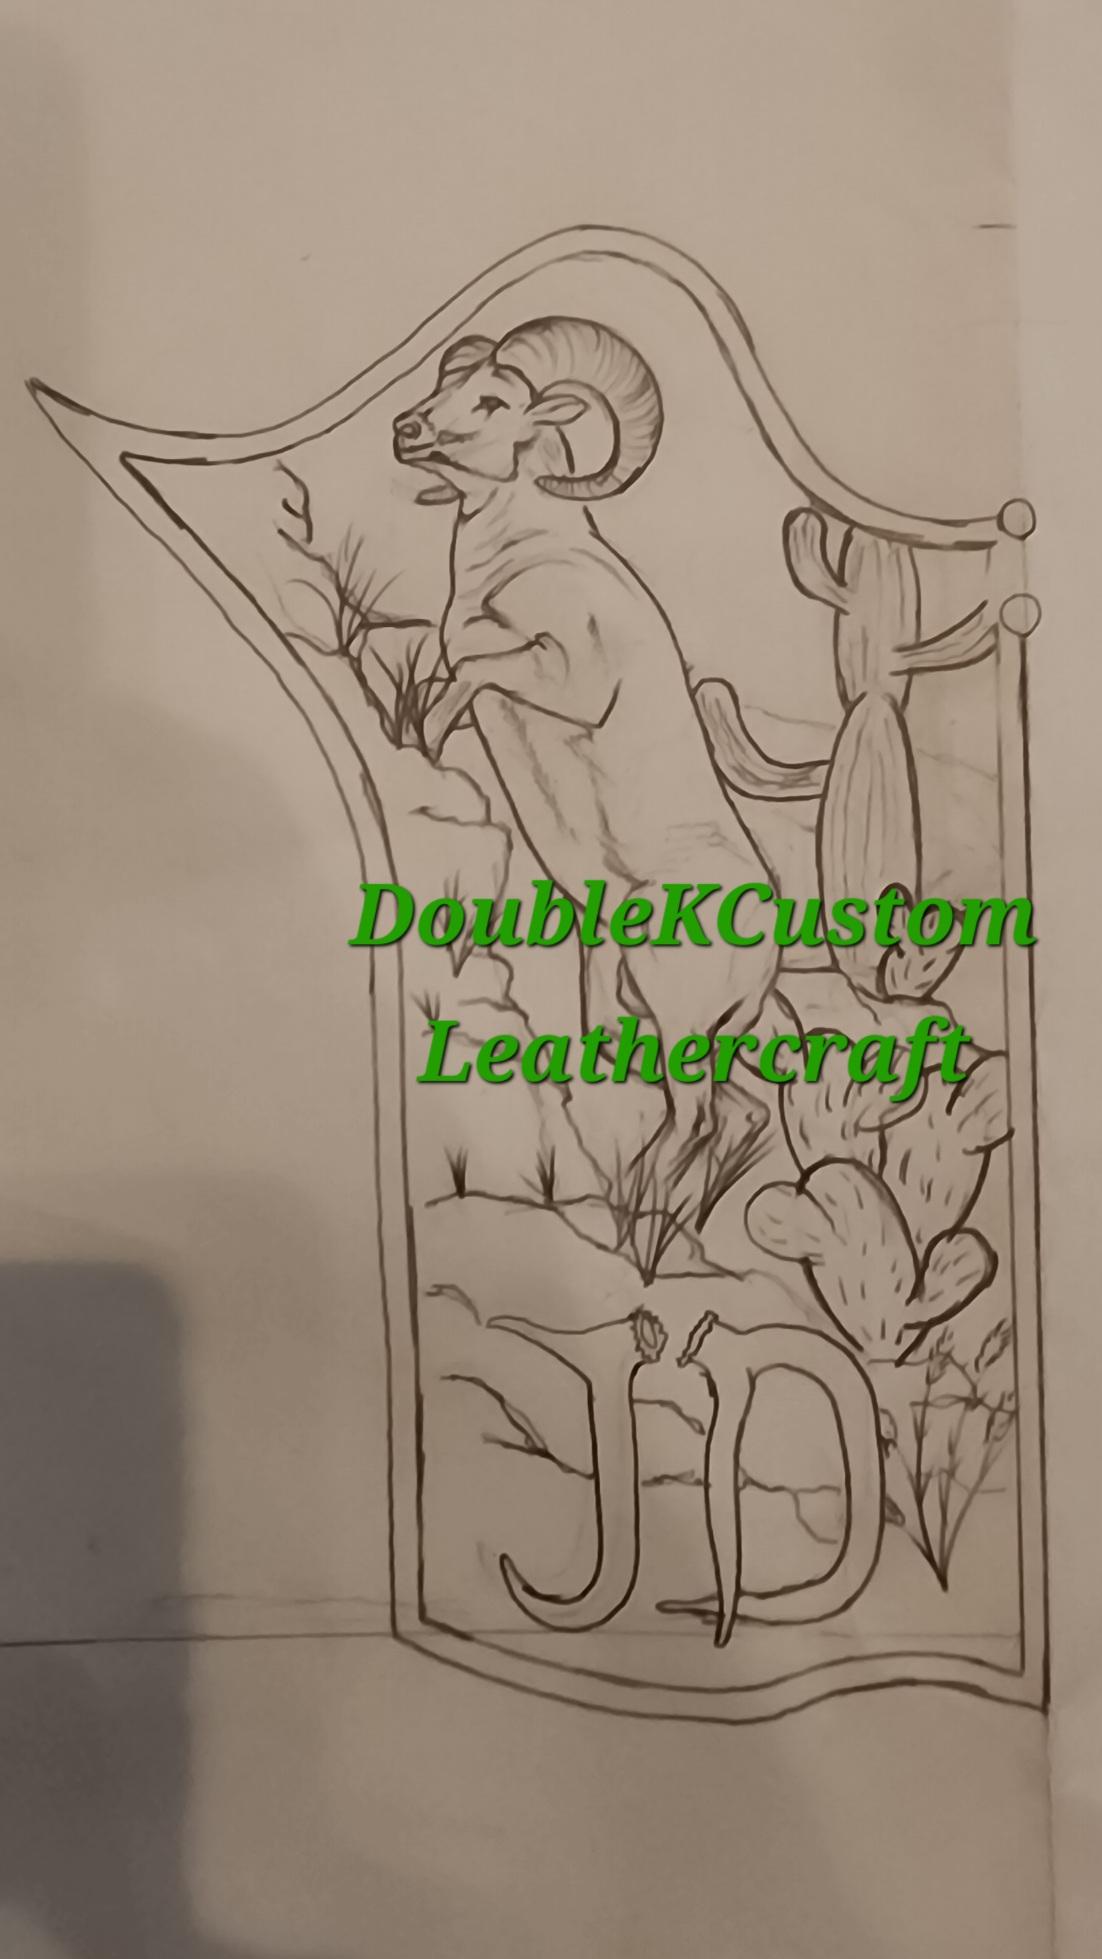
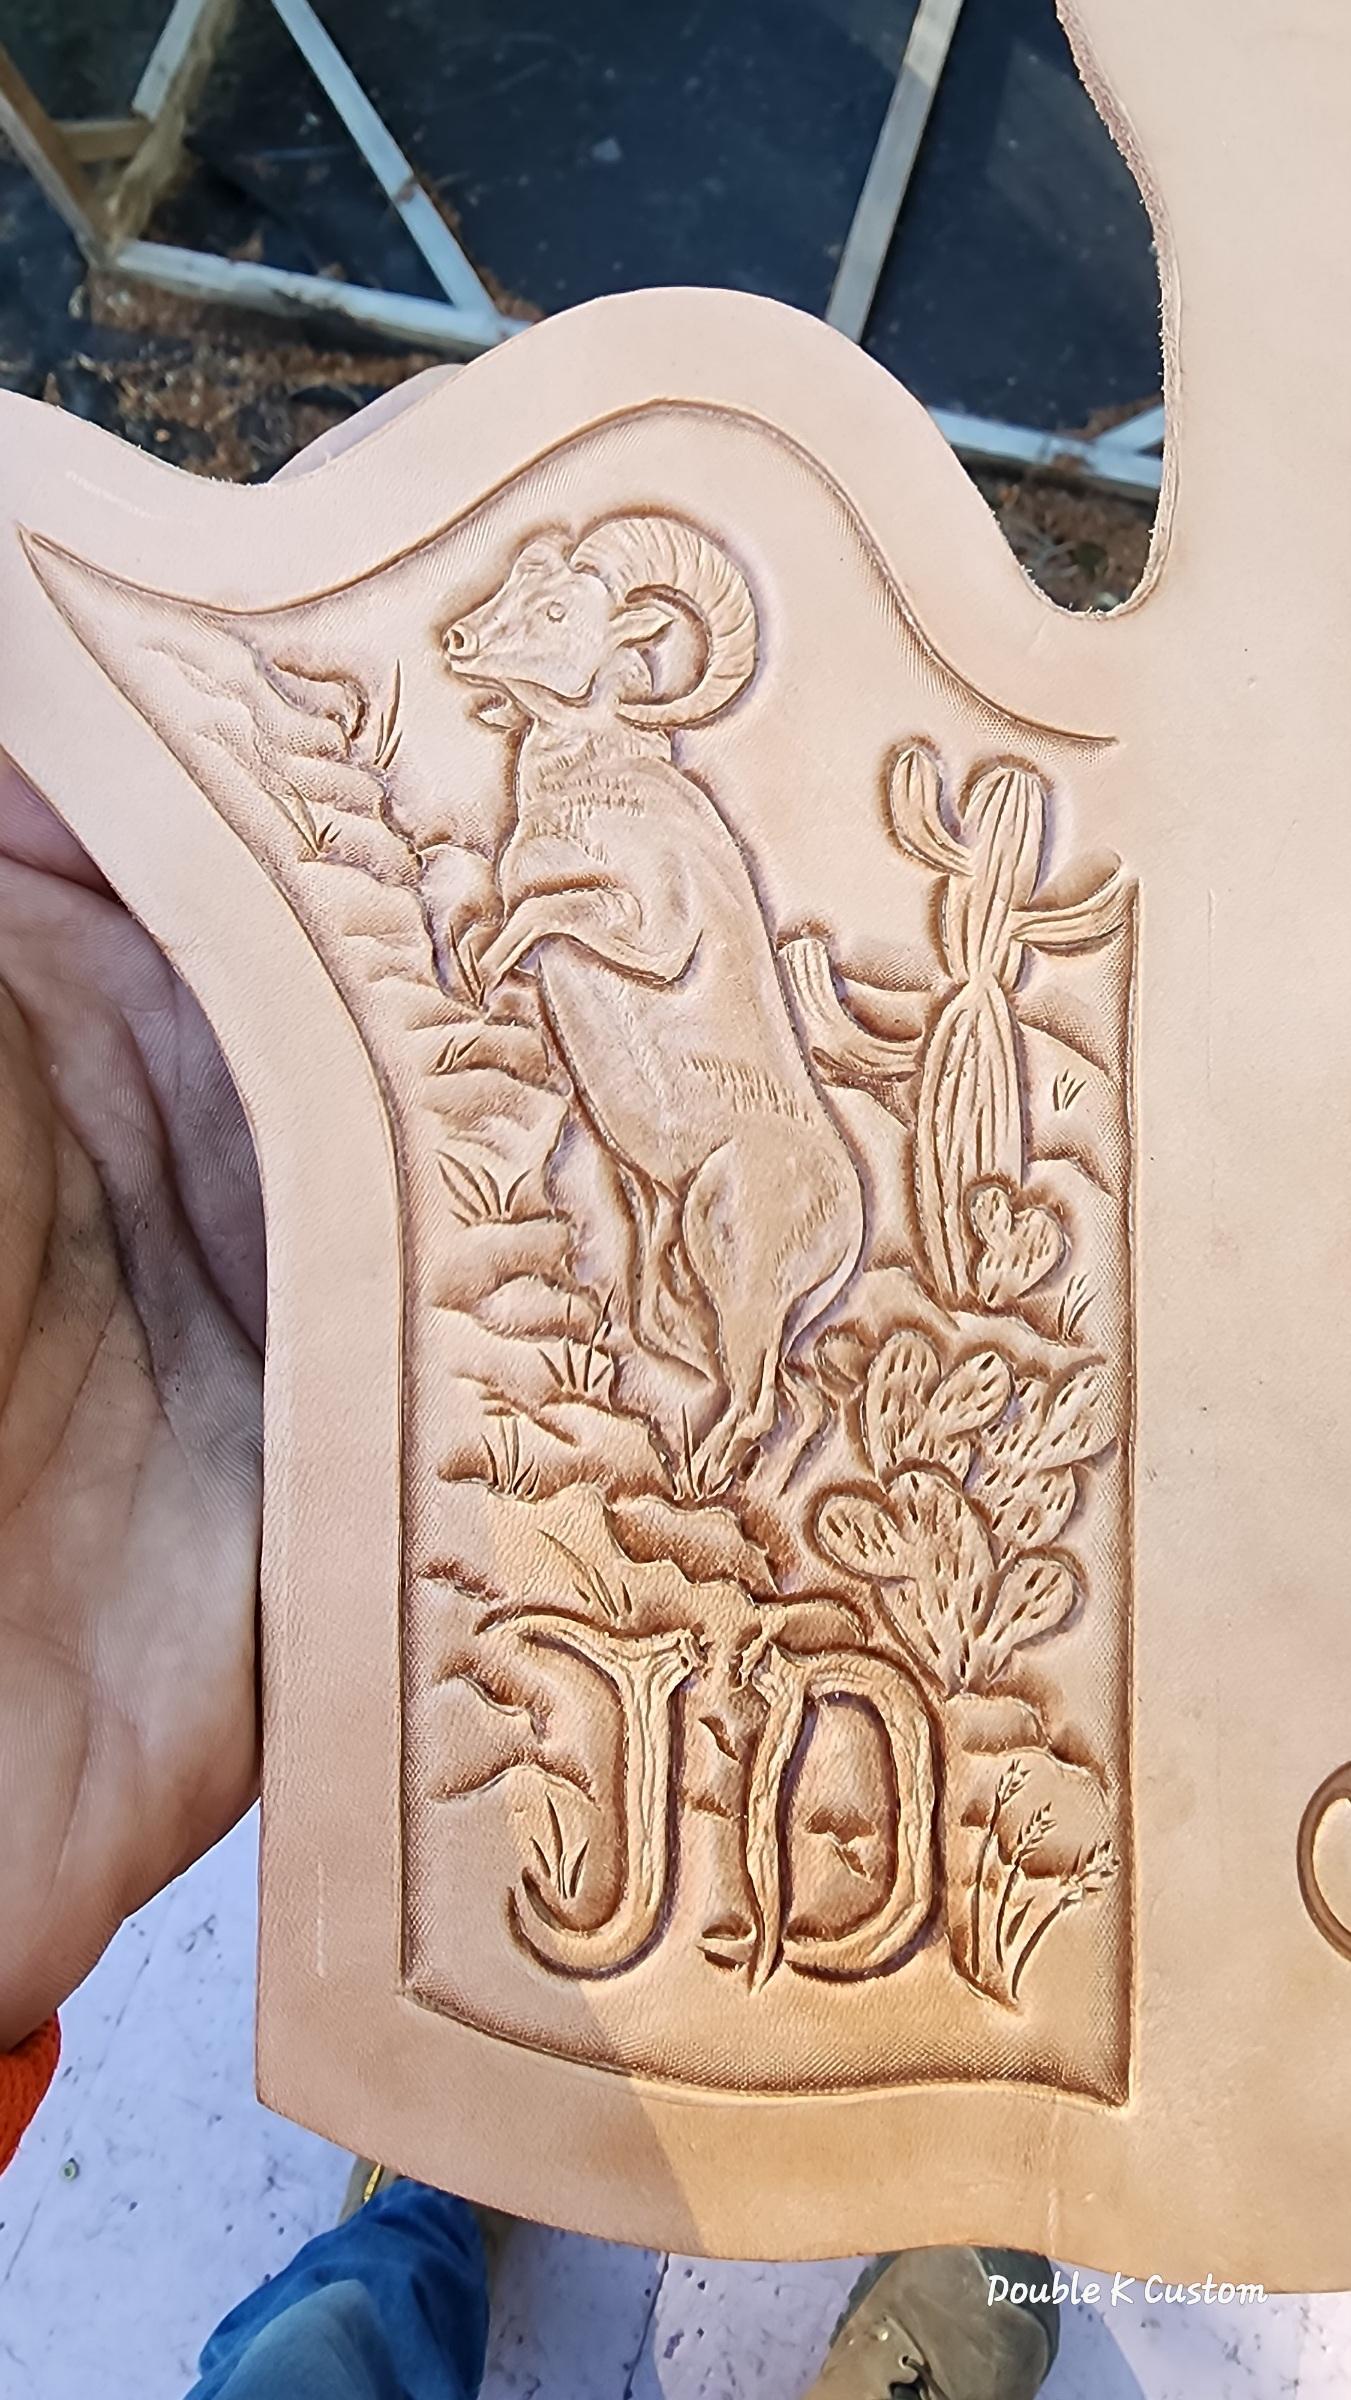
I'm not finished yet but I'm close. I just need to same the edges and finish. I'll update this as I go. I just wanted to share the process of making unique patterns to carve. First, it took me some time to find the right picture. I knew what i wanted and could've easily just drawn out, but i wanted to see the muscle structure of the sheep climbing. And not just climbing, but climbing steep country with the right angle to flow with the holster shape. I use an app on my phone that's called tracing paper. It allows my to zoom in or out and lock the screen so I can trace the outline to make the photo a line art pattern to work from. I can do things freehand, but sometimes it's just quicker this way. This is how I started the pattern. I traced the sheep first, then added to the background and foreground. After that it's just business as usual. Case the leather, transfer the pattern and go to town. I'm stoked at how well this has turned out. It will be dyed light brown with a dark brown antique. Hermann oak holster tan from weaver. This is the last holster from that side and had a severe taper in thickness from 10 oz to 7 oz. I evened out the thickness to the bend of the belt loop and left the loop at 10oz. Feibings pro dye and antique finish Ritza tiger thread 1mm cream Leather balm to finish Lined with 3/4 oz Water Buffalo to make up the lost weight and bring it back near 10oz overall. I'll post more pics after I finish everything
-
I dunno... this seems sus to me. No name, no goal, no real information given. I'm not clicking any unknown link. Doc already gave the warning, but I wouldn't anyway. Not trying to discredit anything, but this looks like the same fake generic messages I get on LinkedIn. Let us know more about this non profit and it's mission.
-
I find this comment to be key to a lot of business in the industry. As a holstersmith myself, the best compliment I've ever gotten is just about what you said. "It's the most comfortable holster I've ever worn." Or the other great compliment is, "I find myself carrying my pistol now often" The biggest problem with EDC firearms is the fact that a lot of holsters are just notoriously clumsy or uncomfortably bulky. Keep it up 912
-
The bone work is sharp and deep. Nicely done. How's it feel? That's the most important part of any holster. 😋
-
I agree with the others. To add, pics will help a lot too
-
Totally appreciate your input. You bring up valid points. Yes he is picky, but easy going too, and he definitely uses some really nice high end custom shotguns, among many other types of firearms. Five figure guns that are specifically made to his measurements. I love his collections, but they're so far out of reach for someone like myself lol. I was thinking if using veg tan with leather hardener as an option. It was his suggestion to use the plastic in the first place, and handed me a couple small sheets to use. I do have to consider the thickness of it all coming together at the chargers because it's a friction mount, and I believe their original pistol l purpose was to be used with horn. I did and will tap and use matching brass set screws. I was wanting to find a better solution than plastic. I will glue, and stitch whatever I decide to go with for that reason. I made the first one in a way that build up shouldn't be bad but not impossible of course. It's going to happen some. I have to stitch it all together in a specific order to make any overlapping pieces fit as flat as possible. Making sure the overlap is like a roof, working from the bottom so that things will flow like water. Thanks for the suggestions


.jpg.e30292f14b8a64a861abcd7e87228004.jpg)
.jpg.584905d51756fc9d9712f46add3a74c9.jpg)
.jpg.66a3d1aab4701b2cca2157c76b80ab93.jpg)
.jpg.daaaf2a8ad2966160cb9a081070fcf57.jpg)
