


mbnaegle
-
Posts
87 -
Joined
-
Last visited
Content Type
Profiles
Forums
Events
Blogs
Gallery
Store
Everything posted by mbnaegle
-
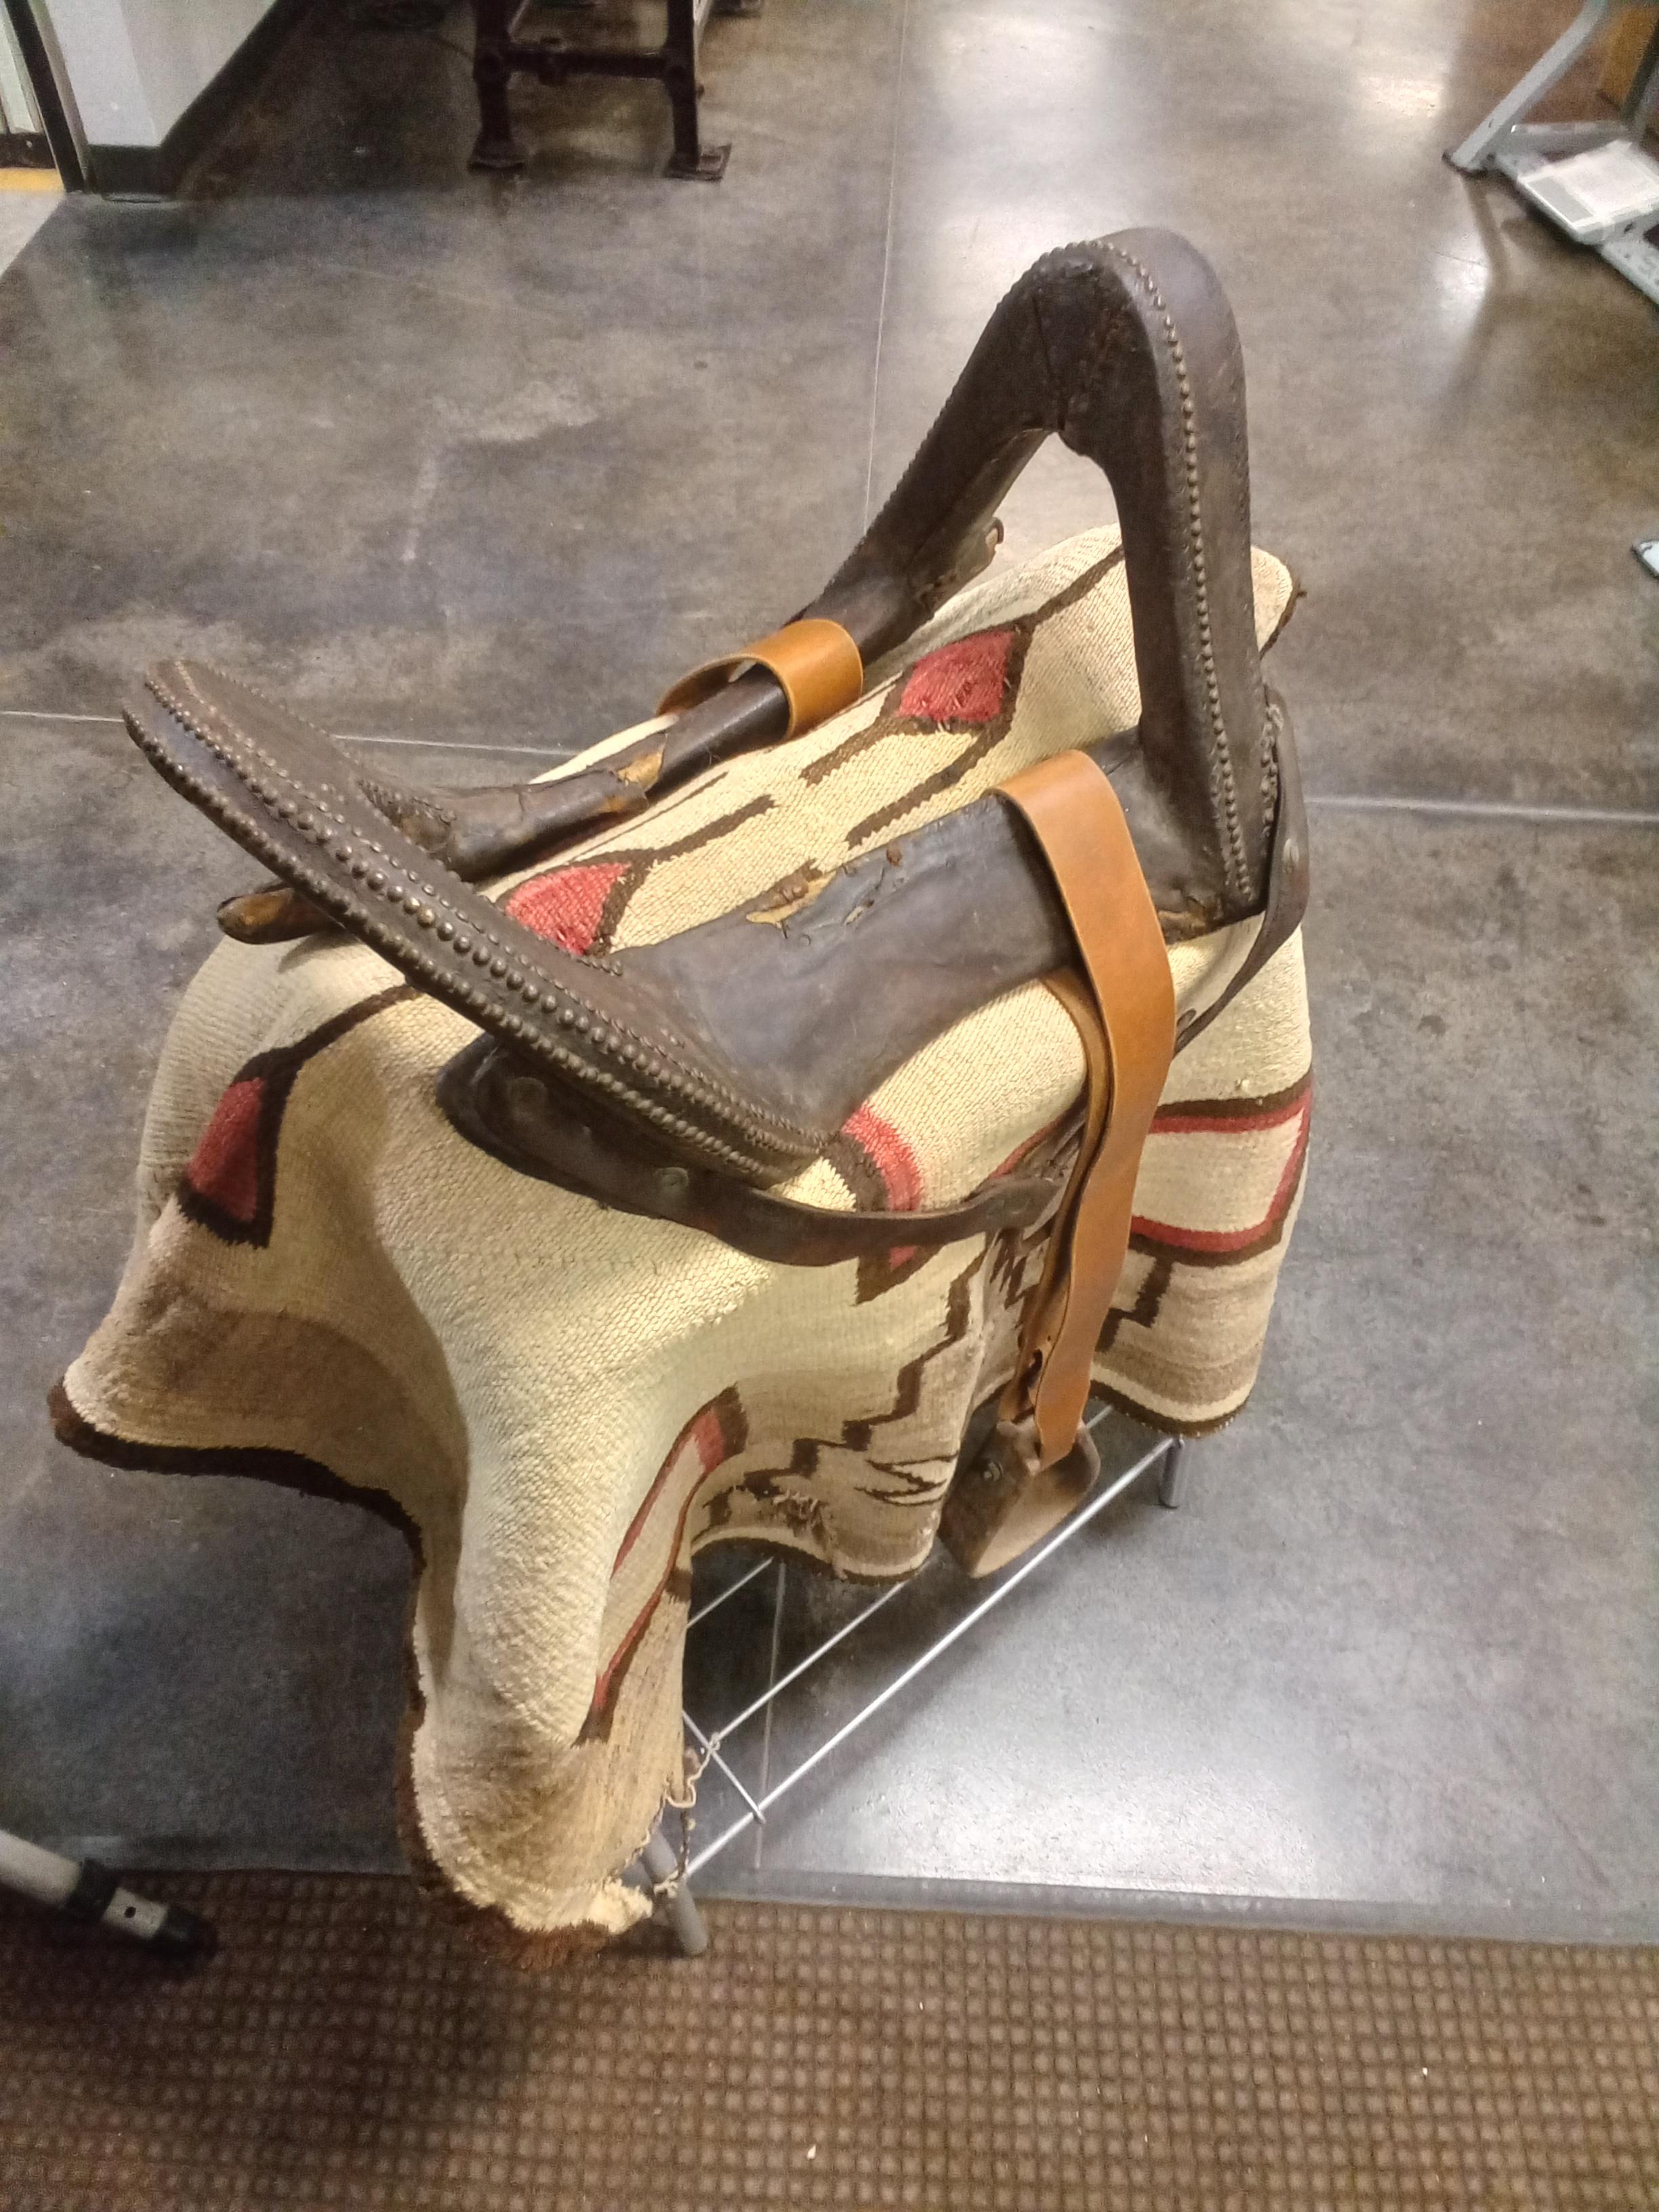
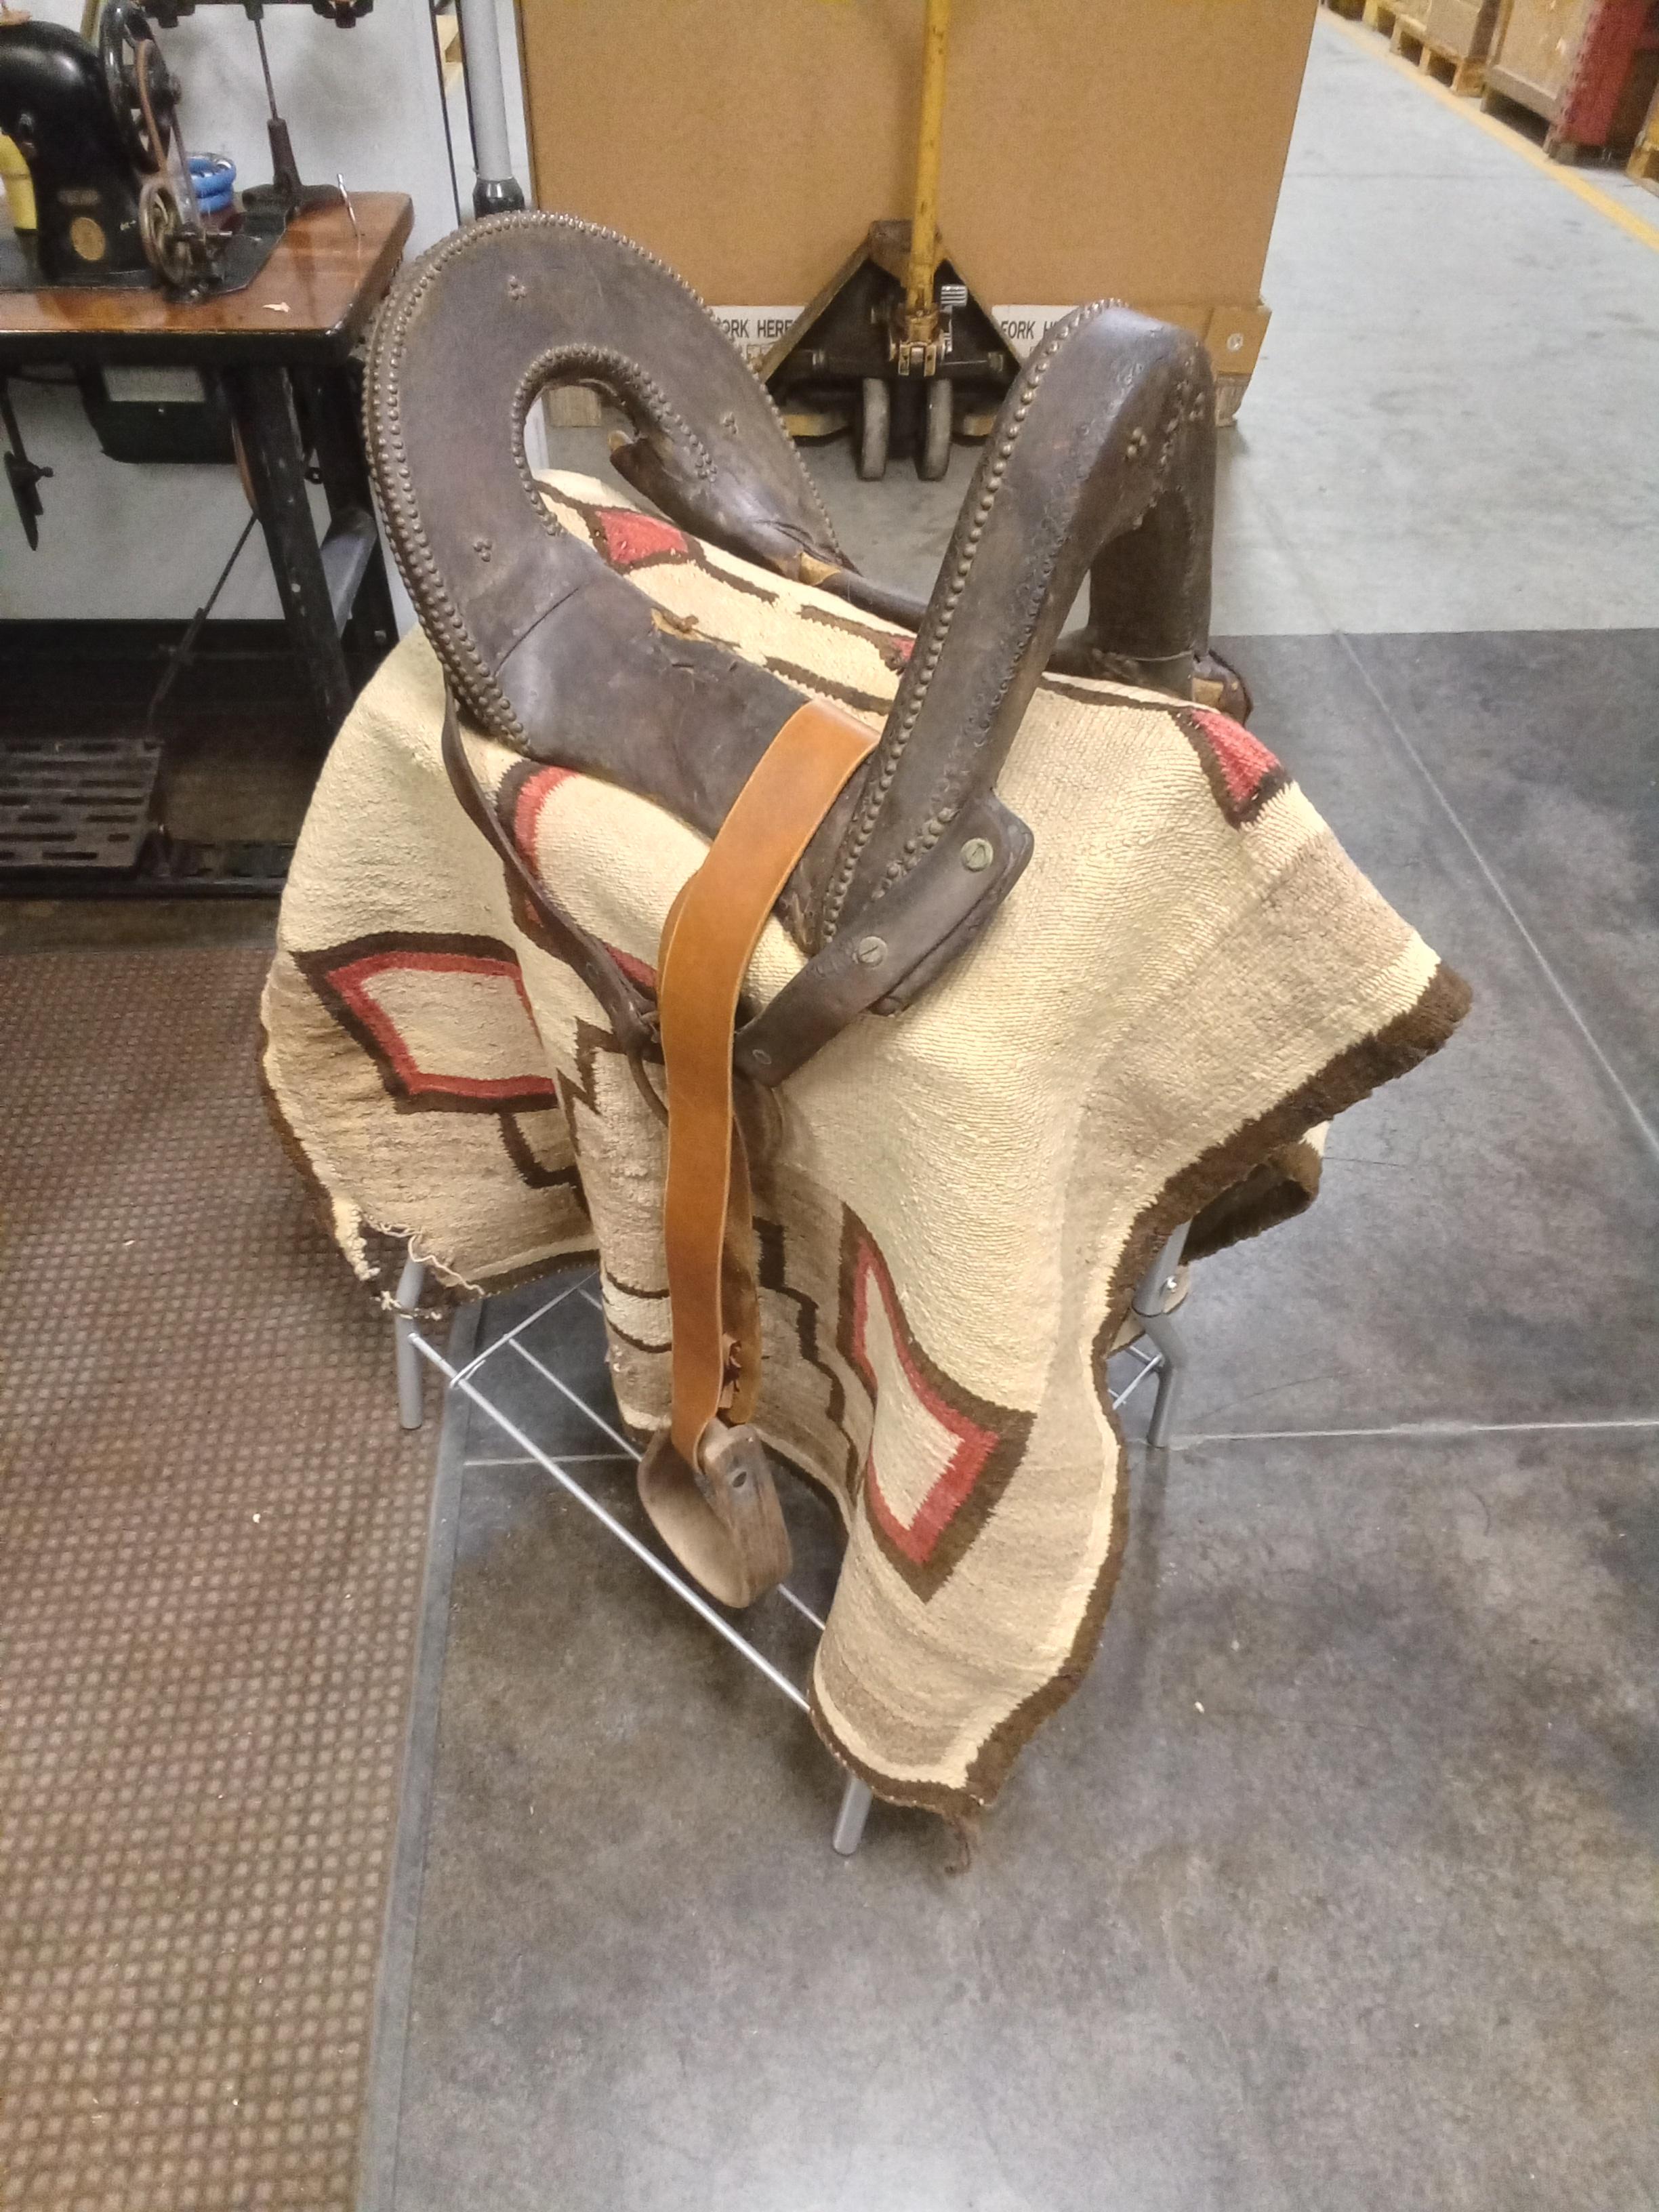
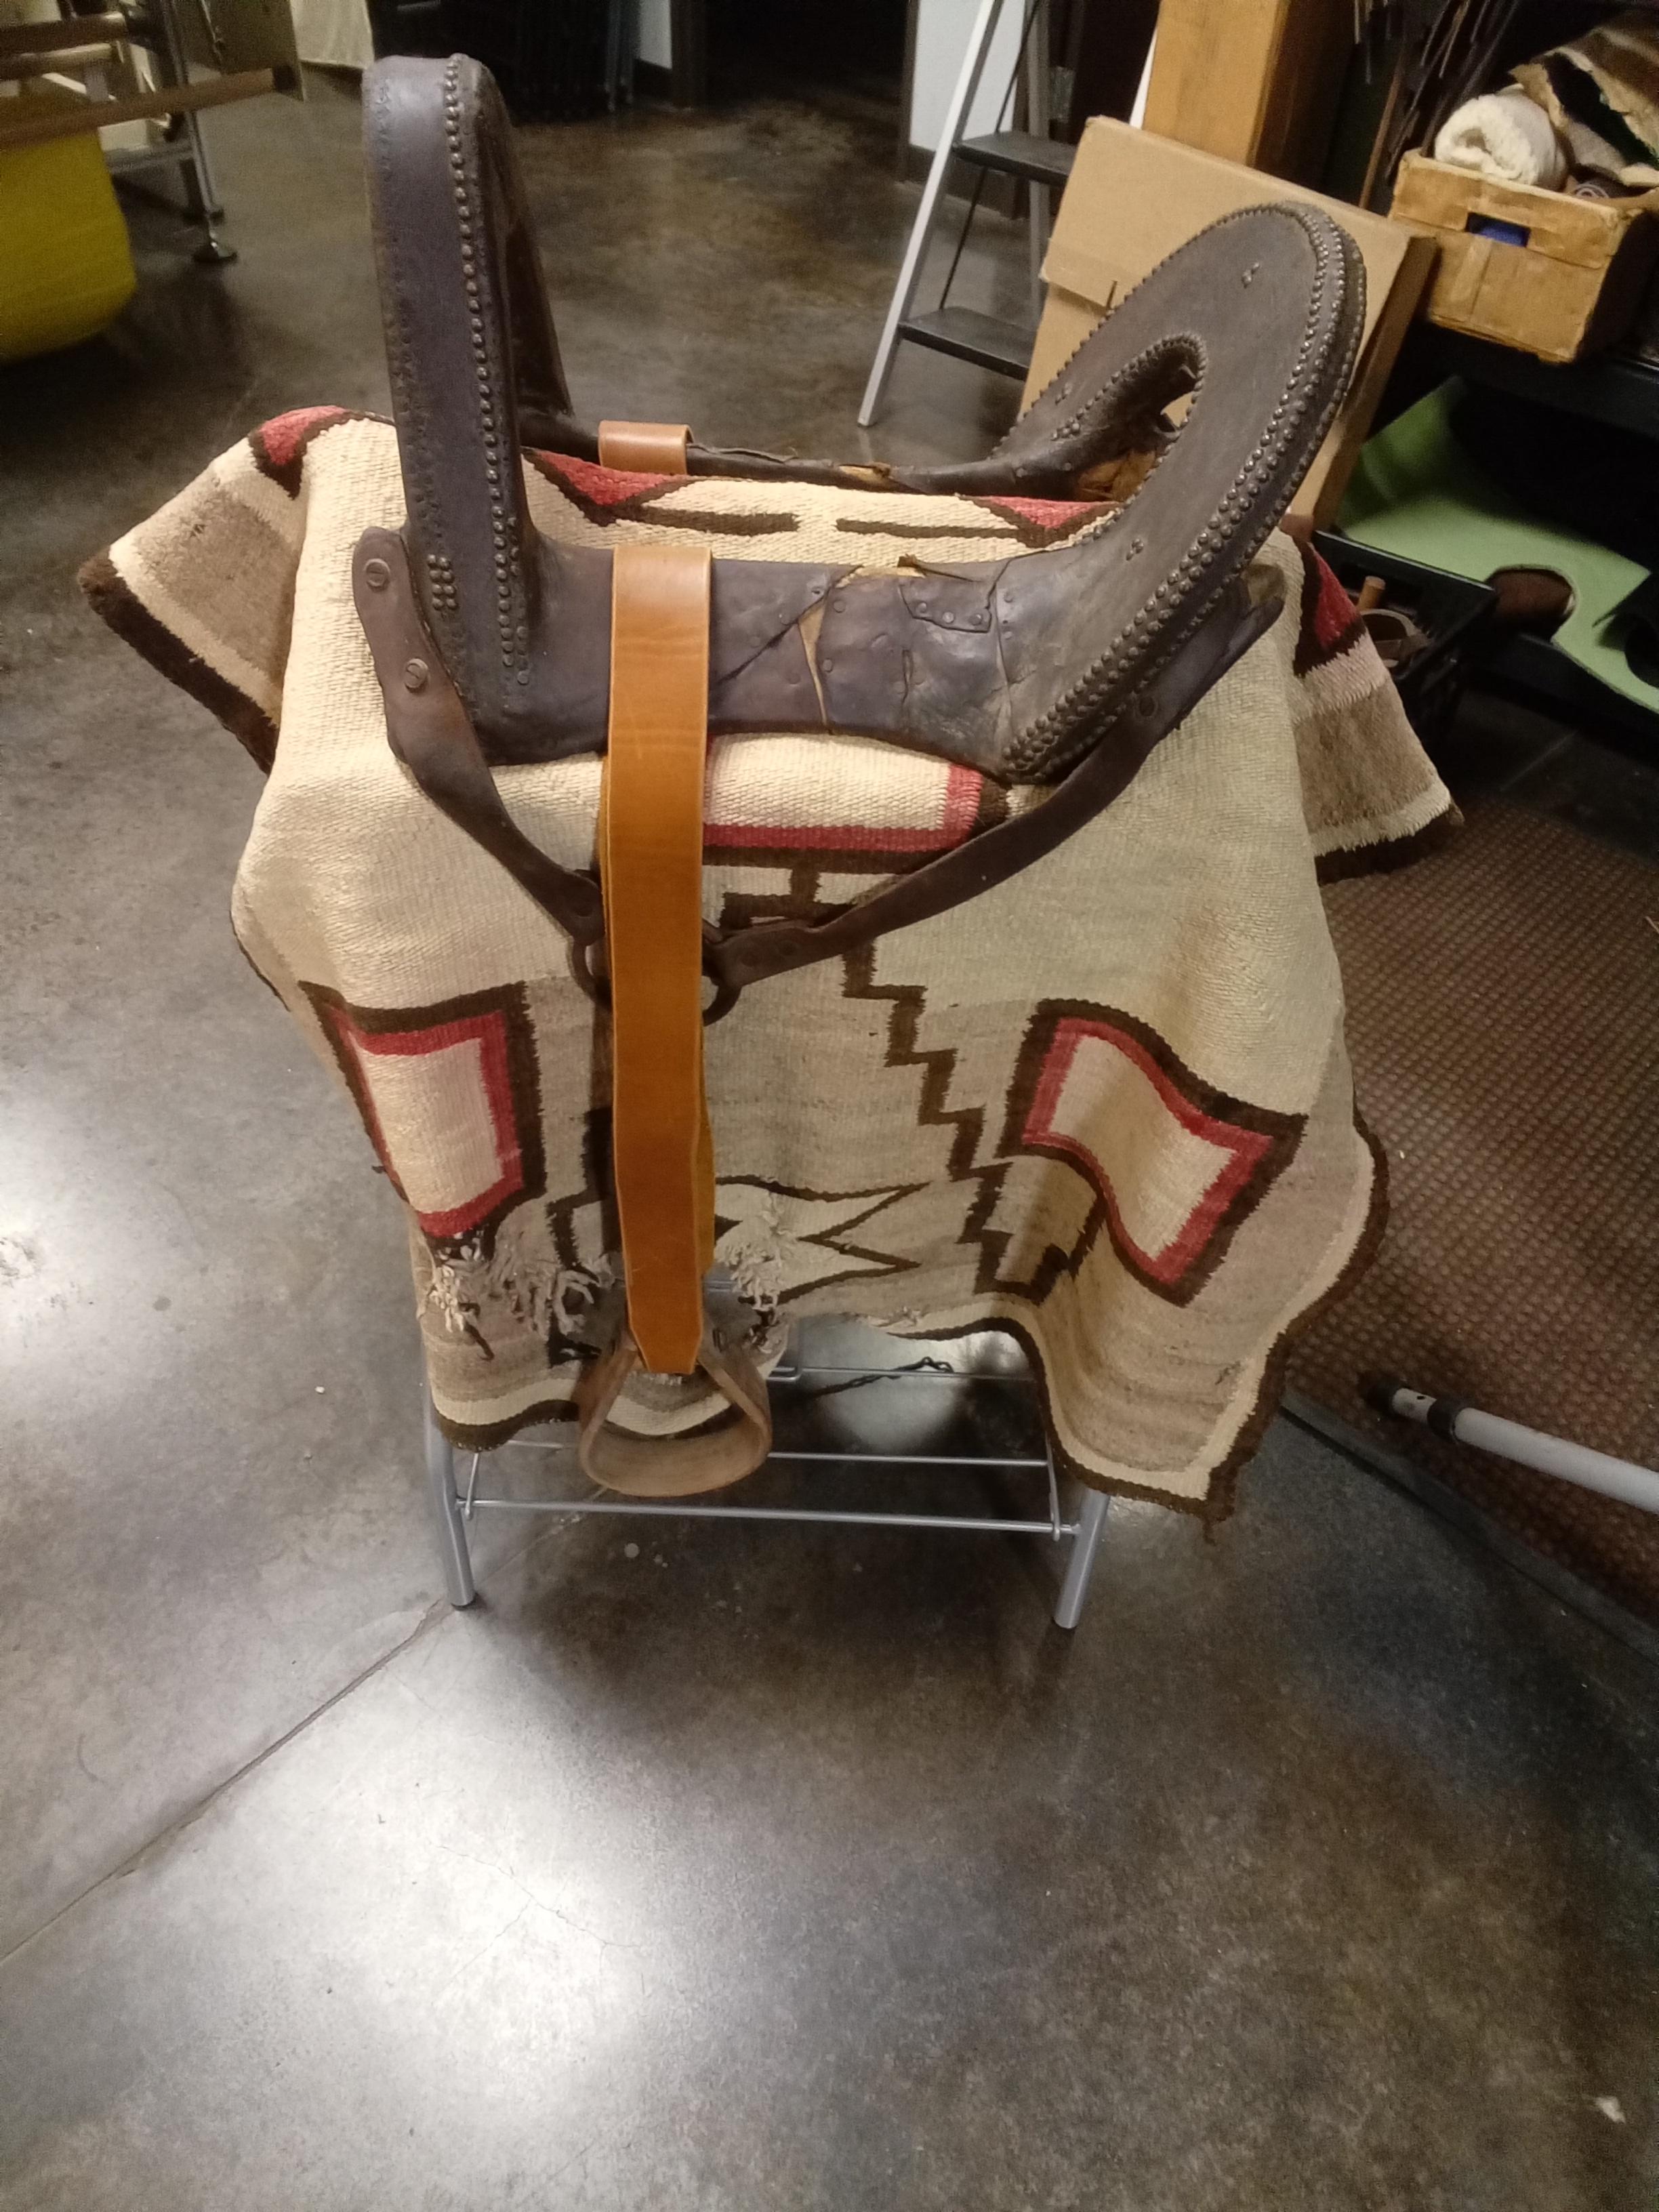
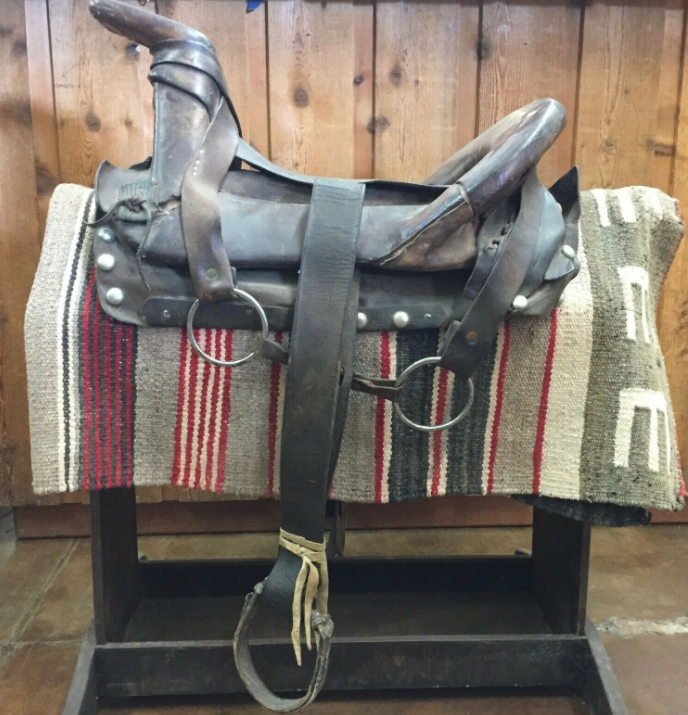
I got another saddle stand so the Navajo saddle is setup for display now. The stirrups are an antique set of wood oxbows that seemed fitting, and the stirrup leathers they are hanging from I cut and laced together to "fill the hole." I left the leather lighter color intentionally so its obvious they are not original, but might stain them to match at some point. I don't want it to look like a forgery though. At some point I plan to make a set of simple skirts as well, unless I can find some used ones to recycle from a western saddle that fit the saddle and look right with it. My goal is to complete the setup as much as I can for display, but to preserve the original saddle as it is. The Navajo blanket I a bit tattered on the ends, so I'm going to add some padding under it. My Dad used to hand sew canvas behind some of these rugs if they were coming apart, and I think this one is a good candidate for that.
-
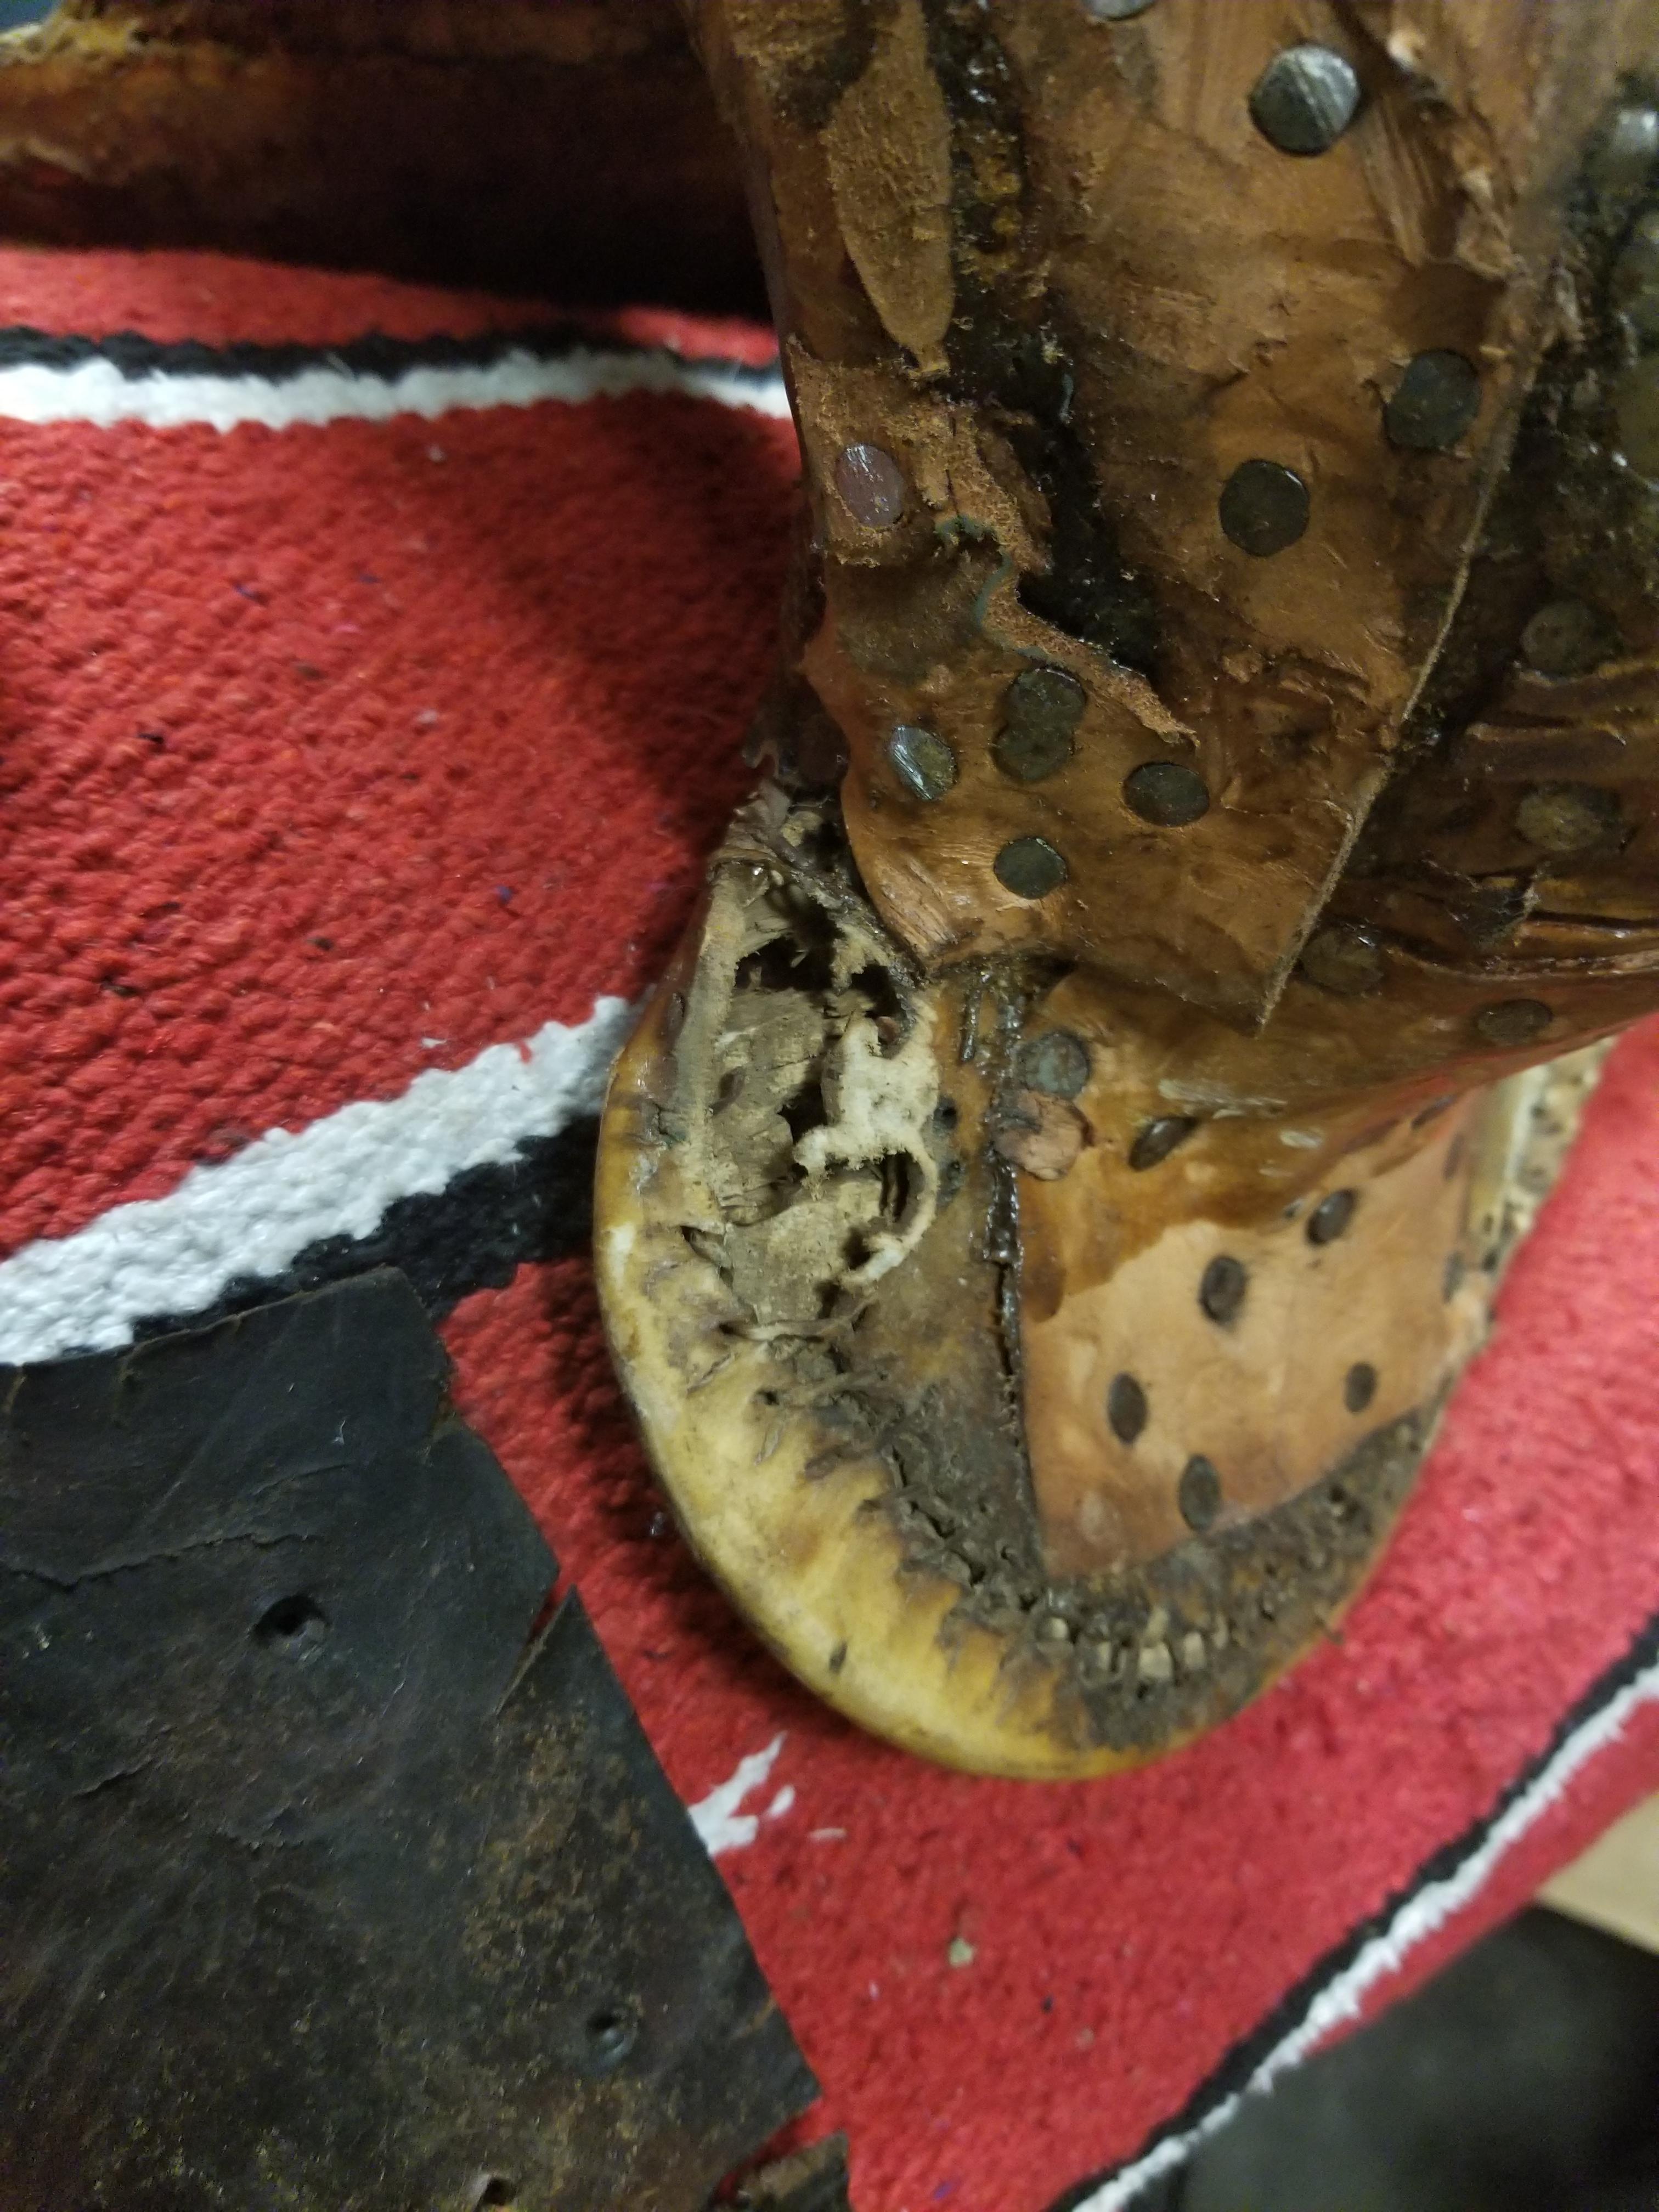
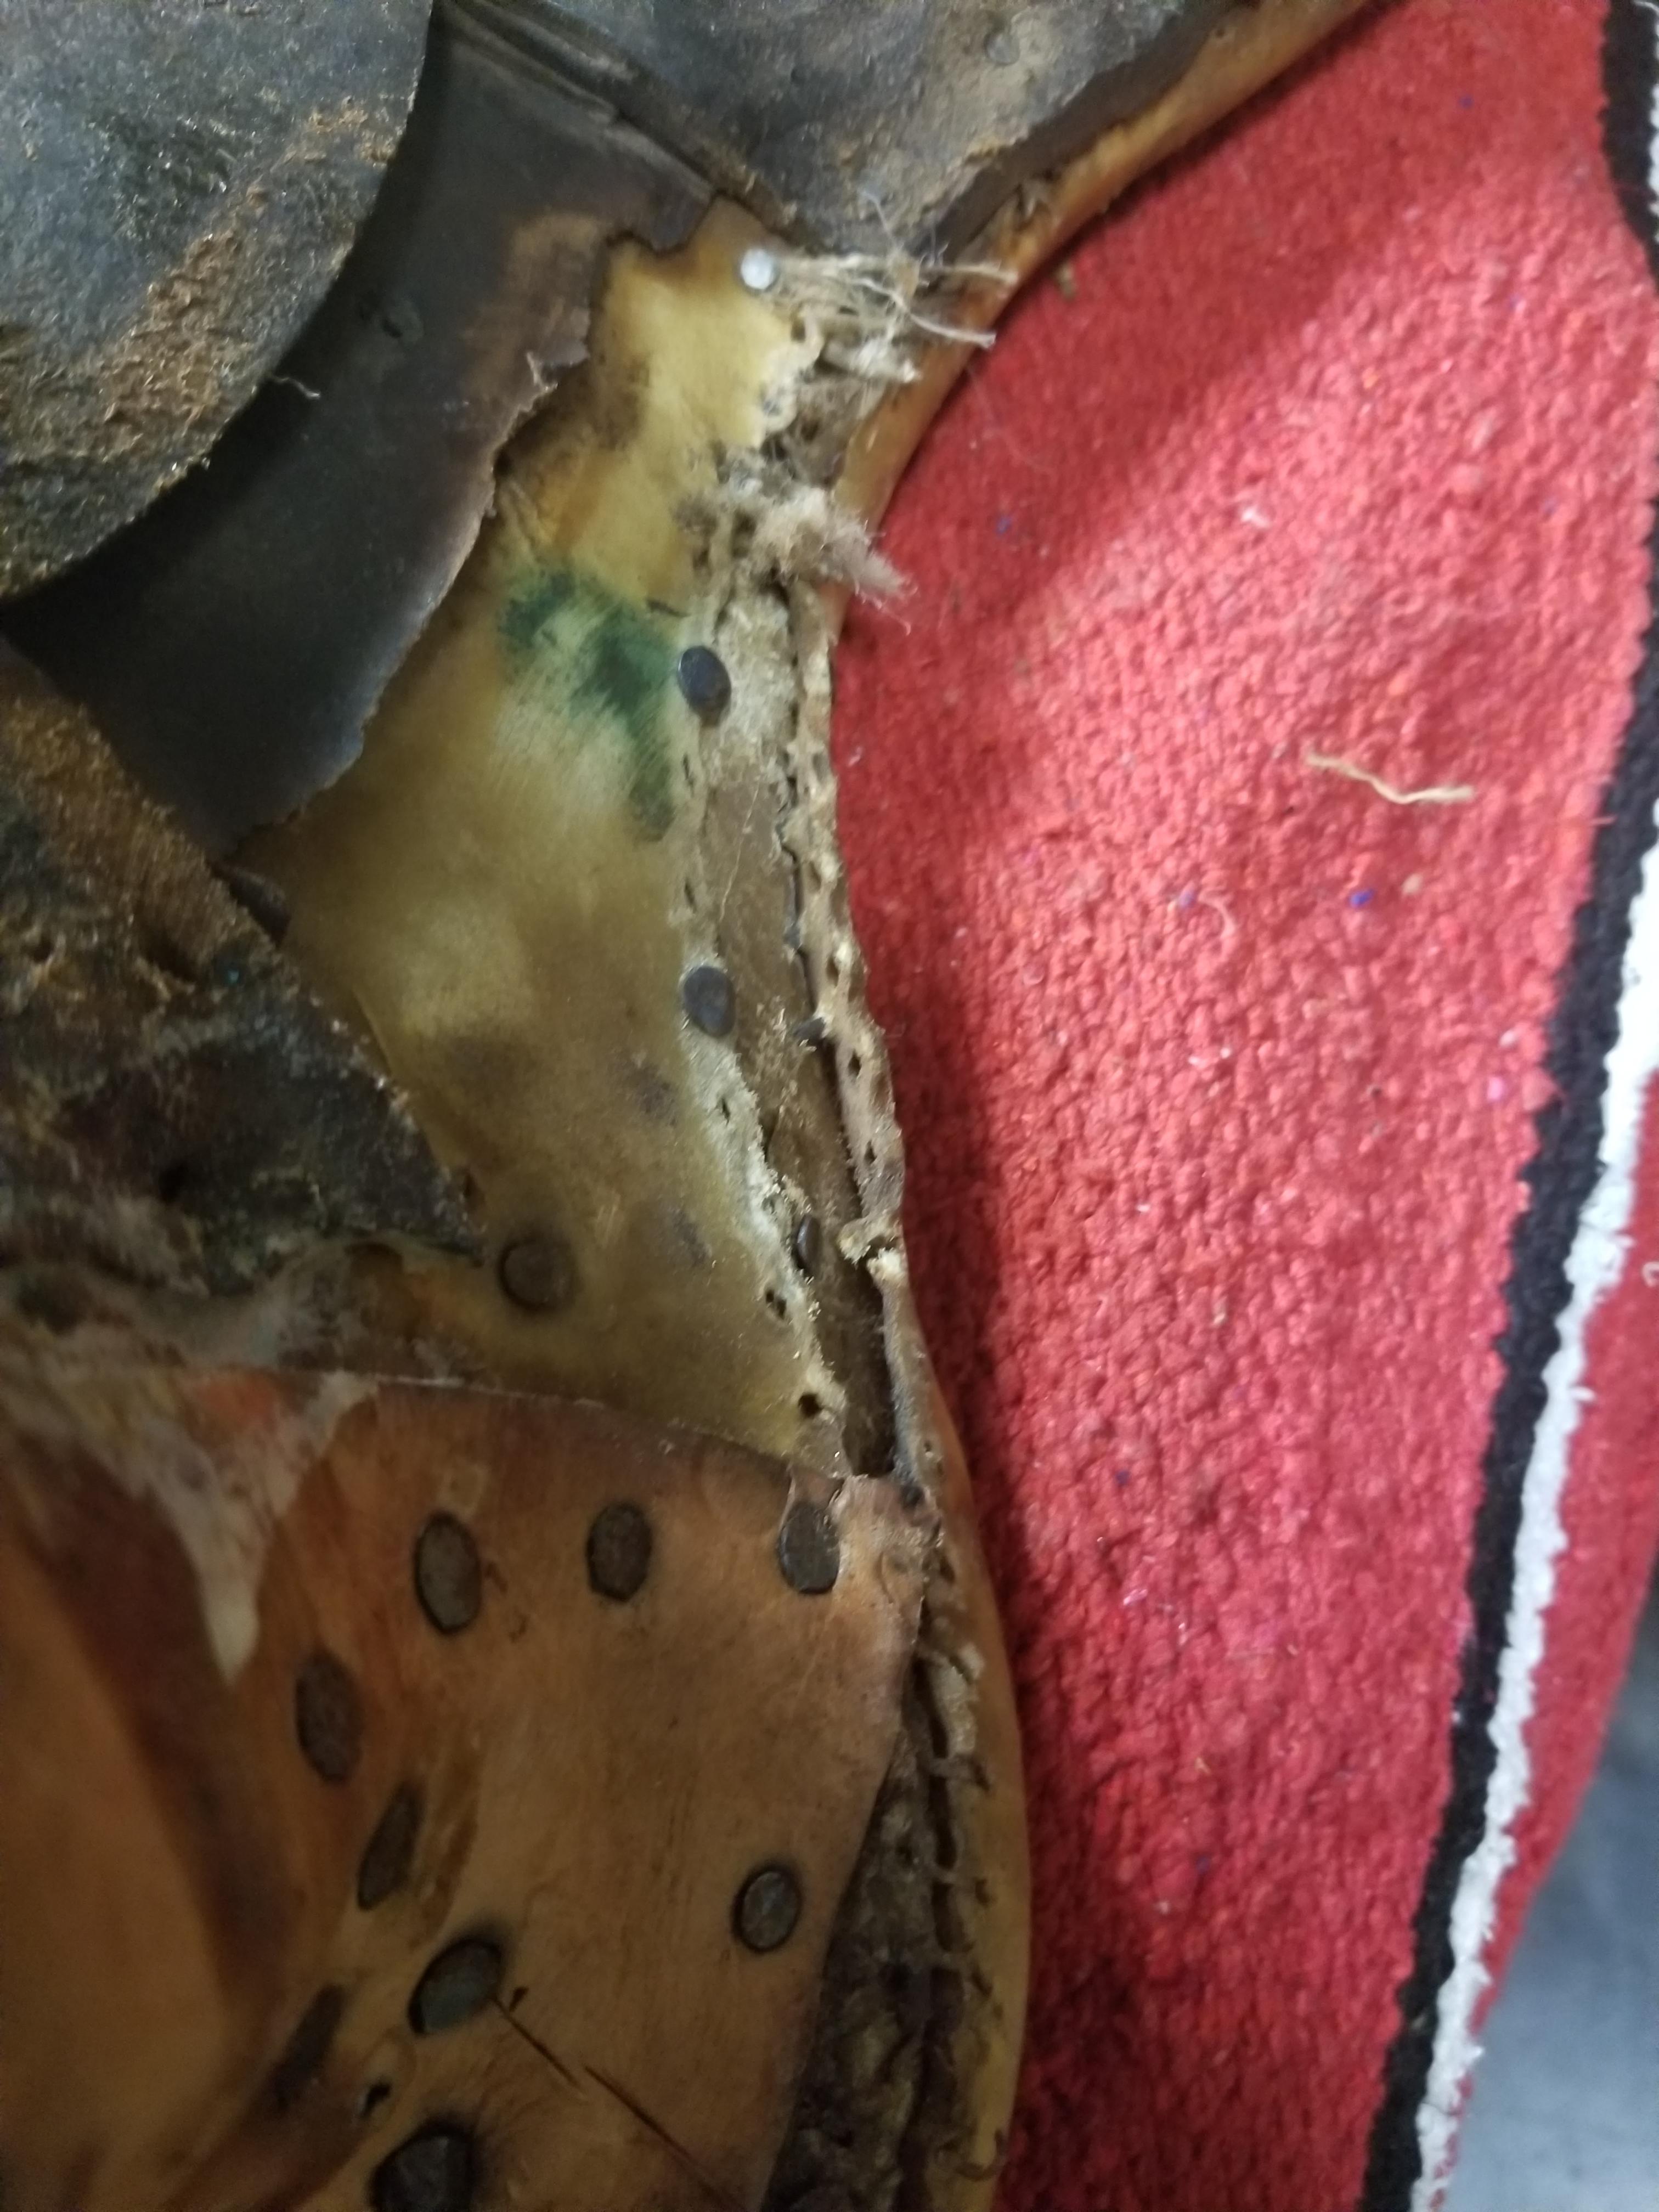
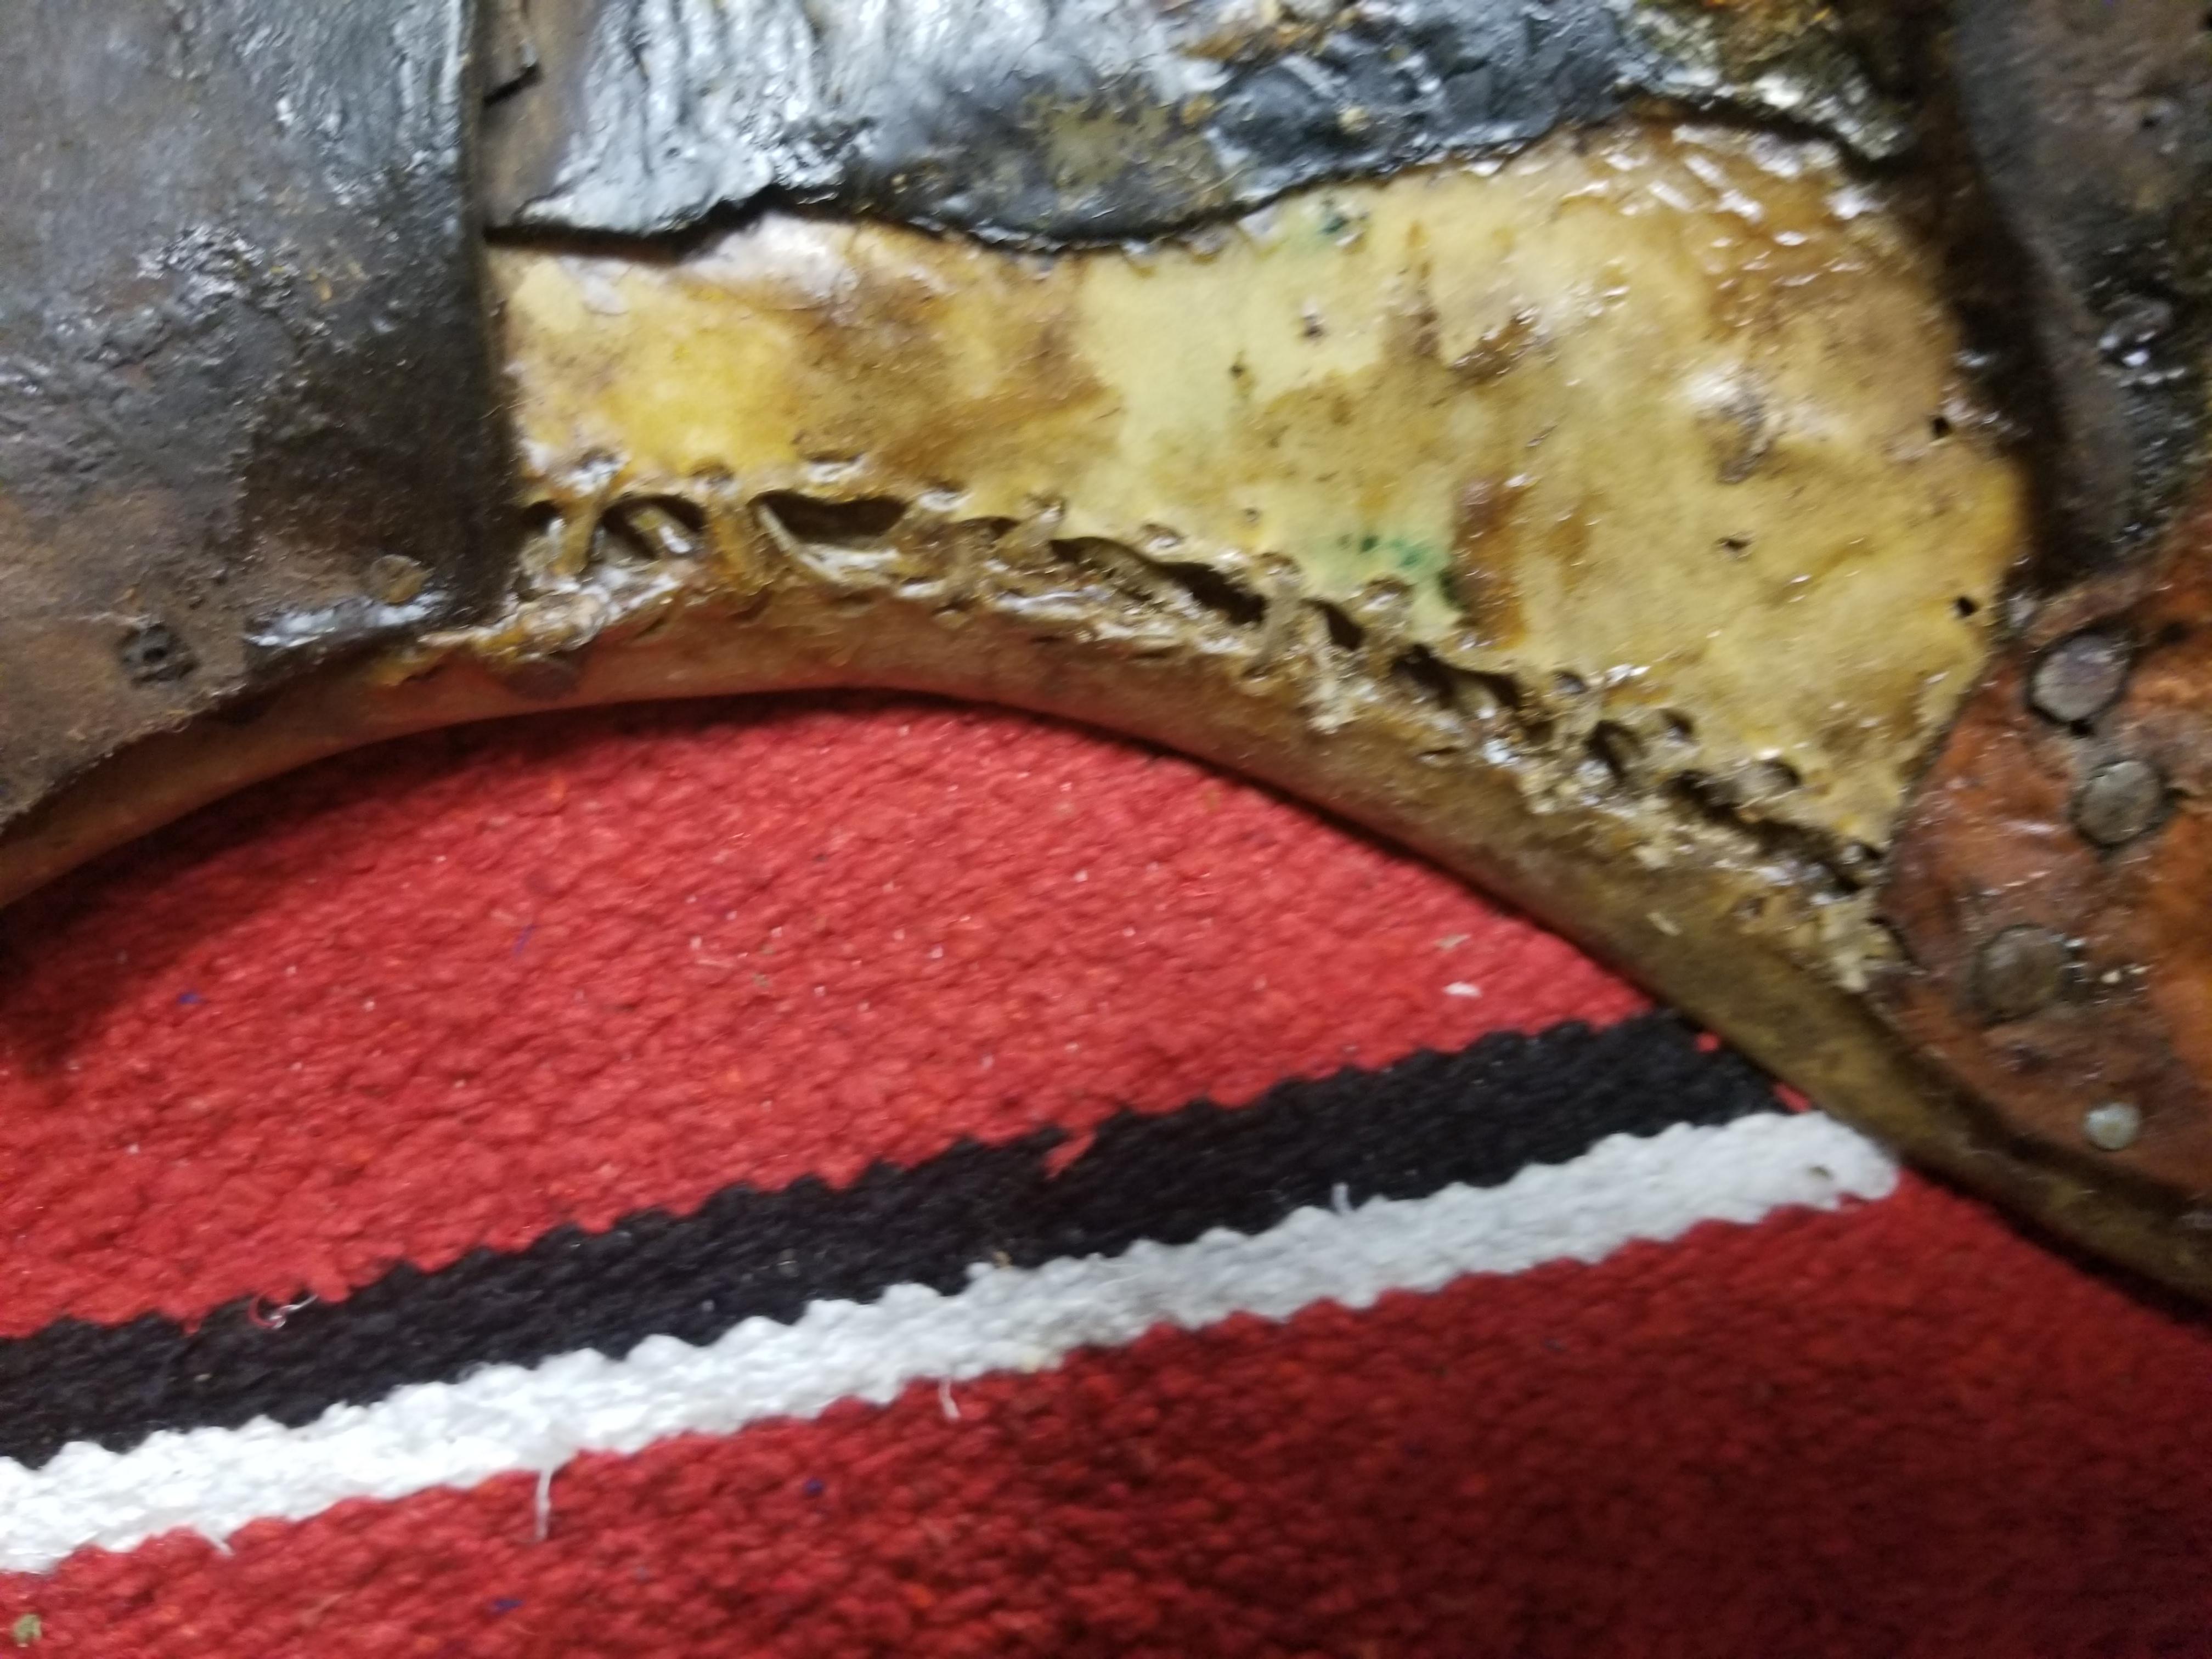
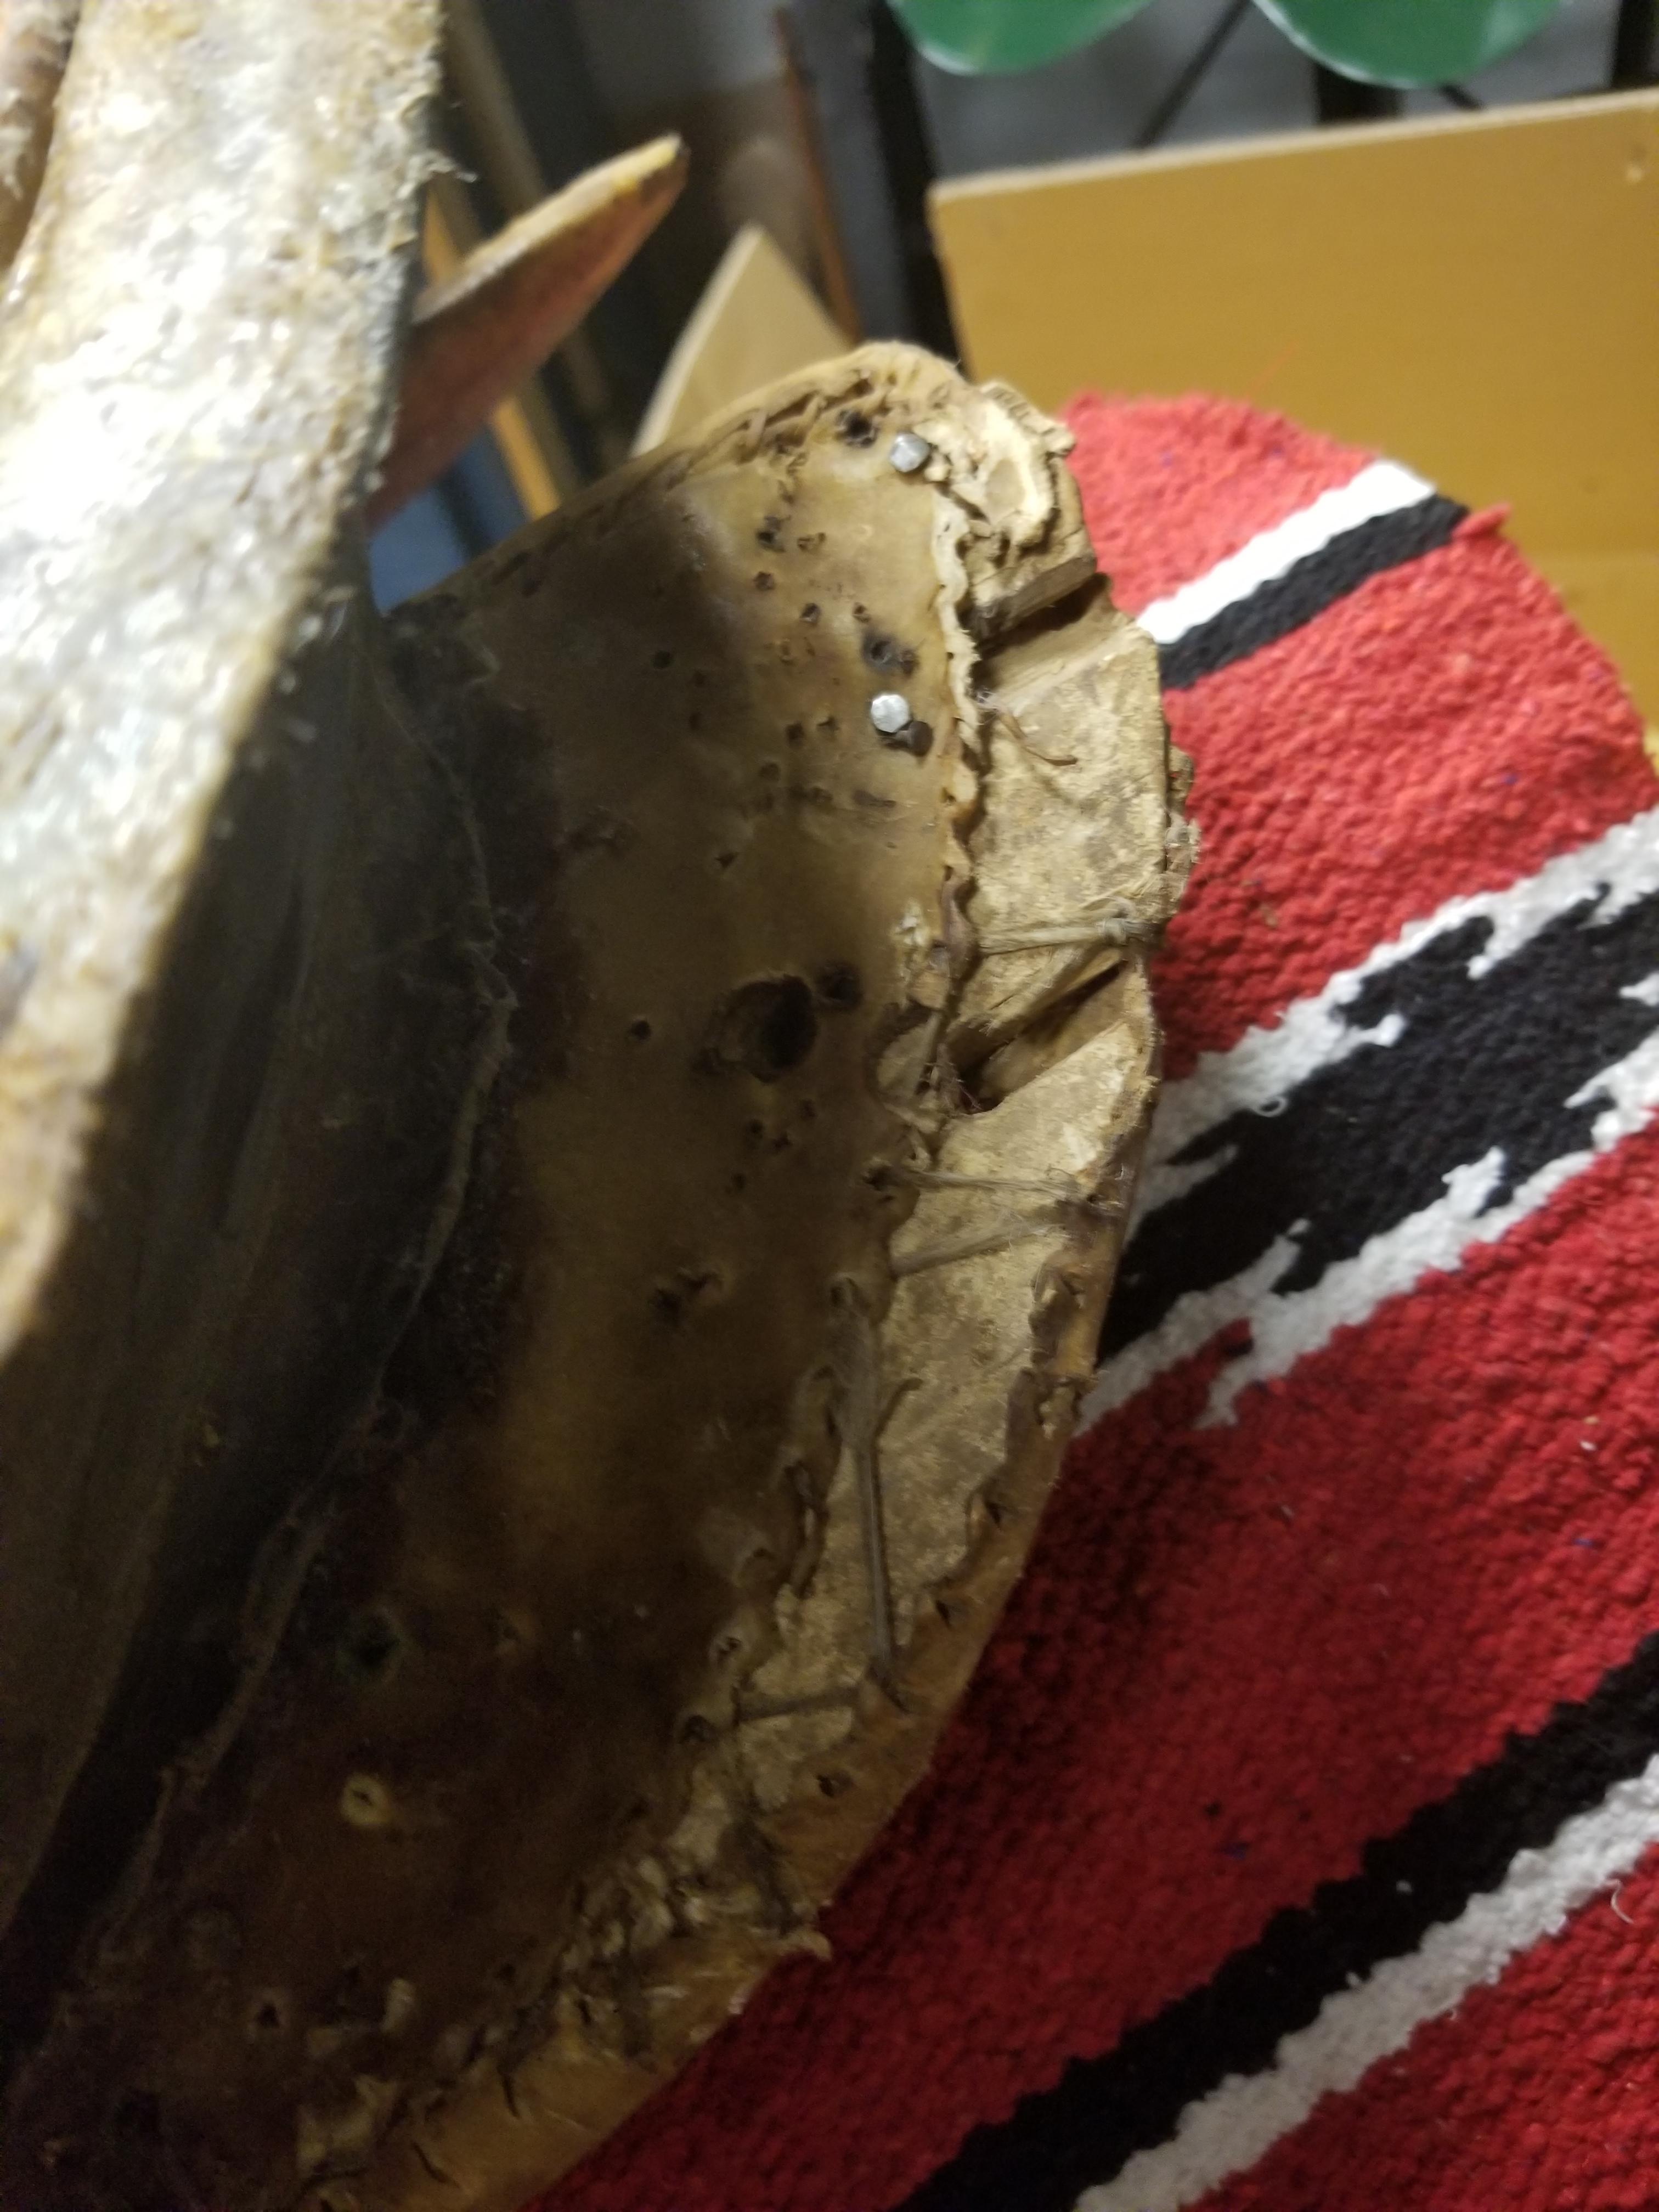
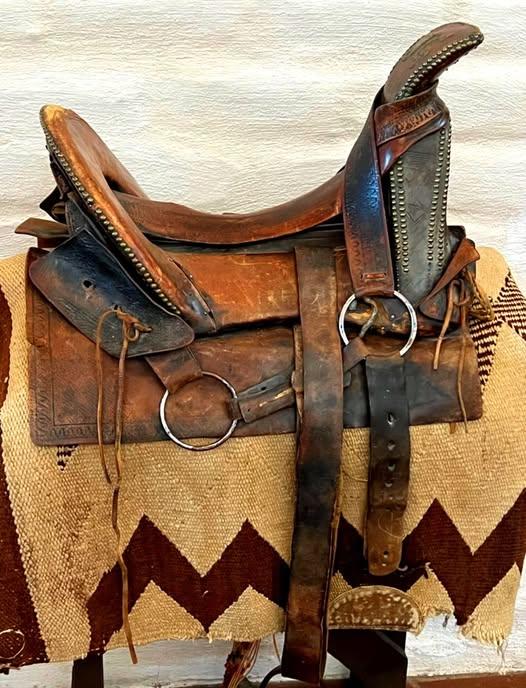
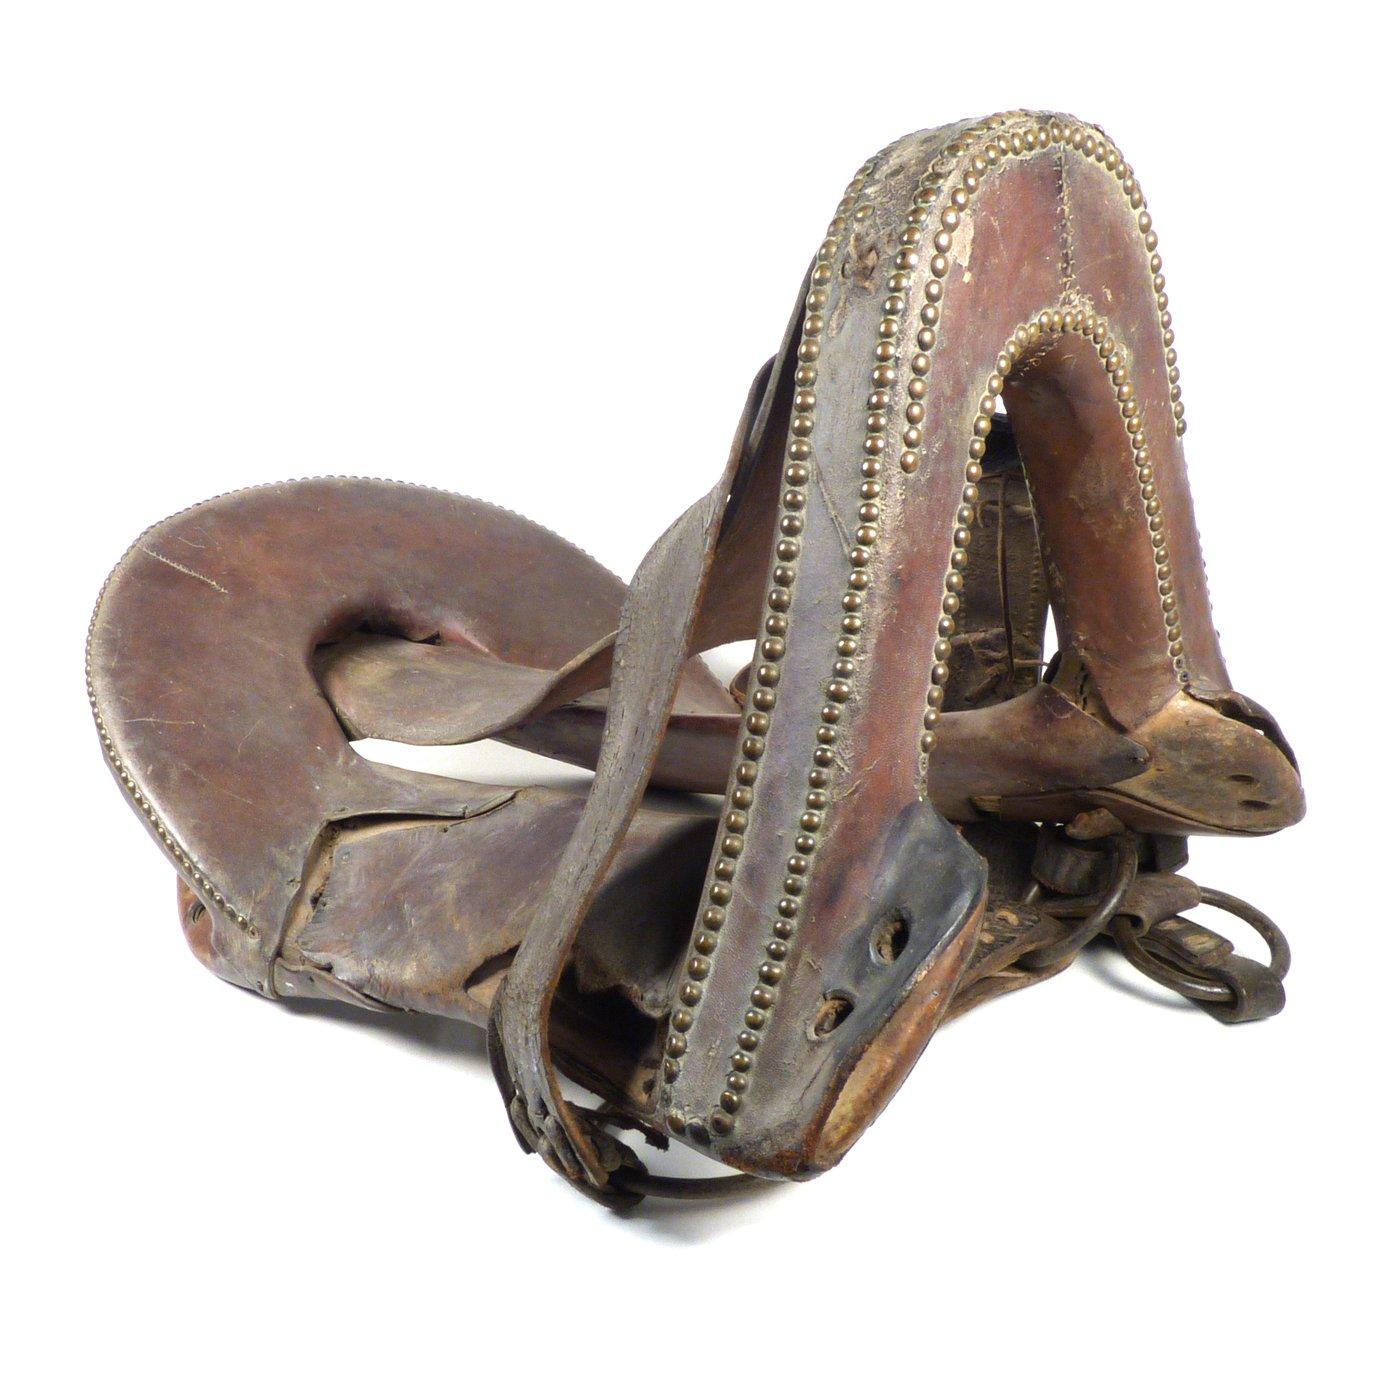
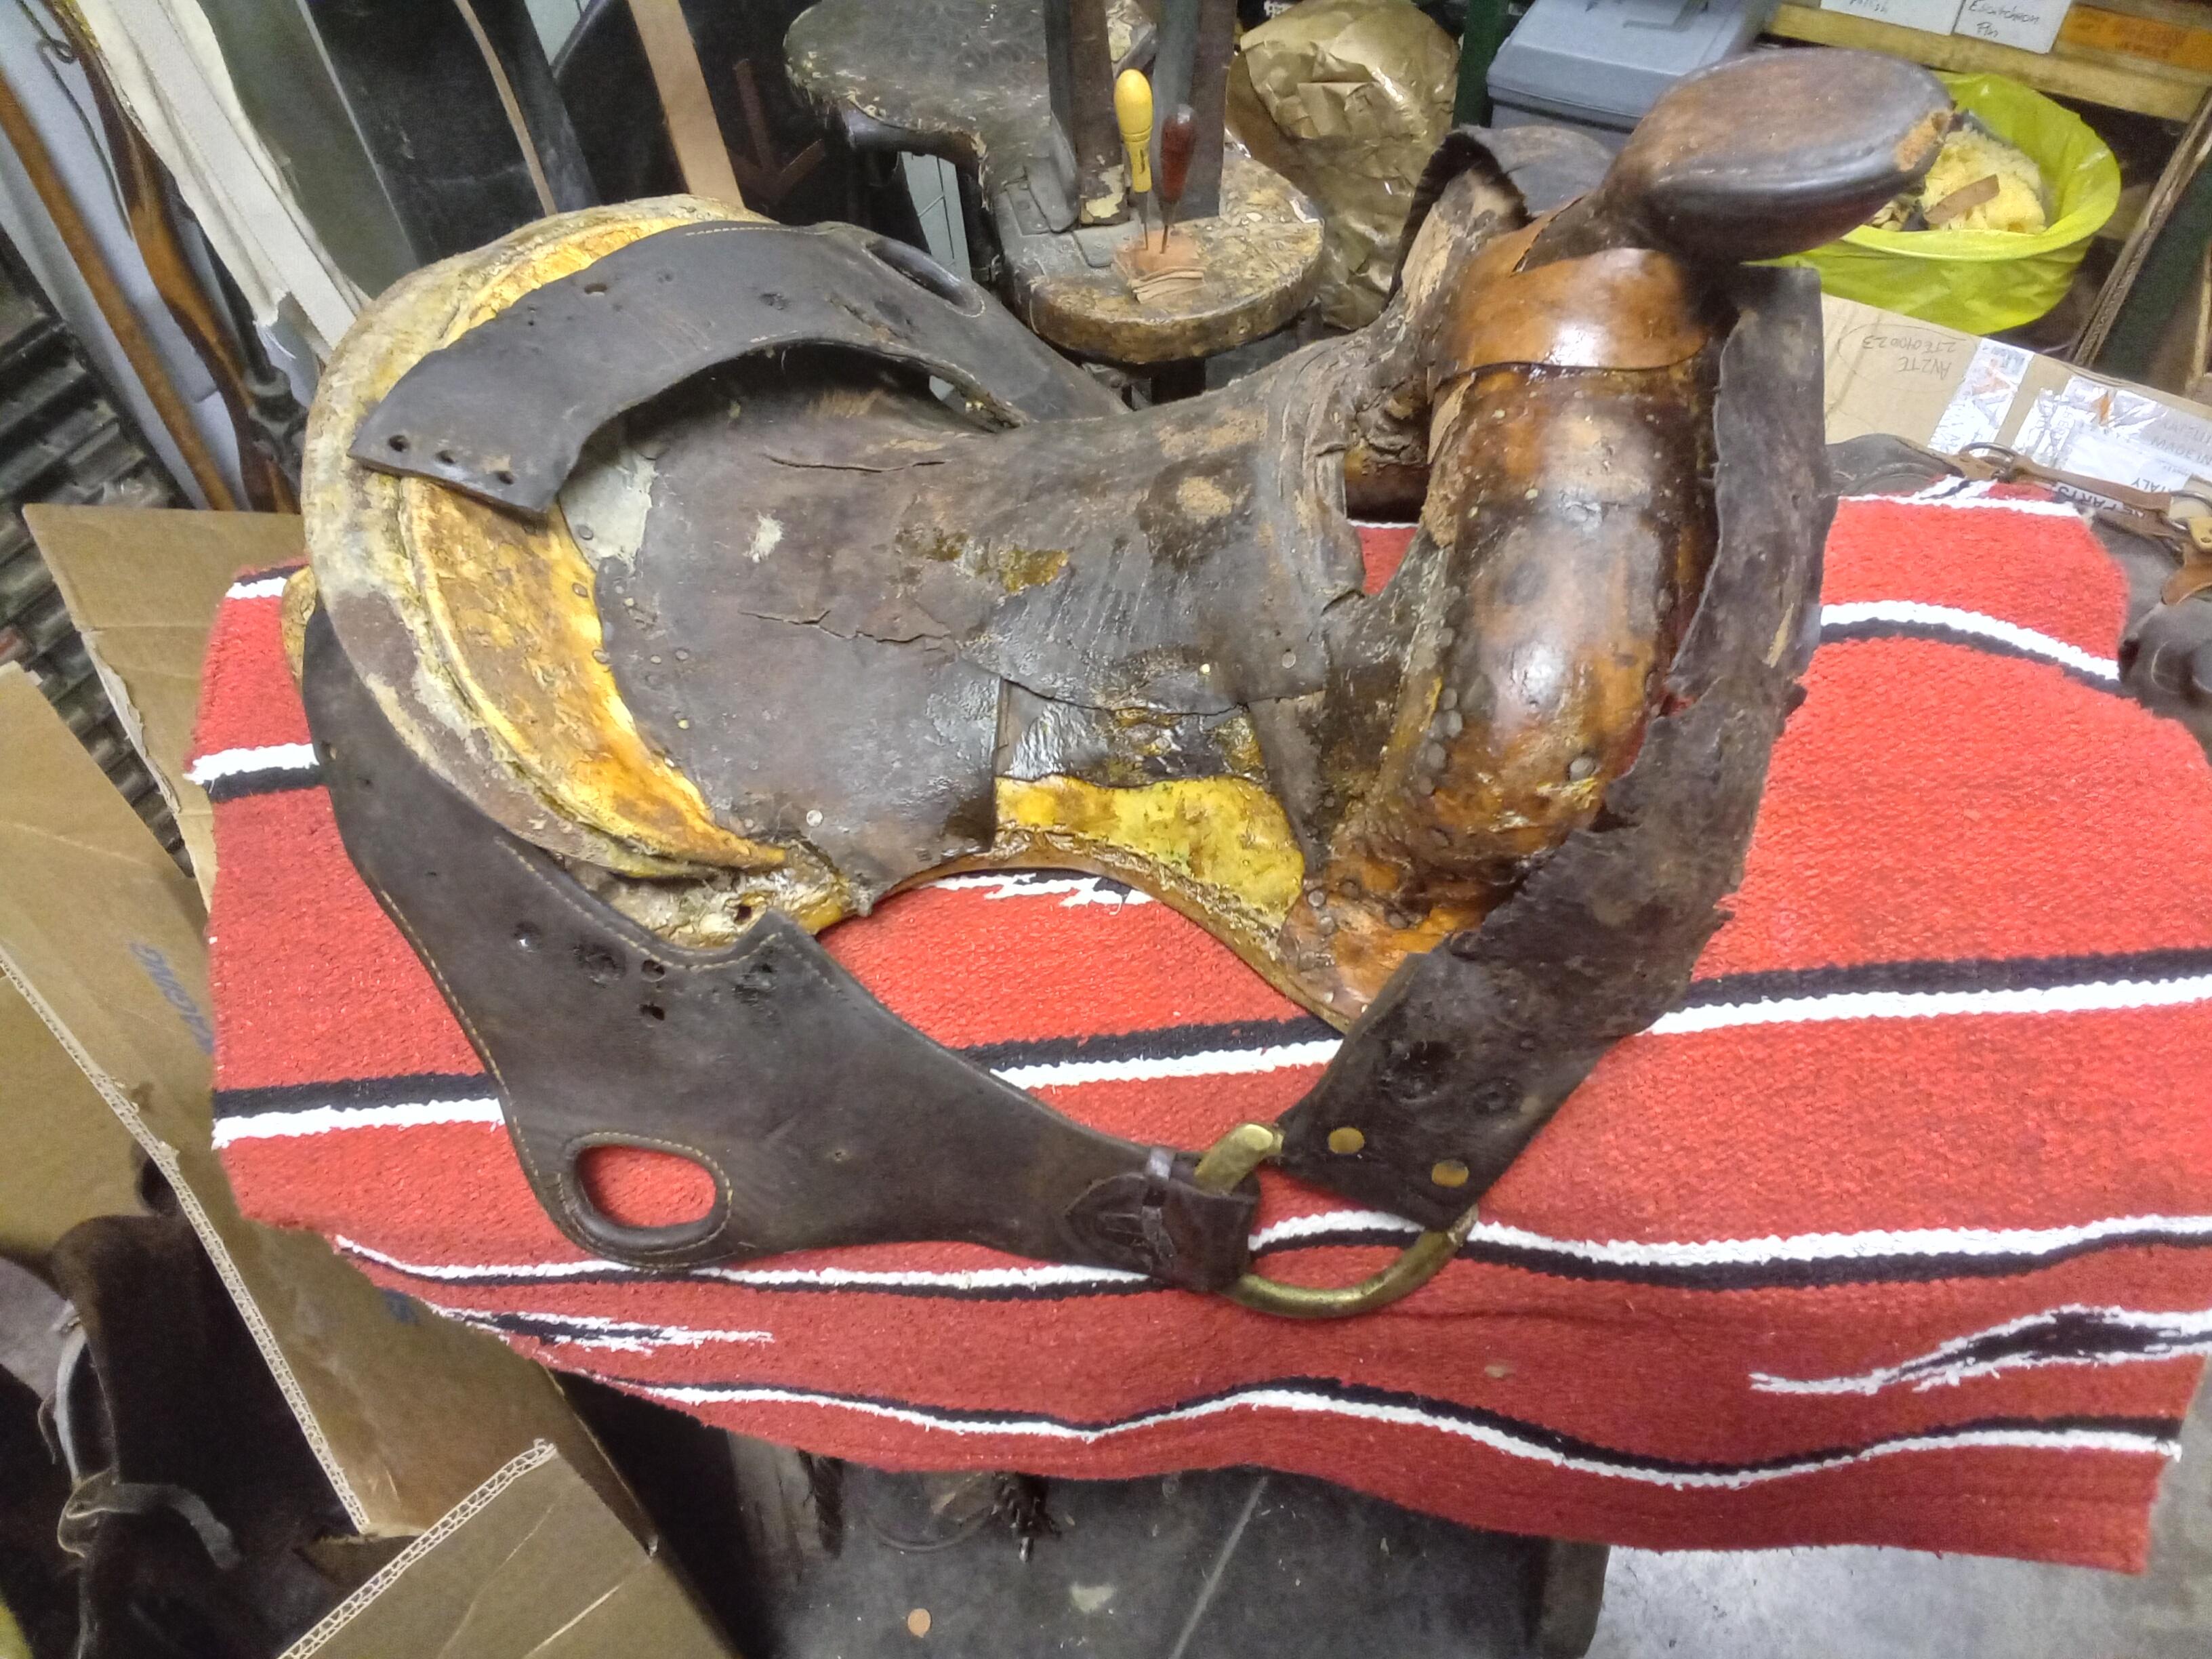
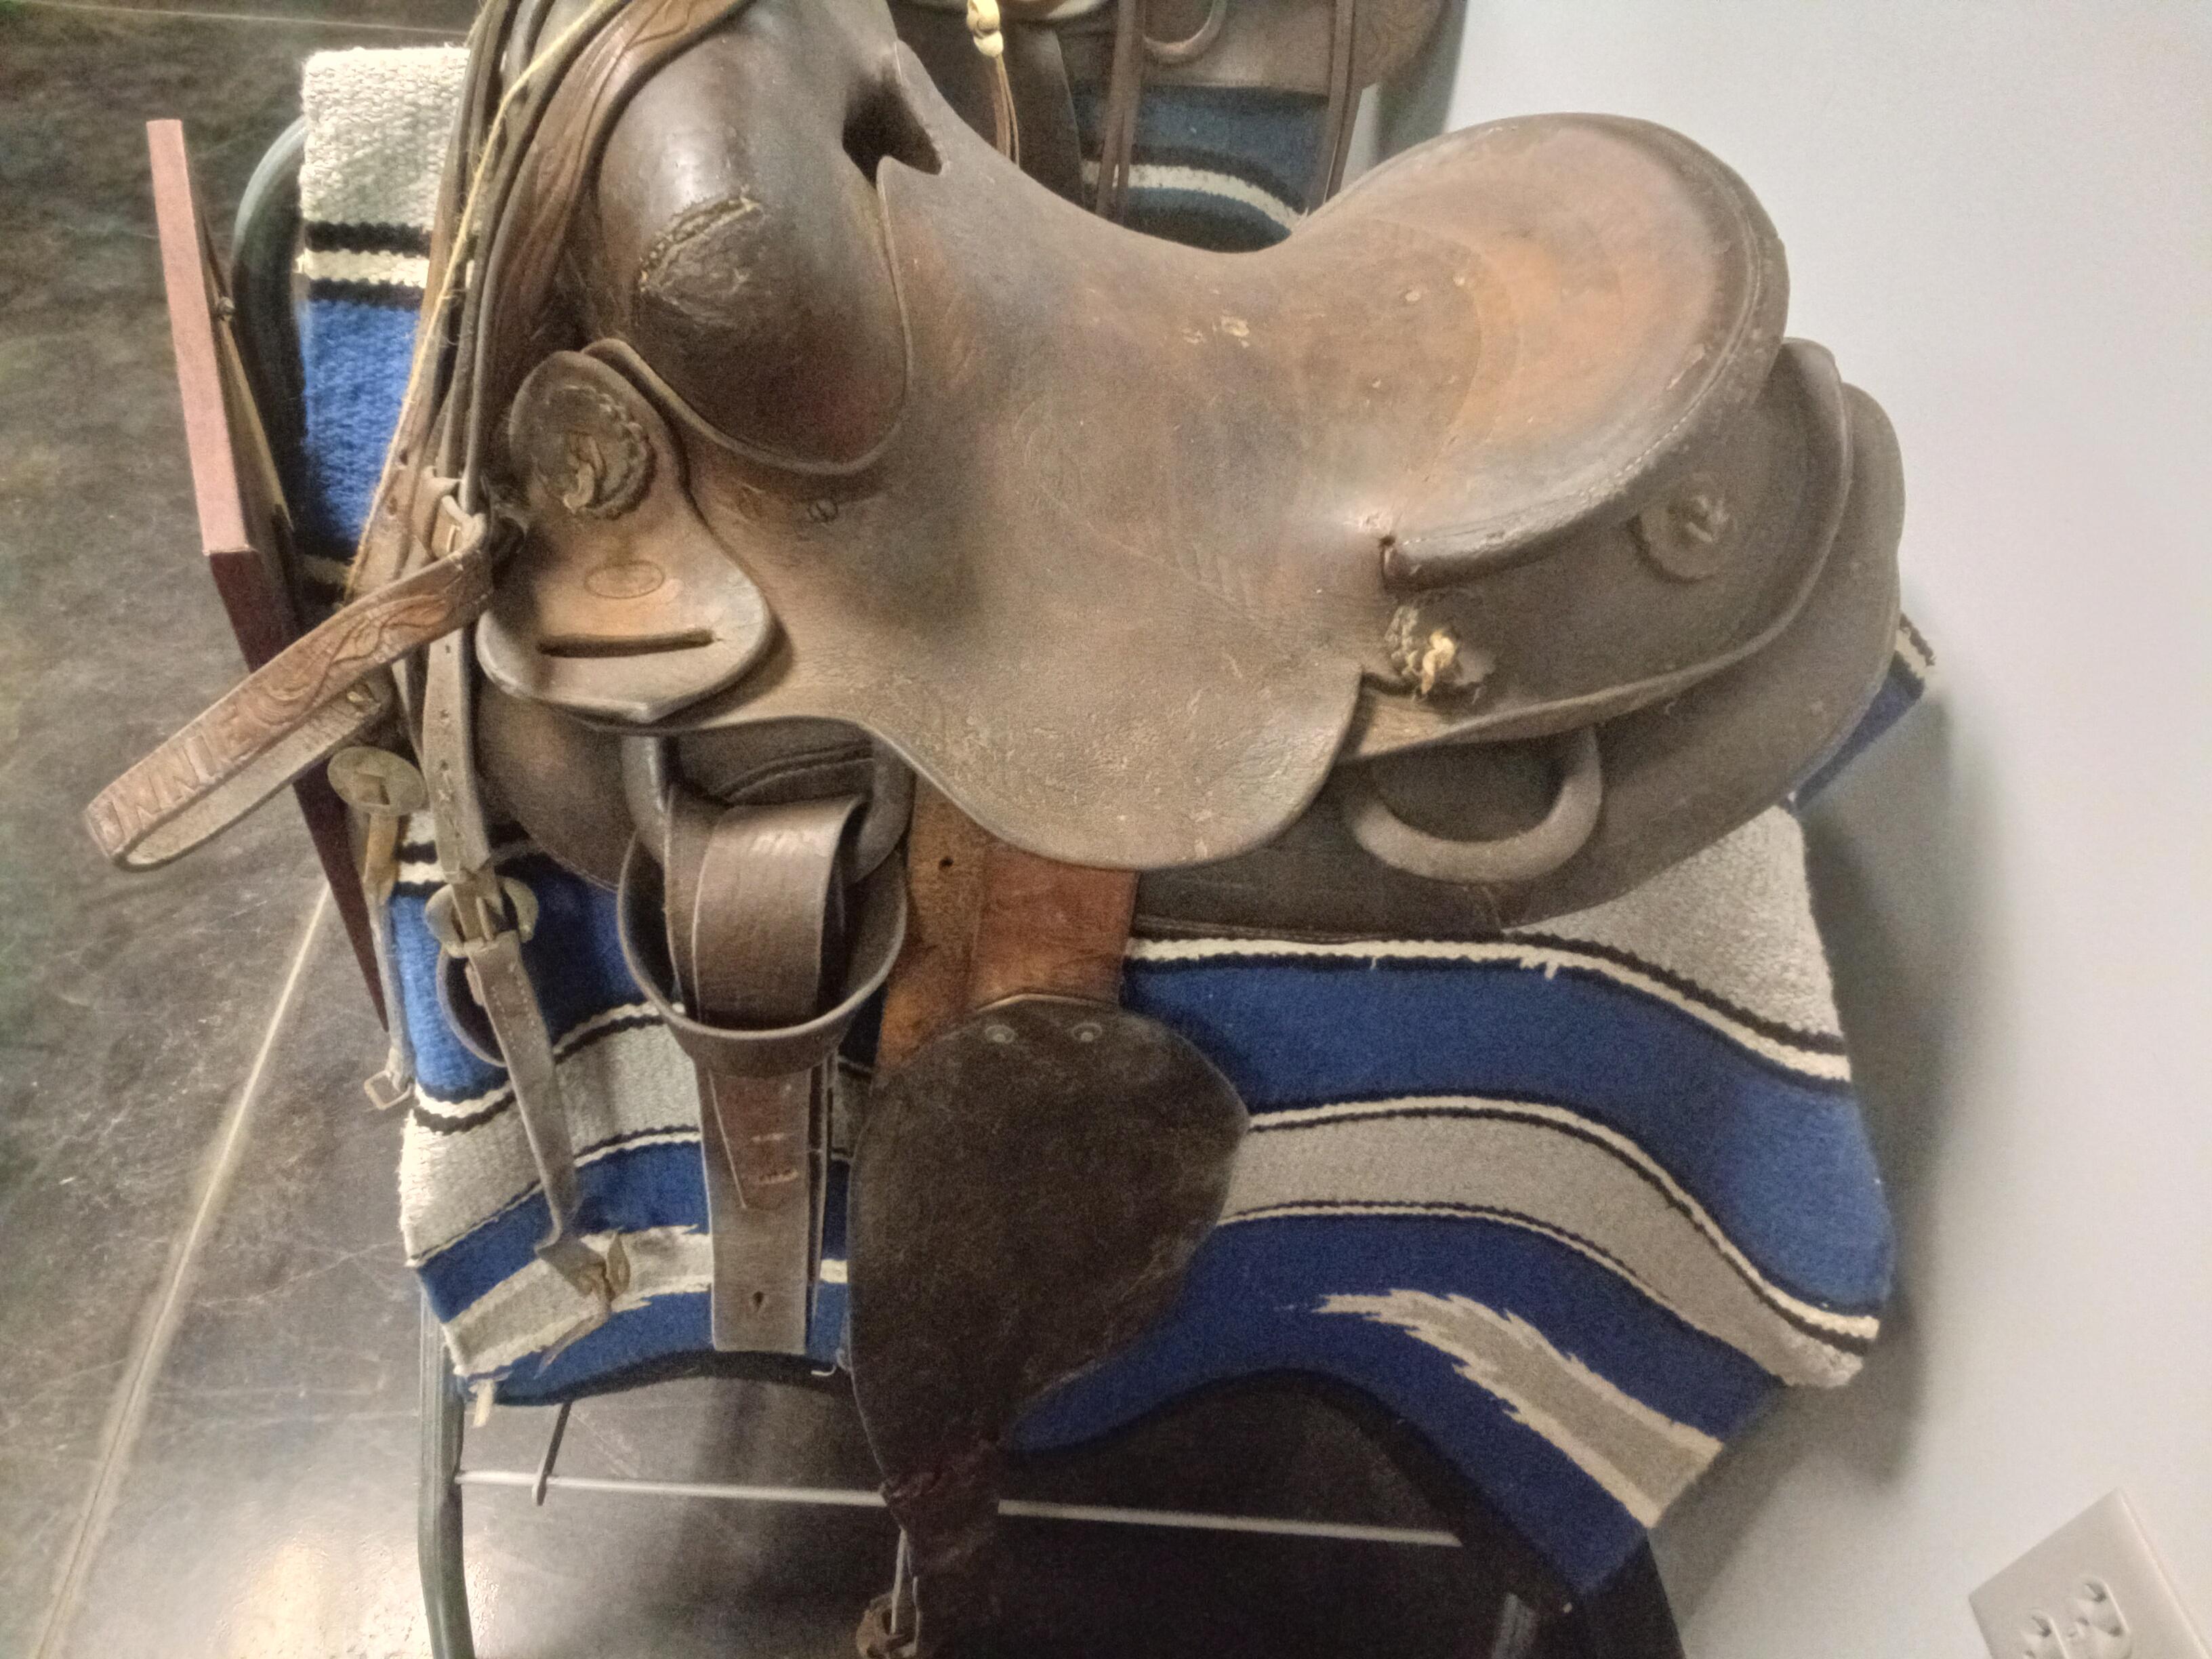
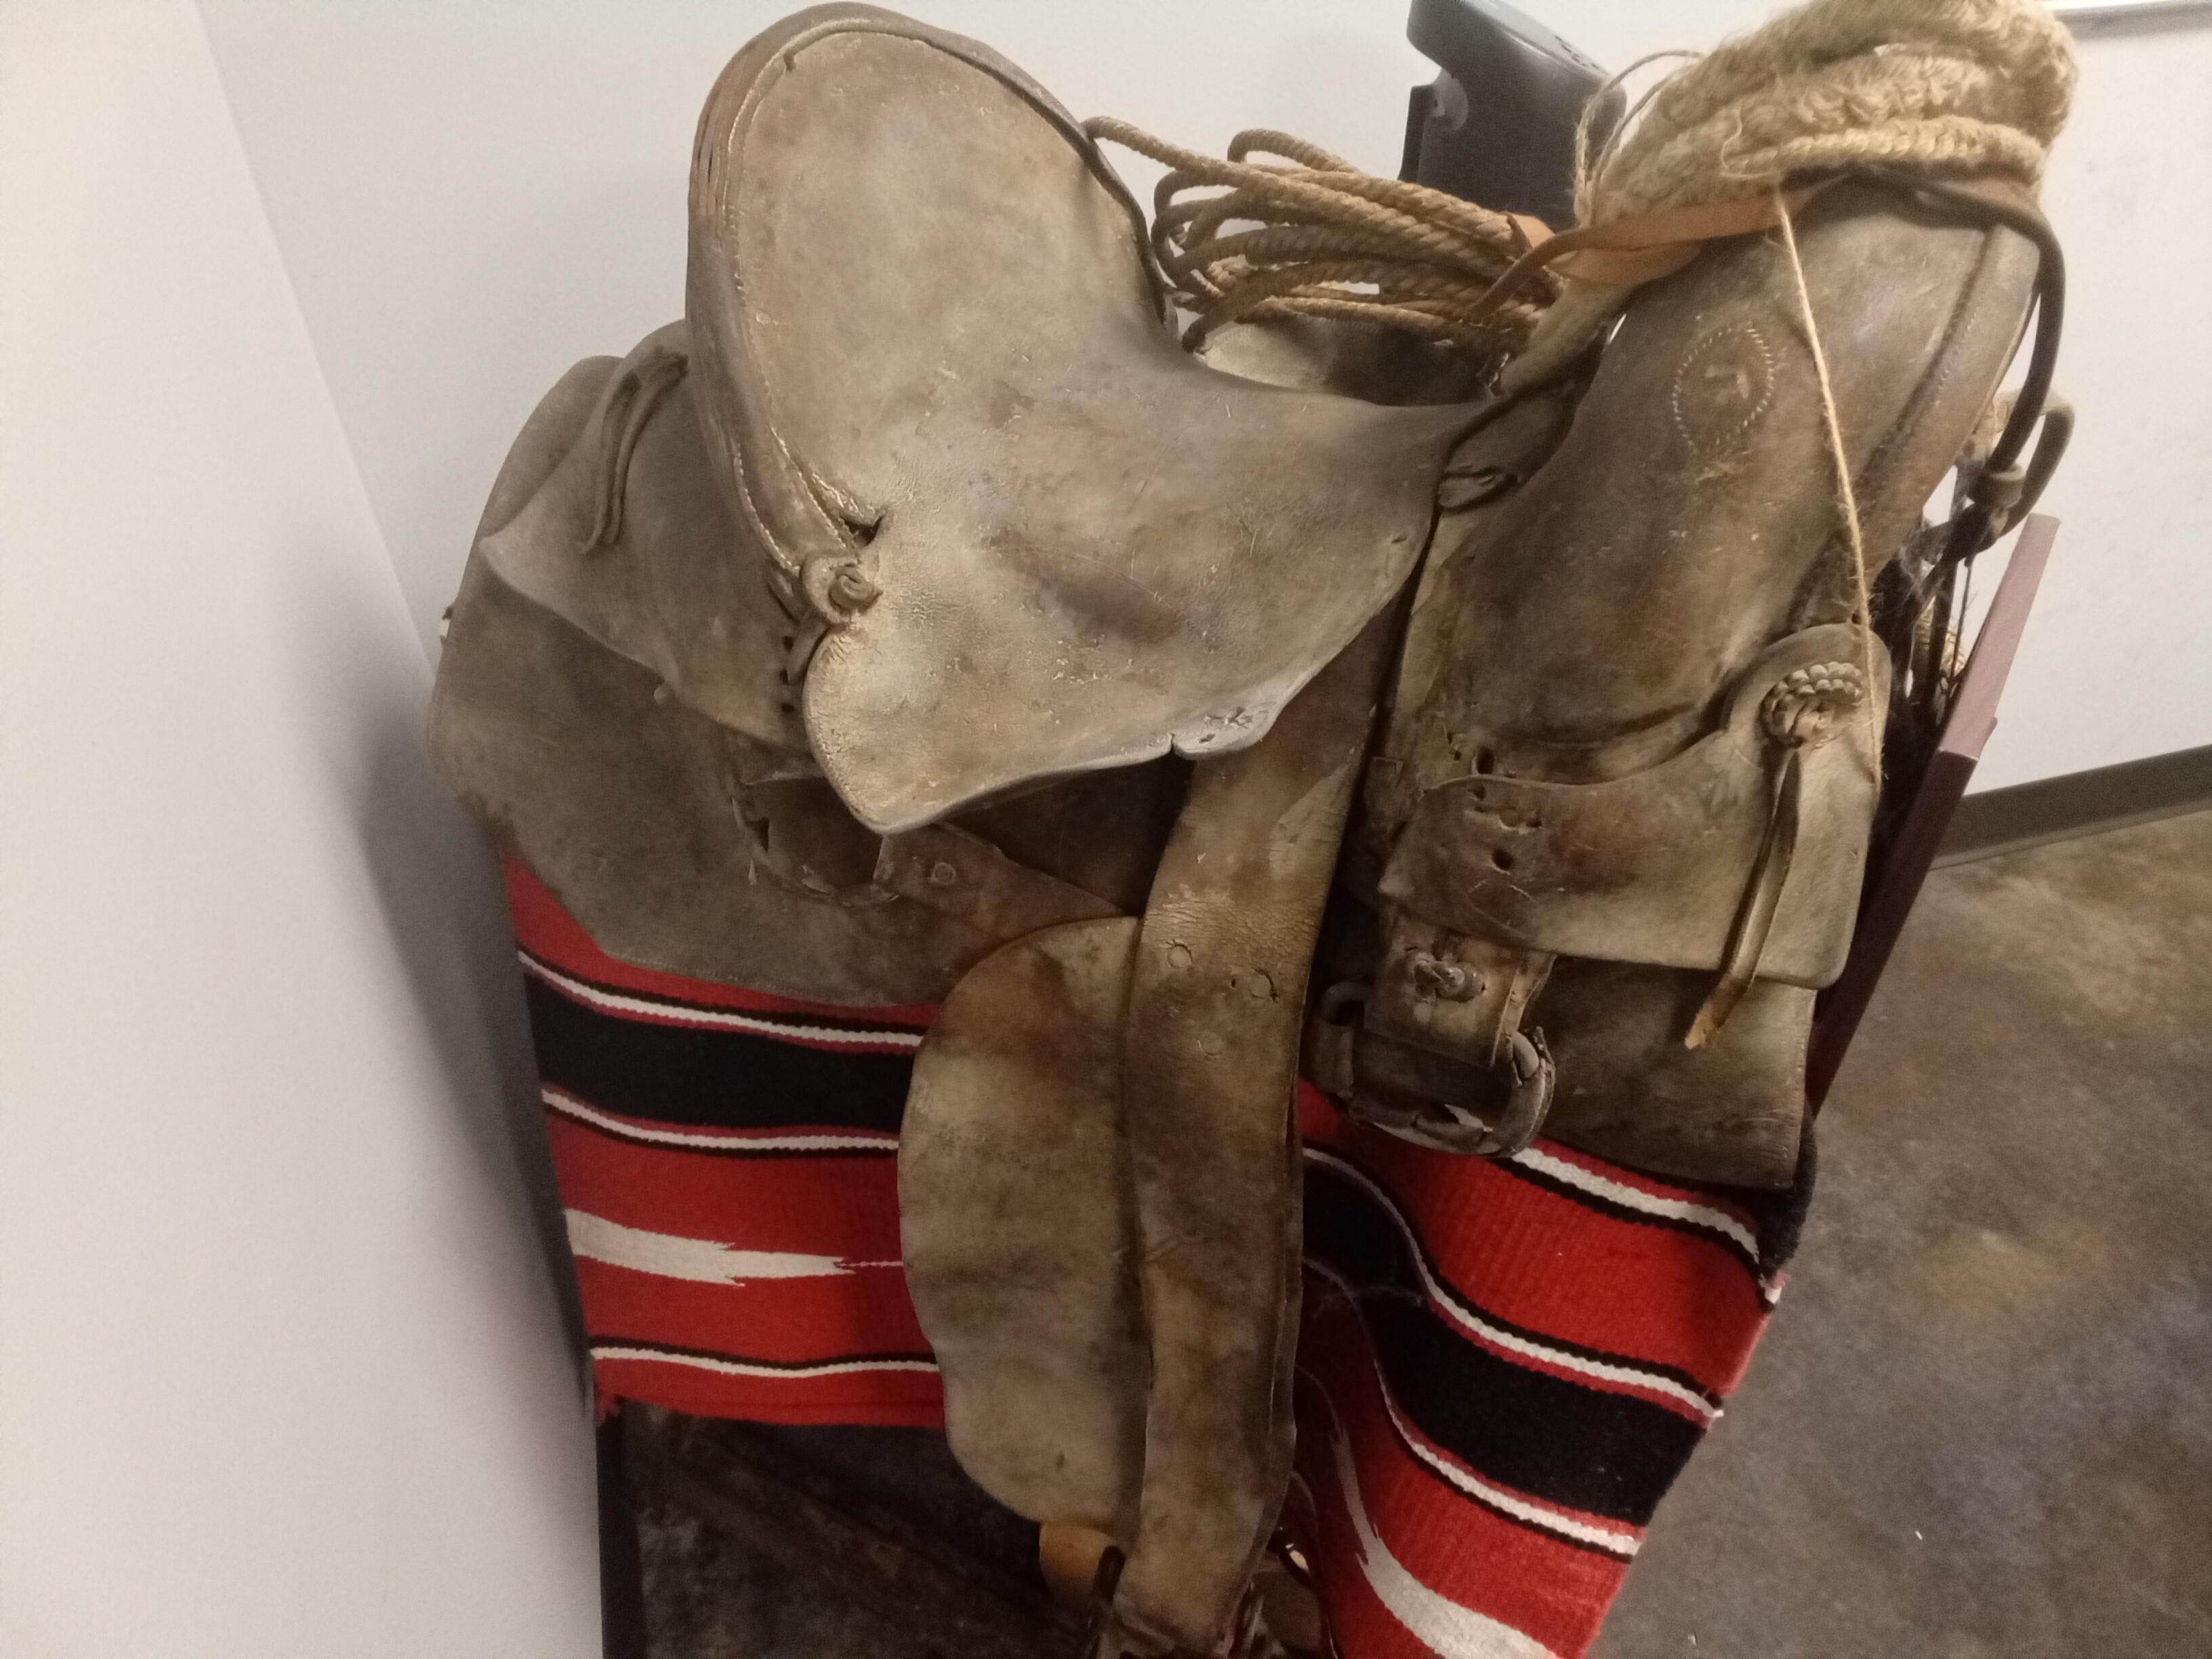
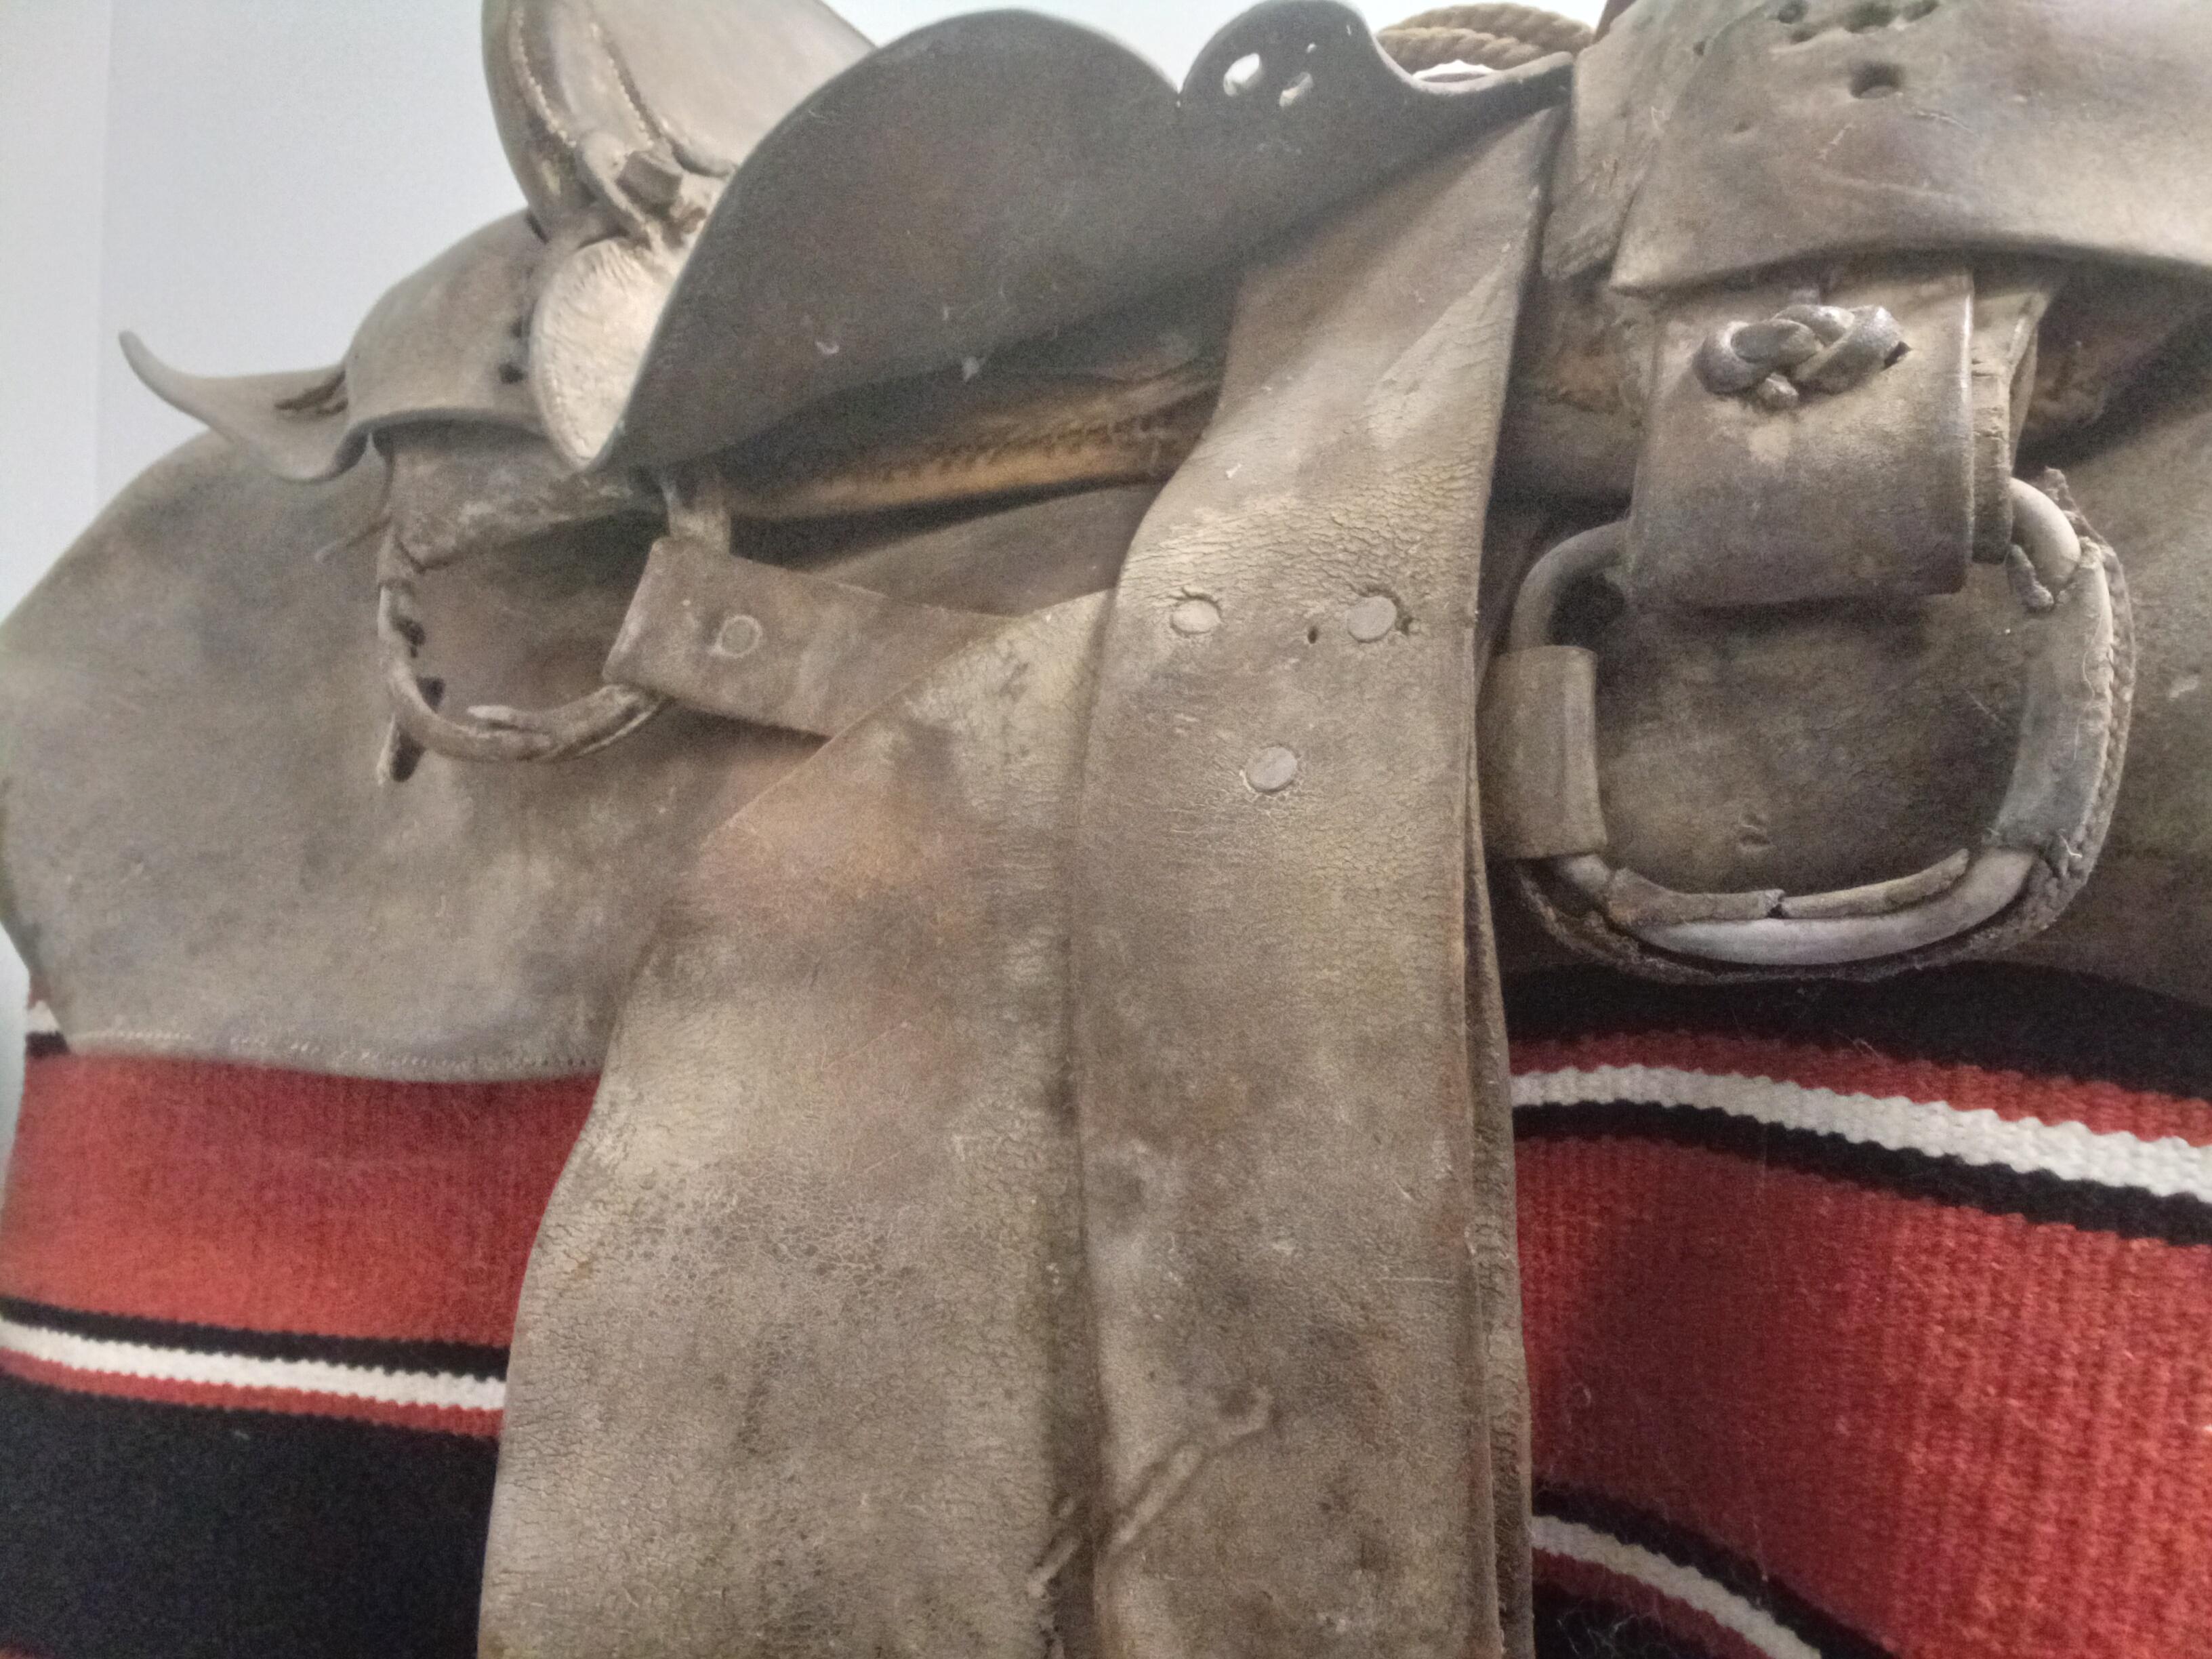
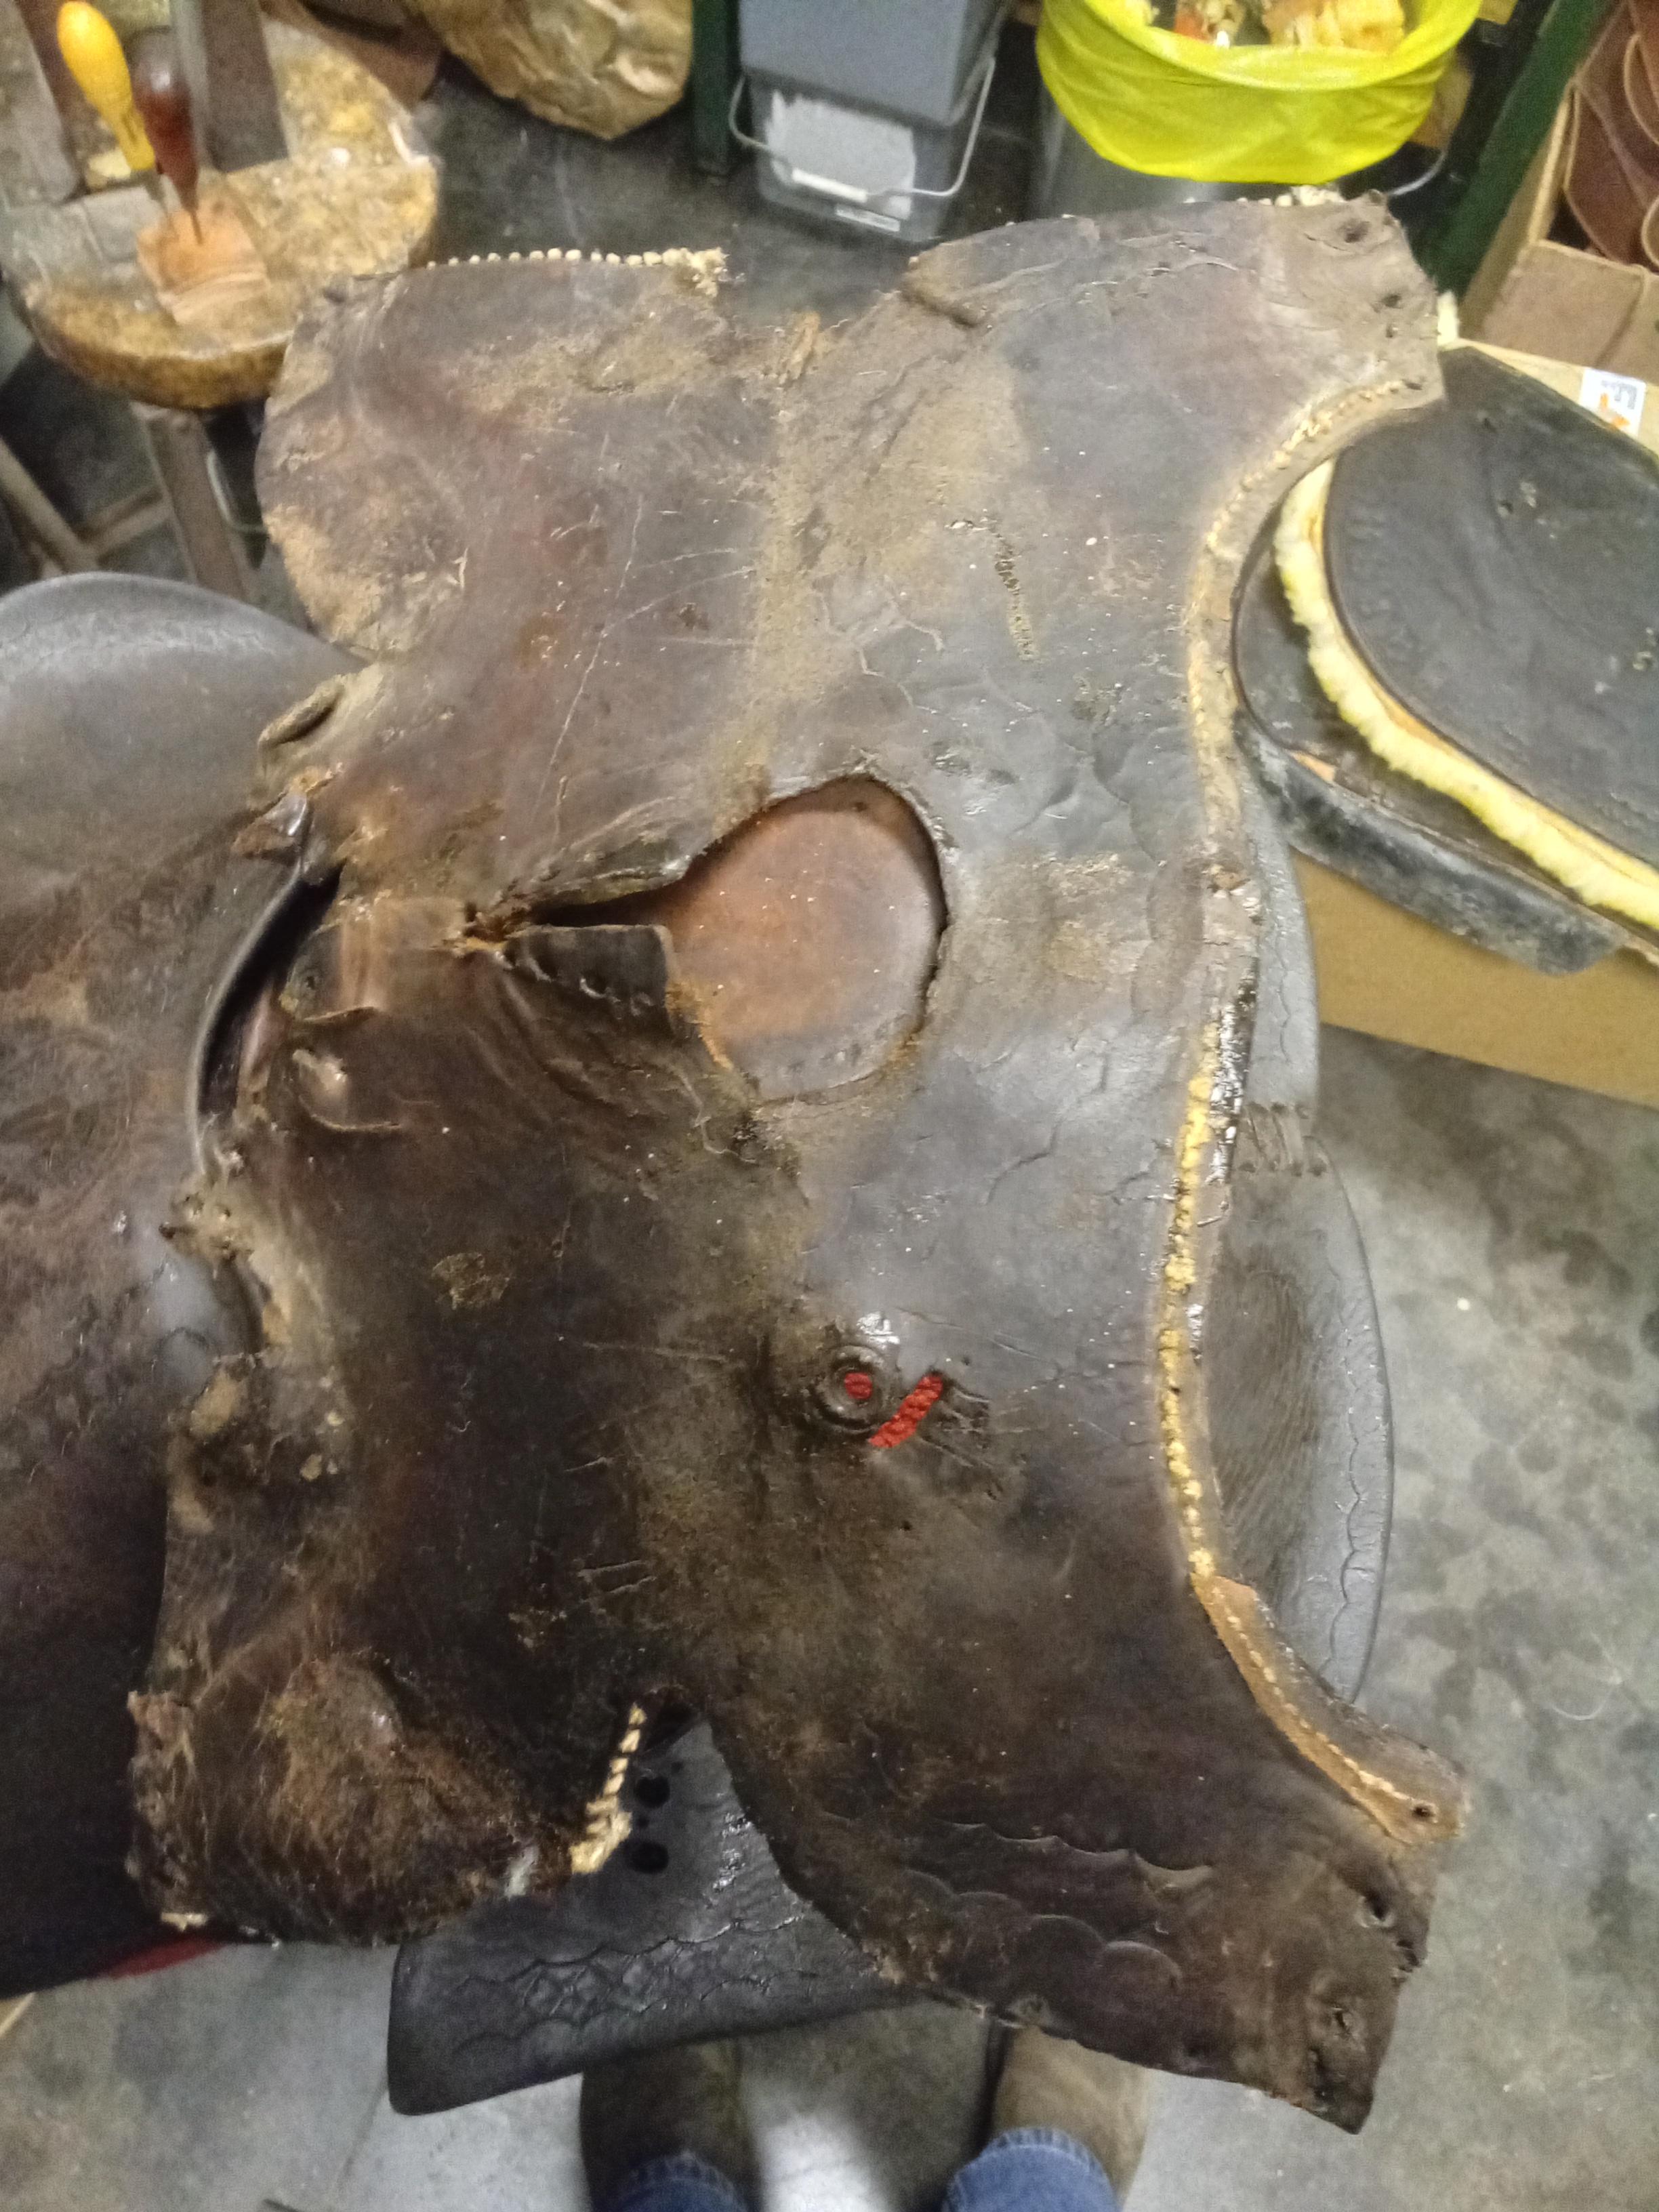
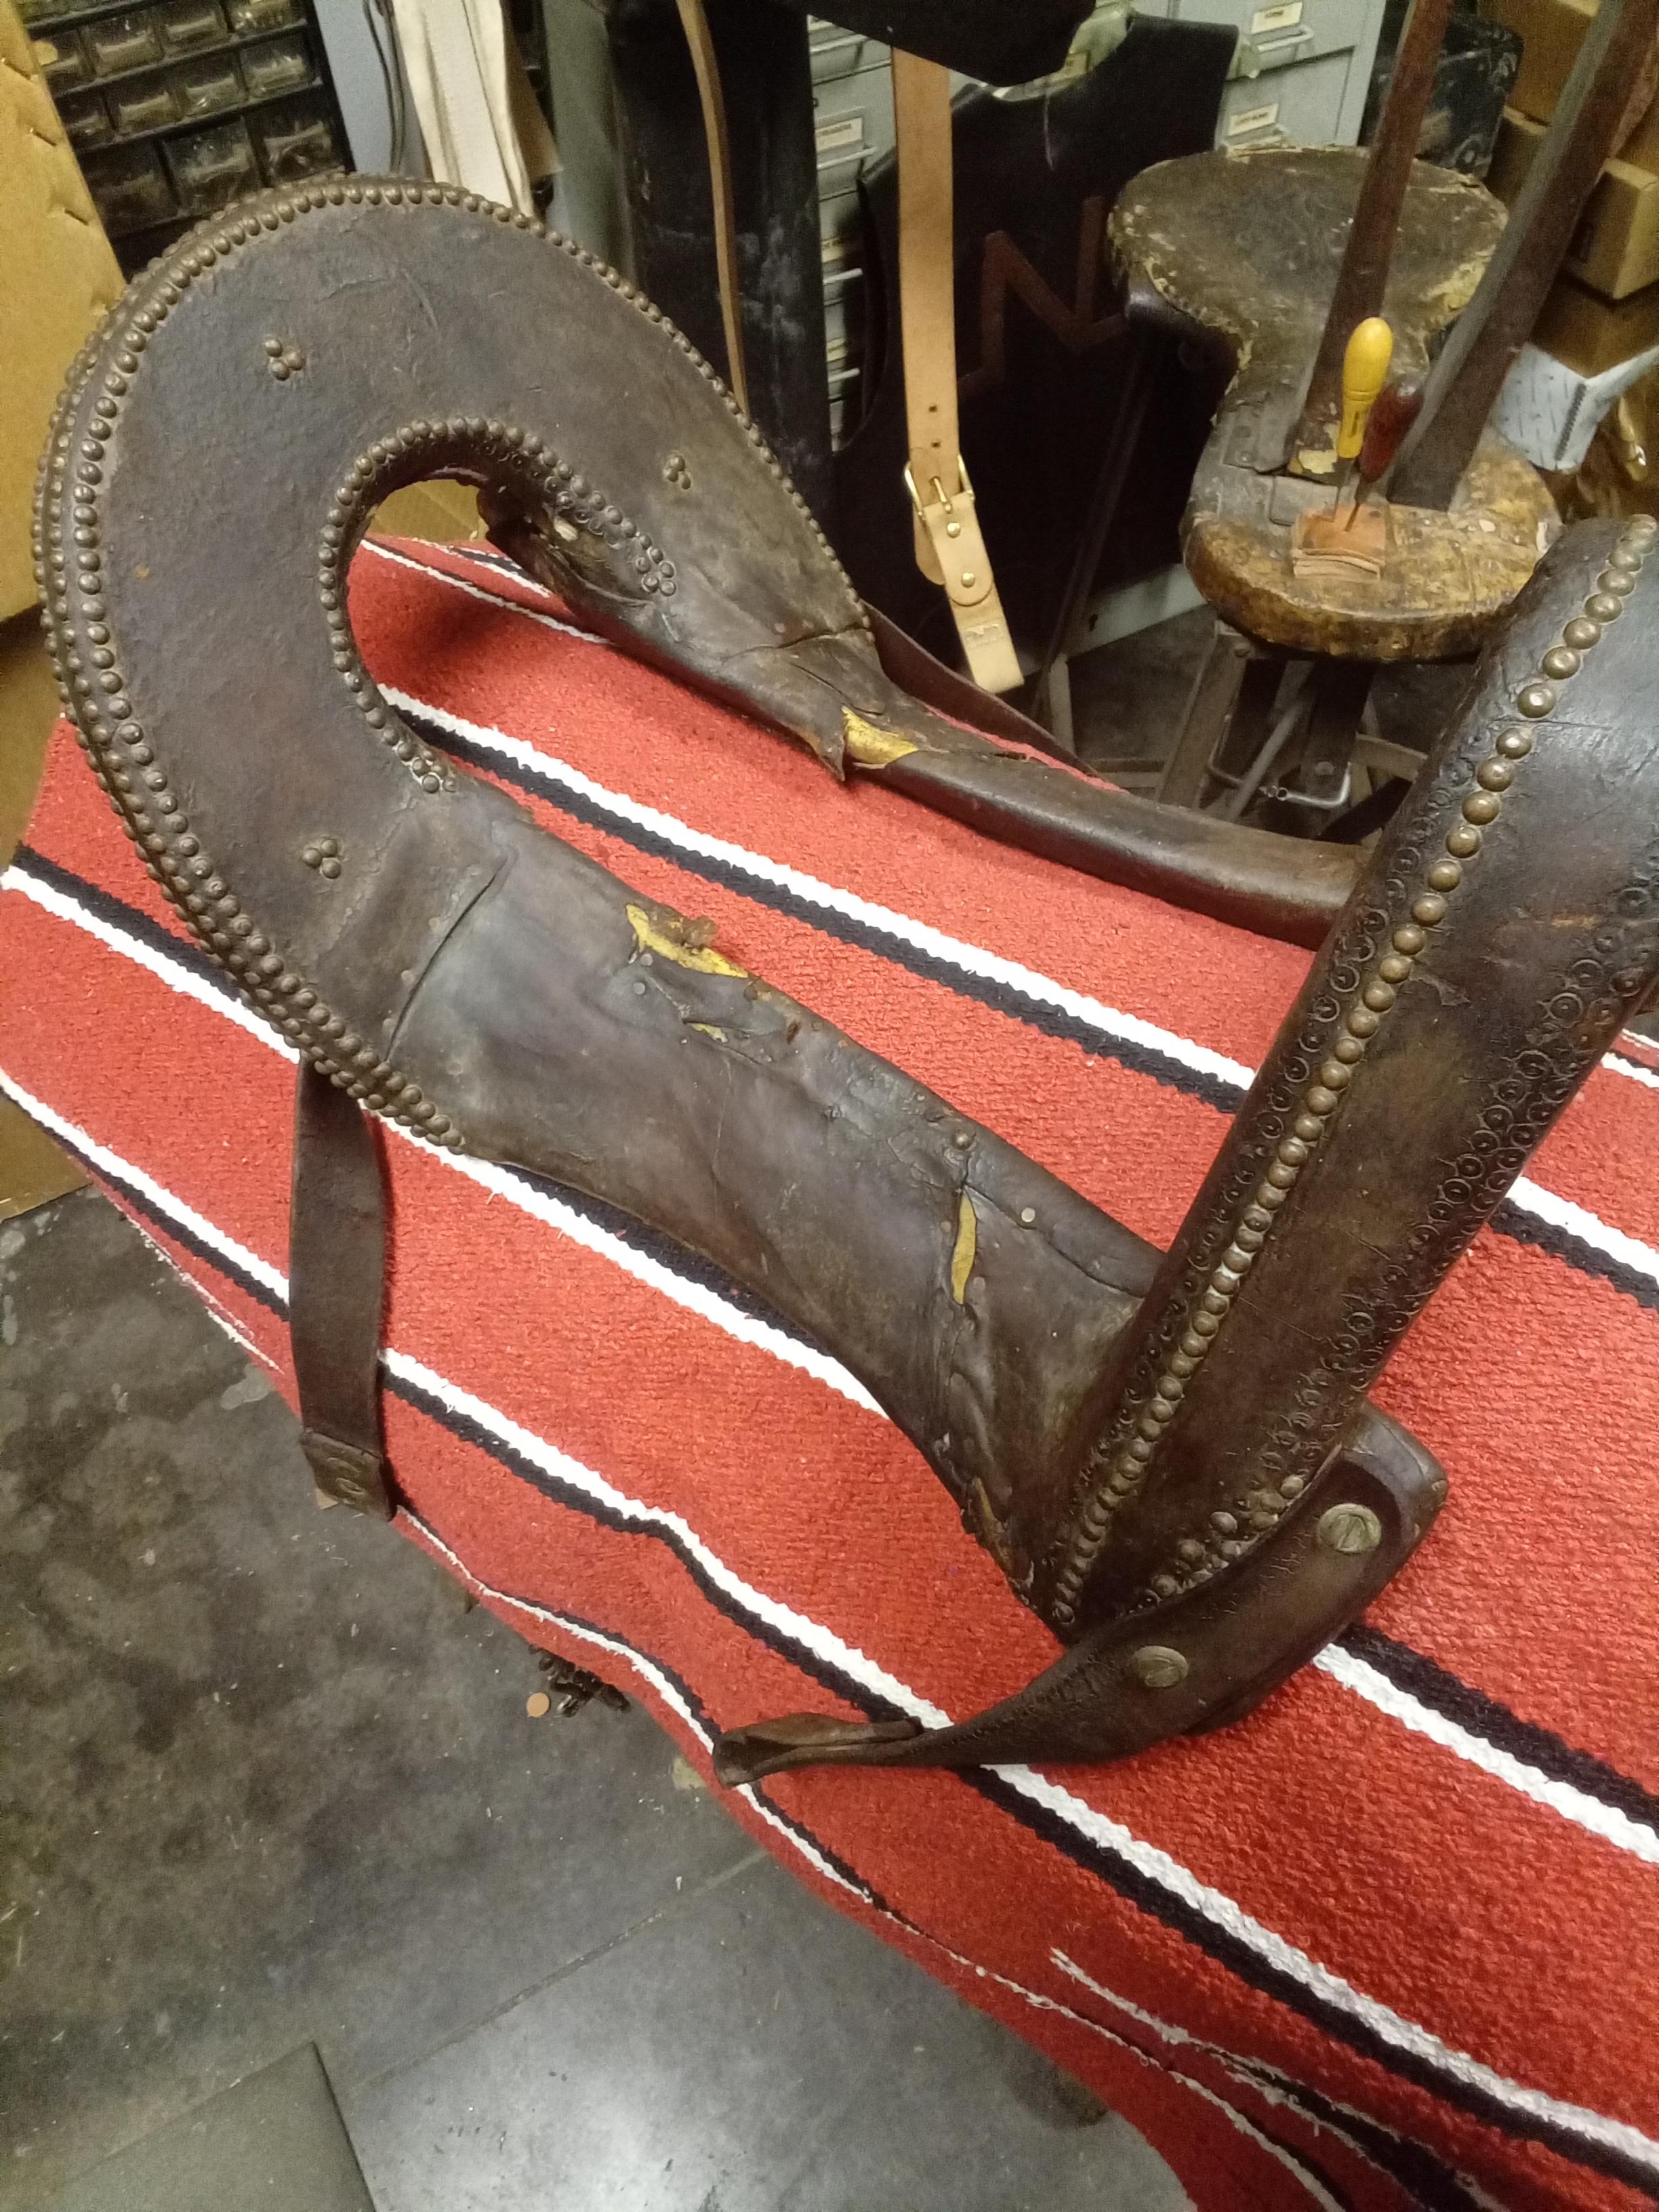
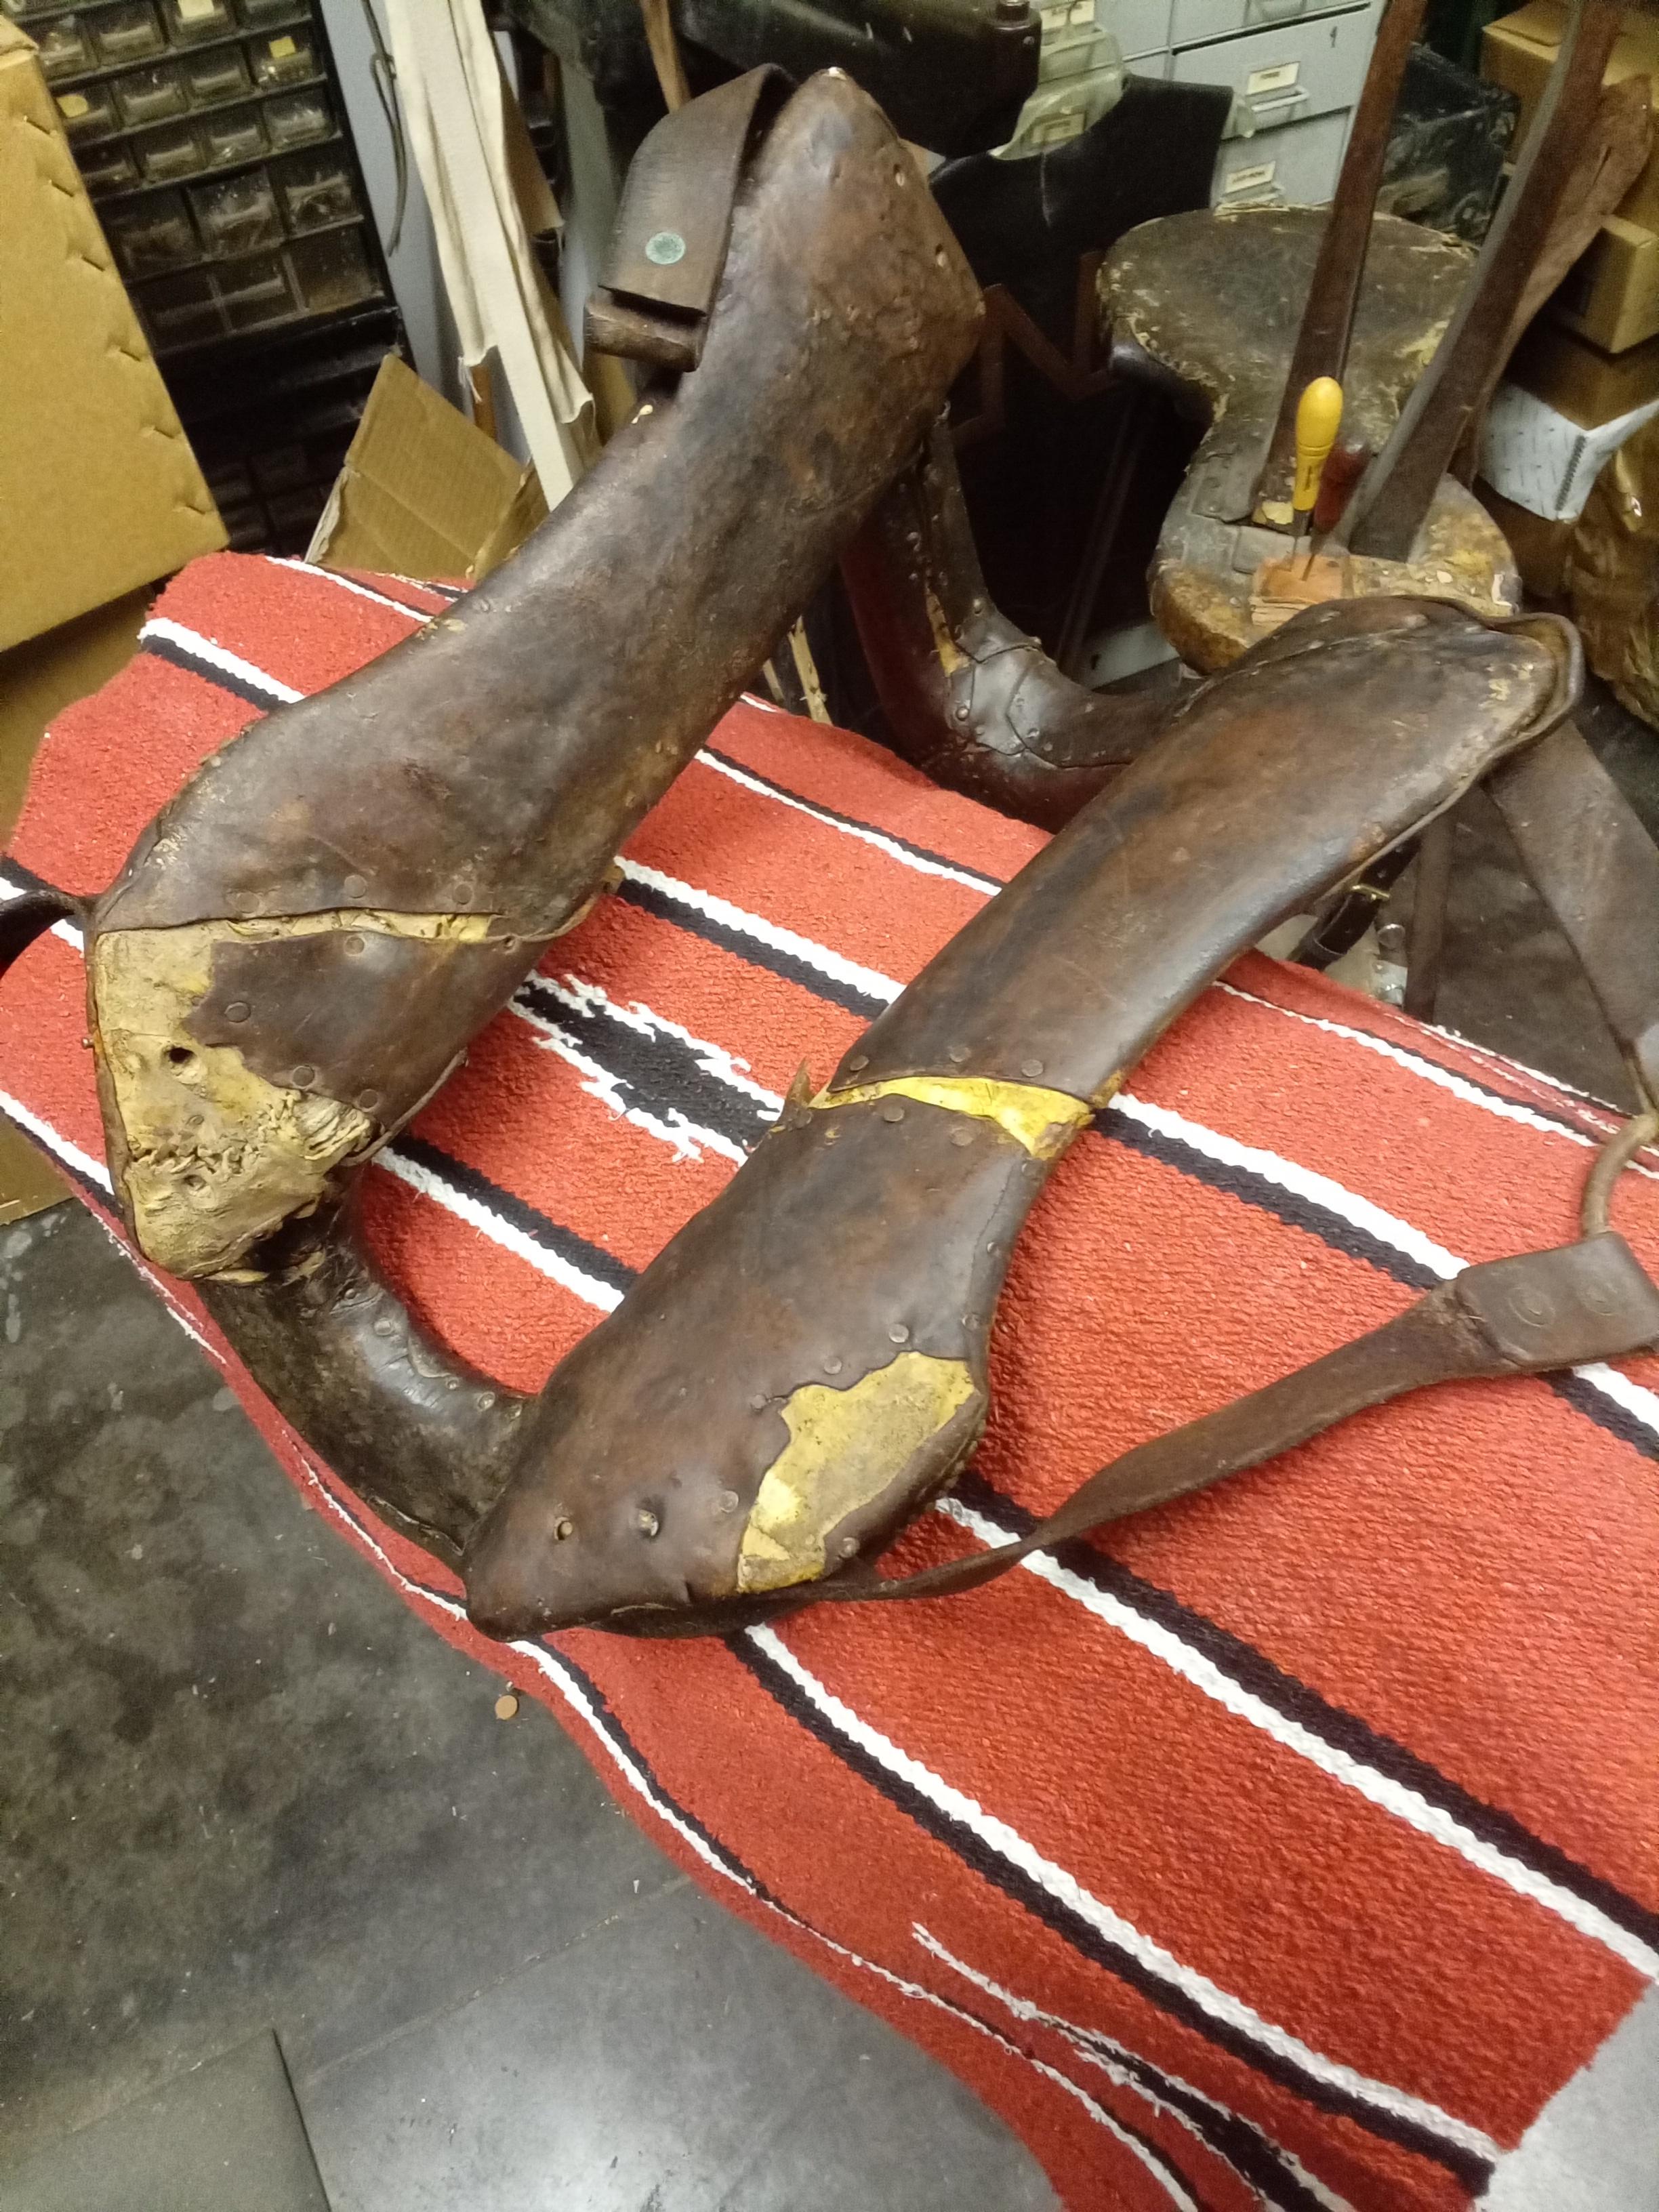
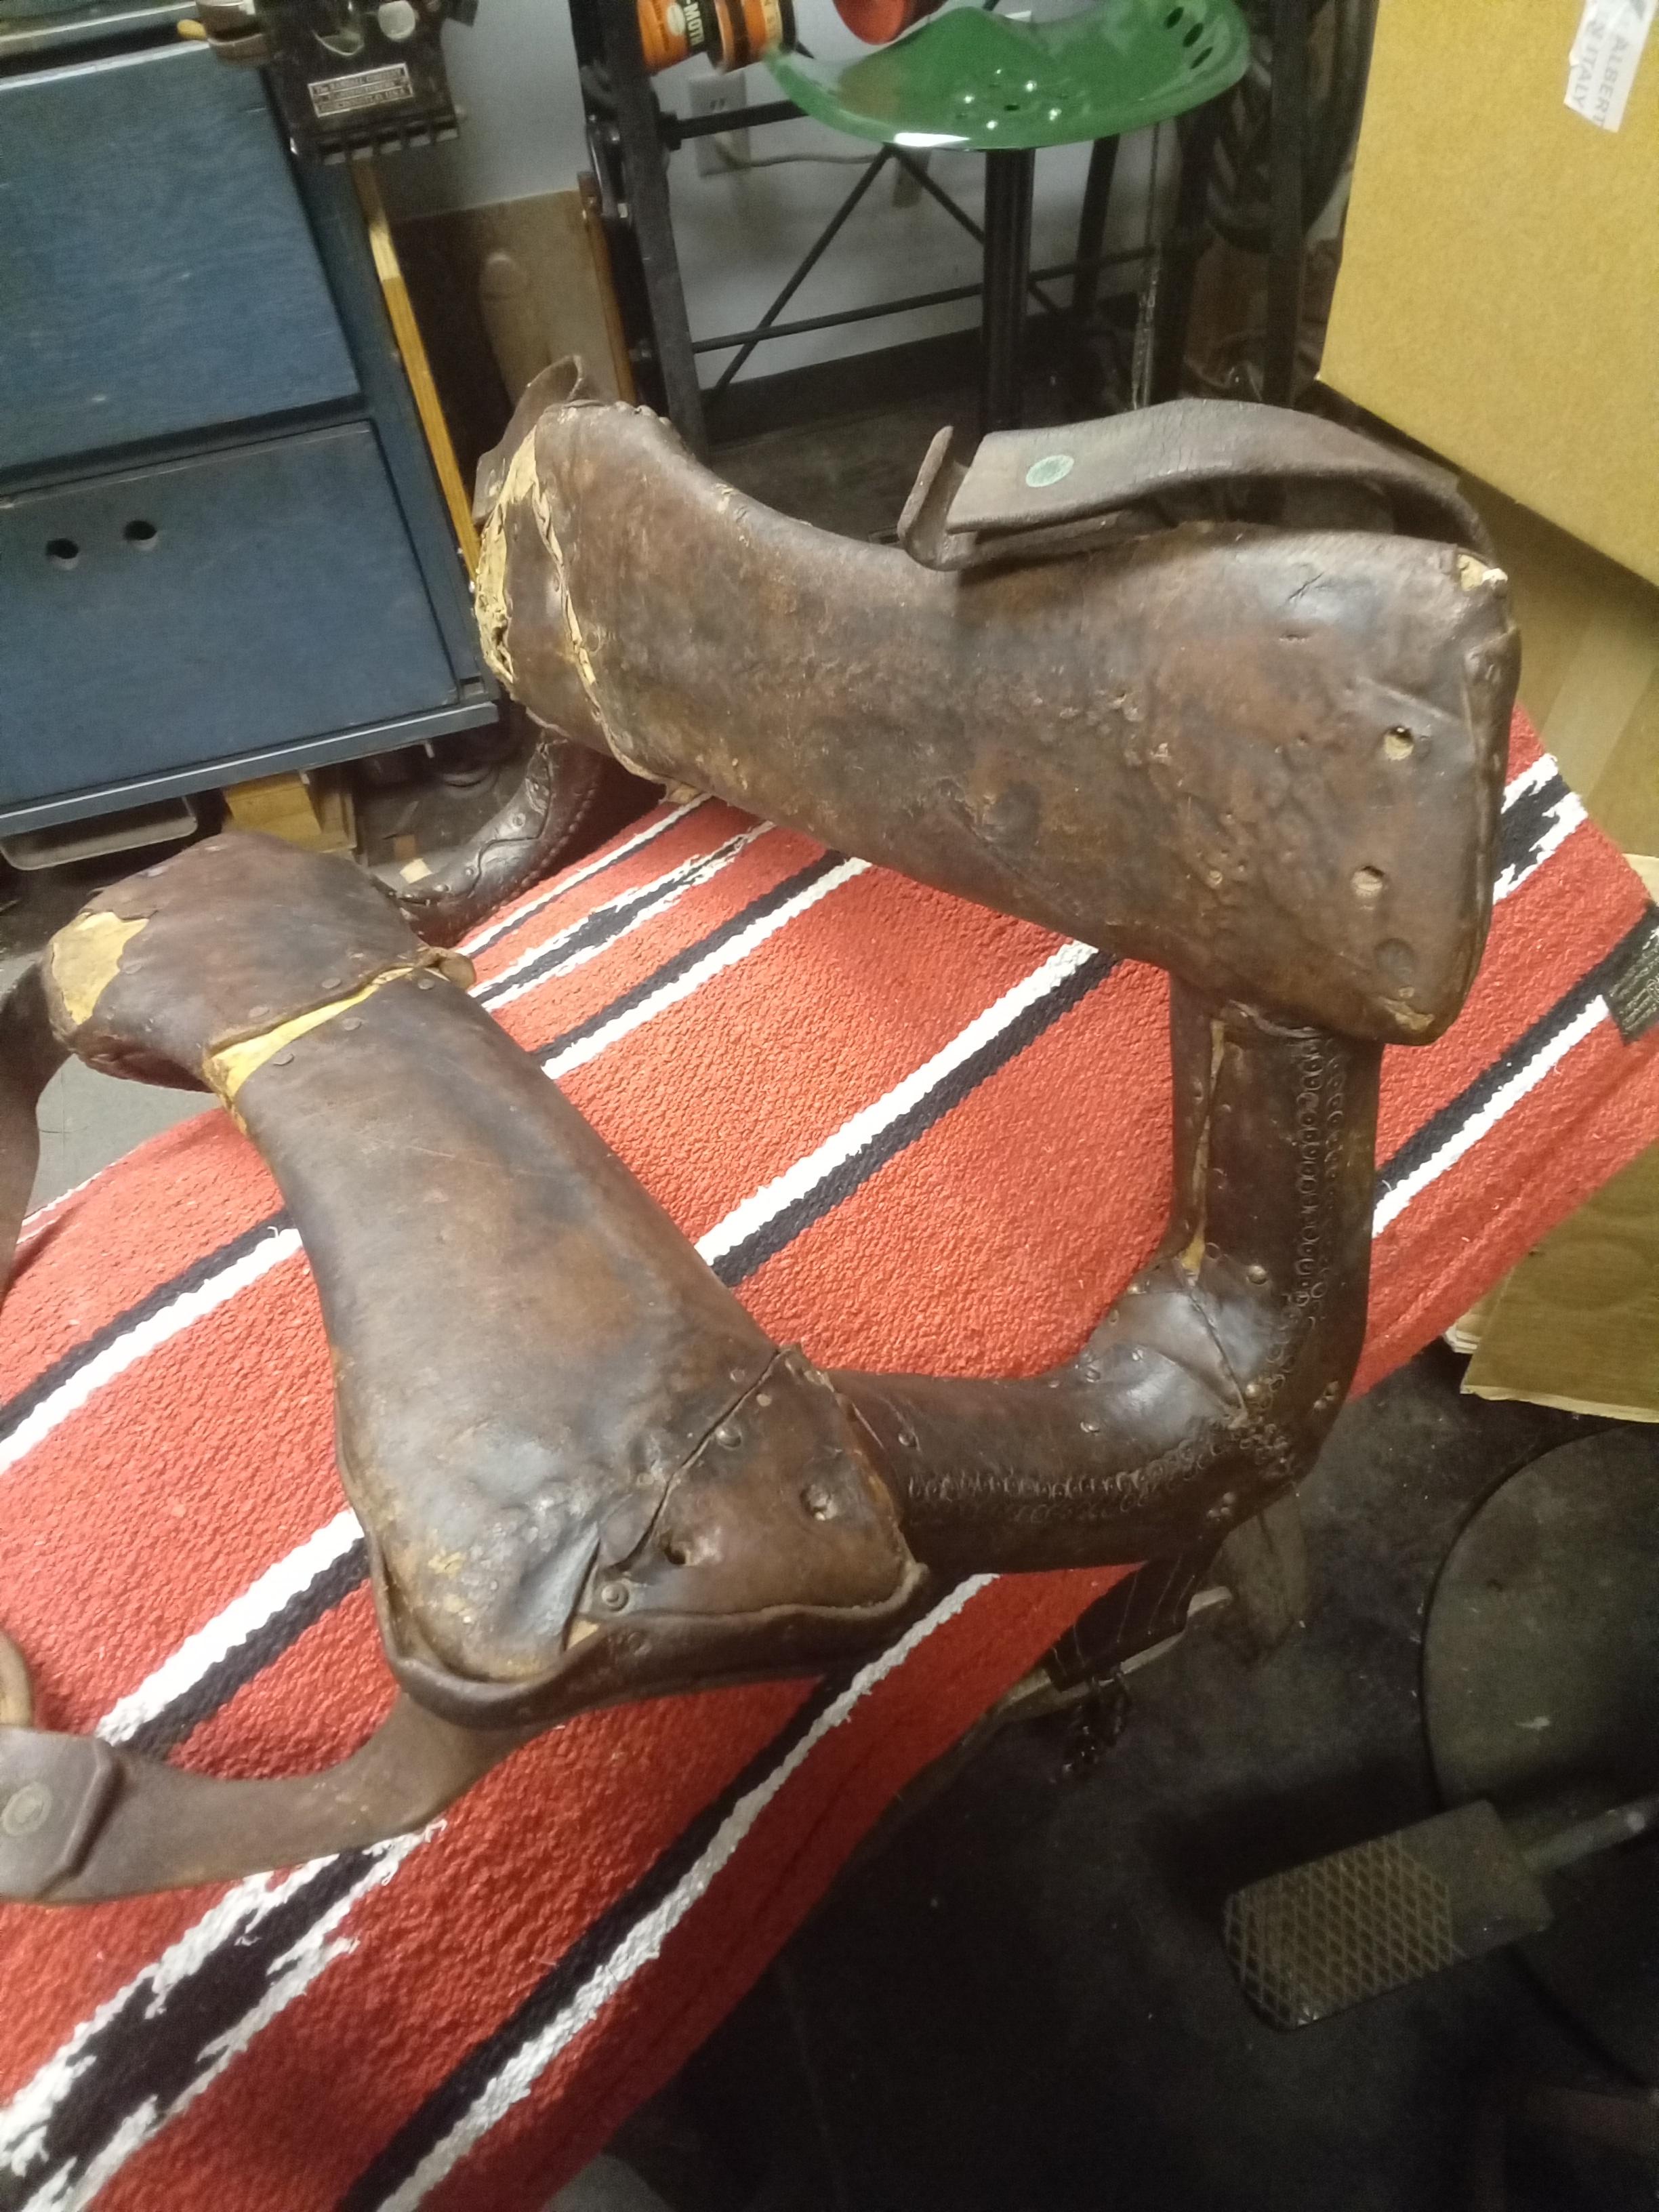
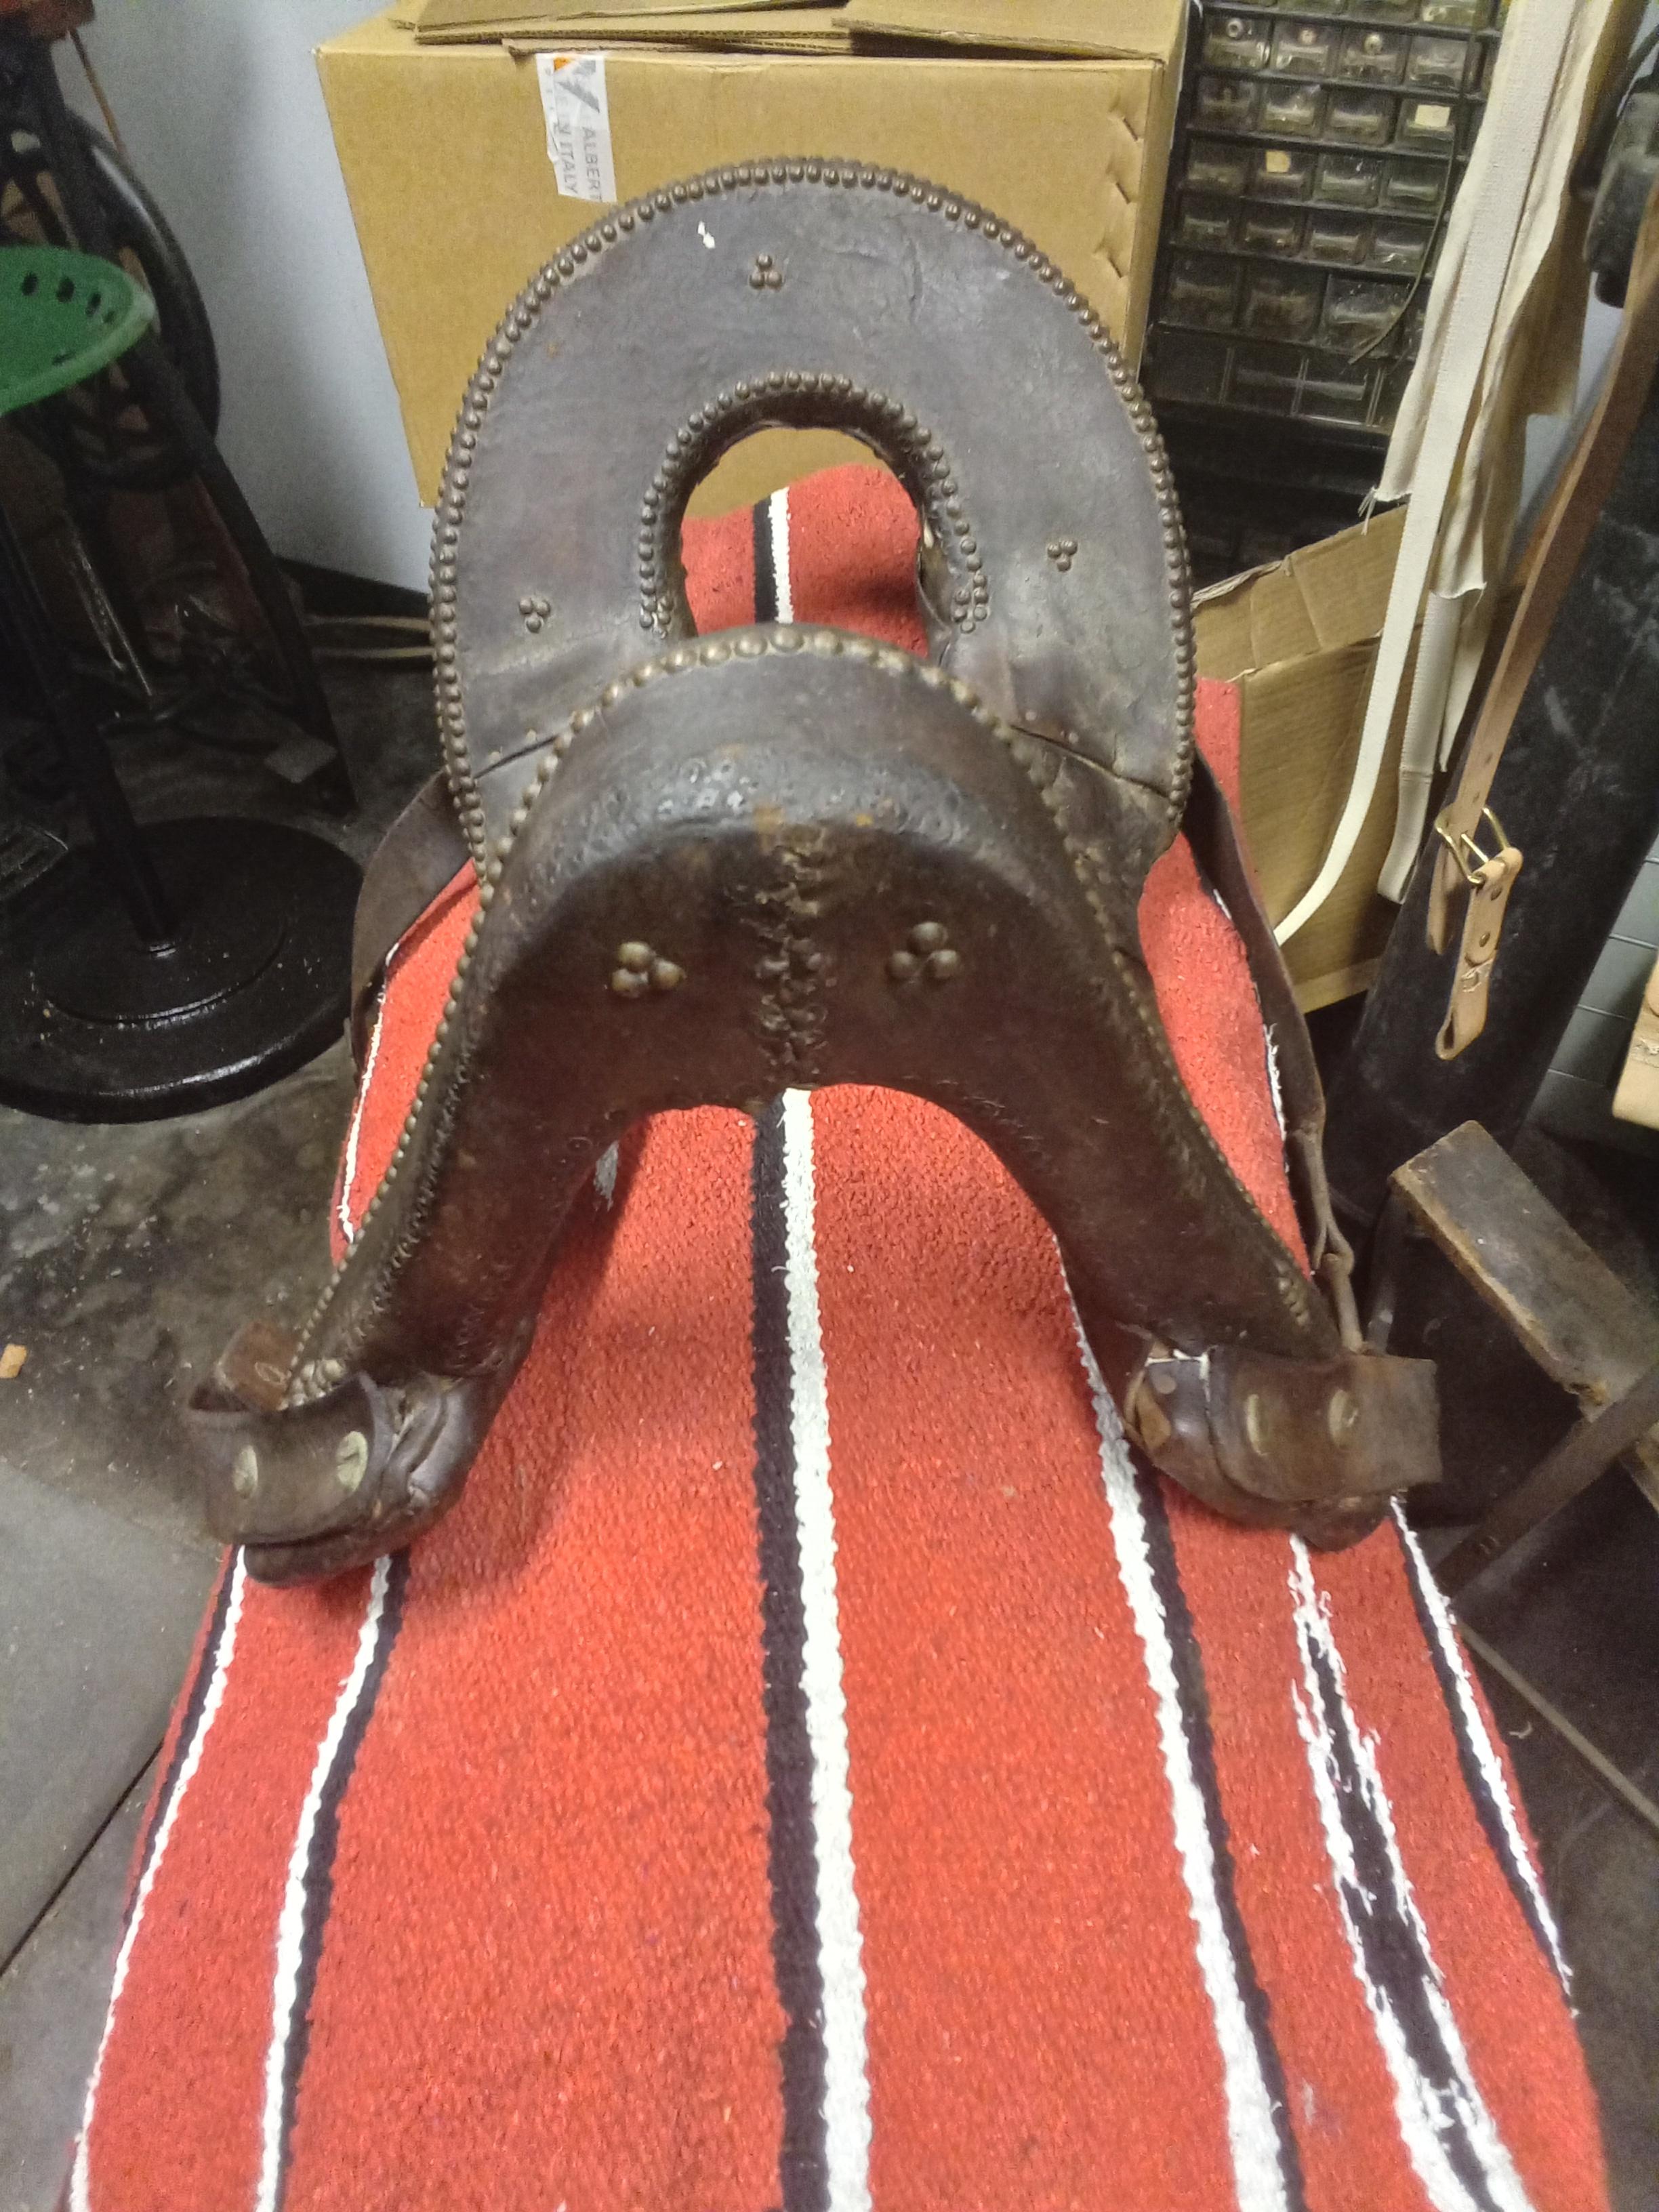
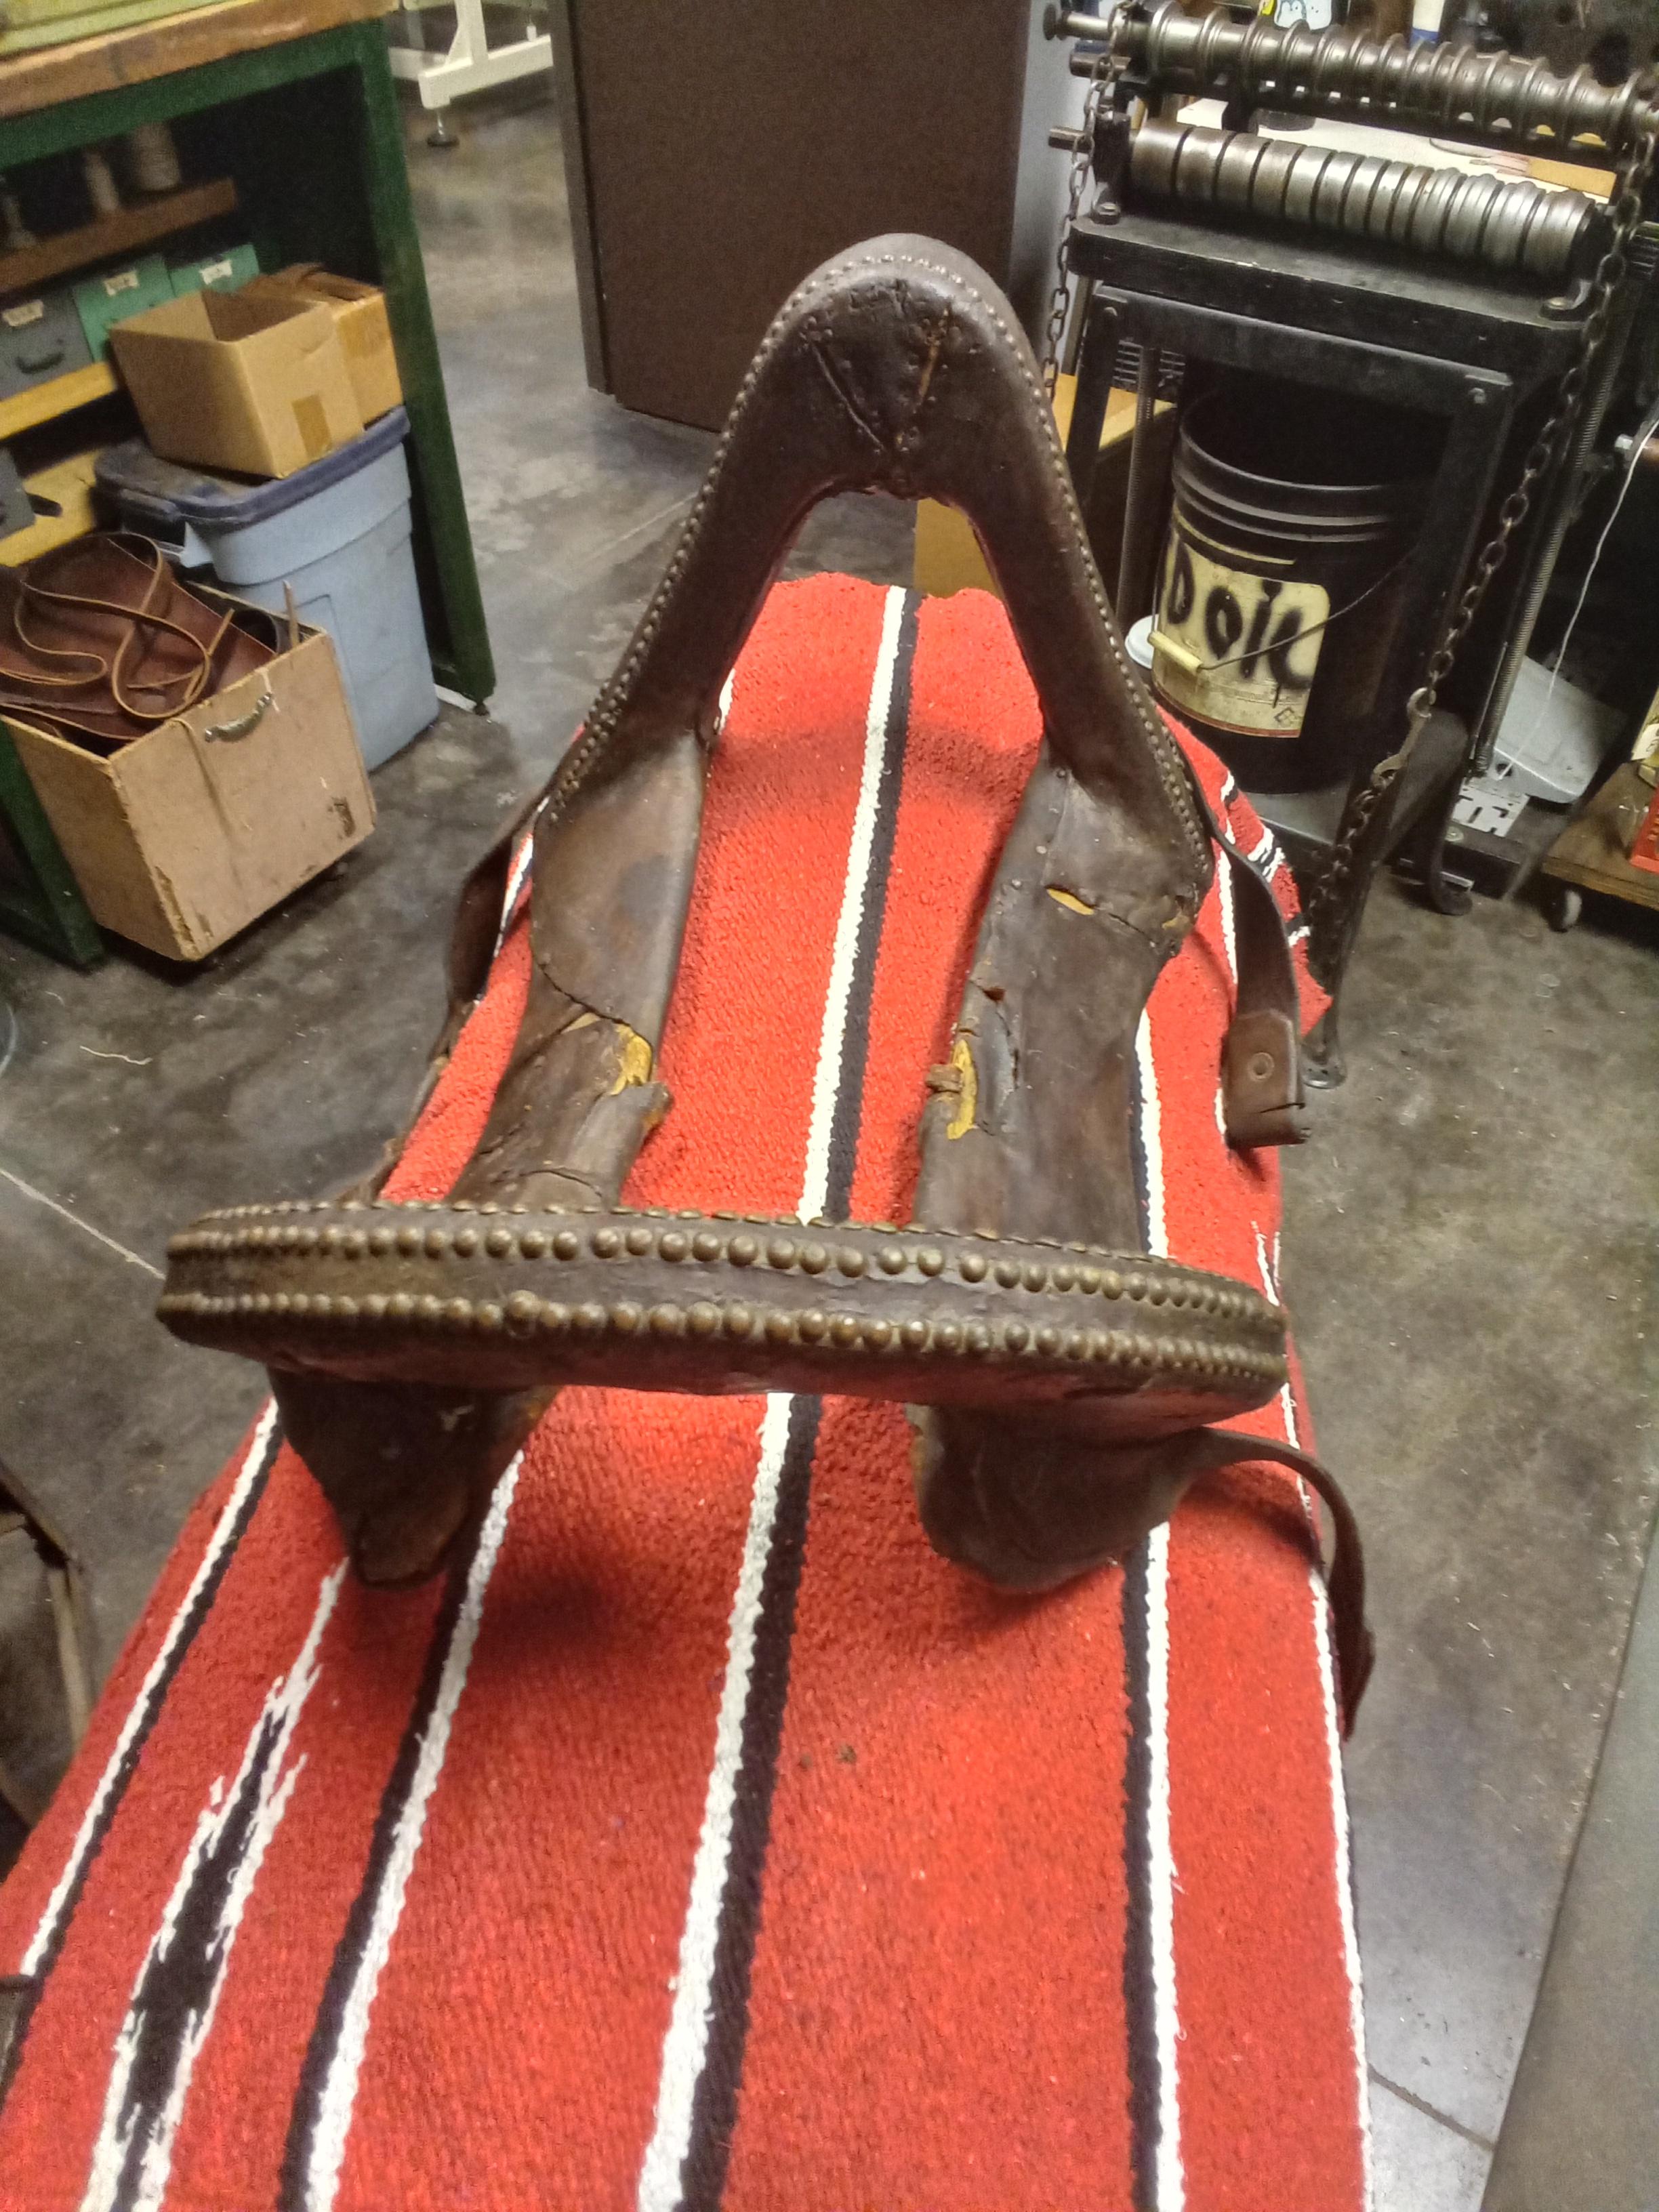
A few more pictures. This first one shows the rigging, which I think is what made this saddle "unique" compared to the more common double D rigging saddles in the 1930's. The ring placement, leather back ring, and the full wrap around anchoring on front and back all look to make this a good saddle. Now some of the rougher bits. The tree feels really solid and most of the rawhide is intact, but there are places it has torn and pulled apart and the wood under it has damage from too many nails. The leather bits on the swells are some past repair reinforcing patches and some of my Dad's prior efforts to repair the saddle as it is, and I think I want to start by removing those to really see how the tree is. I think I would rather repair the rawhide than patch reinforce it. The other thing is all those tacks are not helping the wood underneath and with my luck I'll be hitting them right and left tacking in the following layers of material, so I'd rather get them out and glue up the holes. Similarly, the ground seat is a bit more compacted and rotten than I initially thought, so I'm going to take a lot of pictures, measurements, and make a plug for the front hole to model, than remove it as well. The horn seems to be good and I'm thinking I might keep it intact in an effort to preserve at least some of the original leather? Not sure yet. Now to fix the tree ends, Initially I was thinking about filling and leveling the voids with some kind of putty epoxy, but while I think it's a good solution for the wood underneath, I'm having 2nd thoughts about doing it on the surface too thinking it won't stretch and flex the same as the original rawhide and lead to problems later. I'm thinking once the leather is out of the way, I'm going to see if I can re-hydrate the rawhide to pull it out of the way, but hopefully not induce too much moisture into the wood under it. Once the rawhide is pulled back I'll let everything dry, putty and epoxy the wood, sand it smooth, then see if I can hydrate and stitch the rawhide back together perhaps using some swatches of new rawhide. Worst case, I might need to replace the rawhide all together, which itself doesn't seem to be too much of a challenge, but getting it to integrate with the good parts of the old rawhide might be a challenge. If I must, all of the leather including the horn will need to come off and all of the rawhide will get replaced. I want to take it in steps to preserve what I can, but also intend to make this saddle every bit as durable and reliable as it once was, and that starts with having a solid foundation. I can always come back and fix and improve parts later, but fixing the tree is a big first step before everything else. If all of the leather and rawhide has to go.... then that's just the way it's got to be.


-
I've been looking for period images of these saddles, and often finding Navajo riding western saddles or the saddle being covered with blankets and clothing, but did find this one that appears to be a Navajo saddle, circa 1900. source link
(1).jpg.6444cdf123ec7b63480925eccc9ddaf9.jpg)
-
 Paper mache might be a good option. At least it could make a "master" bust that I can perhaps make a silicone mold from to make my own hollow plaster or resin busts. I think the labor and initial pattern is where people make money on these. The materials are cheap.
 -
Thanks for all the ideas guys. Keep em coming!
-
As the title says, I'm looking for a way to display several headstalls, halters, hackamores, etc. Ideally something that can hang on the wall or somehow arranged in front of a saddle stand display with a plackard nearby explaining the what and why. I've found several places that sell plastic or fiberglass busts of horses heads, but often at $300+ and that will add up quick doing multiples (anywhere from 5 to 20 depending on how far I go). I'm wondering if anyone else has done something similar? I would actually prefer less detail so it doesn't detract from the displayed item, similar to mannequins in a department store, but It still needs to be life-size and have some form of mouth, ears, jowls, and everything else that would play into a headstall properly fitting a horse. I'm looking at 3D printing them myself, but the size makes that a challenge. Also considering a very very simplified wooden frame or lamination that again has the important area's but lacking detail. Almost like the heads used on steer roping dummies that have horns, but are not a fully modeled cows head. The alternative of course is hanging them on a hook like you would in any tack-room, but being able to see how it fits and why pieces are where they are is the real intent. This is more for educational display than for storage.
-
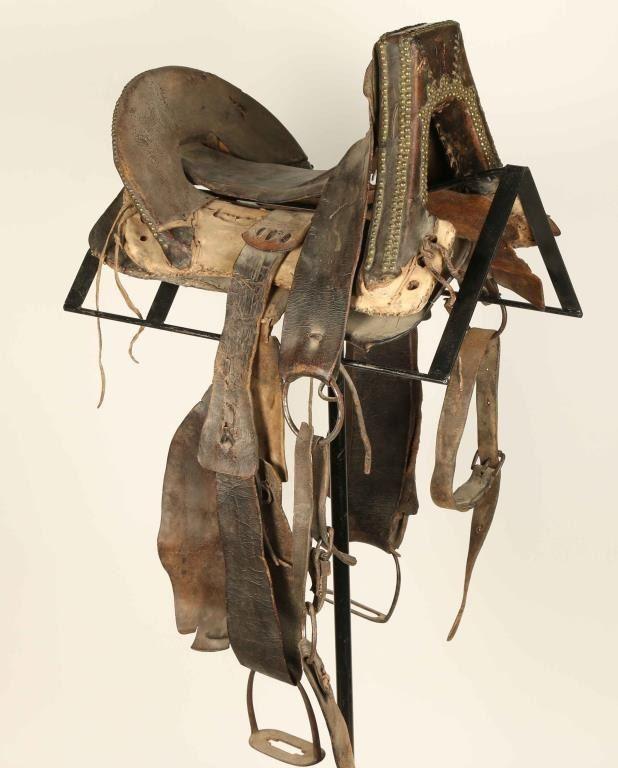
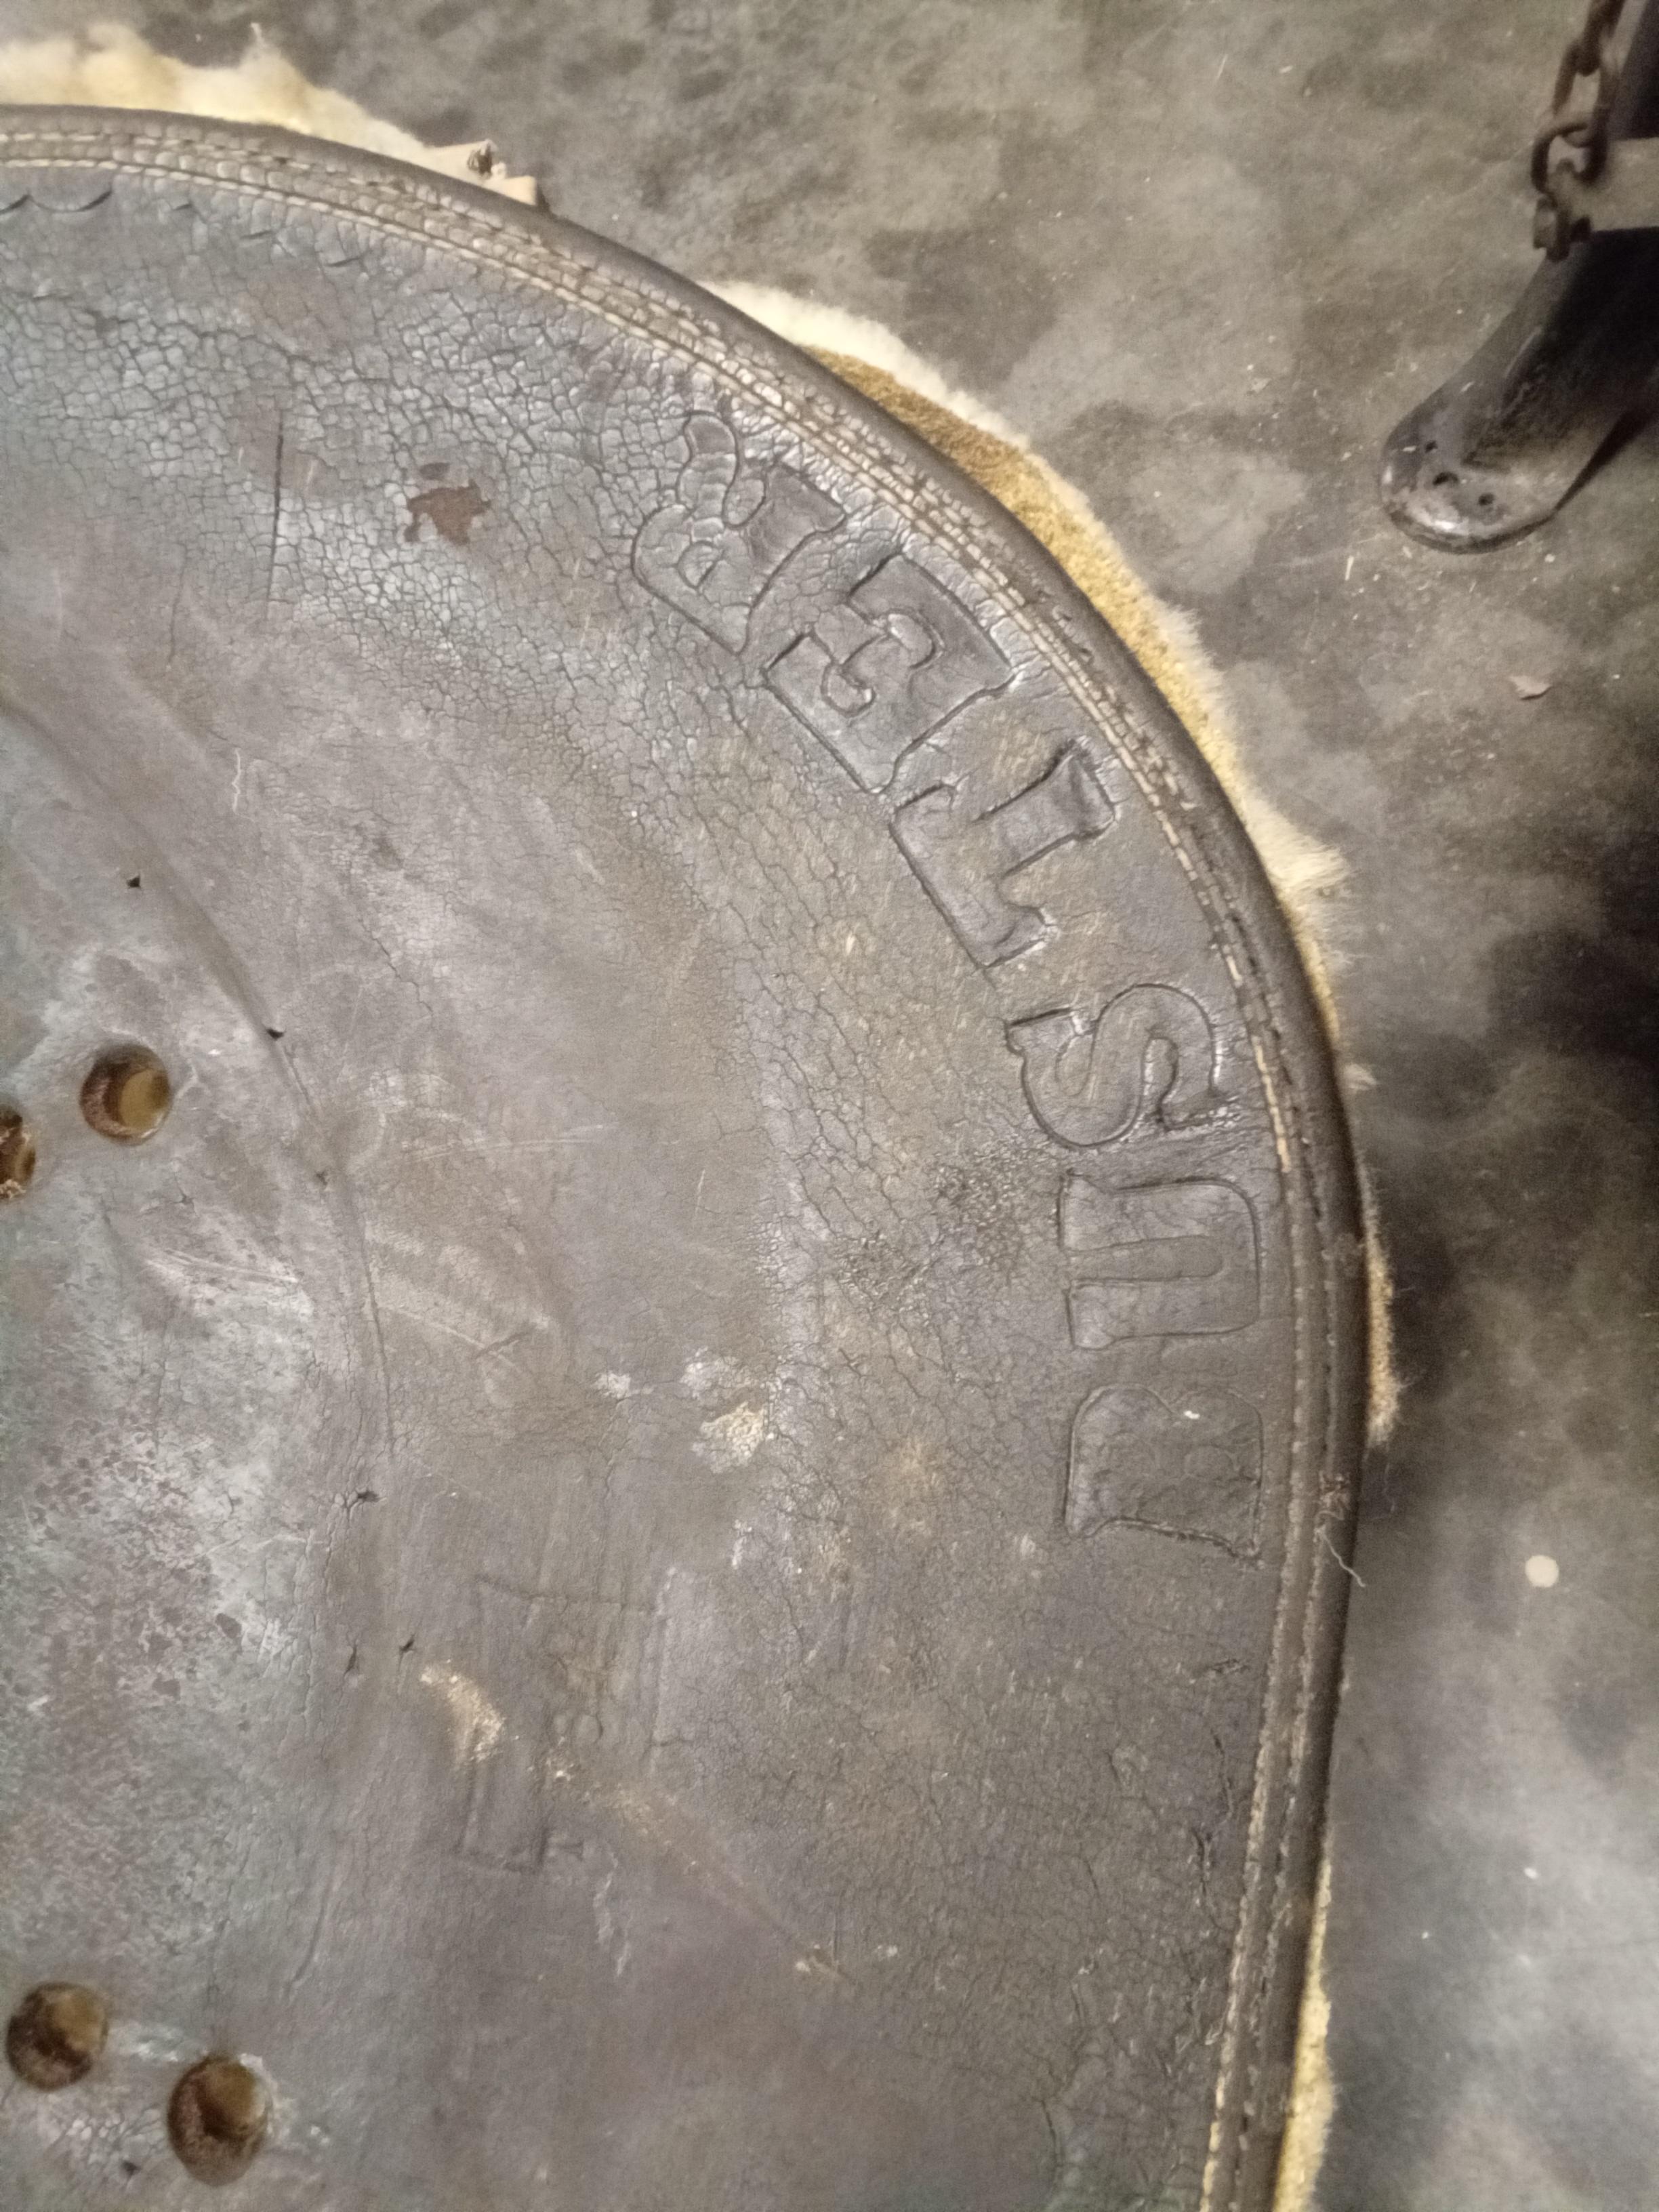
Here's a good Write up from Bill Manns on Facebook: (link) Rare NAVAJO SADDLE I just acquired this 1870s-80s Navajo saddle in Arizona a couple of years ago. The Navajo were the only tribe that made and used a saddle that was strikingly unique. Other tribes made simple rawhide covered trees of a mostly generic design except for the women’s saddles of the Crow, Sioux and Blackfoot in the northern plains. The Navajo tree evolved over time but was inspired by the early Spanish saddles appearing in the Navajo lands in the 1600s-1700s. Later they were simplified along the style of Anglo saddles used by mountain men arriving in the Southwest during the early 1800s. Much of the leather used by the Navajo in saddle building was recycled from old, damaged Anglo saddles. Not at all uncommon to see cowboy saddle fenders on an old Navajo saddle. The sling seat, cushioning detail was common on several styles of American saddles in use during the 1700s well into the 1900s. The rigging is a simple variation on the Sam-Stagg rigging that became very popular on Western saddles starting about the time of the Civil War. Brass tacking is a common detail on all Navajo saddles. Navajo horsemen were till using these saddles up until WWII. A truly handsome saddle and beautiful relic of the early Navajo equine culture.
-
And another. This one has the same swells construction, but also has a horn. It's referred to as a Navajo ladies saddle. According to the description linked bellow, the horn was used to hold gear that the ladies would pack, including a baby board, while the mens saddle didn't have a horn because it would have been in their way hunting and fighting. It also has skirts, and the tree sides are similarly leather wrapped, so I think mine originally likely had skirts tied under the sides. I find it interesting seeing the similarities between western saddles and these Navajo saddles. Link The link has more pictures of this example.
-
Here's another Navajo saddle. The stirups don't look correct (who knows, they could have been traded for?), but the stirrup straps and cinch look original. This one appears to have skirts as well.
-
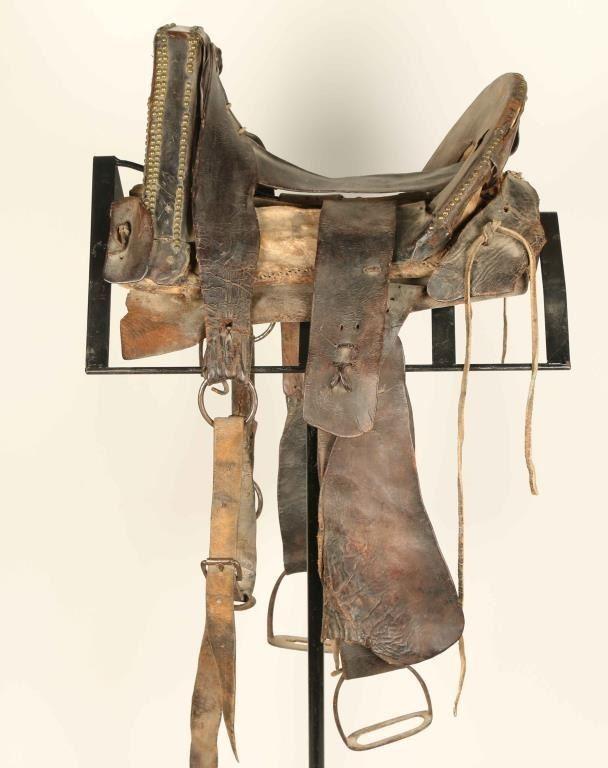
I 100% agree. The only conservation I'm doing with this one is periodically (5-10 years apart?) cleaning conditioning the leather (no neats-foot oil). I've used generic saddle soap before, as well as a product called Victoria Cream that works well hydrating and sealing antique leathers. One of the rigging rings is missing and appears that it was cut or torn from the leather. If I can find one of the same diameter and similar patina, I plan to tie it in place with some string, but the original leather would remain modified.
-
I found a very similar saddle, referred to as a "Navajo Mens Saddle". Same basic shape and construction and same brass tacks. Sounds like Navajo blankets would be a perfect fit. Link
-
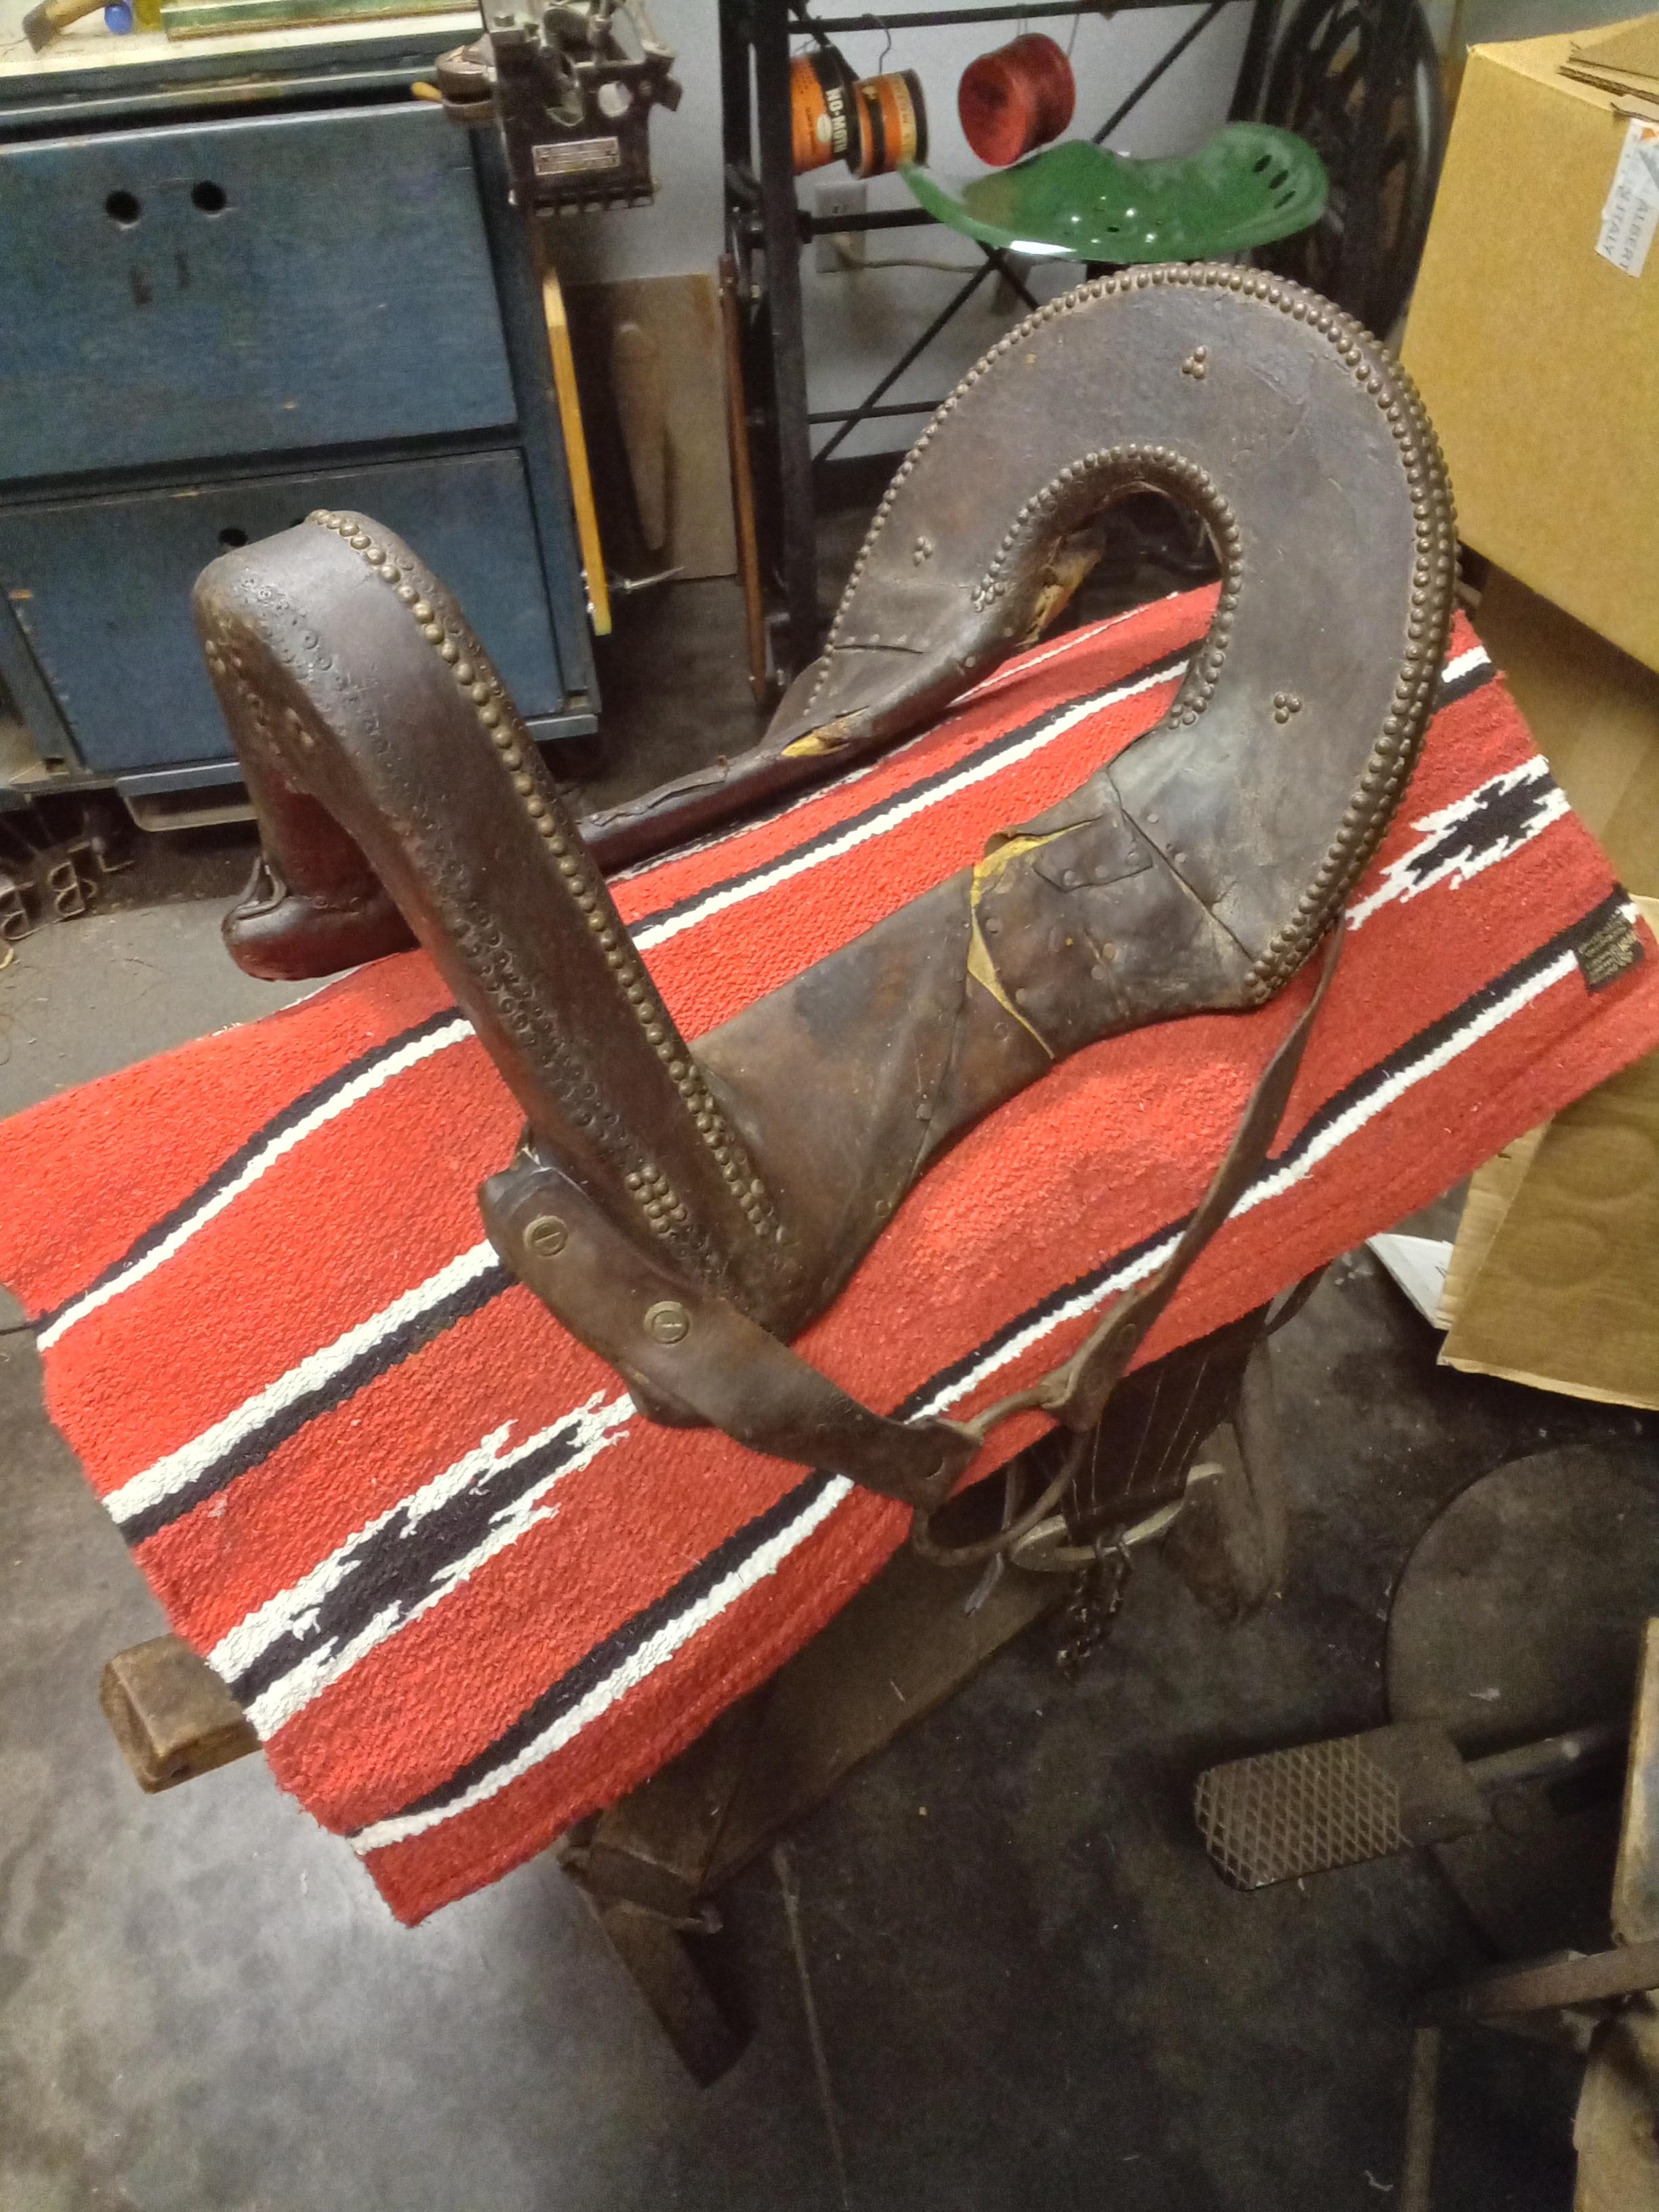
I'm going to do some digging and see if we have a set of oxbow stirrups in our collection that fit with this saddle. If so, I'll make a pair of simple stirup leathers to hang them (not permanent of course, but I'll try to color match them to the rest of the leather). I'm thinking about moving this saddle from the shelf it's been on to a saddle stand, as that would allow the rigging straps to hang more naturally. My mom has a few Navajo blankets/rugs that need to get out of her closet that I think one would fit in with the display as a saddle blanket.
-
Thanks for the insight. Yep that's about what I found when looking for other examples of squaw saddles. Same concept, only this one appears to be more geometrically square and the cantle and swells seem to be slightly more "western" in nature. The brass tacks seem to be unusual, but it would make sense that they were traded for. I wonder what the stirrups would have looked like? I imagine they would be similar concept to western saddle stirrups with the straps wrapping around the sides of the tree, only being exposed instead of under a leather seat (I imagine some kind of loose blanket padding was used between the saddle and the rider?).
-
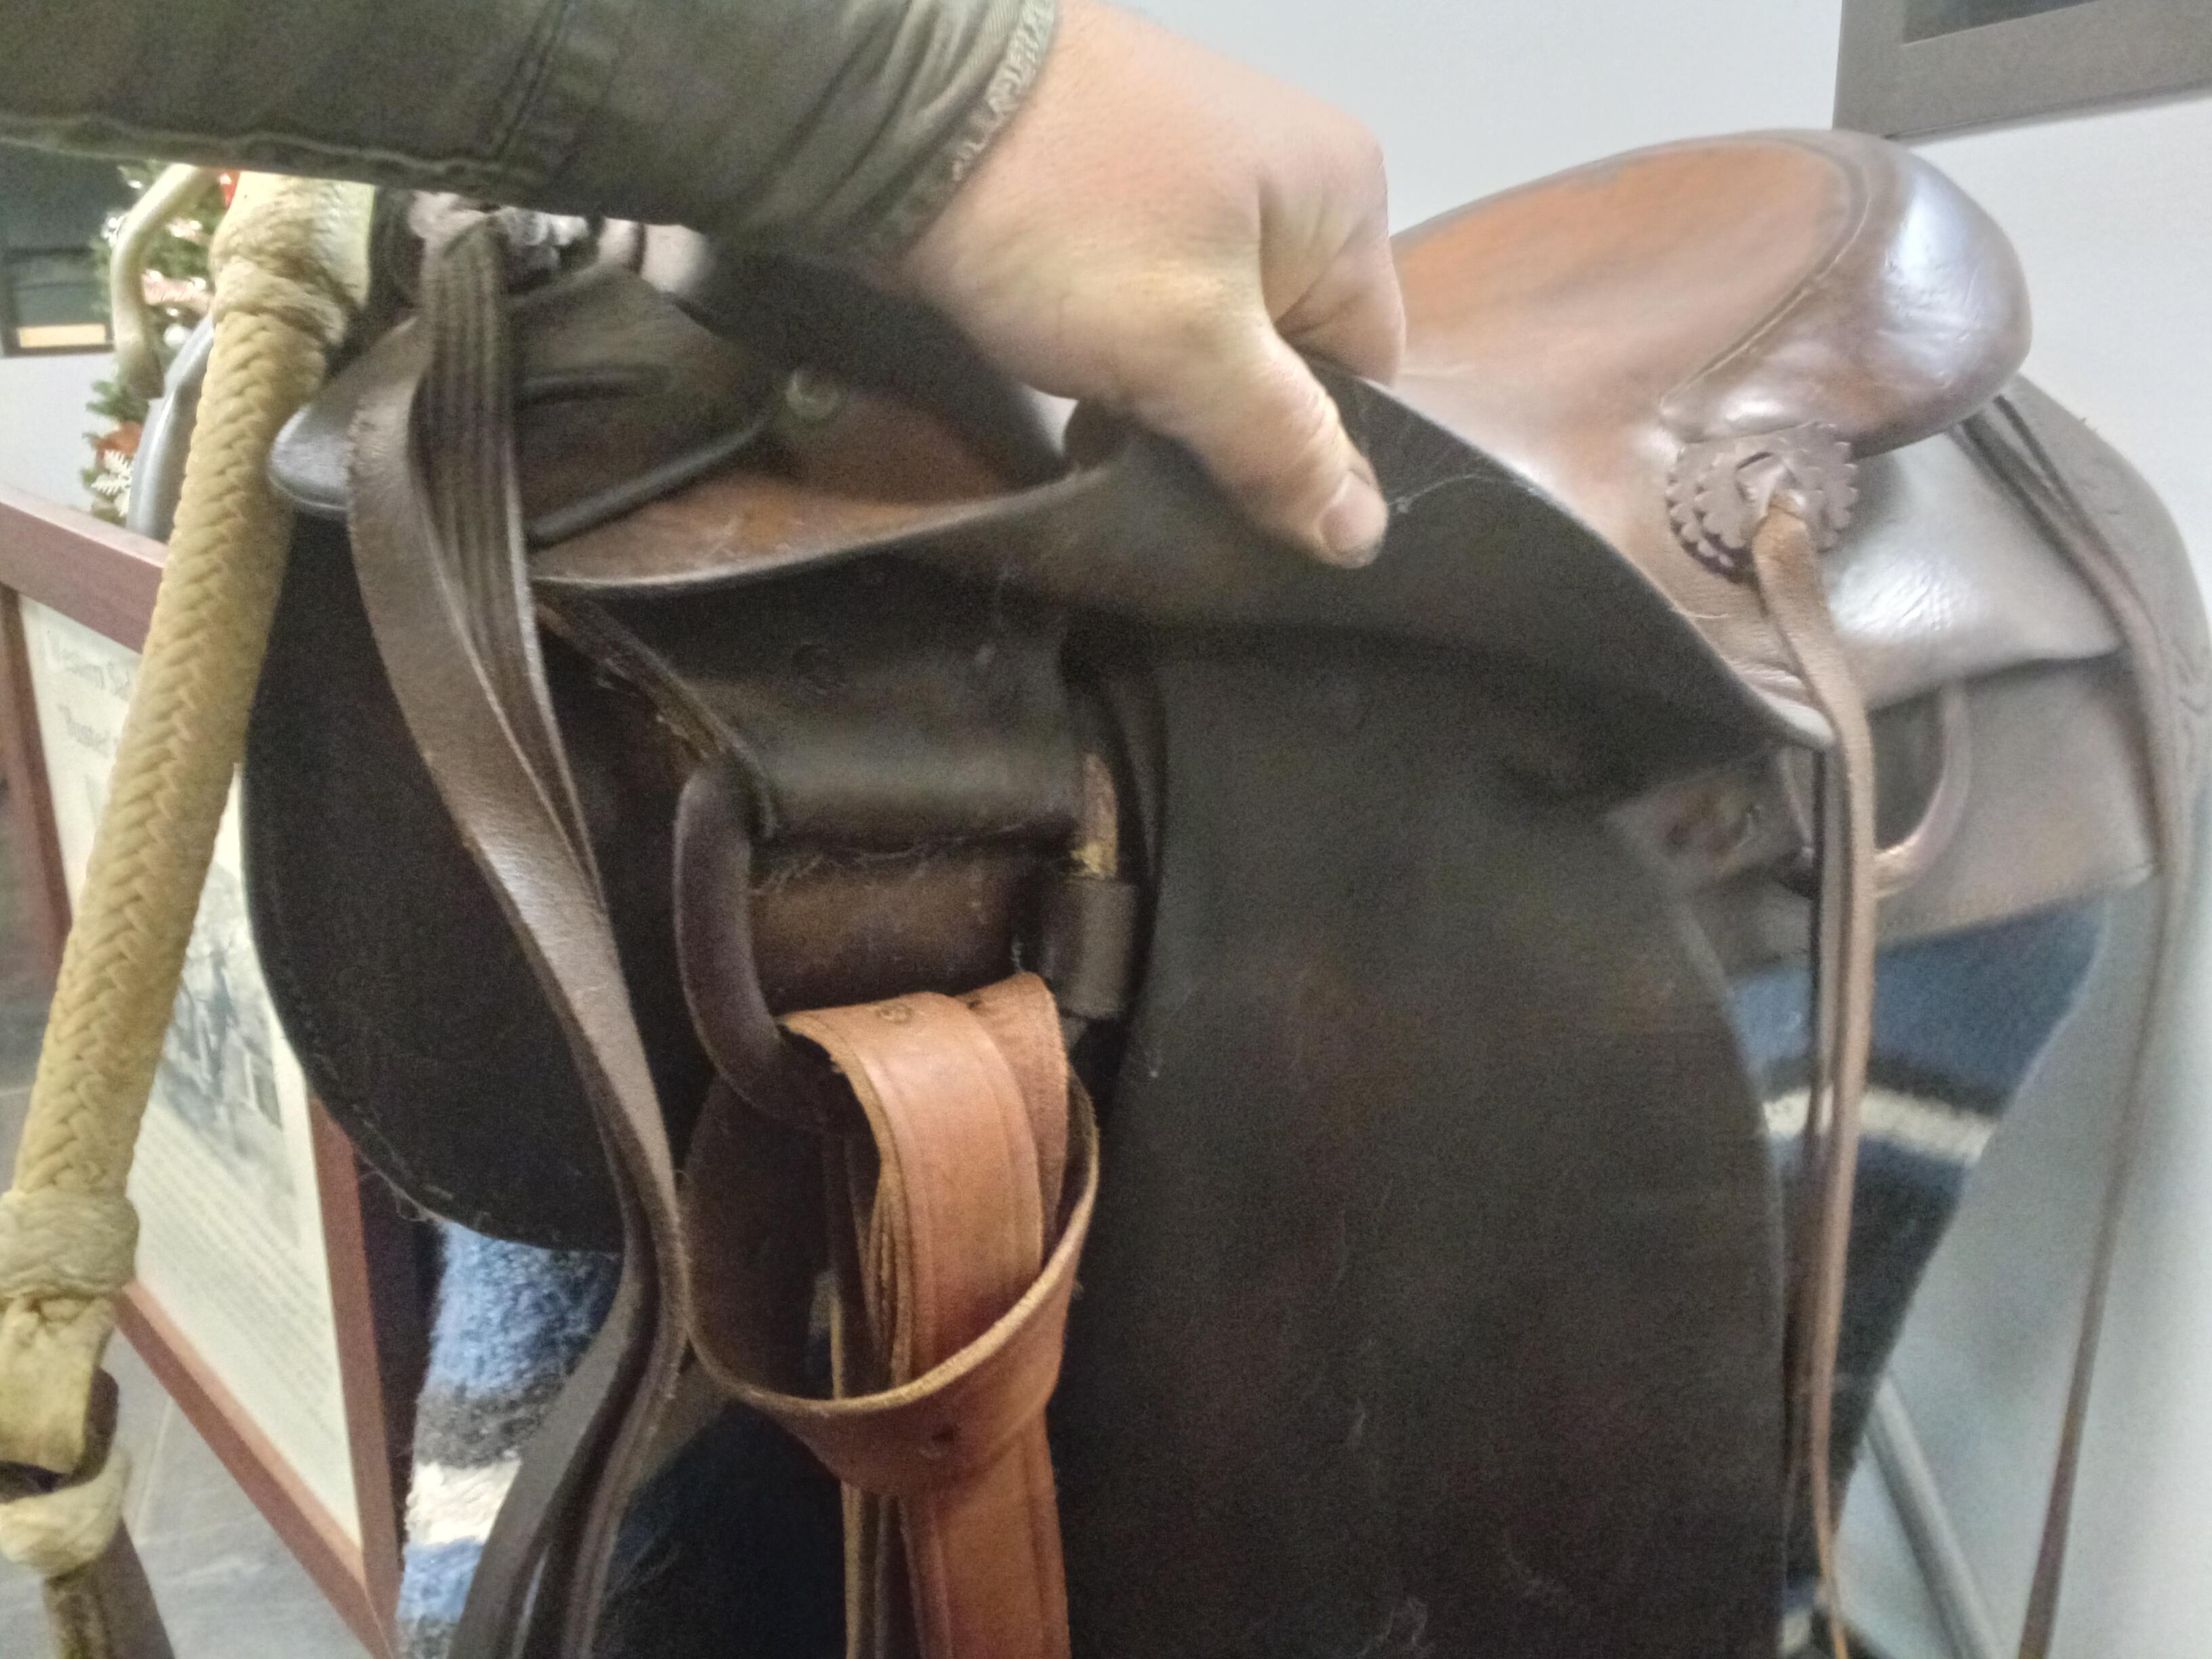
Here's another Pic showing the rigging from the Porter saddle thread. This is interesting as it's similar to Al Stolemans style of double rigging, but also has an additional reinforcement of having the leather for the front rings wrap clear over the swells. This kind of makes sense as the front rings have so much more holding responsibility than the rear, which seem to mainly stabilize the saddle. I don't want to detor too much from the standard saddle design for this build, but I'm wondering if the very basic leather tabs that held the rings previously contributed to the bottom ears of the tree breaking off? If so, it would be good to go a step further in how the rigging is mounted to the saddle. I did some sketching tonight and am thinking about doing a simple hybrid of the Stoleman double ring design, and the Porter design. The Leather would need to have the edges tapered and skived so it dosn't mess with how the seat, jockeys, and swell cover mounts, but it could help the geometry of the tree. I'm going to stick with the welded rigging rings, but carry the leather for the front rings over the swells, and the leather for the back rings around the back of the seat with the same strap continuing forward in front of the rear rings to make the connecting strap. It shouldn't radically alter the appearance and outer design of the saddle, but improve how their holding is distributed across the tree. I'll make a card-stock paper pattern first, and will make patterns for all the other pieces as well which might help one day to eventually build out the unused saddle tree and rebuild the junk store saddle pictured previously. This saddle didn't have a metal floor panel, and there was no hand hole under the swells, but both I plan to add when I do the ground floor leather.
-
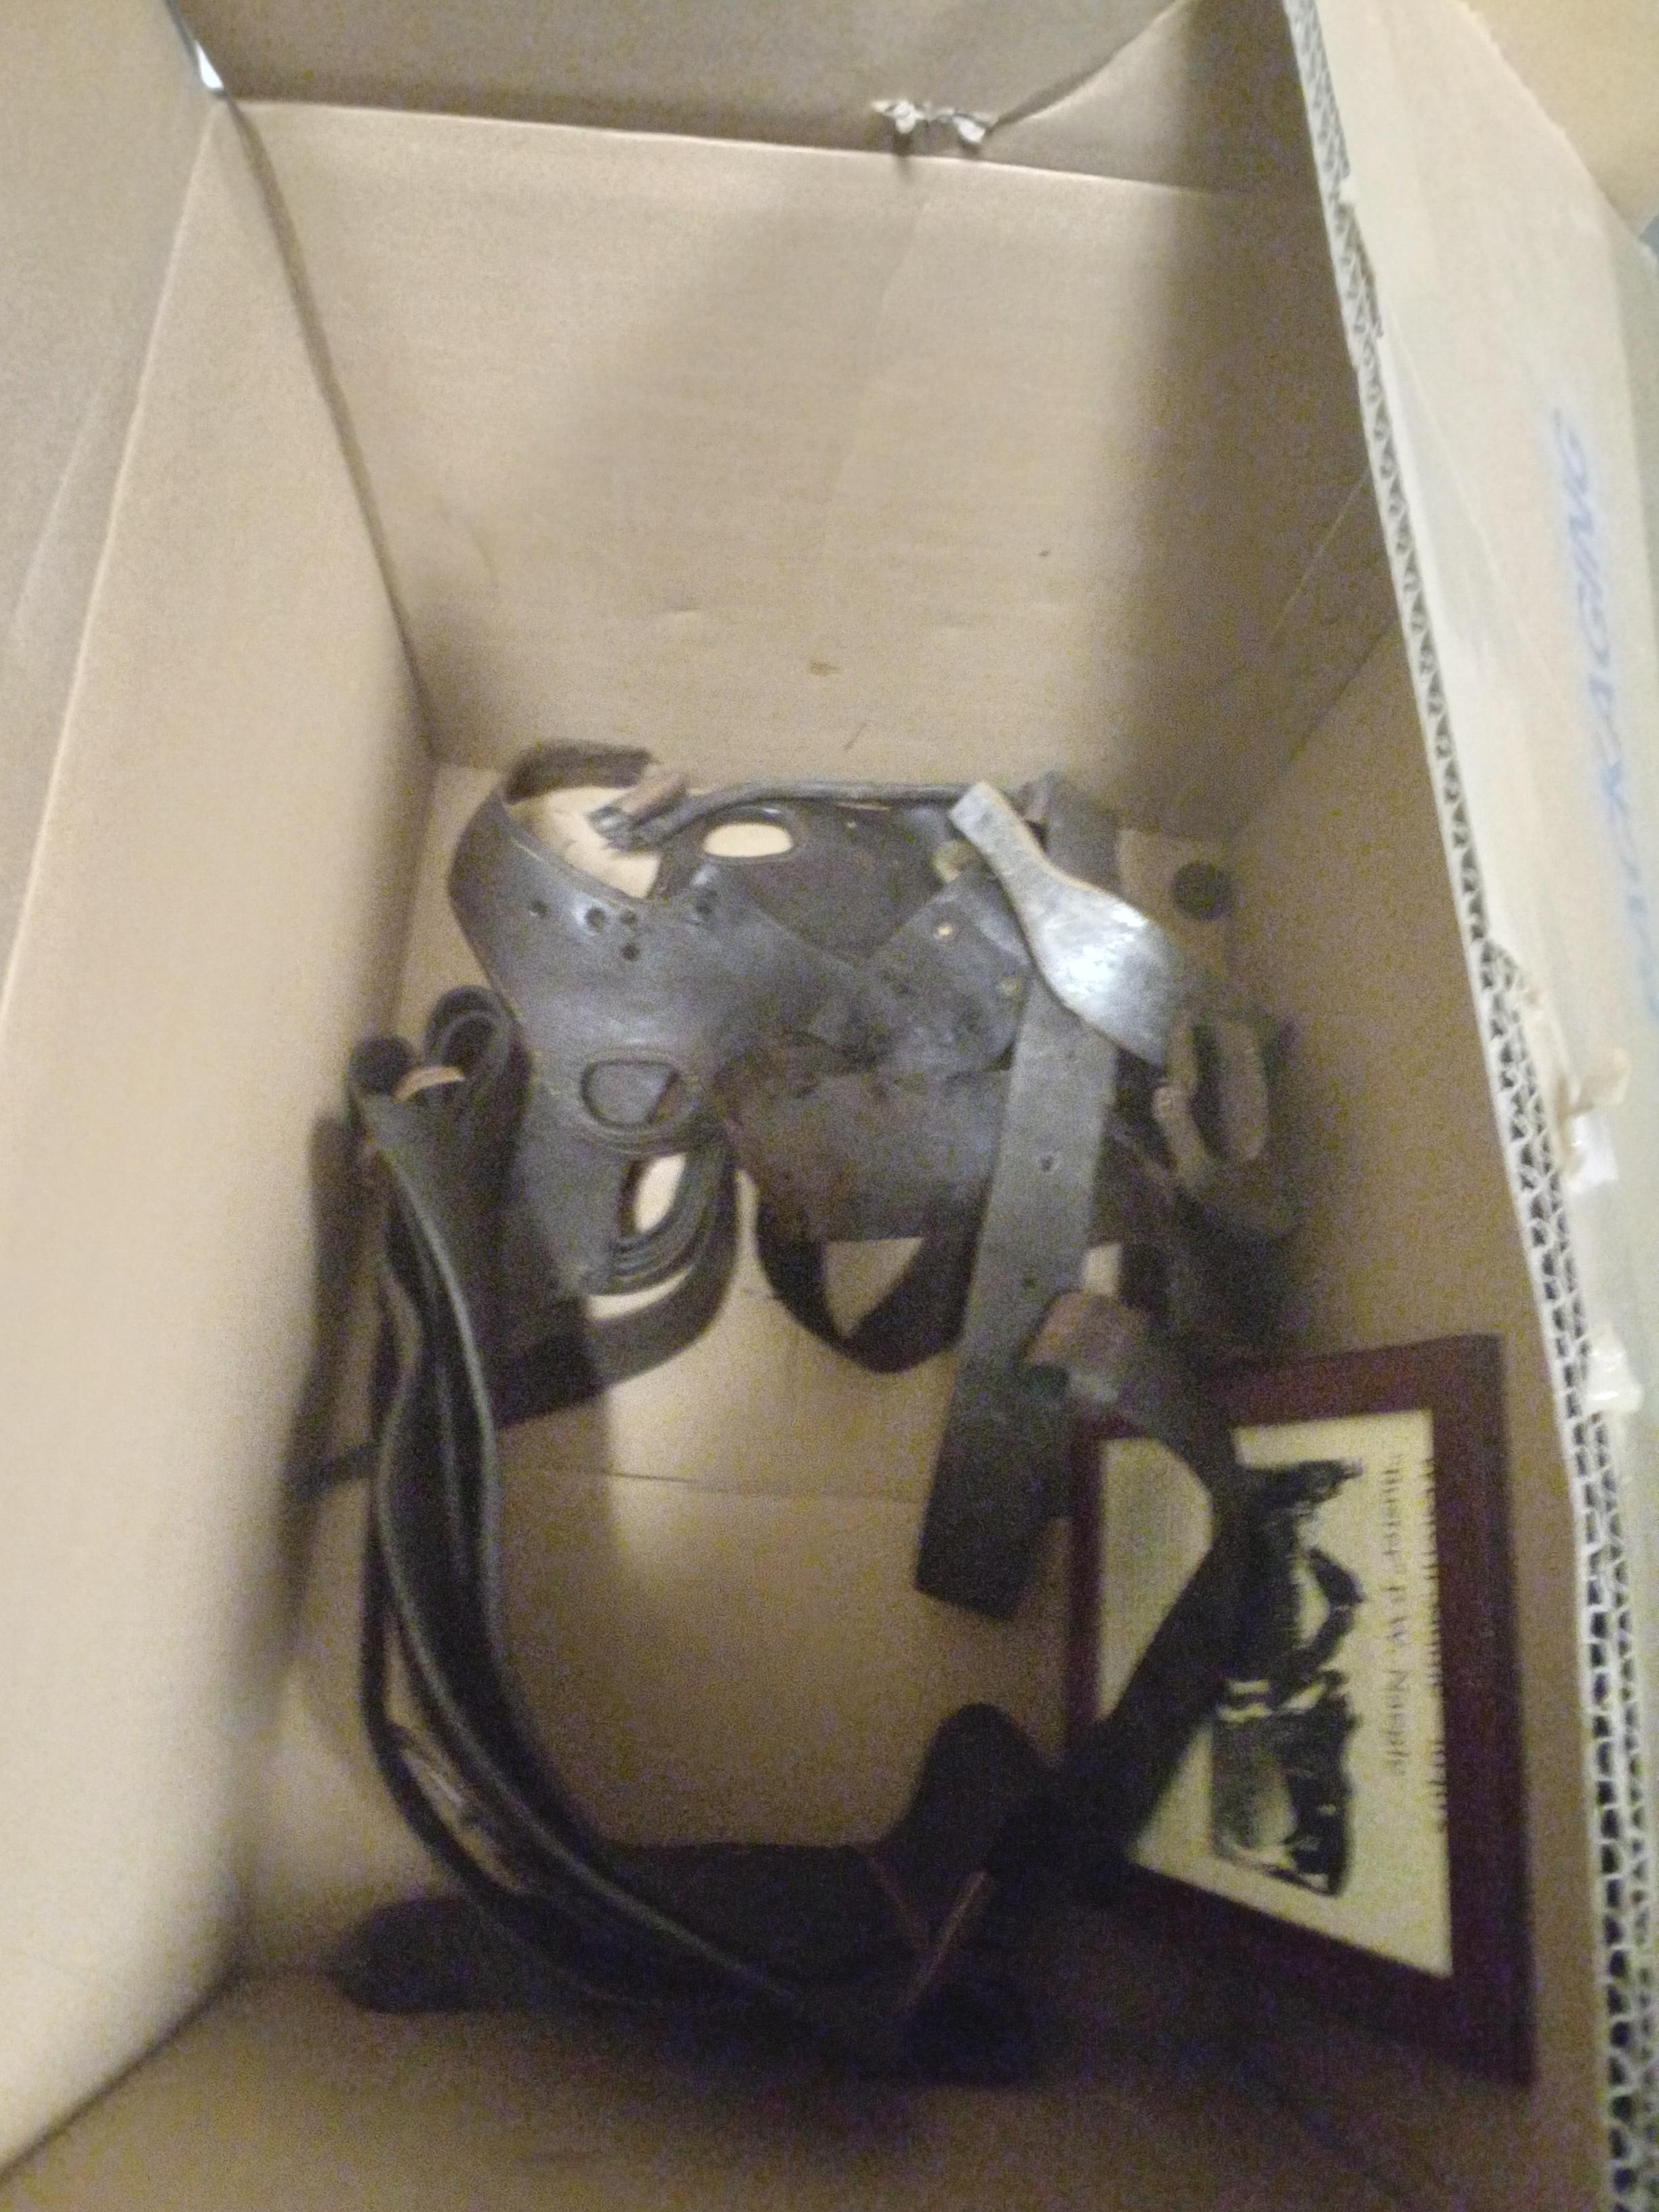
Just to give some perspective, these are some of the family saddles I'm taking inspiration from, and eventually want to repair, restore, or preserve. This saddle my grandfather had made in the 60's and was one of his general use working saddles. It's one that's still usable. This one was a general use saddle on grandpas ranch, though it was mainly used by my Dad in high school. He had a drop calf he raised on a bottle and eventually trained it to ride and do circus style tricks as a rodeo act, and from the pictures I'm 90% sure this was the saddle he used. This saddle was my great grandfathers and goes back to the 1880's. It's one we've decided to preserve and not restore, as every piece would need to be replaced, and the tree's shape wouldn't fit modern horses anyway. The wear and tear on it to me speak volumes of hard life in the west and give me gratitude for what I have, so I wouldn't want to lose that restoring it. As you can see, these are all standard double ring rigging, and I'm thinking I'll use their ring placement and proportions on the youth saddle in this thread. I also started a thread for a saddle my Dad started before he passed, and I hope to complete. Restoring a Porter Saddle I'll also start threads for each of these and some other saddles eventually.
-
I'm still extremely early in this process, but wanted to start a thread for this project as it's technically already in motion. My Dad, Conrad "Connie" Naegle, was a saddle and harness maker and leatherworker for half his working life, before pivoting towards the machinery side of the industry where our family currently makes it's living. He had inherited several family heirloom saddles and had planned on restoring them eventually (of course life gets in the way). Half are currently in OK shape needing some basic work done, and the other half are far enough gone that they would need to be totally rebuilt. His health went downhill in later life (Alzheimer's and dementia) and he passed away in 2023. Being a working man his whole life, he didn't take well to having his body degrade, and his decline in memory and mental understanding of things we never really learned to cope with. I grew up partway between his leather shop and his machine shop, though my carrier has been on the machine side of things. I worked with him a bit on the saddles, but often found myself having to hold him back from getting in too deep. In his mind he knew what to do, but somewhere between there and his senses things would get scrambled and he rarely recognized it. The saying "He's forgotten more about it that you'll ever know," comes to mind, but in a sad and discouraging way. His original plan was to restore all of the saddles to be ridable again and I think this intent was a way to put his skills to work righting the wrongs of himself and past family members who had let the saddles fall into disrepair (the saddles were all ridable in his lifetime), but we quickly found that doing so would remove a lot of their history and authenticity, especially in the oldest saddles, so we decided to preserve some (such as my Great Grandfathers 1880's saddle) as they were, and make others ridable. This Porter saddle my Grandfather Buster Naegle got sometime in the 1930's in southeastern Arizona before he went off to school and then enlisted in the army during WW2. He went through boot camp down in Ft Bliss, but was transferred to Ft. Reno in Oklahoma where he trained horses and pack mules for the army. At some point after arriving there, there was some problems with their military saddles so with permission he had his family send him this Porter saddle to use and in some way it was a model of the kind of saddles they needed, and I think the guys in charge even ordered more from Porter to use at the fort (I'm hoping to eventually get in contact with someone at the fort to corroborate this, and I've already sent a message to the guys who have the old Porter card file website). I remember in the mid 90's my dad did some minor repairs to this saddle and rode it around our place in northern Idaho. As a kid I didn't make the connection, but my Grandfather died around this same time and I'm certain this saddle was particularly special to my Dad. When we started digging into it, the hope was to soap it up, replace the sheepskin, and do some other minor repairs, but the more it came apart, the more the pieces crumbled and stitches ripped through the leather. In retrospect, I think it should have been preserved as a static display, but at this point I think the can of worms is open, and my choices are to replace 90% of the leather, or call it a loss (not really seeing that as an option). The original leather is heavily worn, which would have been nice to preserve, but I think the alternative is to reproduce the pieces as closely as possible. I'm going to need to reproduce the Porter makers mark somehow. I think hand tooling it will leave too much room for error, so I'm hoping I can have one made without getting in any copywrite hot water. I had considered handing the project off to someone with more skill than mine, but I think these kind of projects always have a level of "artistic license" interpreting what details matter and which ones don't, and it's hard to turn that license over to someone else. Also, since my Dad was the family leatherworker and the saddle is a family heirloom, I think it best to keep the process in the family, even if it takes years to complete. My leatherworking skills have always been better on the technical process side, but I have a lot to learn of the craft and wisdom it takes to build a saddle. I'm starting by rebuilding some saddles that are less sentimental (thread about the first one *here*), but my end goal is to finish rebuilding this saddle (and others I'll post about later). Fortunately, all the pieces are there and give good patterns to follow. Even the tooling I can already see how to replicate. Thankfully it's simple old-school boarders and nothing too artistic, which is how I like saddles personally. Starting with the tree, I don't think I need to remove every bit of leather. I think the floor and other reinforcing pieces will continue to work. There are a couple of places that the wood under the rawhide has degraded, and I'm considering using some modern epoxy filler to fix those points (more on that later). Part of the challenge I think is that I want the saddle to be 100% original, even though so much of it has to be replaced. I can make a new seat and skirts that look exactly like the old ones, but then getting them colored right and formed together right can be a challenge. I don't want to artificially wear or weather anything other than dying the leather to match, but I also don't want the new parts to stand out against the old. Like I said, I'm starting by practicing on some other saddles, but with this one I'm going to take my time. One of my favorite mantras is to "Avoid permanent solutions to temporary problems." History deserves preservation, and I think keeping things functional as they were originally intended to be used is always the best approach.

-
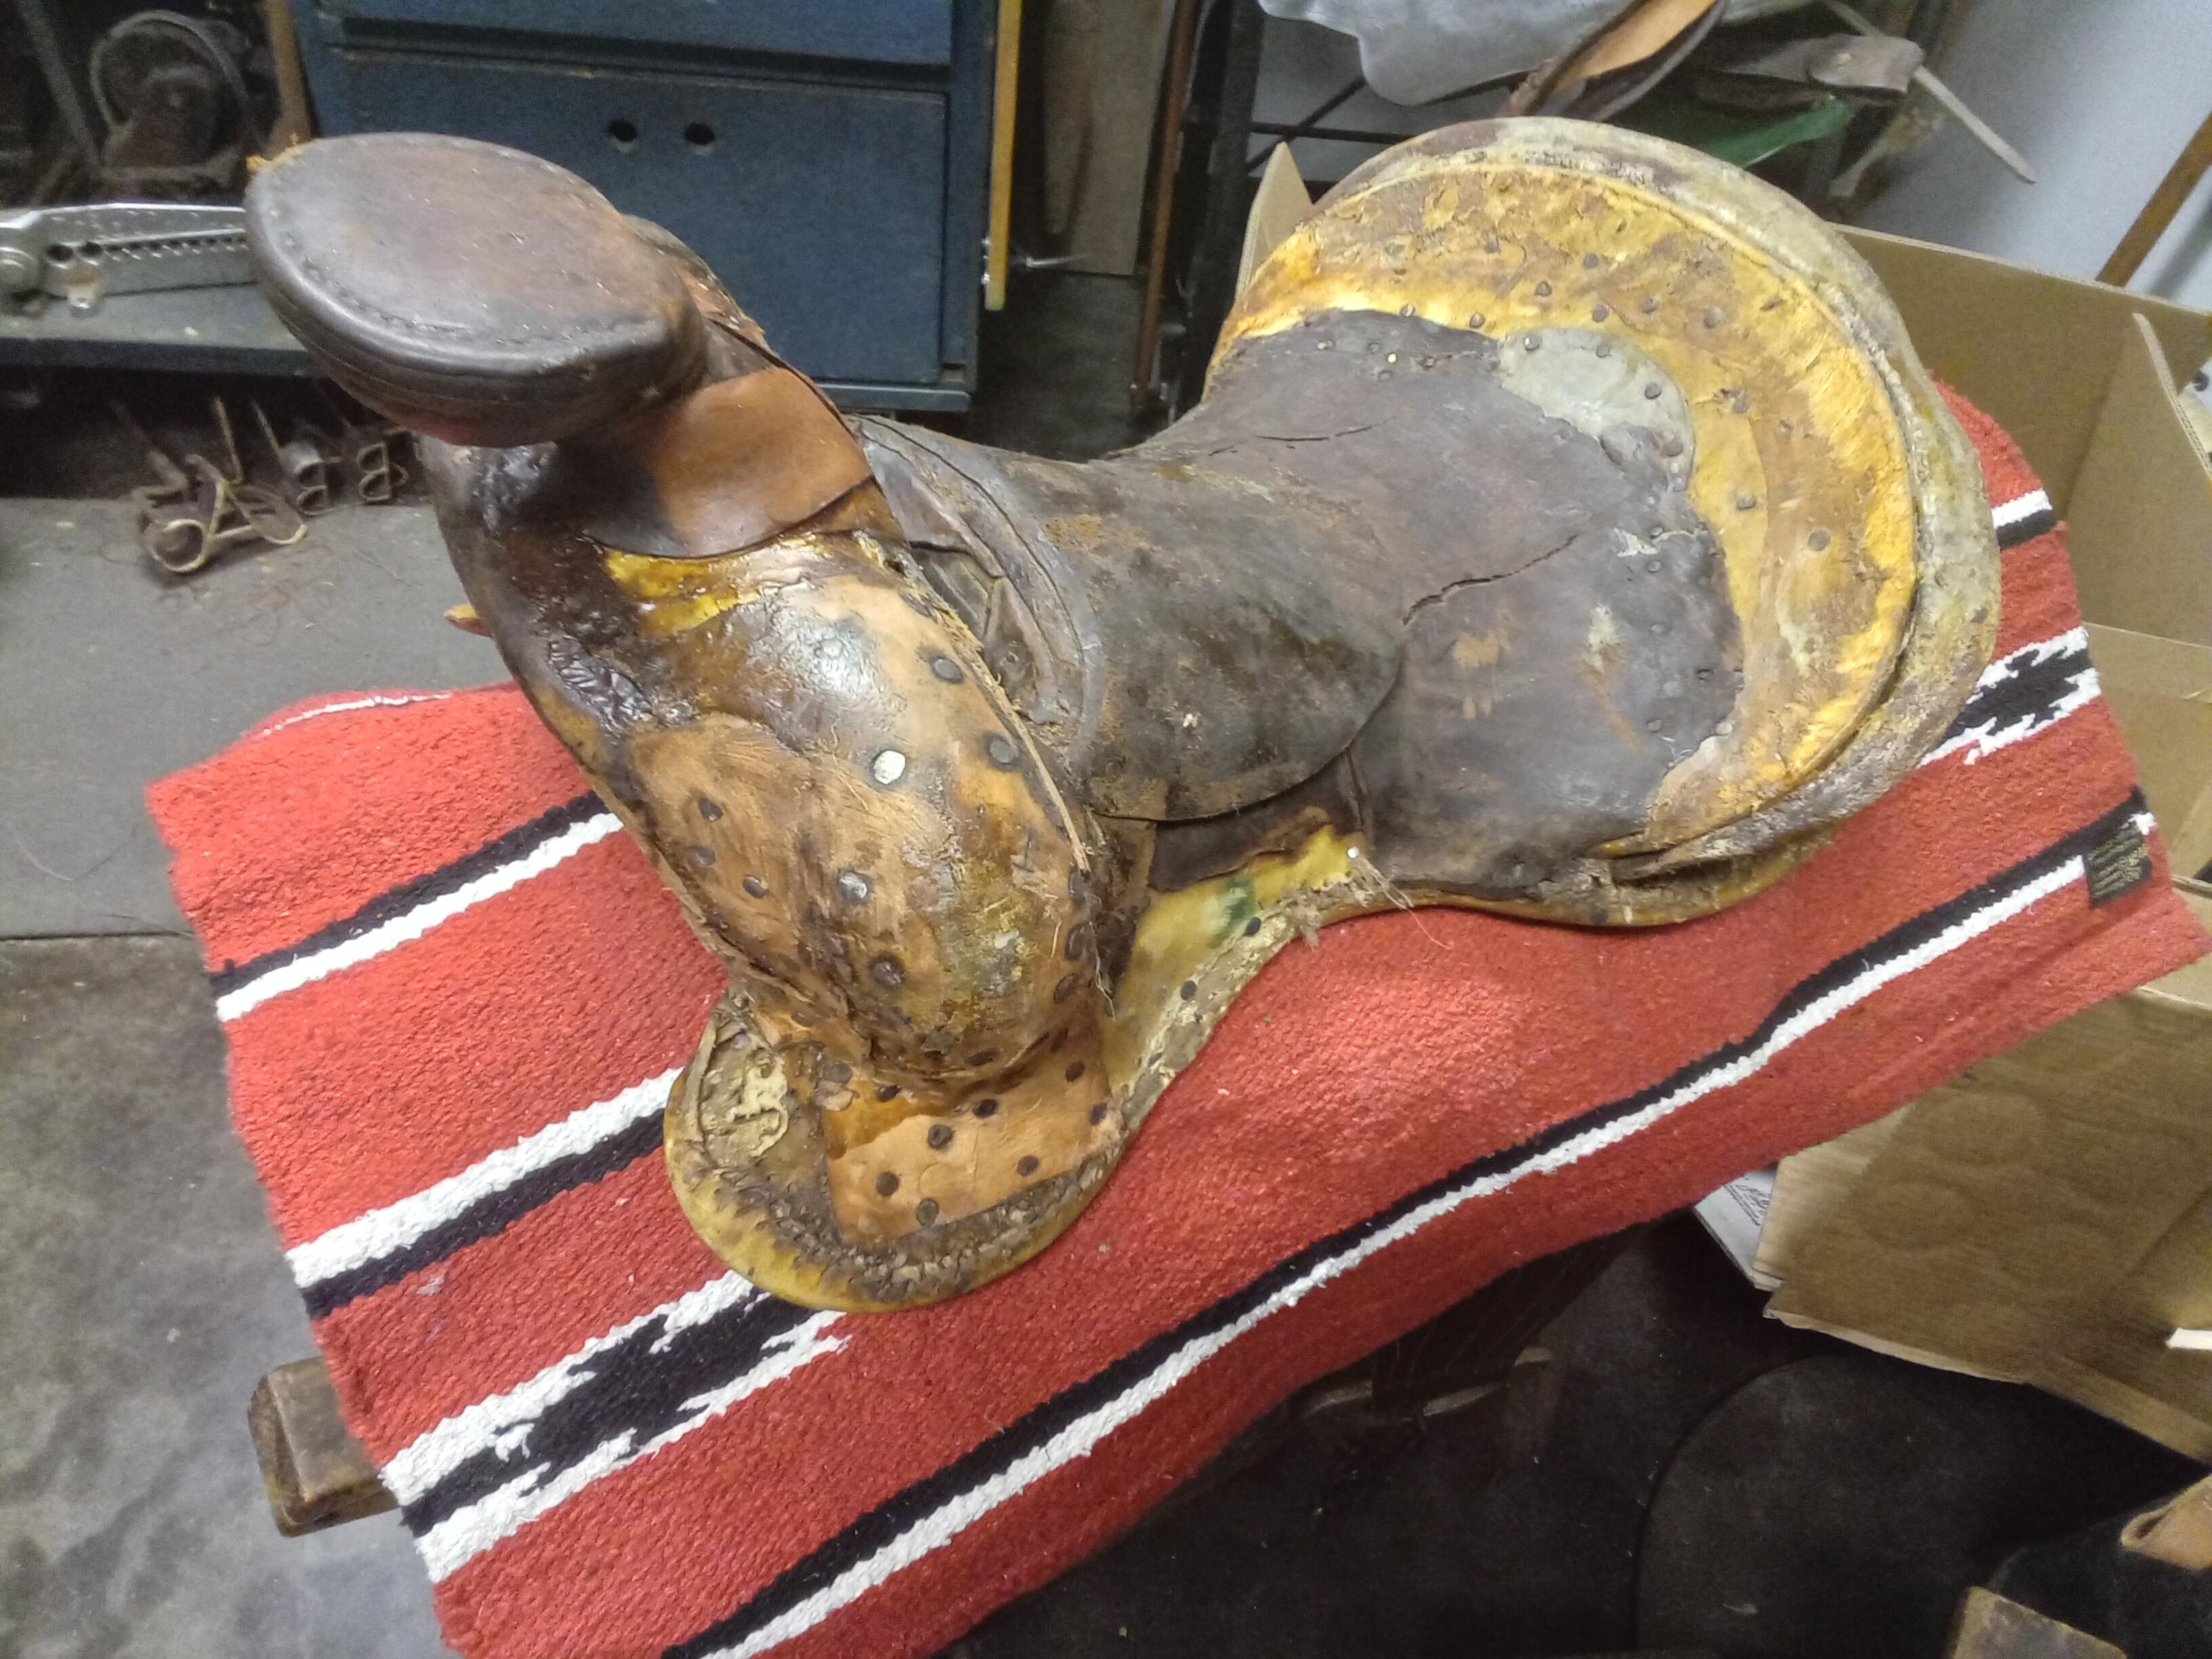
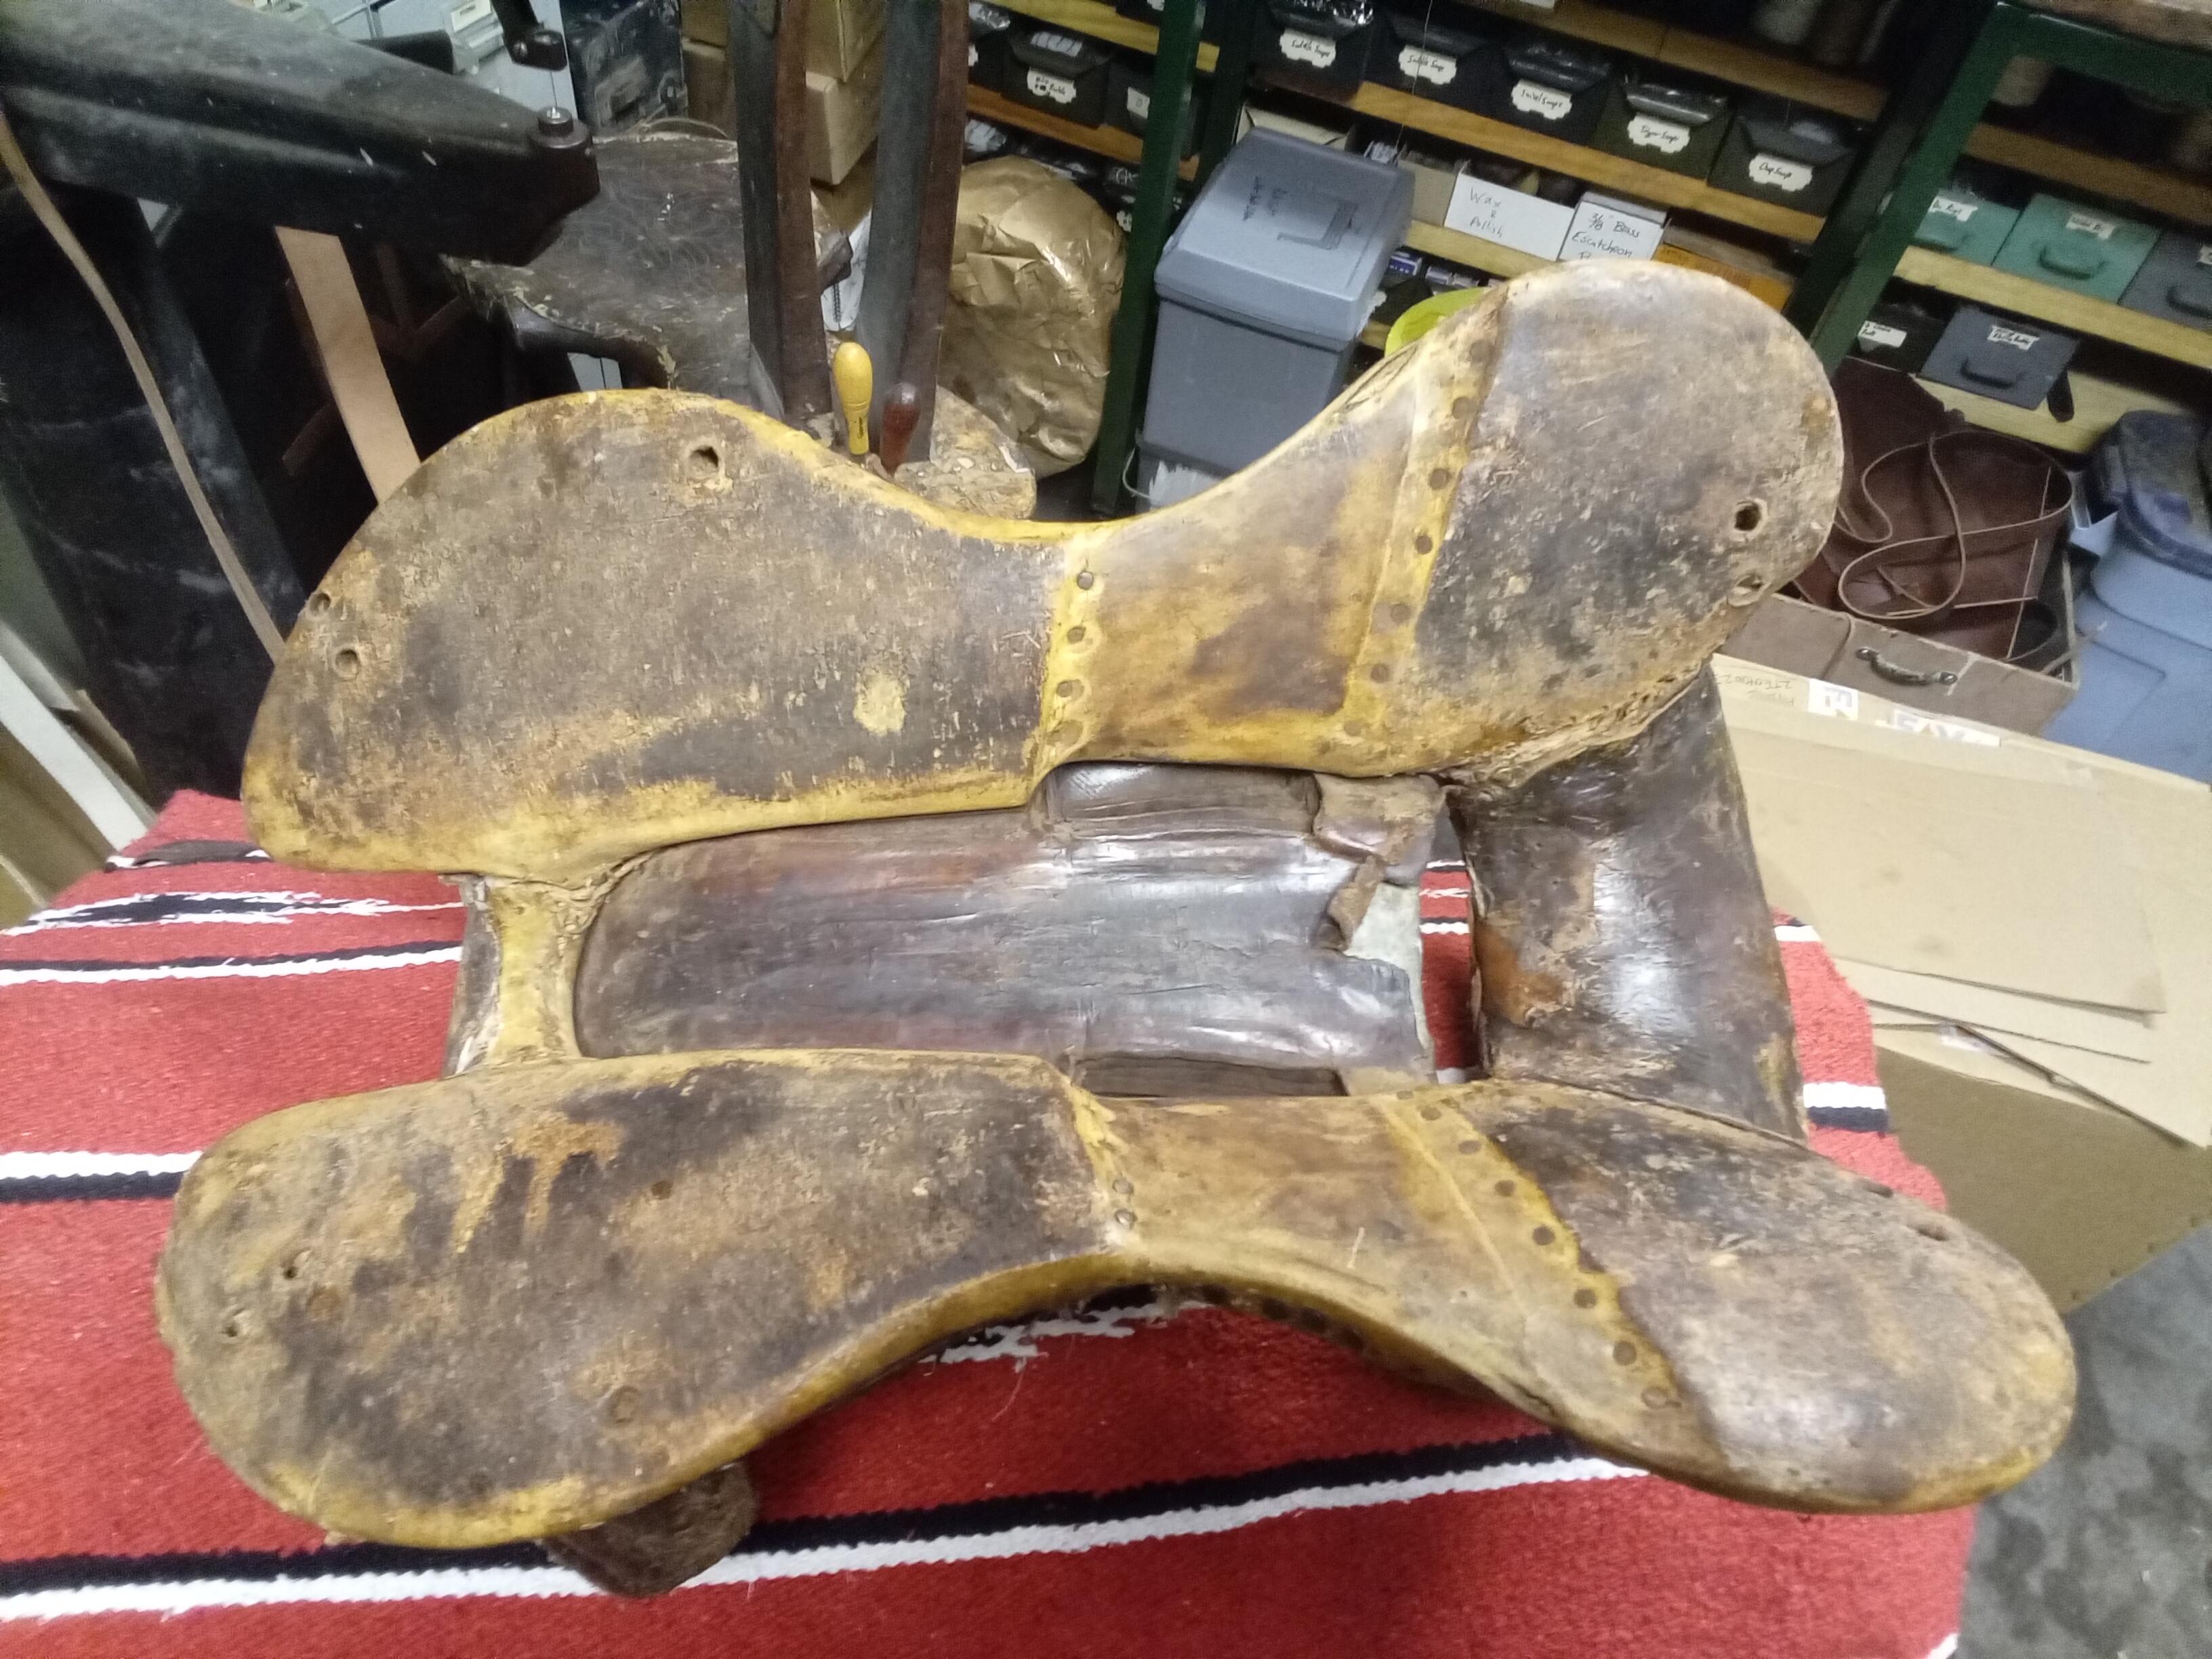
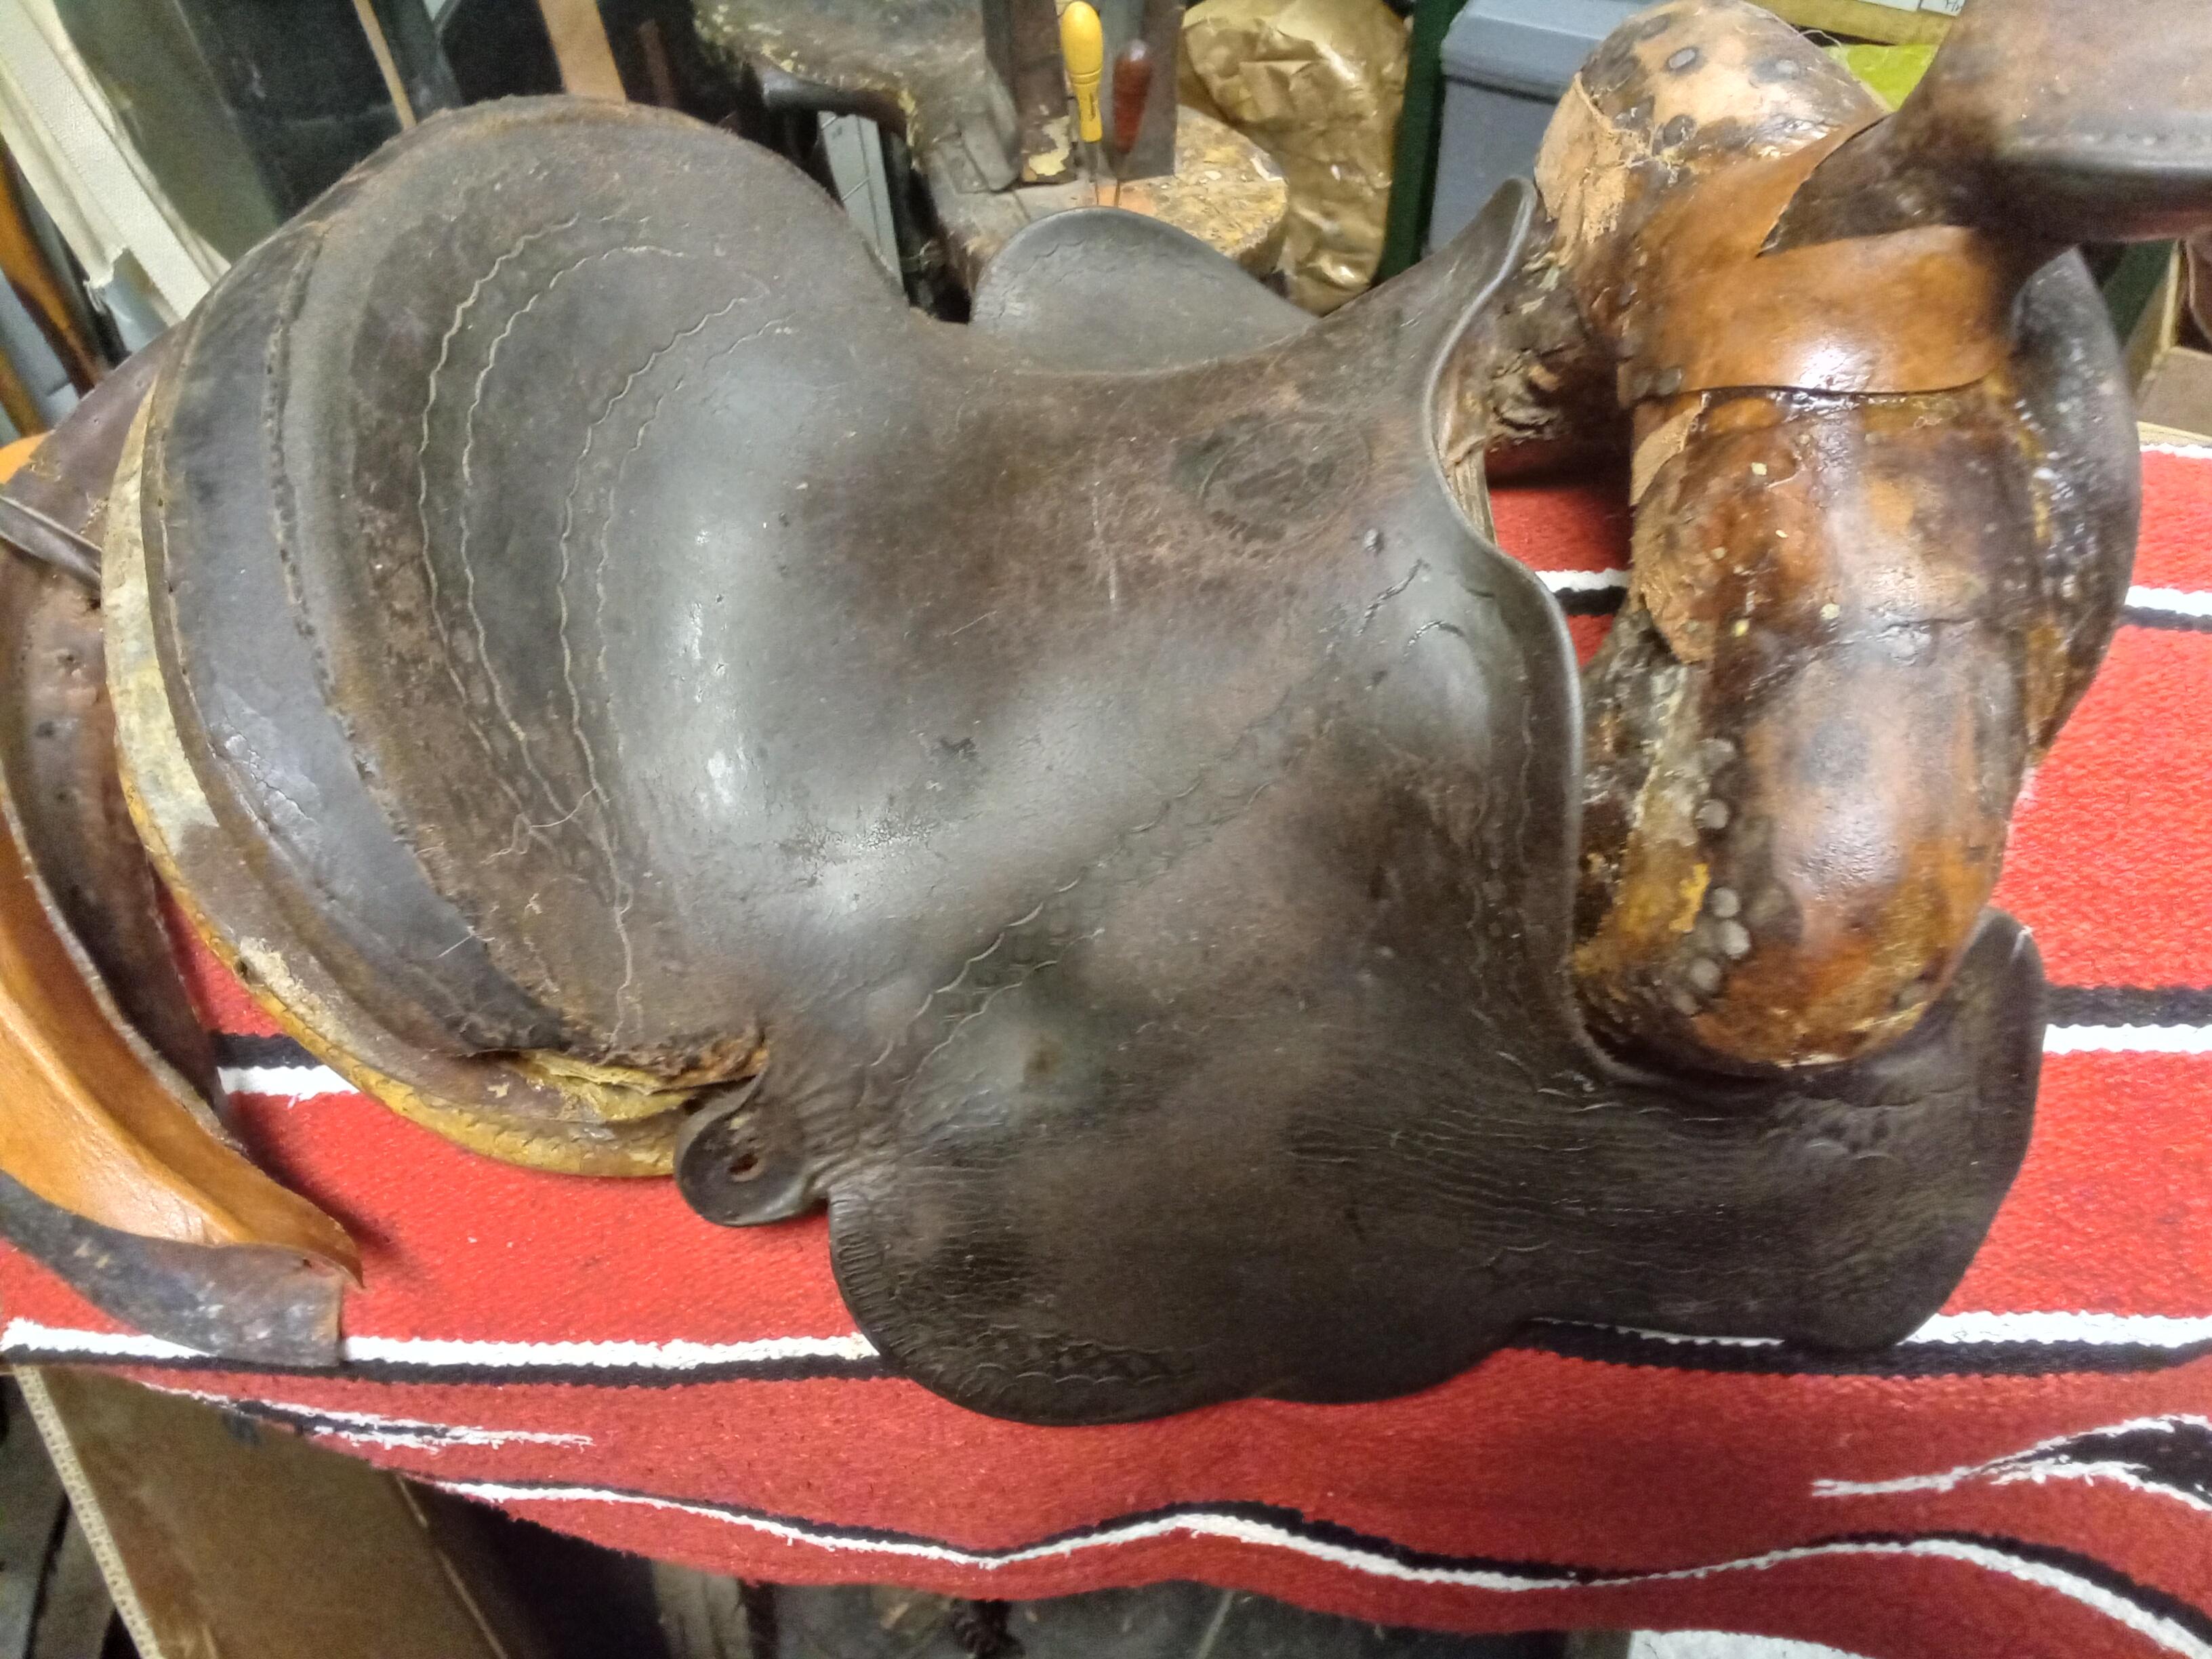
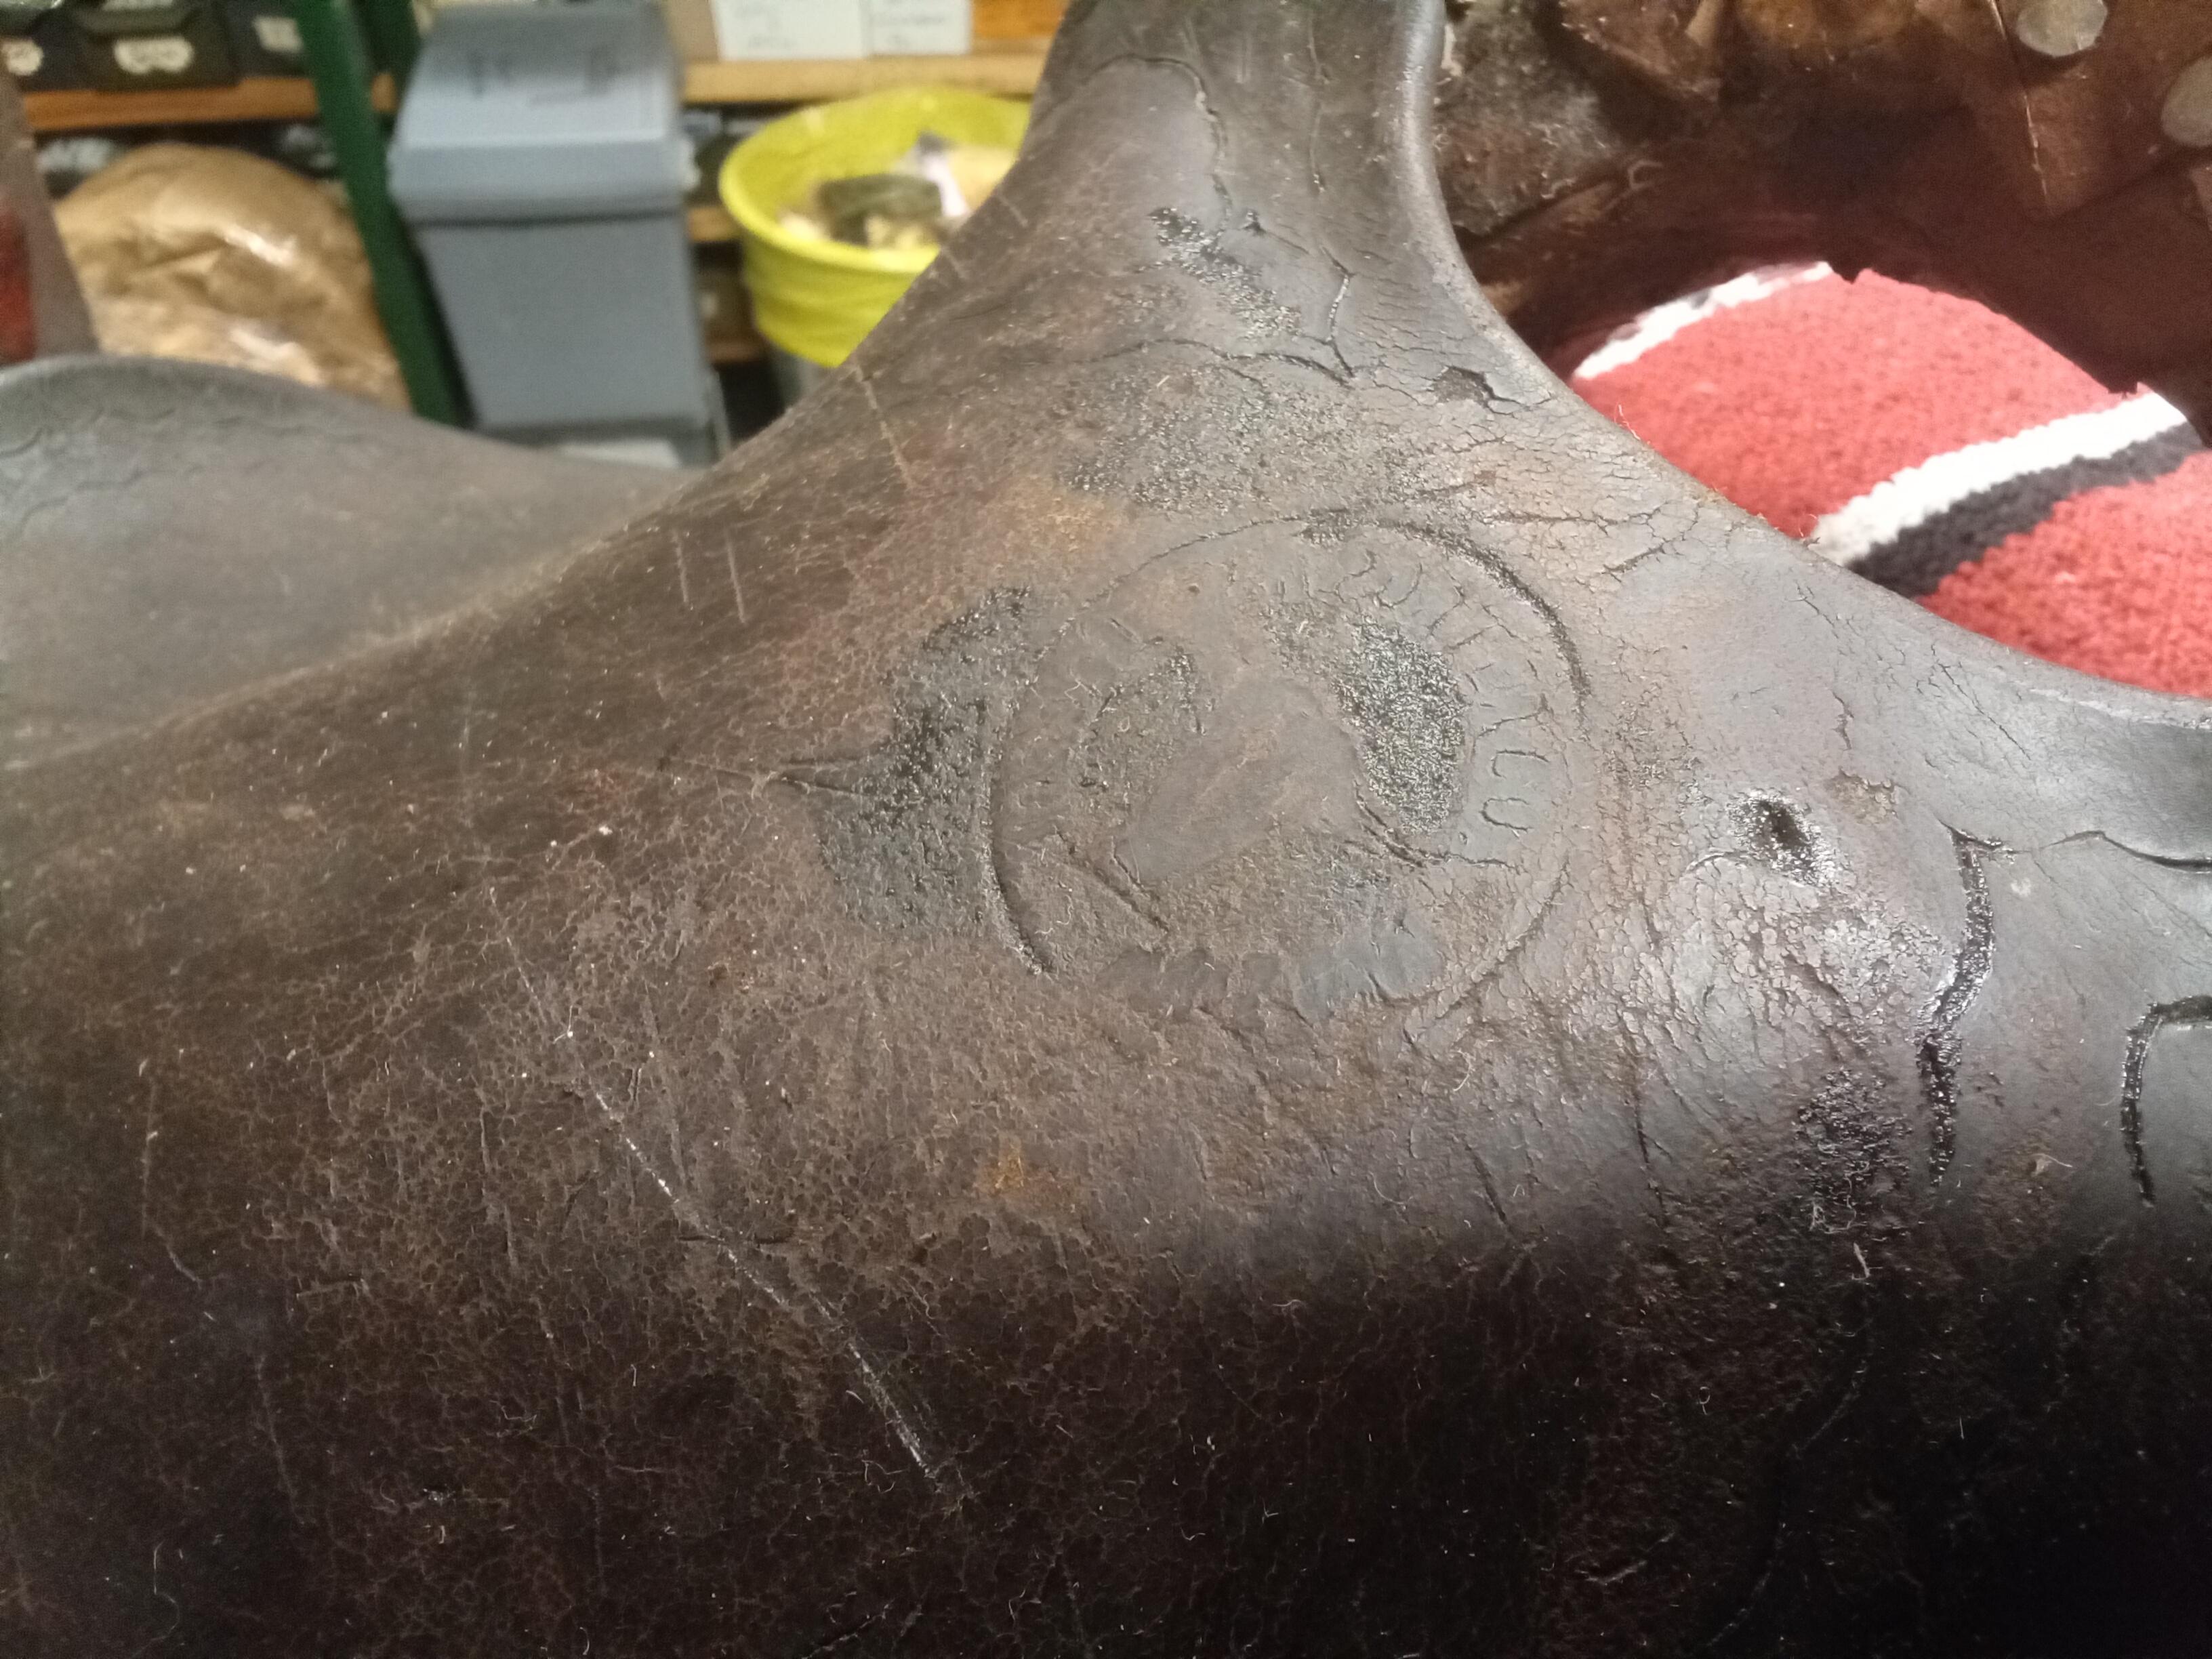
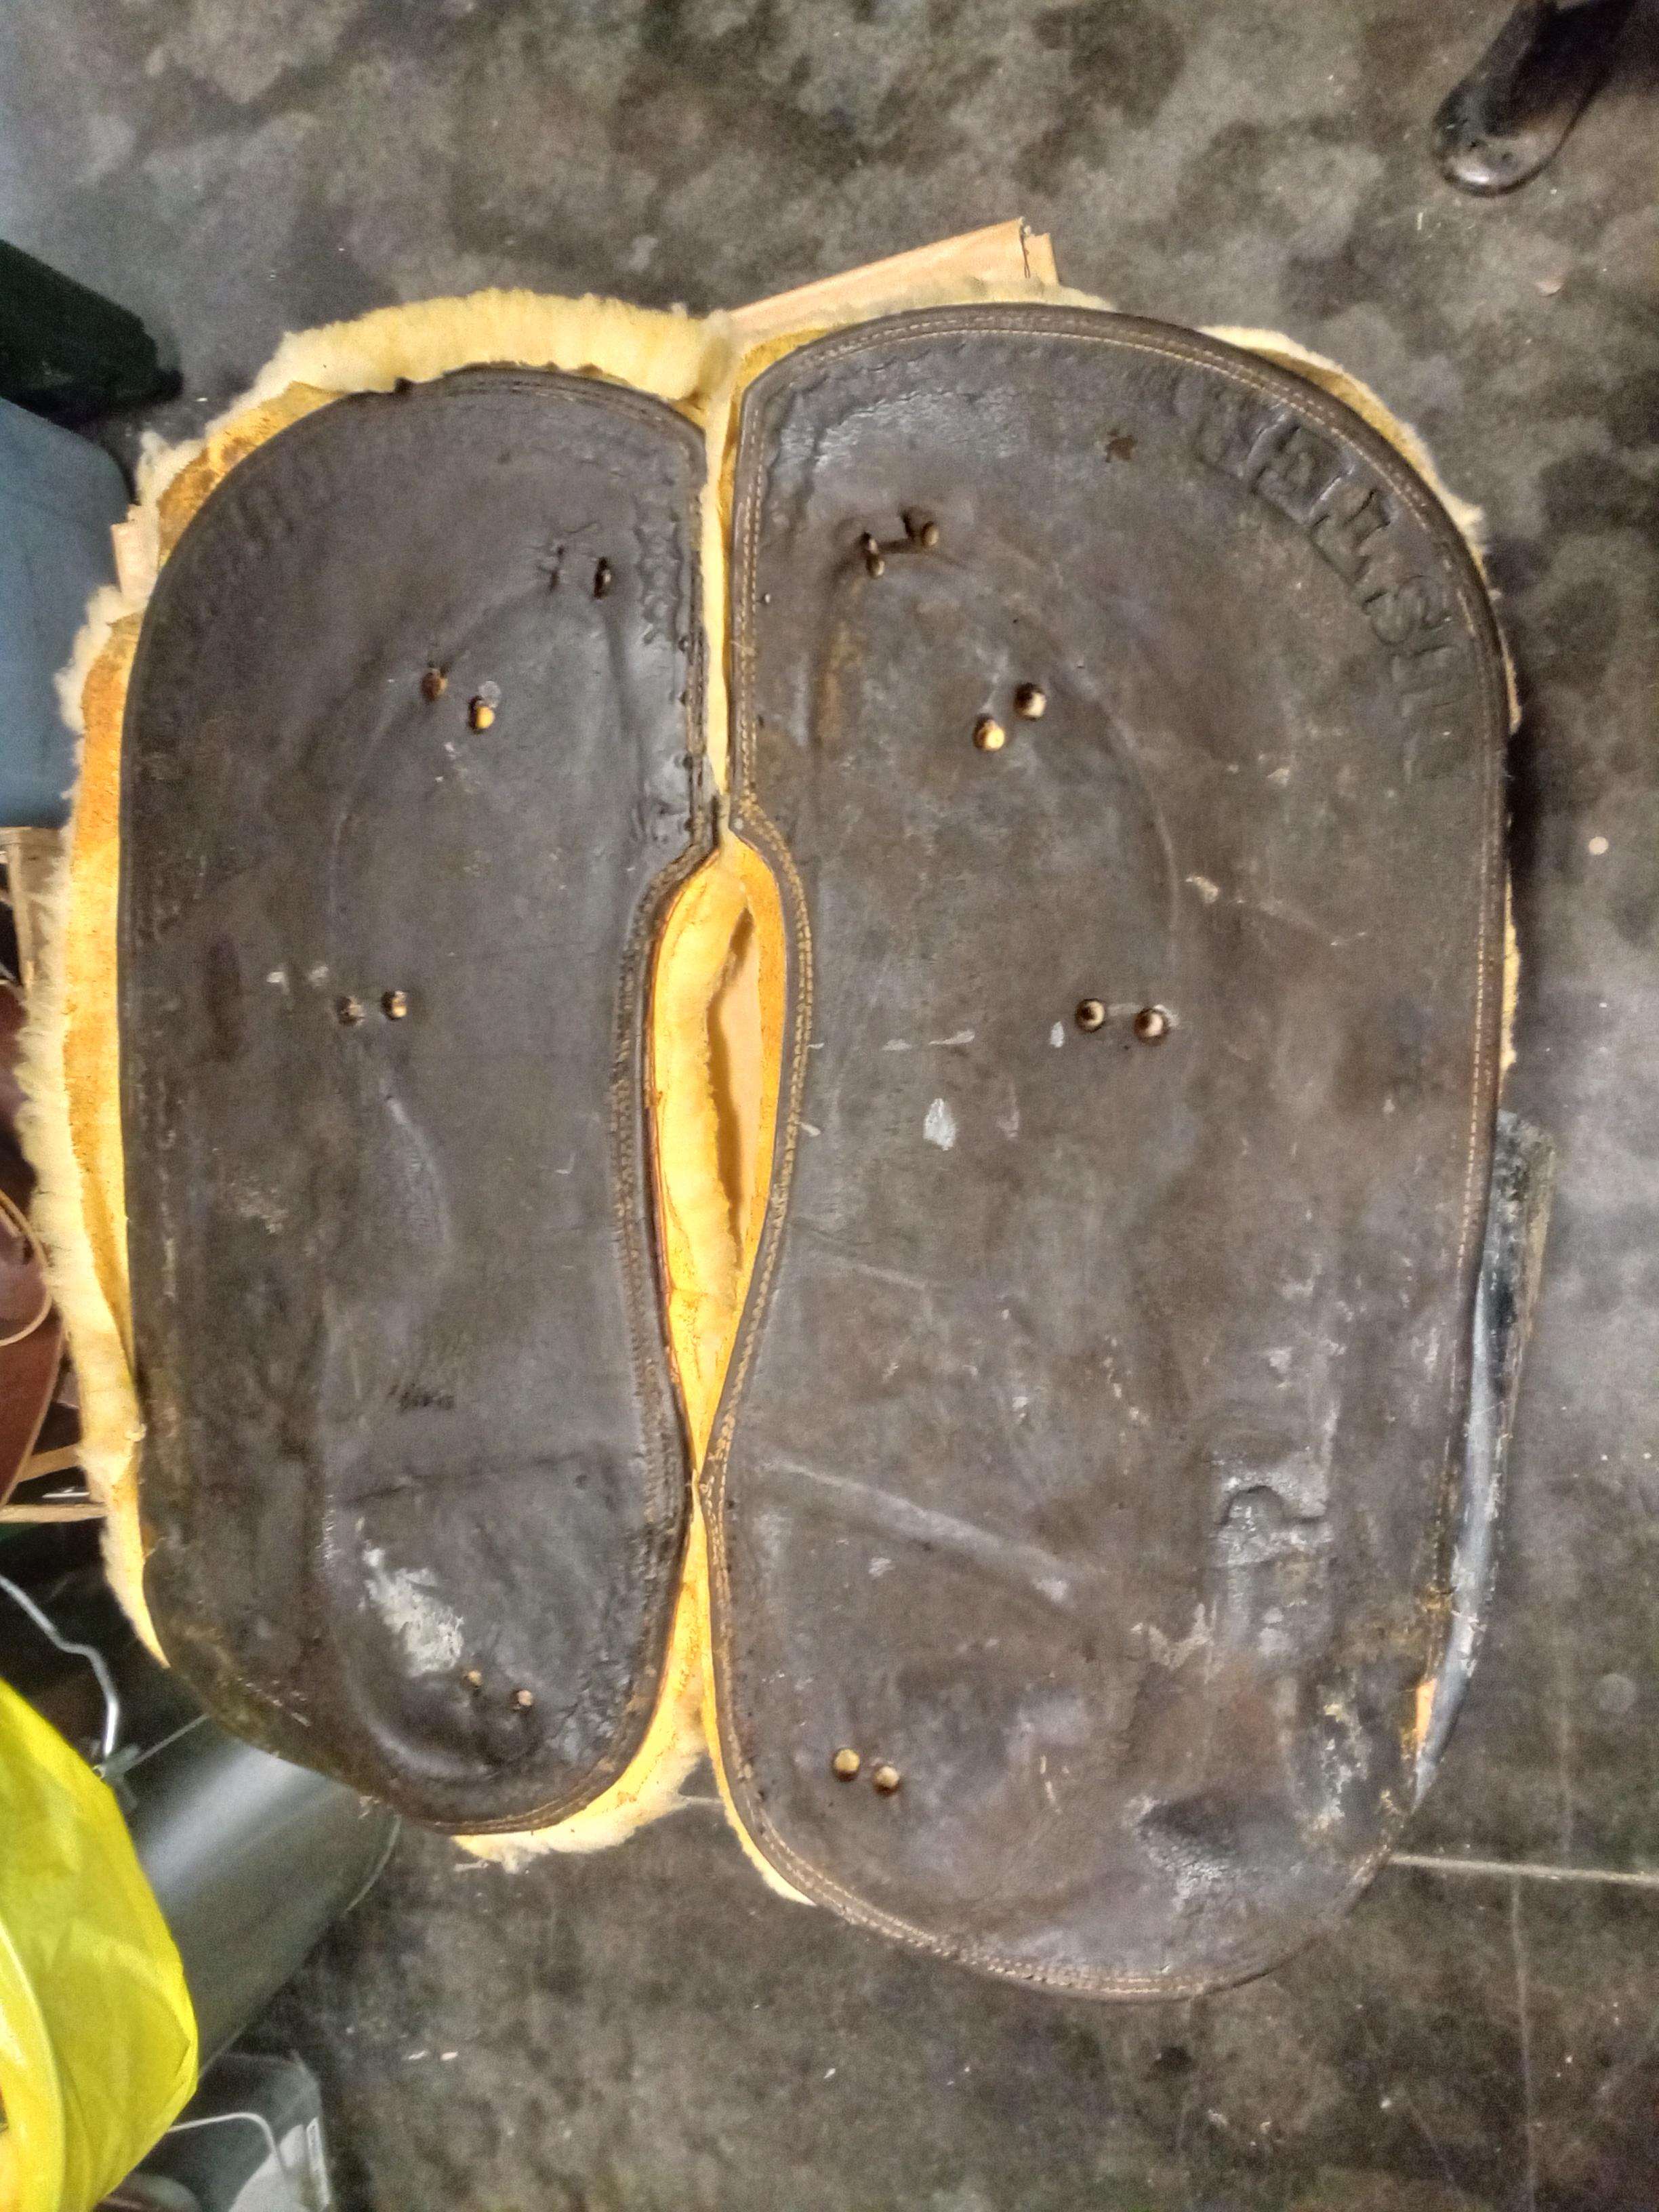
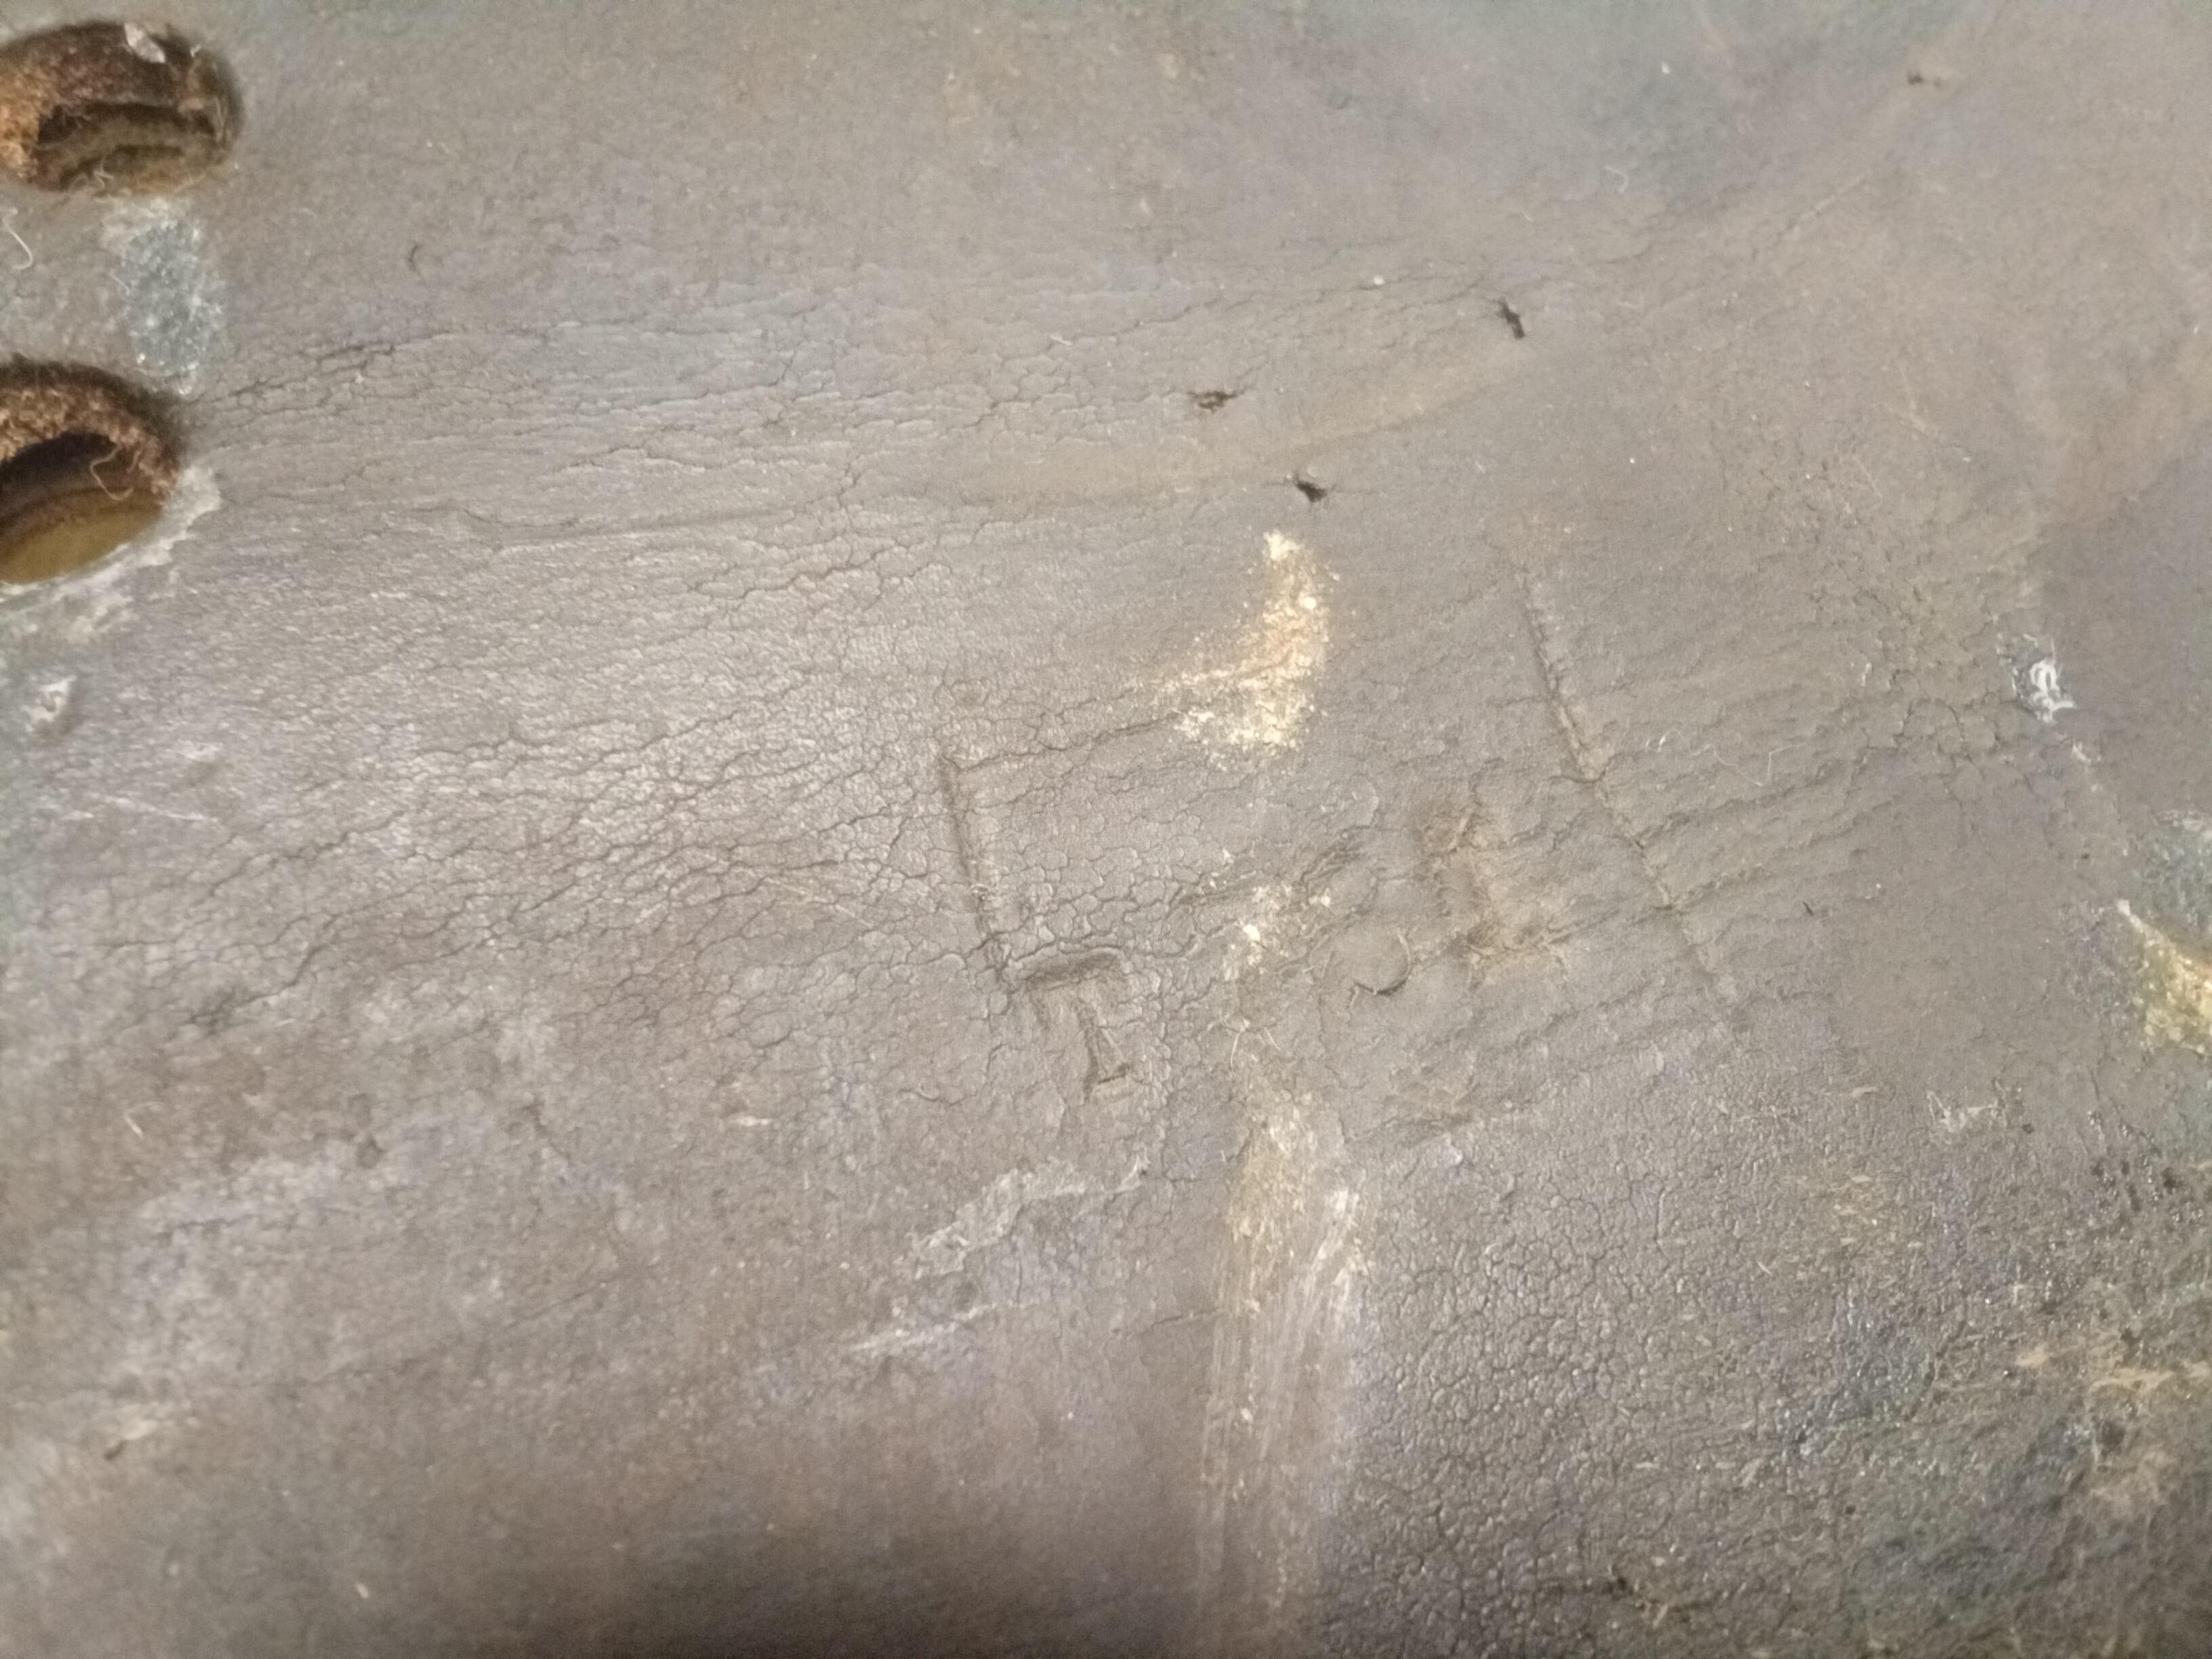
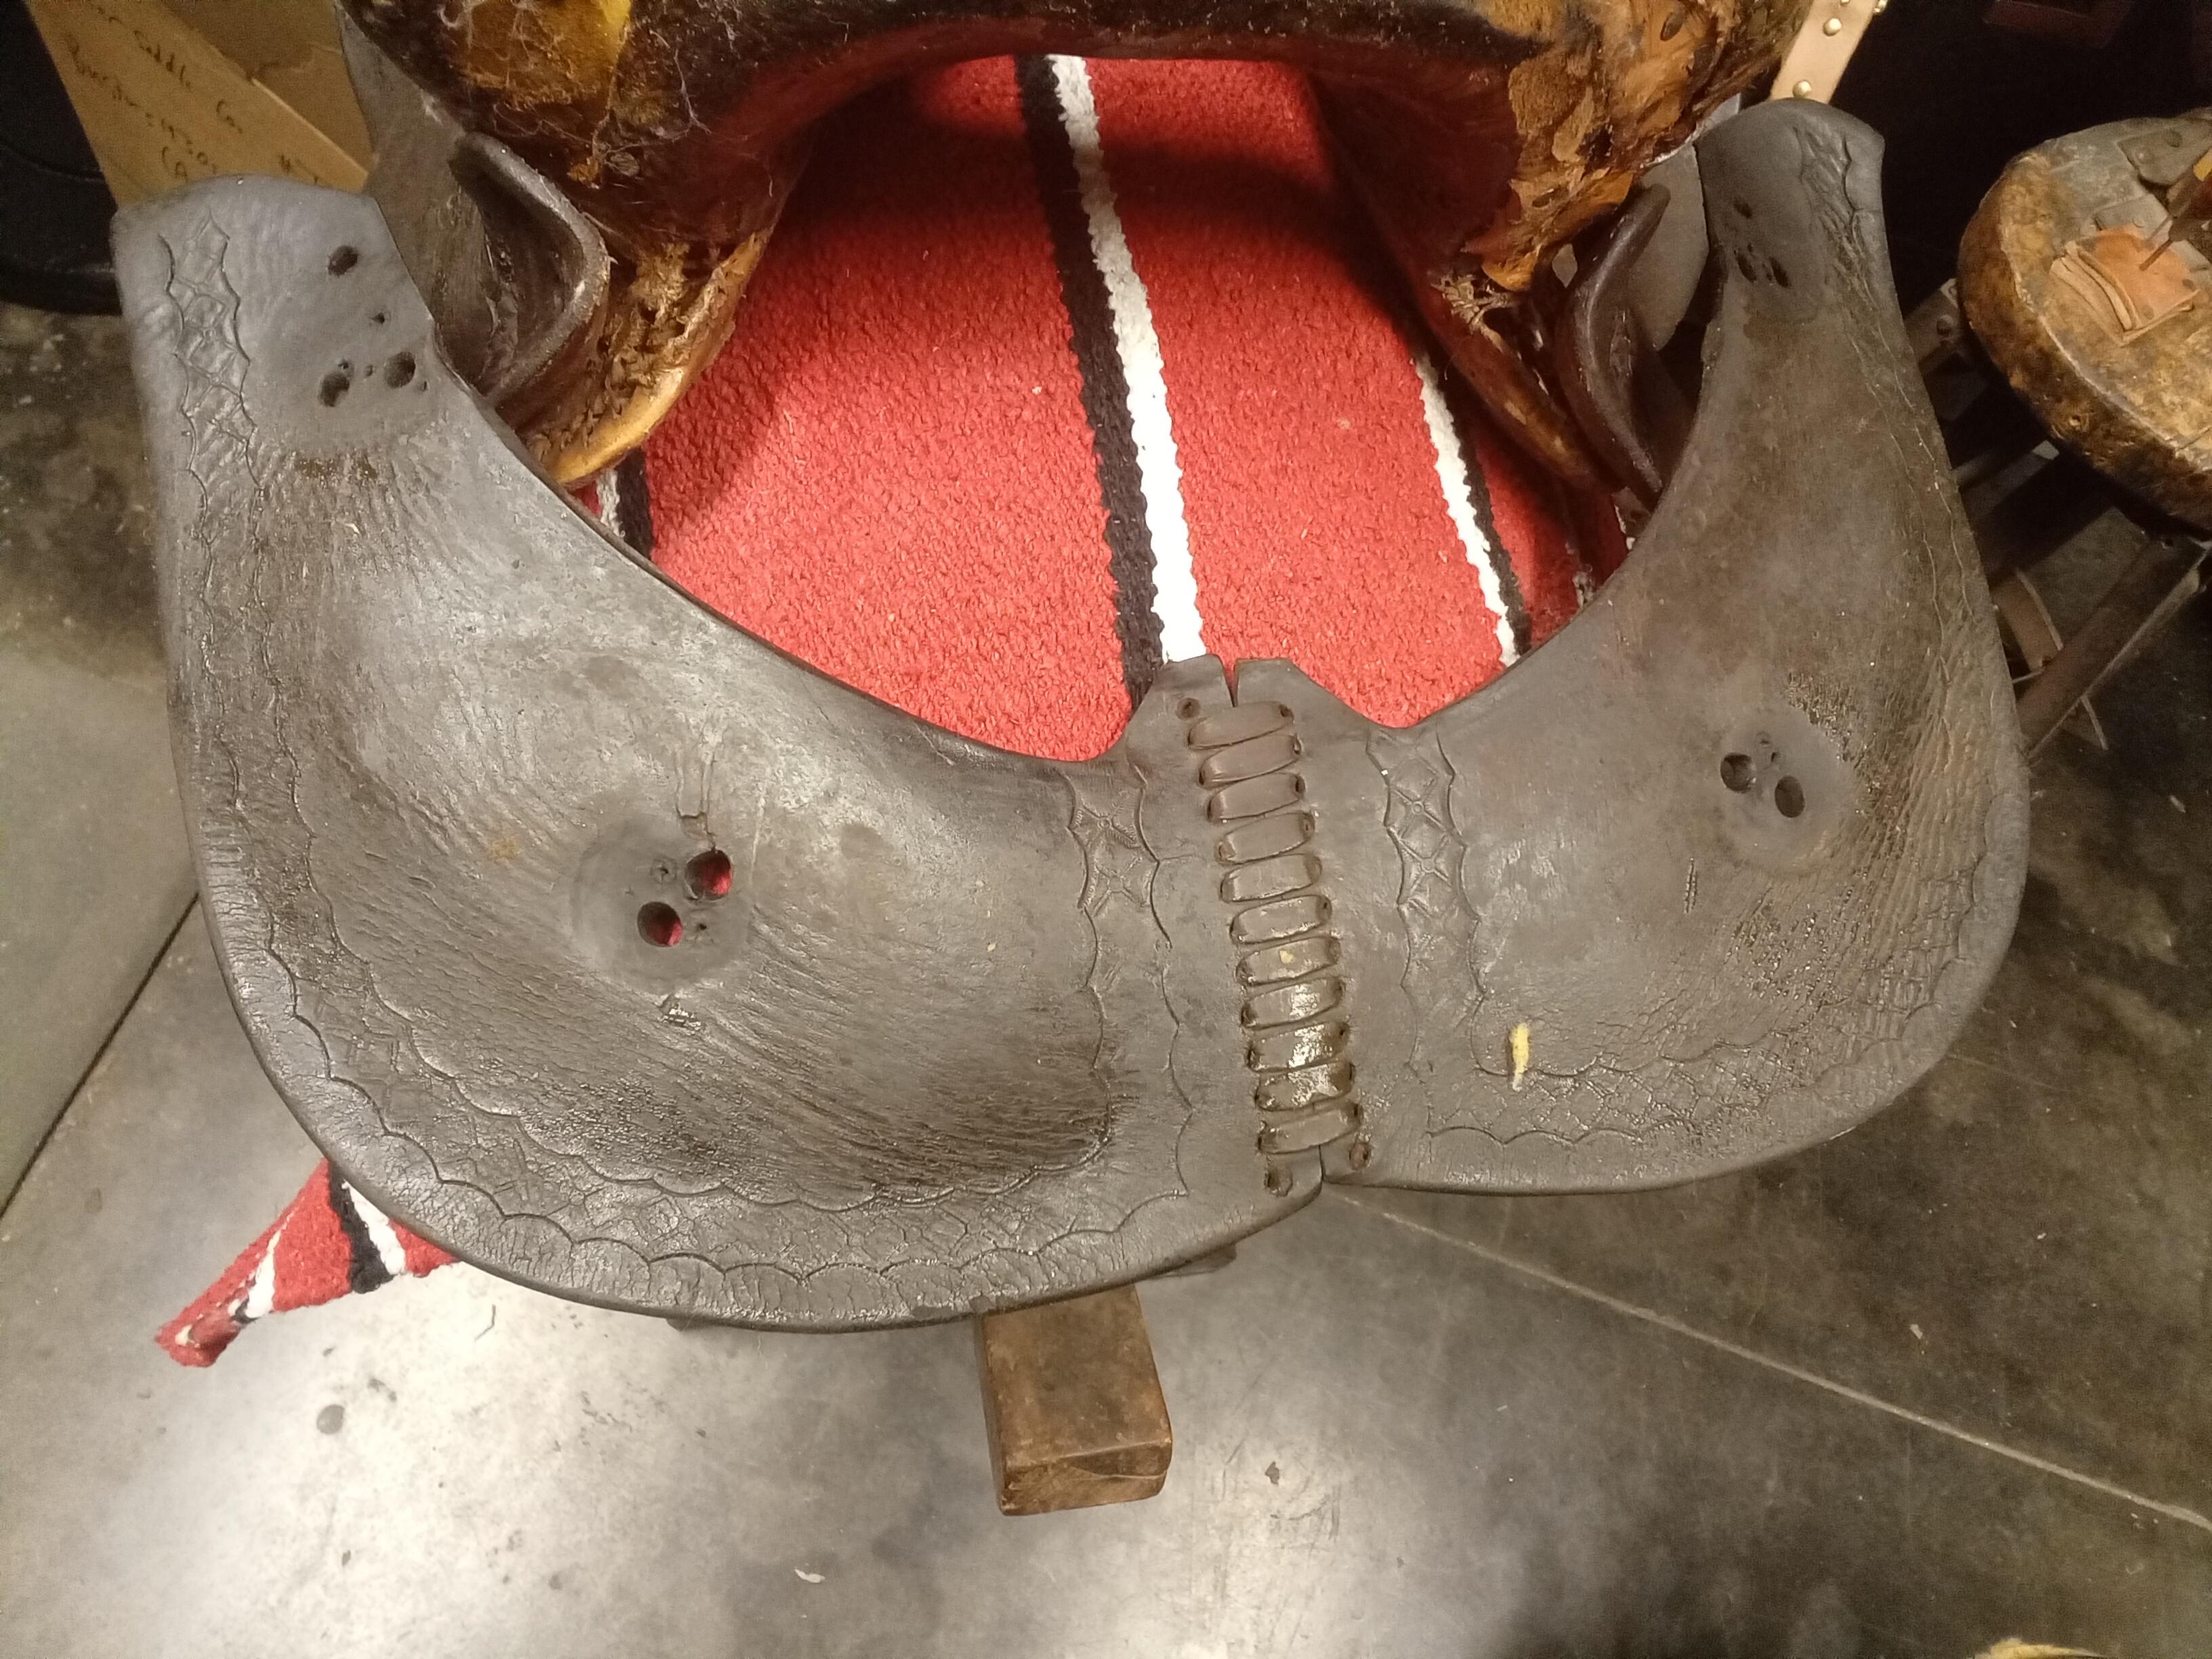
This is one from my Dad's collection. He always called it a "squaw" saddle (no offense to native Americans meant), though I don't know if that's the proper name. I'm not sure where he picked it up but it's old. He had a knack for collecting old western and ag paraphernalia mainly from the American southwest and rural west coast, and he also was around a lot of it during his years doing props and special effects in Hollywood, as he would buy or was given authentic artifacts to study or duplicate for film, and this could be one of those pieces. It appears to be a wood tree, wrapped in rawhide, and then wrapped in leather, with brass dome tacks added for embellishment. They also likely add some wear resistance on the edges. The rigging straps are held on with screws, but I think they are a later repair. The brass tacks seem advanced for a natives saddle? I'd be interested if anyone recognizes what culture, area, time frame, etc. this saddle is from. I have no intention of restoring or selling it. Periodically it comes down for a cleaning and soaping, bit otherwise it stays on the wall.
-
Yes. I think this saddle is best served as a pleasure saddle and not built for any specific tasks like roping, racing, etc. That said I think the typical double ring rigging would be fine, but that placement of the rings I'm still deciding on. The first photo's of how the saddle started, the rings appear much lower than they should be, but the way they had made the skirts (not sure what style you would call it as they just covered the sides and sewed fleece to the bottom with no real "skirt"?) kind of makes them look lower compared to a traditional saddle. Most of the traditional double ring saddles I'm looking at for inspiration show both rings at the same level, though Al Stoleman's book gives some good points to setting the front rings lower than the back so they don't interfere with the stirps. He also brings up the merits of mounting the back rings to a wider area, having the leather come up each side and lace together behind the seat, provided it doesn't make any raised lumps under the skirts and seat. Coming up with the rigging design for sure needs to be settled before laying in and carving down the floor leather, but I plan to get both started next. I'm also considering attaching the front rings to the tree in the typical way and building the back rings into the skirts as a way to get around having the rear ring mount and the floor leather get in each others way. My only reservation with doing something like this is that it would be a newer design than the traditional saddles I'm trying to emulate. Al Stoleman's book does give some good guidance on how the front rigging placement can interfere with the stirrups and the horses shoulders. With my lack of experience though, I'm wondering if it would be best to keep it simple with the rings at a full or 3/4 position? Mounting the front rings lower also seems to lead to the skirts being elongated in the front to support them. I'd like the skirts to be the more traditional long and squared off design, but that could work to my advantage being able to mask the hight difference between the rings without changing the skirt design. One other thing I might do is replace the front rings with something a little bigger. Reason being is to make it easier to adapt the saddle to a bigger horse. Part of this build is I do want to put together a cinch and ladigo's so it's all ready to go, but I haven't delved too far into that topic yet and not sure if I can make a 'one-size-fits-all' rig for a saddle this small, or if it's better to have a smaller rig for smaller horses and a larger rig for larger horses, and just tackle that aspect once I know what animal it's going to go on, and just stop at the rings for now.
-
Thanks!
-
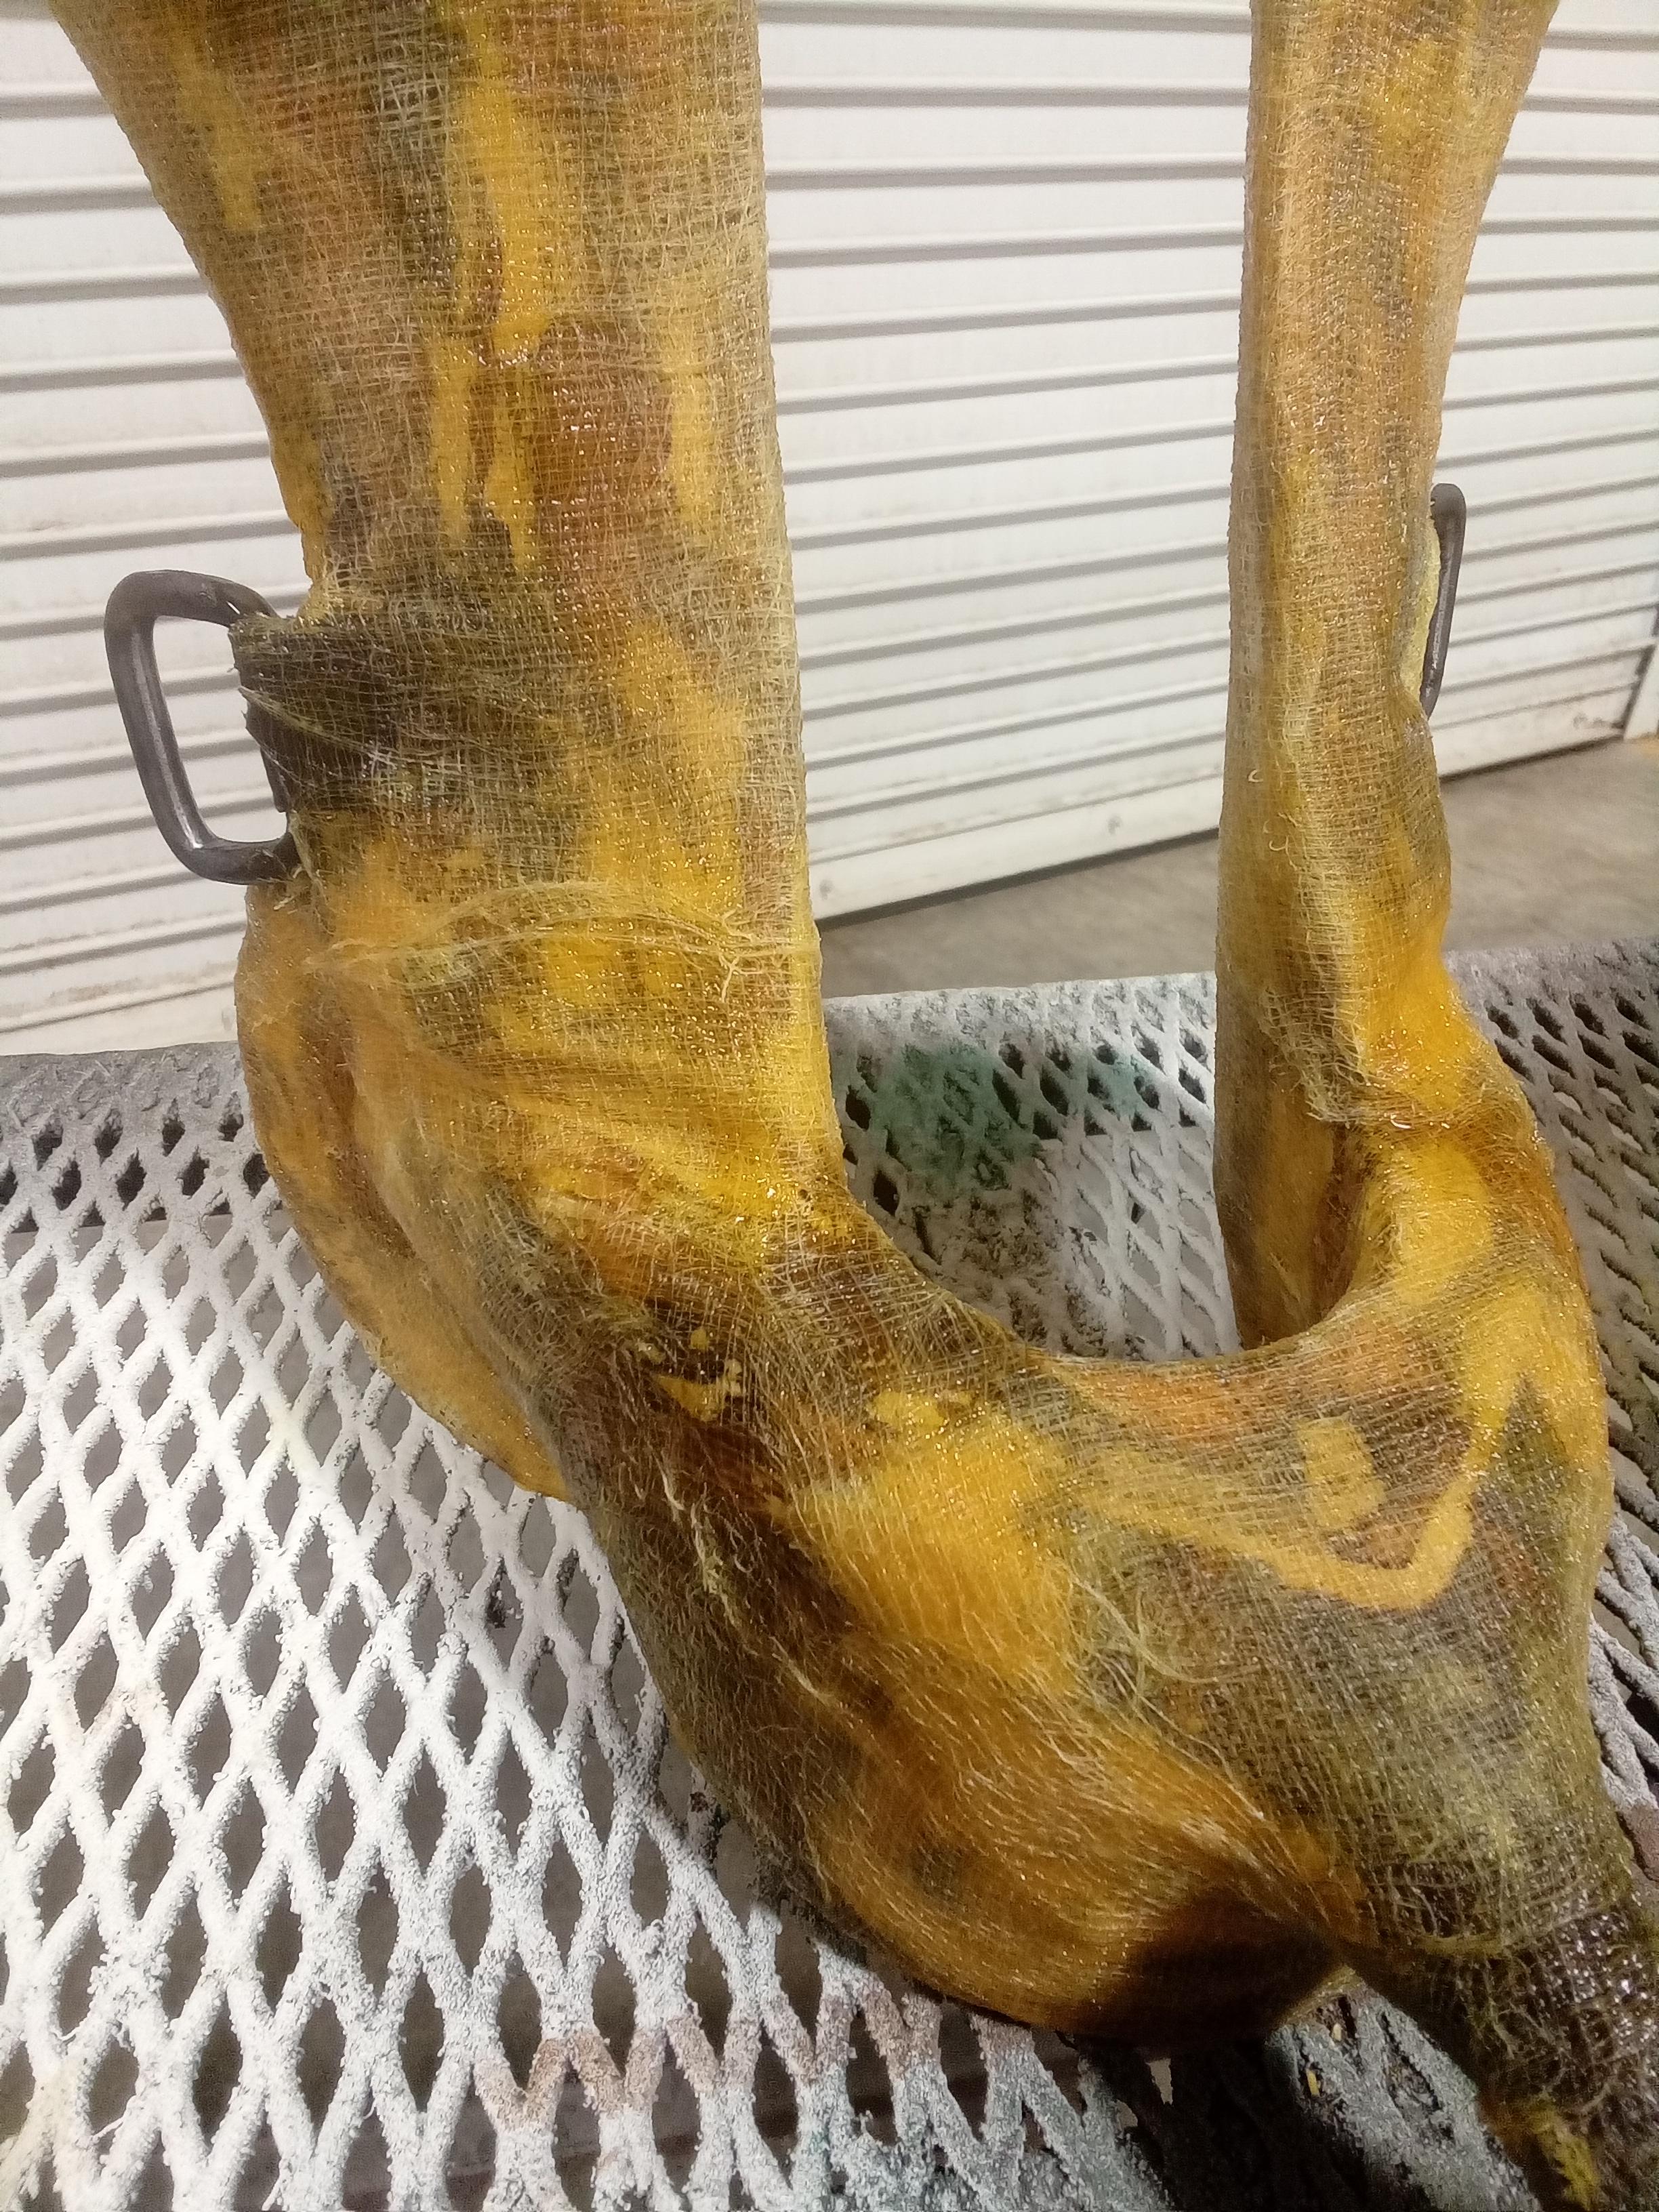
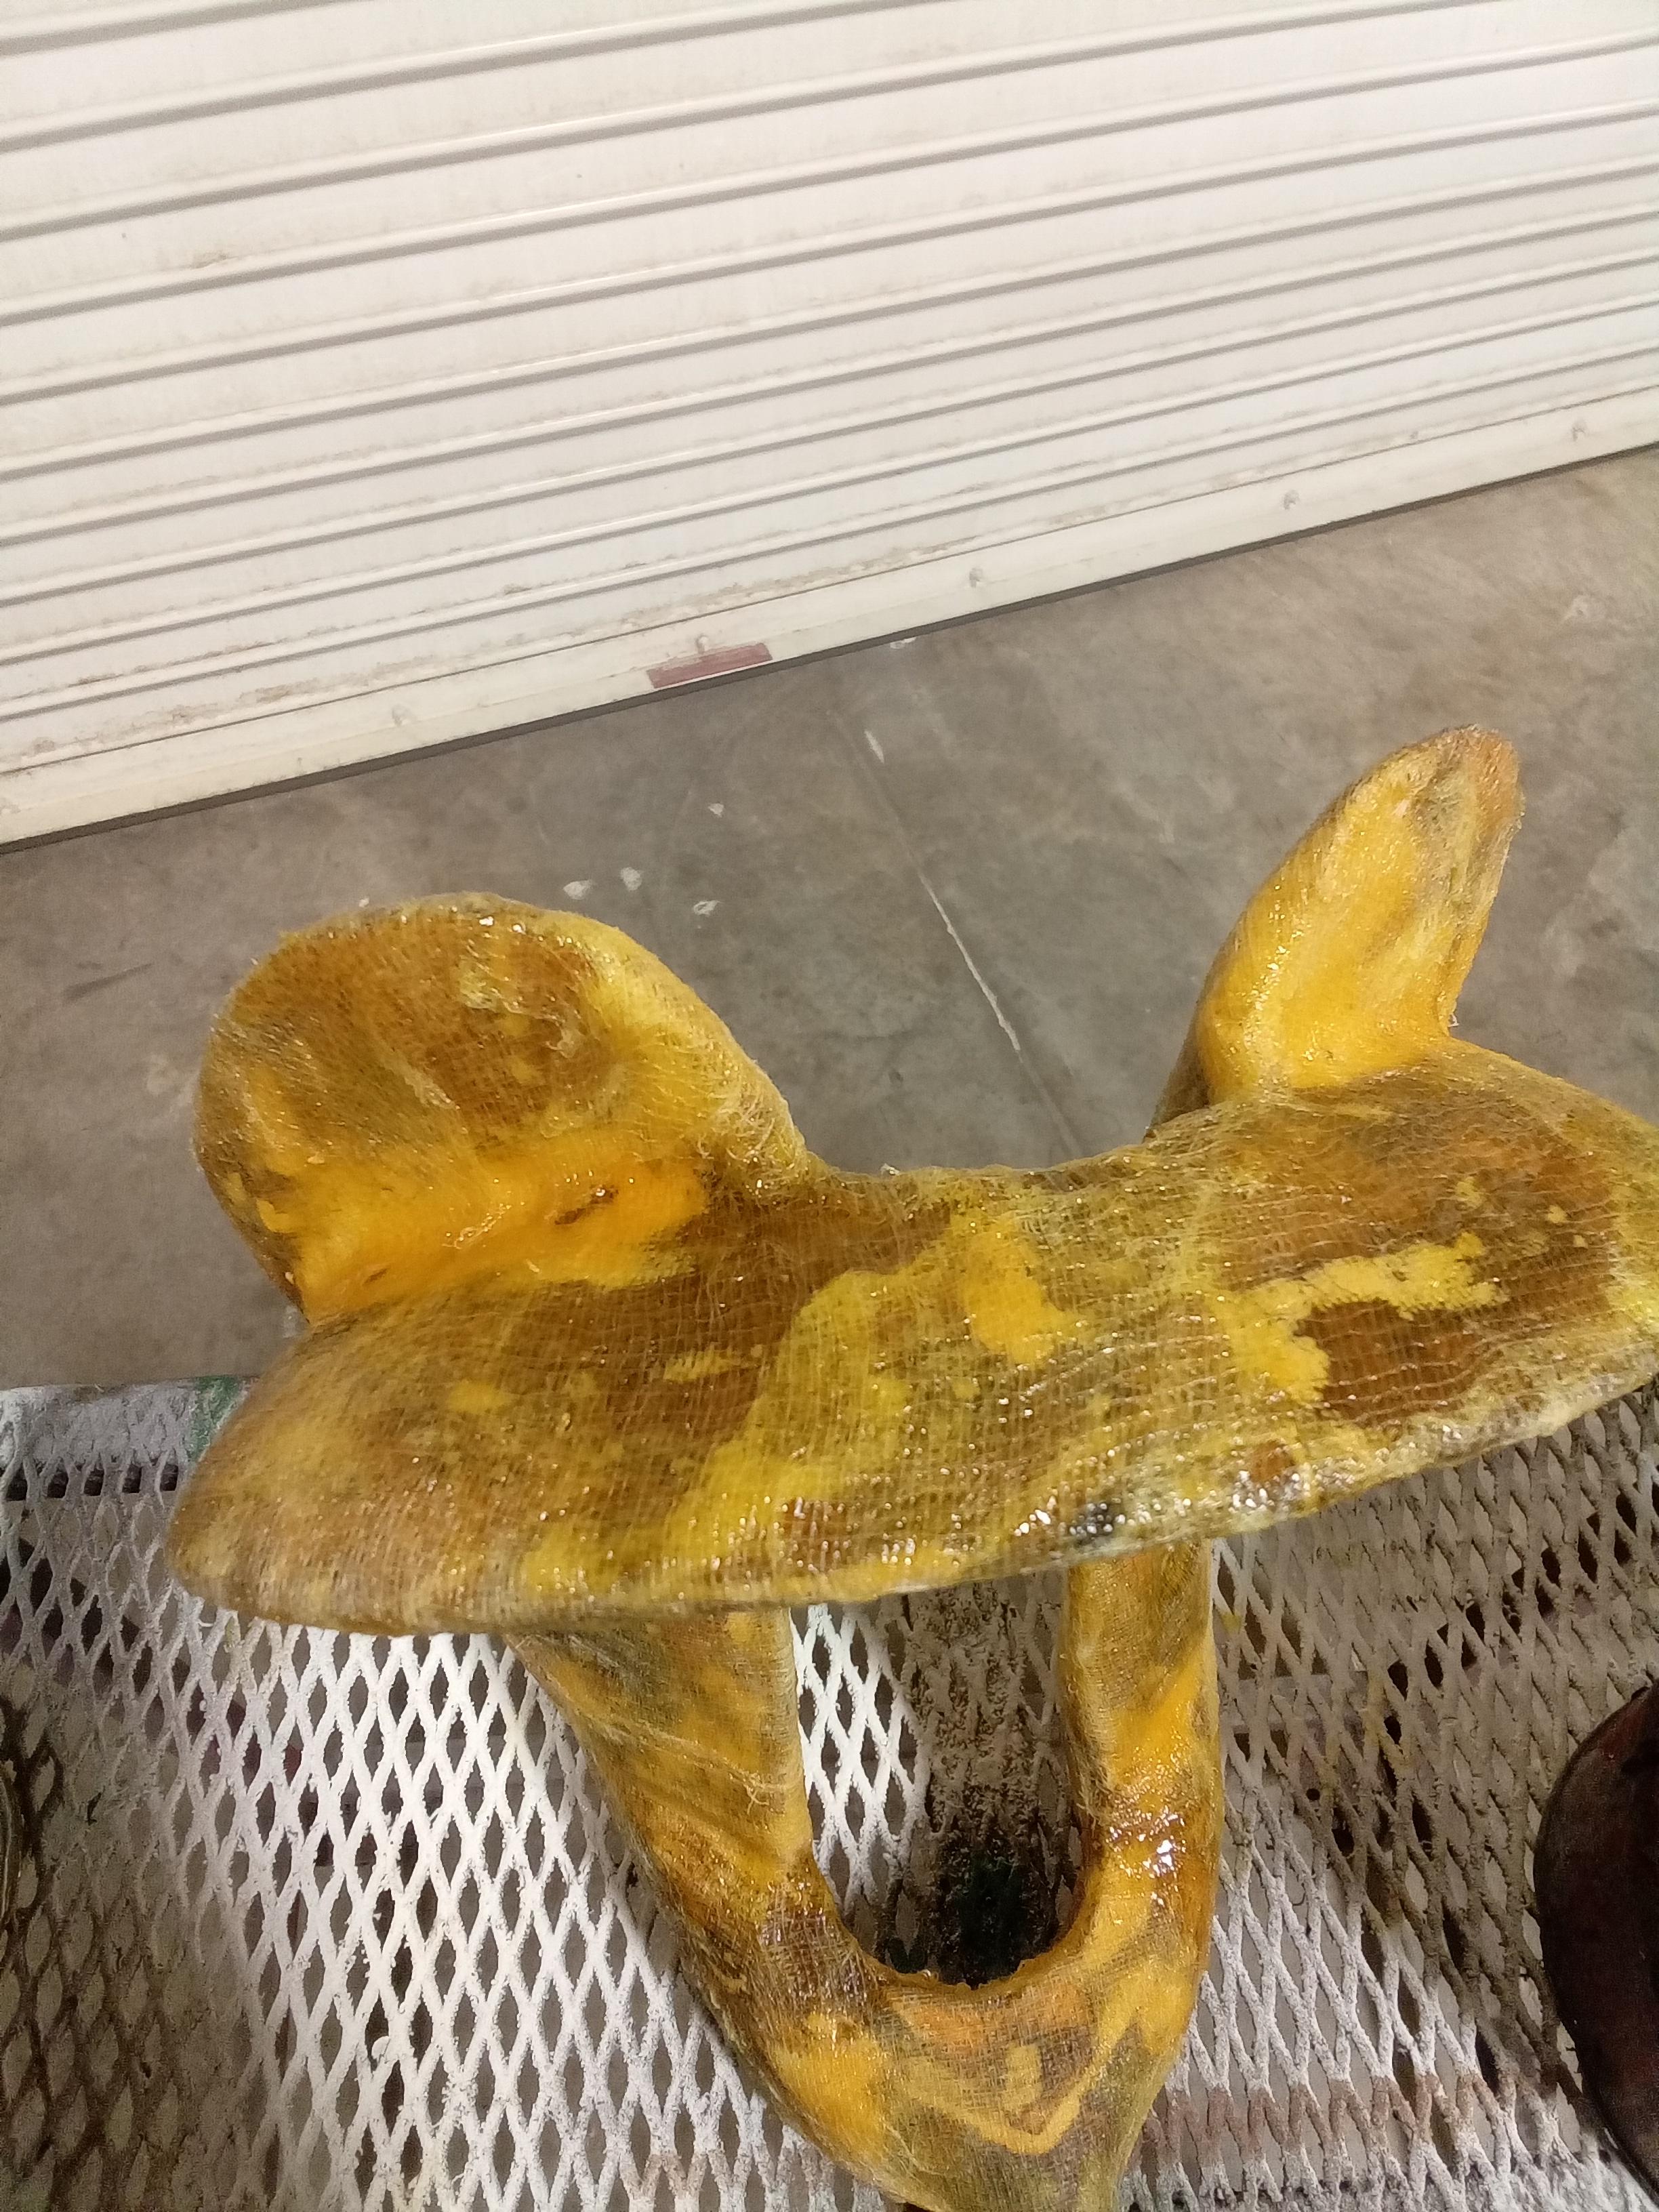
Been a few months, but got the sanding done and got around to applying new cheese cloth. I'm sure it's nowhere near as good as rawhide or fiberglass, but I get why companies used to use lacquer and cheesecloth for economy saddles. It's easy (and cheap)! It's kinda fun too! It's similar to laying fiberglass as it helps to lay down a layer of varnish first, but then you stick the cloth on and apply the varnish until it kinda goes clear. The cheesecloth is a lot more moldable than fiberglass though. It's easier to bend it around corners and overlap the ends, such that you really have no waste. Even if you have a little patch cut out, you can just lay it into an area that looks a little thin. I'm using a can of Polyurethane varnish that had dried out to the consistency of leather cement, but it still spreads easily and it's a "fast drying" variety which helps. If you keep on it and keep painting down any loose ends, wrinkles, or bubbles, it comes out pretty fare. My only flub so far is that there's a couple of lumps of wood putty I didn't smooth out enough, and some of the old cheesecloth painted down but formed a lump. I found that letting it dry you can shave off the high spots with a razor and then just add a few layers of varnish and cheese cloth to blend in the hole. I'm not going to bother getting it perfectly smooth, but do want to smooth down most of the lumps, especially on the bottom, seat, and visible parts of the saddle. That way the leather has an easier time faring over the surfaces. I'm going to let this round dry, do some trimming, and do one final round of varnish and cheesecloth. The cloth and varnish do seem to add some strength (better than bare wood or course), but it's not going to be a hard use saddle. I expect a saddle like this would have been for a kid to learn on and play with, but on a well broken and docile pony. It's like kids shoes though in that they'll grow out of it before long and need a bigger saddle anyway, which I think plays into the economy construction and likely a low price point. One other thing I've been thinking about with these youth saddles, is that while they don't give good practice in designing a saddle or in making a strong and durable saddle, they should give me some practice in reproducing the elements in scale and assembling a saddle, which is one of the big things I'll be doing with the family saddles. Making a saddle of my own design would be fun and rewarding, and I'll get a little bit of that with these youth saddles, but with my goal of reversing the effects of age and deterioration on the family saddles, I'd rather have experience in reproduction than with making something new. Thinking of it in terms of classic cars, it seems that most custom saddle making is akin to building hotrods and customs, in that you master skills to produce something that borrows from the past, but is often a new creation that combines the best of function and art, and while there are patterns and pictures to follow, the intended use and his imagination are the ultimate driving factors in how it's designed and built. These saddles I'm wanting to do would be more along the lines of restoring a classic car, reproducing parts that are correct for what it once was, regardless of if it's the best design or has the most crowd appeal. In that way making it look and work as good as it once did is more appropriate than making it better.
-
Landis 3 and landis 16 needles and awls.
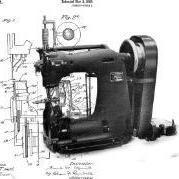
mbnaegle replied to speedybri's topic in Leather Sewing Machines
Yep, same needle/awl system. Landis needles and awls are harder to find. If you can't find them, you can convert it to use Campbell needles and awls which have a slightly larger shank diameter. The Landis needle bar collet will flex enough to take the Campbell needle, but the awl bar would need to be taken out of the machine and have someone with a lathe ream out the hole for the awl. The size numbers between the Landis and Campbell systems are different, but in either case your thread size dictates what size needle you use, and your awl should be one size larger than the needle. -
A few generations before my time (before 1830 that is) my Naegle ancestors were wine makers. They emigrated to the US from Alberweiler Bavaria, which to my understanding is an area that's bounced around from German rule to Swiss rule and back for centuries. As far back as I've been able to go (1500's?) the Naegle's were there and made wine like the rest of the village and their fathers before them. The old village is still there and they're still making wine. I Google translated the village website a while back, and I think I remember finding a page that listed the families/vineyards in the area and there was at least one with a similar spelling of Naegle that might be a distant cousin, so one day I want to go back and look them up. Now after 1830, not long after arriving in the states my great great grandfather John ran away from home and joined the Church of Jesus Christ of Latter Day Saints (Mormons!) who teach abstinence from alcohol. At that time, they still used wine for the sacrament and grandpa John made wine for that purpose and he sold some too, but the church eventually moved on to just using water for the sacrament and John moved on to other endeavors like growing vegetables, livestock, etc. My family is still part of the LDS church and I don't have any desire to drink wine, but I like learning about the process and feel a bit of kinship to it. A couple years ago I started some vines in my back yard and have gotten into making grape jams every year. I've thought about canning grape juice too, but I still need to learn how to keep it from fermenting but still getting it to store well. Maybe next year... Around here in south Texas the Muscadine varieties do really well. They have a tougher skin so while they're not a good table grape, but they can process down into other things just fine and to my unrefined pallet they taste a bit like a concord. I've also got a couple or hybrid vines going that haven't put out much yet, but should put out red table grapes eventually.
-
I think the part # for the table plate is 202259, and the hook end on the machine is #210844. Same hinges are used on the 107W zig-zag machines. Googling those numbers pulls up a number of sources, and I think you can still get them from Superior.
-
They use the Schmetz 331LR needles, which at one point I think were discontinued, but looking online it appears some suppliers show inventory so maybe they started making them again? Landis #1 Needles Parts I highly doubt will be available, other than finding good used parts or making your own. If anyone were to have them, check with Eli Schlabach at Landis Machine Co. in Arthur, IL (217-543-3464). He's mainly in Landis #3 and Landis #16 machines, but he might have something.
-
New Tool Idea - Large Leather Shears - Should I make these for sale?
mbnaegle replied to Stagesmith's topic in Leather Tools
Good job on those old tailor's shears! I agree they are worth fixing if you can. For sure there would be a market, but I think the key will be effective communication. In just about any hand-tool driven craft or trade, there's always a big range between guys who will do everything with a plastic butter knife, and guys who think you need a million special tools, each one slightly different for slightly different demands (and some only used on Tuesdays). Both ends of the spectrum (and every point in between) has guys who feel clueless and would believe anything you tell them, and guys who will die before giving up their one true way of doing things, and honestly every one of them is "right" if they can do the work they do. I think the trick when it comes to selling any tool in that environment is to clearly explain what and why your product is and how it can help, but avoid claims of authority unless you can back it up with your own AND others experience, while also leaving room for other perspectives. You'll always have guys that think you are wrong or trying to rob them. I think good products should sell themselves and good salesmen just provide information and let you make your own decisions. For sure you need to learn from the masters before you, but the water gets muddy when that master is also trying to sell you things, no mater how helpful or necessary they are. All that said, my take is that there's no "one-tool" to do it all, but it helps having redundancy and overlap in tools. I think good craftsmen have preferred methods and methods that they turn to when necessary, AND they're always learning and looking for other ways to do things better. When cutting thick and heavy leather, shears are not the first thing I reach for, but they can be really helpful when making adjustments to things after assembly or away from the workbench, like cutting flat belting for powering machinery like they were designed for. I think I've got a pair like in the first picture and they come in handy. In this case, the tool isn't "new" but is less common. You shouldn't have to worry about promoting your design as much as bringing the proven concept to a broader market, while also toting that they are hand crafted so the level of quality can be expected to be a little higher than factory made pieces.