-
Posts
101 -
Joined
-
Last visited
Content Type
Profiles
Forums
Events
Blogs
Gallery
Store
Everything posted by BillinOK
-
Does anyone know where I can get one of these bolts? May have to make one if I can't find them. This is from the old Tandy press
-
They are more or less shot all the way down. Can't beat $15 for a new one.
-
I found one on ebay for dirt cheap and its new old stock. So I'm going to try that. Thanks for your help, and everyone else!
-
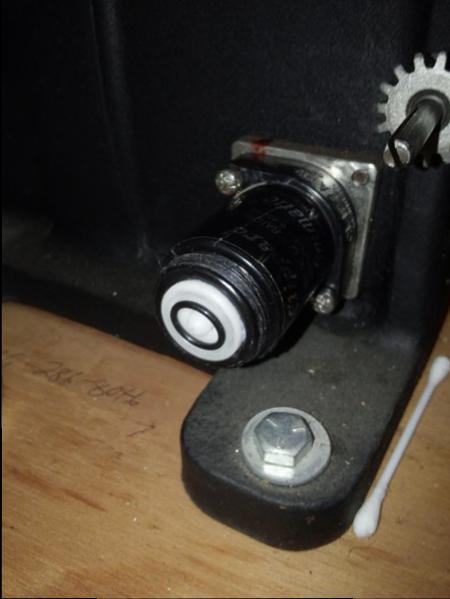
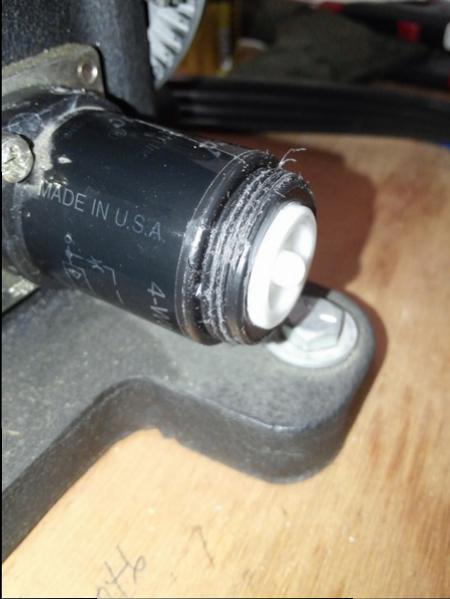
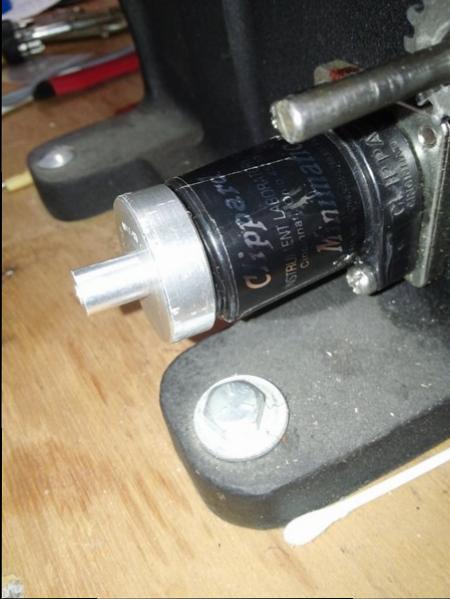
2 photos show the main valve without the cap. If looking at the white part, there is an O ring on it. You can see the threads are messed up. I guess over the years they became weak. The cap, when screwed down, seals with the O ring and does not allow air to leak out. The pic with the cap shows that it will not thread on right. Once you get it started, trying to tighten causes the side not to go down, thus causing that side to allow air to come out. The cap has a button that pushed in and out when air is present. It has a very small O ring in it. This button raises the sewing machine needle.
-
UPDATE***** I think I have found the problem. Got new O rings for the main valve and it's still leaking bad. I think the main valve #64 threads are shot. The end cap that seals, when screwing it on, slips. This is causing the leaking of the air. Called Tippmann again and those main valves are expensive. Does anyone have a used one they could let go of?
-
Aerostitch......Started to sew a project today and when the needle goes down, it either #1 goes all the way down and stops, will not return up. Acts like it run out of air....or #2 it returns (goes up) only part of the way causing the stitch not to tighten, then goes back down. It is very sporadic in doing this....sometimes it does sometimes it doesn't. But it can be certain it'll do it if you are sewing a project so it can mess it up. I did notice air coming out around the #56 return button housing, can't remember if it should or not while it was running. I have about had it with this machine. Called Tippmann, but they were closed. Any ideas??
-
Thanks, I'll take down the part about the pattern. *** Won't let me edit the part about the pattern.
-
-
Thanks! I'll check that out.
-
Does anyone have the Dawn Handbag pattern? It is in the Ideas for Leather Projects Vol. 2. Thanks!
-
Do you still have this available?
-
-
I've been getting some from Springfield leather....not a tannery, but another option.
-

Need help dying. Leather is cracking and way too dark
BillinOK replied to bigskyxj's topic in How Do I Do That?
Only see one pic. Sounds like your putting too much dye on your projects. Try using a piece of cut up t-shirt and just lightly wipe your project, until you get the shade that you want. Mainly, too much dye will cause the dark color and the drying out of the leather to the point of cracking when bent. If you are using thin leather, you'll have to be careful with the amount of dye applied until you get use to the application. -
Springfield leather has calf lace with formed edges
-

Stitching problem with knot at turns
BillinOK replied to BillinOK's topic in Leather Sewing Machines
Thanks guys. Wiz, I'll go back to #180 needles and try that. -
I don't know if I have developed a bad habit or what, but this has been going on for sometime now. Every time I come to a corner or sharp turn this is what happens. My machine is a Tippman Aerostitch, 207 thread, and a 200 diamond needle. If I'm on a straight line it does ok....sometimes the knot depth varies though and it seems there is nothing I can do to stop that (?). I know I must be pulling or doing something wrong.
-
Not sure where to post this so I'll try here. I am trying to find a high resolution vector drawing of a police badge so I can have a stamp made. I attached a photo of the badge that I would like or one similar. Anyone have any idea where I can find one? Thanks
-
I'll third the Aussie's. I use that stuff all the time!
-
I was afraid I was curving some. I'm going to try some ways mentioned, and practice a lot. Thanks!
-
Thanks guys! I'll give those a try. I'm out of practice on basketweave!
-
Yes the problem is above where the arrow is, sorry I didn't get the arrow where it was needed. I circled it in red. The basketweave did not meet right. When I tool around the blank area, I just cannot get it to come out right when the basketweave meets where I started. After thinking about it, maybe I need to start at the blank box and go around it first, then tool out towards the end of the leather? or a different angle?
-
I'm embarrassed to even put this up here but this is the third one I've managed to trash. I have not done basketweave in 5 years due to a back injury. I use to fly through this and no problems. I don't know if the angle is off or what I'm doing wrong......maybe the whole thing is wrong. This is a square for a double light switch cover. In the center are the penciled lines for the screw holes, switch rectangles, and another rectangle (between the switches) for an initial stamp. The rectangle is really throwing things off, or something. I'm using a Tandy X534 basketweave stamp, and yes I know that is definitely not the best. The rectangle for the initial is not tooled inside, but around it. I drew my starting line from opposite corners, and started at the bottom left corner. I've read several articles here, but this thing is just not clicking with me.


.jpg.19ad63d8b880f16a29b180d2402393b8.jpg)


.jpg.3472eeceb01a7ee6c22c4bb4a6010434.jpg)


