


JLSleather
-
Content Count
7,357 -
Joined
Posts posted by JLSleather
-
-
I don't mind that color ONE BIT. My only "wish list", I like ta see tha slots dyed as well

Color is FUN, but not for everybody.
")

-
a 26 for holsters?@! Okay ...
I use thread from a couple of places, in both poly and nylon. SHORT VERSION - call [866-362-7397] or contact Bob, he'll fix ya up with what ya need. -
the machine doesn't care - if you can accurately turn the project "fast" you should be fine.
but I agree .. I'd shorten the stitch length here. -
PDF download lists a few more stamp makers (I haven't tried them, just some that were recommended, put together in one place).
-
I had Alex make mine (2). Very reasonable, though I'd have to dig back and MAYBE find just what I paid. Very nice quality work.

-
I like LL point needles - lots of posts of mine already tellin' a fella why that is, so I'll skip that here.
Bob K. prolly got some D or some S point that'll do jus' fine
-
if you're busy enuf to need dies, maybe hire it done. Ask these folks... purdy reasonable if i remember .
-
1 hour ago, MtlBiker said:get leather needles
I think 794 means it's leather needles
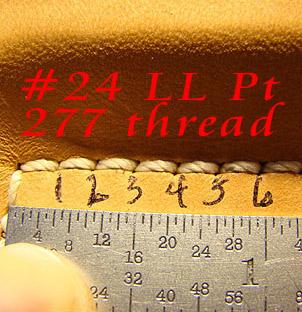
But I use #24 for 277 thread ...
-
You could do it that way. But I would not.
First, you better do something to ensure the lining lays in without bulge or pucker, or you just booger a lot of cowhide.
and,
Presumably, not all the belts are the same size, which means not all the belts would have the same curve, which means that some in the larger range might be fine but the smaller ones will have "pucker" on the lining side.
So, to me not worth doing it that way. Since i would polish the edges ANYWAY, no time is saved really.
-
OH, yah ... this video wasn't about, but this will show a guy a holster ":rough shaped" BEFORE forming. Had it been lined, guy coulda adhered the lining at the "rough form" stage ...
-
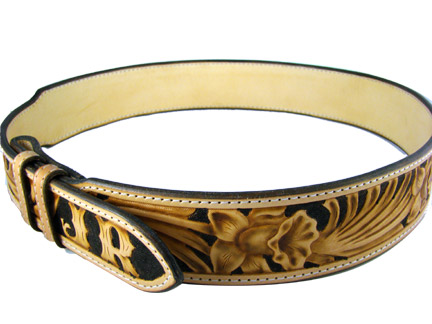
first issue, ya kaint say "made many belts" and not git withda pics. We like leather pics
nofair.nofair.nofair.
That said, I do not make my belts that heavy. Absolutely no need for that much cow to hold in people. Save the 14 oz stuff for saddle fenders.
My tooled belts are - short of a specific reason or request otherwise - 7/8 oz lined with 3/4 oz. I do not know how many belts I've tooled over the years. Prolly a lot to some, maybe not so many to others
 Plenty of depth in the carving in 7/8, and the 3/4 is both a weight that gives me a nice feel and firmness to the belt and is a weight that I use for other 'stuff', so I don't need to stock or split every weight of leather. I do use a good bit of 4/5 for other projects, but I find that's the upper limit of where i want my belts (and I'd prolly be lookin fer the thinner end of that hide for the belt lining).
There are exceptions.
When I make a belt unlined, which isn't very often any more (big in the 80's), I go a bit heavier with 8/9 or sometimes 9/10.
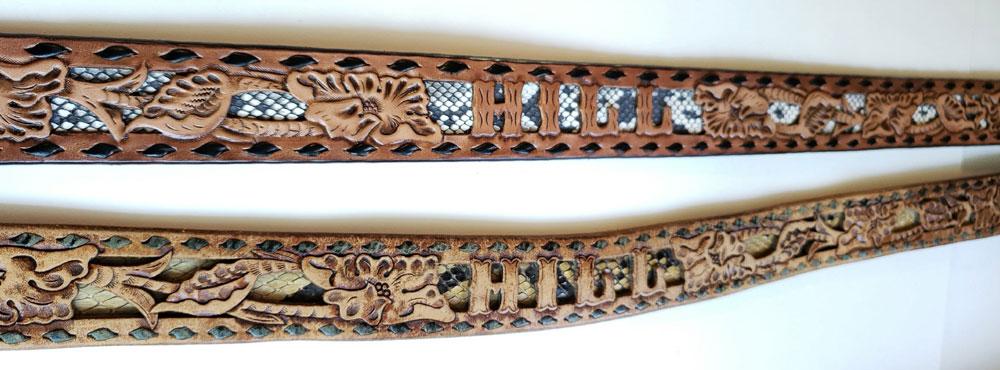
And there's the occasional outlier, like that filigree belt I made for that couple which needed to be "like the old one", made to replace one he inherited from his dad. If I remember right, that was two layers of 5/6 with some snake 'tween em. This worked with the look, the feel, and went through the loops in his jeans
Still, definitely an exception to the rule (but still ends up about 11/12 oz overall).
AND of course, ranger belts are a category on their own, almost.
ALL OF THAT to say, there's rules, and then there's other stuff done without the rules
As a RULE, I allow 3 1/2 inches for the 'fold over" in a belt. Meaning I skive about 7" of the top layer down about 1/3 or so... so it's like maybe 5-0z-ish. Then I don't skive the lining, so you end up with leather about maybe 9 oz thick in the fold and snap (or screw) area. But the last 3 1/2 inches, as in from the fold to the end of the strap, is tapered down to about 3 oz so it reduces the bulk of the 'step' in the end (against your waist). ... Uhh... I'll make a sketch wut I'm talkin bout..
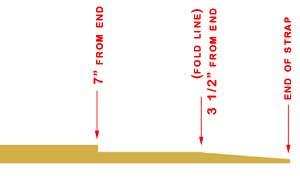 This results in a belt that retains strength, lays flat without creating a big pile of leather in the front, looks smooth when worn. This is the top (tooled) piece of leather, flesh side up. Course there's not a hard sharp corner at the start of the skive, it's shown that way to mark the 7" spot but actually tapers in (like any other skive). This also allows the use of snaps without 'special' posts if ya want snaps instead o screws. This is purdy much what Bruce was on about above, i just go a tad further so the entire fold-over leather sits in a 'pocket" on teh back side.
SERIOUSLY, I question these 'professionals" making 14-, 16-, 18-oz belts. 300-lb guys STAND ON 14 oz leather fenders to get in the saddle and it holds up just fine. To the guy who says he can "blow out" or even stretch a belt with his stomach "muscles", I say 'show me'.

-
link?
-
not sure what trounble you're having. I sometimes dye a holster after constructing it, but far more often I dye the leather and THEN cut out the parts. There's a reason for that, another time.
I haven't had any issues with the dyed leather not taking water, the exception being some drum-dyed HO I ordered exactly ONCE
and for exactly that reason.
I like that contrasting look, and many other people seem to, too.
Still, I sometimes let the thread go in BEFORE the dye, as in the last pic.
-
Oh, yeah! How did I not mention this one? Jim Simmon's write up is (while not exactly the way I do it) VERY well worth the read - good stuff there!
https://leatherworker.net/SimmonsHolster.pdf
-
On 6/25/2023 at 12:50 PM, SixgunCustomLeather said:Hey JLS! Can you expand on your "glue in on a curve" procedure? I have troubles with some liner materials wanting to bunch up during wet forming. Sounds like you have a work-around.
Didn't see this til now, but I see somebody already cured the answer
23 hours ago, dikman said:Partially curve the holster first and then curve the liner before gluing, as opposed to gluing them together flat. It can be little bit fiddly but it reduces any bunching significantly.
Exactly this. The curve doesn't have to be EXACTLY the finished shape, but it should be somewhat close.
I thought I'd have a jillion pics of this happening, but I don't. And I tried find you a decent WHY-tube video, but I don't see any (most leather videos are dross, made by those who think if they talk a long time somebody will listen).
If you have your holster curved (I usually rough-shape it after tooling and before it's dried out) and let it dry in that shape, all you need to do is glue leather and liner and when it's ready, "smooth" the liner onto the leather in the shape it's in. If you're new to this, might be easiest to put wax paper over the holster sides, so only the MIDDLE sticks. Fold you liner roughly in half (don't "crease" it tight, just the curve of the finished goods- ish) and stick down JUST the middle, "smoothing" it on and working center out. THen as you have the center done, remove the wax paper on one side and smooth that down, then do the same on the other side.
Somebody prove me wrong and post a good pic or video of this being done -- I dubbledogddare ya
-
-
there are some things you'll learn about dye / dyeing as you go... called 'experience'.
But first things first, it looks like you could benefit from a GOOD piece of leather -- that should ALWAYS ALWAYS ALWAYS be step 1
To obtain a piece that you can see and use, so you know what GOOD leather should look and feel like, contact BRUCE GIBSON.

Couldnt' resist, Bruce....
Seriously, though... PM me with an address and we'll see kin we git ya a GOOD piece you can use... call it a welcome gift

-
On 5/7/2023 at 3:38 AM, BruceGibson said:I typically line with Hermann Oak,
Yeah, I coulda just typed this but I wanted to say "HEY" ta Bruce

And I often line with H.O., though I absolutely do like a veg tanned GOAT hide as well (very strong, yet moldable and purdy).
 Oh, yeah.. anwer the question .... glue in (on a curve) then trim with CRAZY SHARP knife (like NEW x-acto works great).
-
that's an improvement. never understood (still dont) why somebody would watch HOURS of video to do something so simple. 16 minutes is more.... SANE.
-
9 hours ago, Fraulein said:that little spot where I went over with contact cement when I put the pieces together. If so, that spot rubbed off easily later when I noticed it.
exactly what I thought. down the road, I would recommend rub that off BEFORE the pics. We here KNOW that look, but potential customers may not
Again, I LIKE this
And I saw it as separate pieces, but - and this is really just preference - I generally DONT sew over the step down
-
Looks nice
Not sure what the 'thing' is at the point of the center piece (?) and I would myself maybe try one size smaller needle (might work, might not depending on the thread used). "solid" stitching, without 'spaces' between. The TYPE of needle sometimes a factor though.
... not about your project, but generally...
- I think the "S" and "D" needles make the wrong hole... gives a stitch which looks "broken" with spaces. they're very popular, just not my choice.
-
the "LR" point gives a very angled looking stitch. Some folk really like it, though I tend to put it most only on projects for the girls. Looks a bit "lacey" to me

- and the "LL" point is by far what I personally prefer. Stitching is very straight line, with no 'spaces' or 'gaps' in the stitchin'.
BACK TO YOUR project, since you didn't actually ask for all of this.
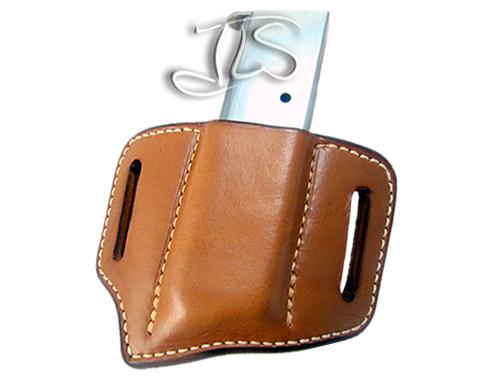
 this young lady will appreciate that for a long time
24 needle, LL point
277 thread, 6 per inch
 contrast LL and LR needles
I used dark thread so it would stand out clearly, but nothing else
was changed. the direction of sewing is the same
in both (parts fed into machine just the way you see), same size thread, same
number of stitches per inch.
The LR "looks" longer and has that staggered effect (like edge braiding lace).
The LL pulls a bit deeper, but fills the hole left by the needle. Very straight line.
Oh, yeah - thread from Cowboy Bob on this site
-
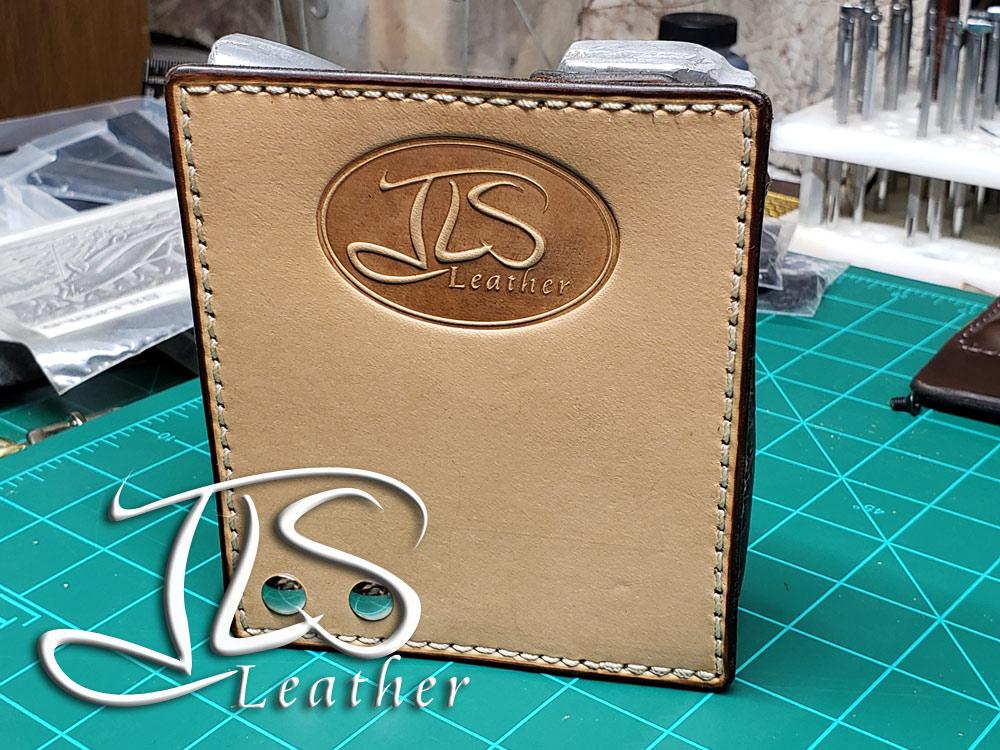
I like it
Your main bag has a "crumpled" look that I think actually adds to the overall look.
That said, if you like working with veg tan (tooling/skirting) leather, Wickett-Craig sells VERY nice DRUM DYED skirting, and they'll split it to the thickness you ask for. Over the years, the brown may vary a bit but the chestnut is quite nice, as is the black. And it's unfinished, so you can still stamp, tool, or form it before applying finish. Cut your parts out and they all match, and the dye is all done and all even and consistent.
-
On 4/25/2023 at 5:46 AM, RockyAussie said:mark a point in the corners before i start stitching so that it gives me some warning to adjust the stitch length before i get to the corner

-
maybe its just the angle? Or maybe a splice? Your lacing looks quite nice, good n tight, but was wonderin' bout this bit?
CB3200 & Class 26 comparison
in Leather Sewing Machines
Posted · Edited by JLSleather · Report reply
You're right around that line, thickness wise, where its' heavy for the one and light for the other. I'd personally go with the 3200, but CALL BOB. He'll be able ta tell ya what ya need an why. Some examples are shown below, with short explanation, but seriously - if you read around here you'd think there are TWO types of machines for leather (SO not true). So - call BOB KOVAR or see his web site at this link - he'll put ya right.
I can say that I make many of the same things, and that 3200 (which I do not own) lookin purdy sweet. I do have machines much like it, and I sew all but wallet-weight leather without too much trouble.. Lemme see ...
Zipper gusset 4/5 oz leather sewn on machine like the class 26.
Gusset then sewn to 7/8 oz back using machine much like the 3200.
Wallet liner sewn on singer 188, then assembled and sewn on class 26 "type" machine.