amuckart
-
Posts
576 -
Joined
-
Last visited
Content Type
Profiles
Forums
Events
Blogs
Gallery
Everything posted by amuckart
-
Hi Kate, Thanks for that. Sounds like Needlebar is a goner and I should forget about it, which is a shame. I've had quite a few people recommend it. Are there any other good technical fora on restoring old sewing machines? In terms of sewing machines, right now I have two Junker & Ruh Sd.28s, a Singer 45K (which is pretty much under control, I just need to get a few parts for it) and a Pearson & Bennion A1 which needs to be completely restored. There are pictures of it in this thread on the History board. It used to be blue, which will be fun to see when its restored. I'm vaguely seriously considering japanning rather than painting it, but I don't know how I'd do the stand and get it to match because I don't have an oven big enough to get the stand parts in. In the pipeline I have: a Pearson/BUSM #6 which is going to need to be completely stripped, cleaned, repainted and rebuilt. a Singer 29k13 a Singer 29k58 with a broken bit in the head somewhere two Pfaff flat bed roller-foot machines two Singer post-bed machines On top of that there's a marshall bell skiver and the Sørensen splitter in my other thread. I have a very tolerant wife. She wants to get a pretty Singer 201 in a nice old cabinet now
-
 Hi Chuck, Thanks for that. When you say "small amount" do you have a ratio you stick to, or do you just eyeball it? Cheers.
 -
Lamb says this: Regarding Logwood: A few paragraphs further on: Any errors in there are mine, I transcribed those paragraphs by hand. At some point I will photograph and OCR the section on logwood and iron black.
-
I don't know who told you that, but veg tanned leather makes just fine shoes. Heck, it's all they used for over a thousand years before chrome tanning was invented less than 150 years ago. All the really high-end makers use vegetable tanned leather for insoles and soles and usually linings. Chrome tanned leather doesn't have the fibre structure or strength to make decent insoles and is way too spongy to make usable soling or heels. 12-13oz is not bad insole material, but unless it's a hard-rolled bend it isn't going to make great outsole because it'll be too soft. If you can roll it up and cut it with anything less than a bandsaw, it's probably too soft. Good hard-rolled soling is more like wood than leather in some ways. If you're making turnshoes though, 13oz veg tan makes great soles
-
So I've got my head around most of the adjustments now but I'm still really puzzled by the fact that the gear cover is interfering with the big drive gear and I'd really like to get it working with the cover in place because the gears are oily and dirty. Any suggestions? Thanks.
-
Nice to see someone else having this thought. I've used this stuff quite a lot making historical goods, but I've given up on it for now until I can find a decent source of strong tannins. I'm thinking logwood or oak galls here, tea doesn't cut it. NZ doesn't have gall wasps so we don't get oak galls. I could import logwood but it's hell expensive to get over here. The acid is the problem in oak gall ink. It's less of an issue here provided you neutralise the acid afterwards with a baking soda rinse but the big problem I've had is the dye destroying the grain surface of the leather because the iron / tannin reaction is stripping tannins out of the leather and leaving it brittle. It doesn't matter how well you oil or condition it afterwards, you've still bound up a bunch of the tannins in the leather and that's going to have an effect down the track. I've got a medieval belt I dyed with this and the grain is just peeling off the leather. I've got a copy of M. C. Lamb's early 20th century book Leather Finishing: Including Dyeing, Staining and Finishing which documents recipes for iron black and talks about the necessity for adding logwood extract to prevent the dye destroying the grain surface of the leather. I need to dig it out anyway to respond to a PM question about it so I'll drop the info on here too.
-
Hi Willy, I'm glad you find my blog useful, that's why I write it Sorry I haven't posted anything for ages, I've been moving it to it's own domain at http://wherearetheelves.net but it's almost ready (note that all content on there currently will get deleted and re-imported from blogger before I go live, so if you comment on that they'll get lost). I'll reply to your other post. I make most of my own stamps because I haven't been able to find good approximations of medieval ones. It's not that difficult to do the simple ones. Cheers.
-
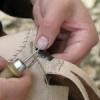
That's very very nice work Willy. Those Dordrecht purses are as good as any I've seen. I too am curious as to where you get your mounts. Did you cast them up yourself? Looking at your picasa gallery I like your casework and scabbards. My only suggestion would be to get a much smaller tool to do the backgrounding. The extant examples all seem to have been done with a very fine tool that leaves quite a consistent stippled background. Where are you based?
-
If you want Stepping Through Time I recommend buying it from Oxbow Books, not Amazon. http://www.oxbowbooks.com/bookinfo.cfm/ID/32567 Oxbow do a lot of work to keep books like this available to specialists, and on a corporate level they're a lot less evil than Amazon. The best book for these shoes is Leather and Leatherworking in Anglo-Scandinavian and Medieval York which is part of the York Archaeological Trust 'small finds' series. Sadly it is out of print now so I'm not sure where to recommend getting a copy. This is my personal opinion only, but I disagree with a fair bit of the content in the Compleat Anachronist on turnshoes. I think the techniques are overcomplicated and a bit inaccurate.
-
Hi all, This is slightly off-topic, sorry. I couldn't think of anywhere better to ask. I'm working on restoring a number of machines at the moment and I'm trying to find people who are members of the needlebar.org forum who might be able to PM the admin on my behalf and see if he'll let me sign up. Currently the whole forum is locked down to members only and registrations are apparently closed. I've emailed admin@ but got no response. Thanks.
-
I'm coming to all this from a background of hand stitching with threads waxed with hand wax, which is sticky and contributes a lot to the lock of the stitch. If you machine sew with lubricated thread how does it affect the lock of the stitch in the long term? Thanks.
-
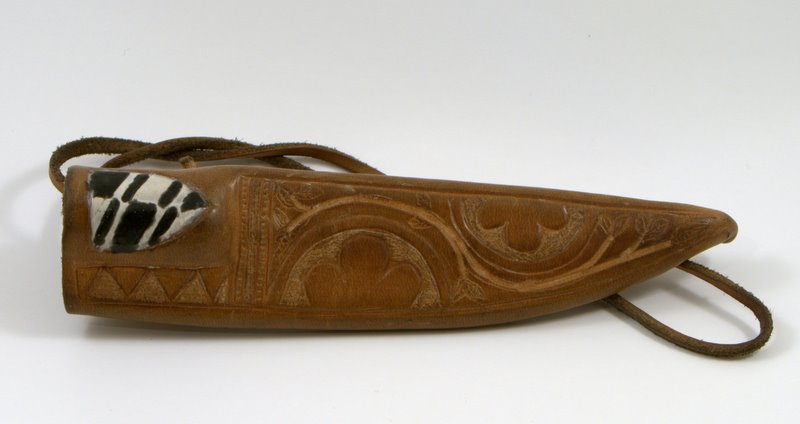
That's neat. How thick is the leather you used? Looking at the way it's gathering at the top I think if you could find some nice supple 0.8 or 0.9mm calfskin you'd get a much neater gather at the top and a better overall shape to the bag. Did you make the frame yourself? I like it a lot.
-
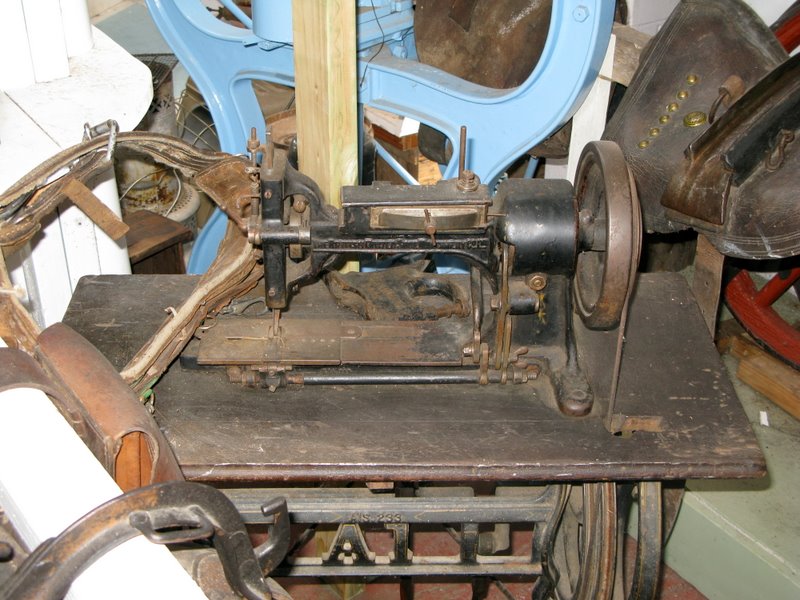
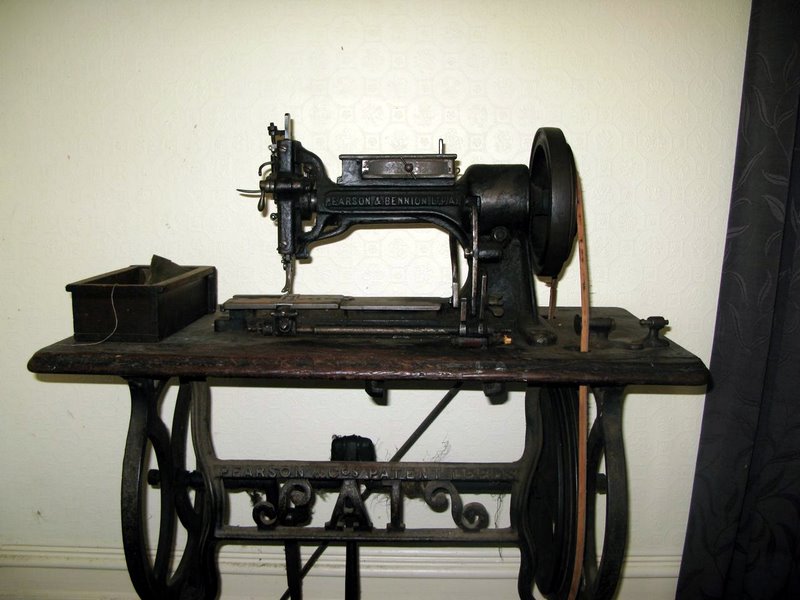
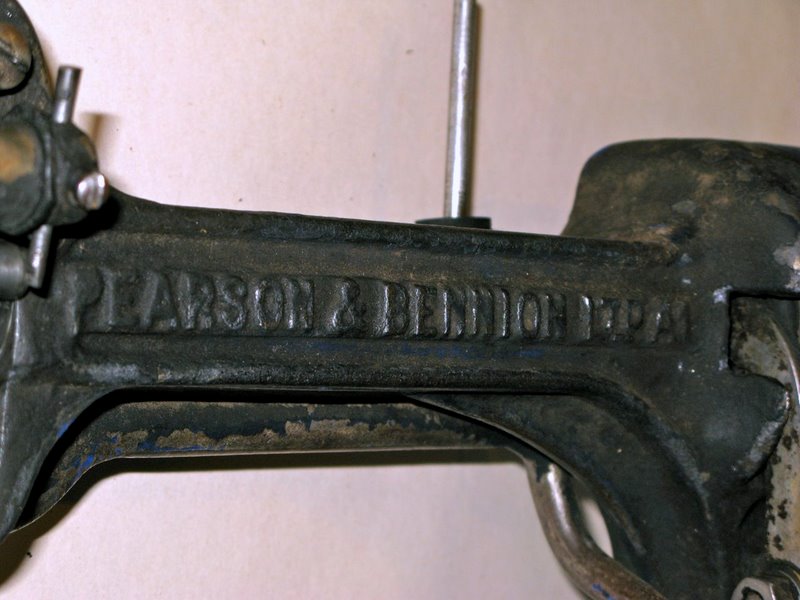
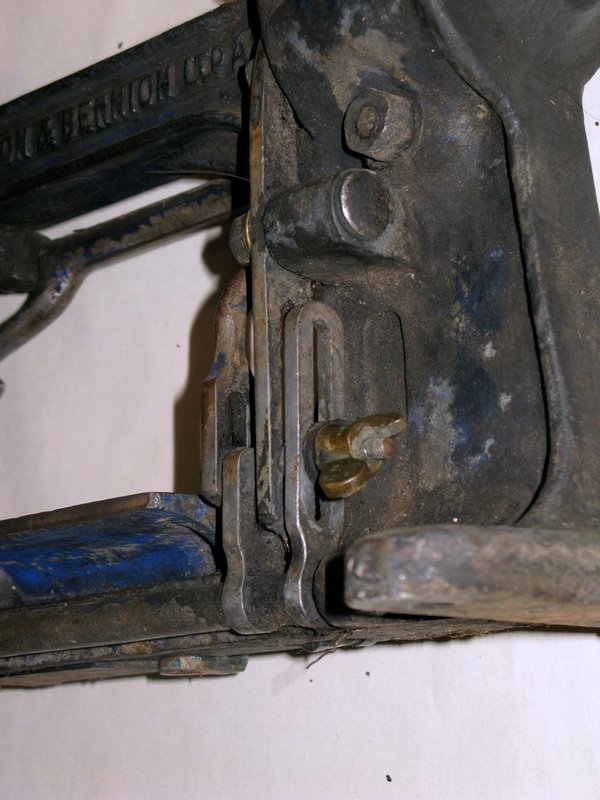
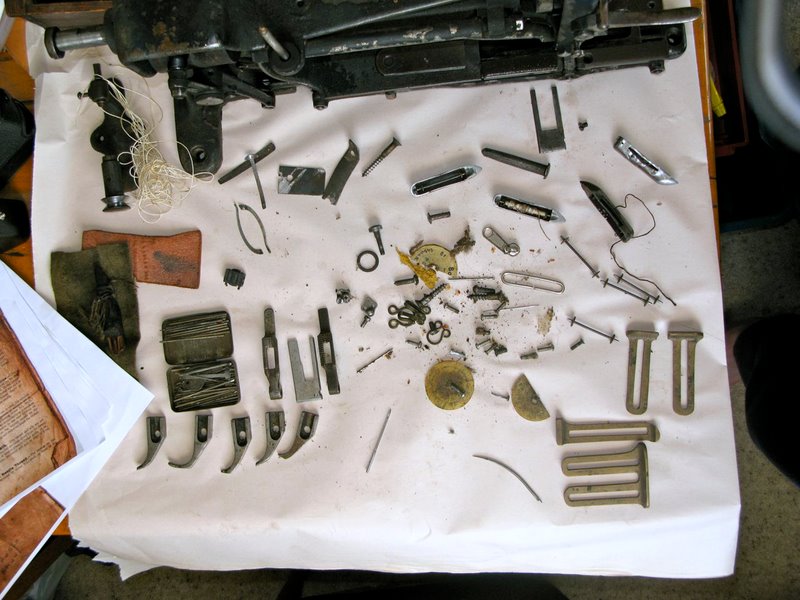
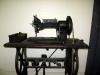
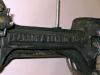
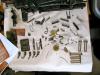
Here's my recently acquired A1. I bought it on TradeMe (NZ's auction website) ages ago but only managed to co-ordinate the 500k round trip to pick it up last weekend. It was a nice drive though up through a bit of New Zealand I've never seen before. It cost me more in petrol to drive up and get it than the NZ$70 I paid for the machine. I bought it with the intention of restoring it to as close to its original condition as I could, whether or not it would ever actually sew. I think it will though but some parts are going to need shimming for the feed to be consistent. The fun part was stopping in to the Central Hawkes Bay Early Settlers Museum in Waipawa on the way home and seeing this machine, which is just like my one only newer The paint on the museum machine is in much better condition than mine so I took a bunch of photos of it so I have some reference for the pinstriping even though it's a later livery. According to the person who sold it to me the saddler who owned it before her used it to sew the horse covers for the first NZ equestrian team to go to the olympic games which was in 1964 so it was a fairly old machine even then. Other than that I know nothing about its history. It is marked Pearson & Bennion rather than British United Shoe Machinery so it's a relatively early one. I can't see anything resembling a serial number on it anywhere though. Various parts on it are marked "16" for reasons I don't know. Thanks to Celticleather I've got a scanned manual for it and I've started the process of cleaning and restoring it. It was seriously caked in gunk. A mix of old grease, dust, oil and horsehair several mm thick over much of the machine and I'm going to have to go after some bits with a brass pick to get the dried grease off. The big surprise for me was cleaning it and discovering that what appears to be its original japanning was a rather striking shade of blue! I can't be sure of course, but given the state of the machine, the fact that the varnish has gone black the way old oil-based varnishes will, and the fact that it dissolves easily in methylated spirit I suspect this is its original japanning and not a more recent repaint. The colour is consistent on all the originally japanned parts, including the flywheel and the various actuator rods and the stand is the same colour. Once I've photographed it I will check under the remaining pin-striping on the lettering on the stand to see if that's blue too. The blue only really became apparent when the top varnish layer was removed. I plan on getting it soda-blasted back to bare metal and I was going to paint it with automotive spraypaint but I'm seriously tempted to make up some blue japan and re do it in as close to the original finish as I can. The only problem is that I don't have an oven big enough to put the stand in The other nice surprise was emptying out the drawer and discovering that there were five different presser feet (including two pricker feet), four guides, four shuttles, eight bobbins two different feed dogs, two different feed dog plates and a tin of needles with it! The original bobbin winder was screwed to the table when I got it. None of the shuttles are in great repair though so I might need to buy or make a new one before the machine will sew. One of them has had the point built up with brazing and the other three are variously dented and blunt but now that I've seen the mechanical condition of the rest of the machine I think it's worth getting going. I've extensively documented the disassembly process so I can put that in a new thread if anyone's interested.

-
Greetings, Thanks for posting these. Did you ever get the chance to scan the No. 6 manuals in full, and is there any chance I could get copies if you did? I'm just about to get one of the machines. I'd be very interested in high-resolution copies of the catalogue if such a thing were possible too.
-
Hi Peter, Do you have the plans for the table by any chance, and photographs of the way it attaches to the machine? I recently acquired an A1, and I'm about to acquire a No.6. If you have, or come across, another bobbin winder I'd be very interested in it. Cheers.
-
Do you have any pictures of the whole purse? Difficult to know what to suggest without seeing the whole article. Looks to me like the straps are some sort of vinyl, or at least probably vinyl covered pseudo-leather from the way they're tearing. My guess is that the material is what's failing not the stitching.
-
Have a look at http://chestofbooks.com/crafts/general/Arts-And-Crafts-Magazine/The-Art-of-Bookbinding-V-Gilding.html and http://www.edenworkshops.com/Gilding_-_A_Free_Step_by_Step_Guide_to_Gilding_on_leather.html They deal with bookbinding, but the principles are the same.
-
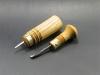
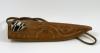
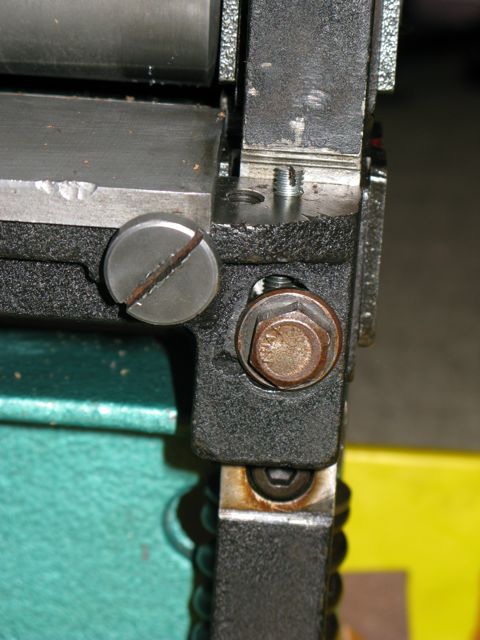
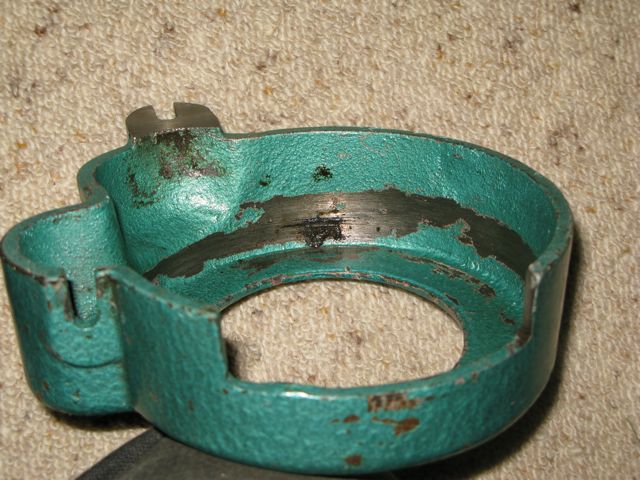
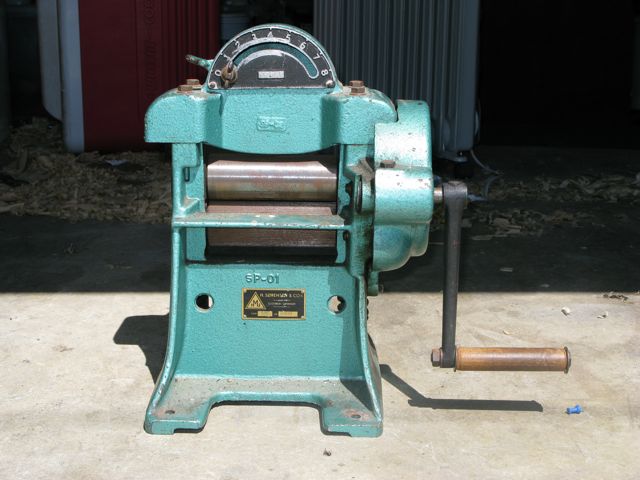
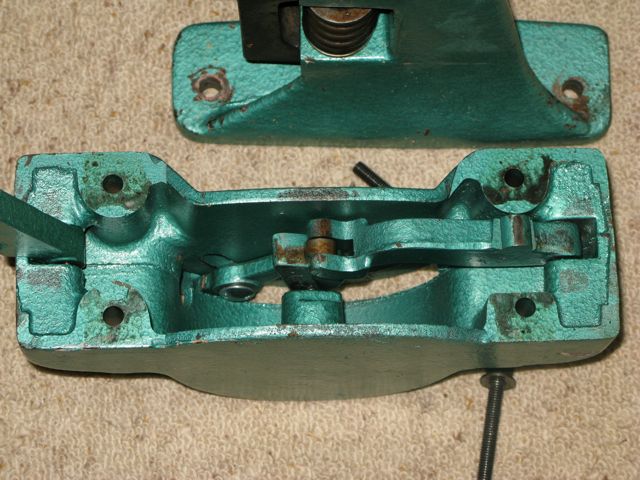
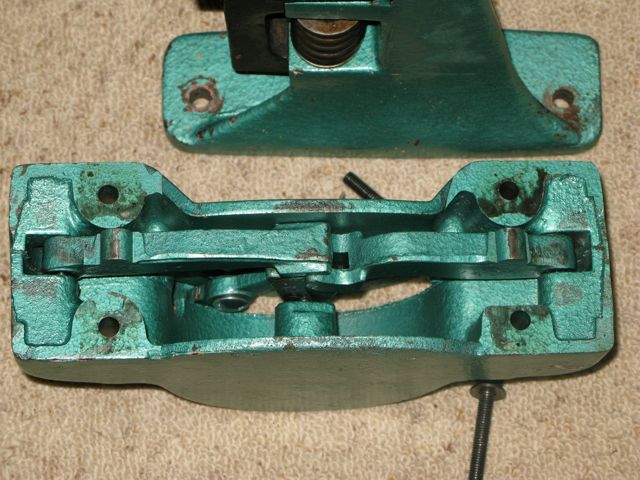
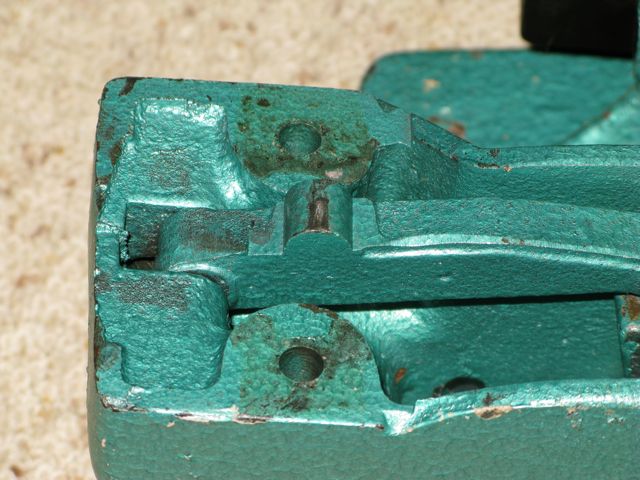
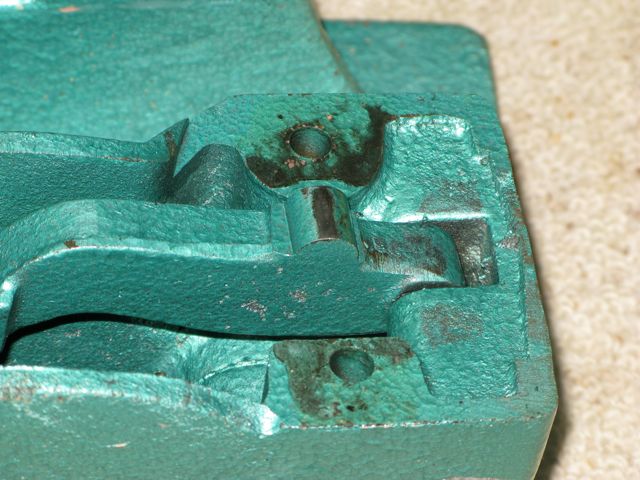
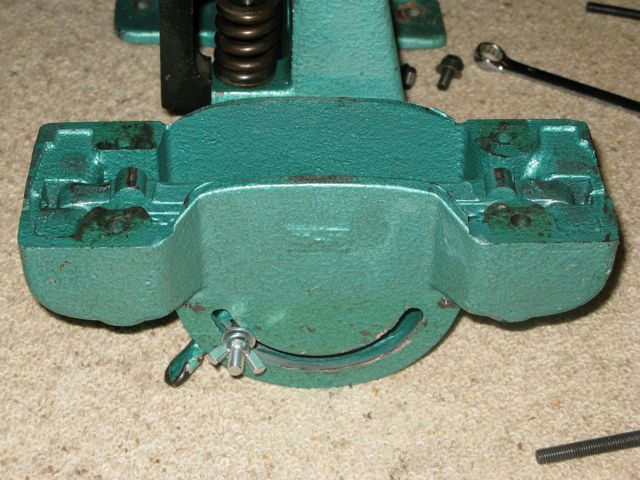
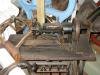
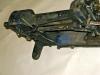
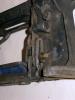
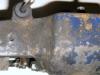
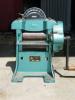
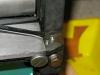
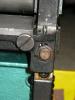
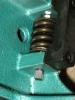
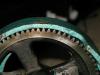
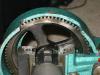
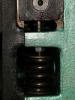
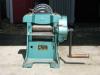
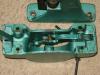
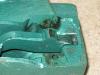
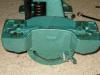
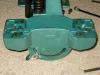
So I've got myself a 6" crank splitter. It's marked "H. Sørensen" but it looks to be mechanically identical to early model Landis splitters predating the model 30, based on what Bruce said in my original thread asking about it. Like the early Landis, but unlike the later ones, the Sørensen adjusts with a single lever on top of the machine that moves internal cams to apply pressure to the top roller bearings rather than having screws to adjust the top roller height. I've got the blade plenty sharp and run some scraps through it to test it. I can get it to split down to paper thin Ok or just shave the tiniest amount off the bottom of the piece, but not much in between. I've stripped it and put it back together again so I have a good idea of how it works mechanically, I've just never seen or used one before so I'm not sure what the best way to set up and tune it is. I'm the kind of guy who wants to fully understand his machines so I can make sure they're set up right and fix them when they go wrong. I'm pretty new to mechanised leather working so please don't assume I know anything about anything when it comes to machinery, but if I can get my head around this well enough I'll write up a "crank splitters from first principles" manual for other people who find themselves in my situation. I'm trying to work out: what the proper relationship of the blade to the centreline of the lower roller is; how high blade should be set above the lower roller normally (do I need a set of feeler gauges for this?); what the various lower roller adjustments do, and when/why they should be adjusted; what the blade height adjustments do, and why you adjust them; whether it is normal for the gear cover to interfere with the top roller adjustment on this type of splitter or if there's something weird with my one; what range of thicknesses this type of splitter can produce; and whether it works better with chrome or veg-tan. Here is my understanding of the theory of operation. I've just derived this from looking at the machine as it goes back together, I have no experience with using these at all, so please correct me if this is wrong (or confirm it's correct ) There are two rollers, a smooth upper and a grooved lower roller that feed the material through onto a blade positioned between them. The blade is fixed relative to the chassis and the upper, smooth, roller adjusts up and down in the chassis relative to the blade edge to control the thickness of leather you get out of the machine. This also affects the amount of pressure on the work as it is fed through. The blade is adjustable for height via set screws in the blade carrier that bear on the bolts holding the blade carrier to the chassis. These are there to level the blade and fine-tune the height relative to the lower roller and aren't intended as regular points of adjustment The lower, grooved, roller does most of the feeding of the work. It has a fixed maximum height but rides on springs so thicker leather will push it down allowing the machine to take a thicker cut. The maximum height of the lower roller is fixed by nuts on threaded posts extending from the bottom of the lower roller bearing blocks that control how high the springs can push it in the chassis. The spring tension on the lower roller is controlled by screws that bear on the bottom spring plate. These don't move the lower roller at all, they just control the amount of force it takes to displace it, and therefore how hard the leather being fed is squashed between the two rollers for a given feed height. Does the lower roller height normally get set once then left alone, with the screw adjustments being to level it rather than adjust its height for different bits of work? It seems to be height-adjustable via nuts on the threaded pins that come from the bottom of the lower roller bearings, through the casing, and bear on the plates on top of the lower springs. When I got it it had some obviously non-original nylock nuts on there that were so tight it unscrewed the pin from the lower roller bearing rather than adjusting up and down. I've since cleaned the thread and put loctite on where the pin screws into the lower roller bearing block and replaced the nuts with non-locking ones. There wasn't enough space to get two nuts in to permanently lock the height of the lower roller as I think is depicted in the landis manual. There's a square-headed screw right at the bottom with a pointed end that bears on the lower spring plate. I am assuming the blade goes in bevel-up? it was in bevel-up when I got the machine but I can see how it could also work bevel down and having it bevel up means the angle of attack is dependent on the angle the blade is sharpened at. That's an issue for wood planes, which is the closest analogue to this I can think of, but probably isn't with leather. Here's a couple of pictures of where I've got it set relative to the lower roller at the moment. The blade stops are quite badly chipped and the blade shows signs of having been screwed up tight against them before but the main edge is Ok. In the second one I've just stuck a bit of leather under the blade to make the edge more obvious since it's shiny and hard to photograph. The biggest issue I'm having is that the large drive gear is attached to the upper roller so it moves up and down with the upper roller as you adjust the machine. This is fine, except that the gear cover that bolts to the side of the machine doesn't have enough space to allow for the full travel of the gear. If I set it so it's just about touching the bottom of the cover at the lowest extent of its travel it only adjusts about 5/8ths of the way up before the top of the gear hits the top of the inside of the gear cover. If I take the cover off I can get a full range of adjustment out of it. Given the damage evident on the inside of the gear cover I don't think this is a result of my having put the machine back together wrong. Here's some pictures showing the clearance, and the damage inside the gear cover caused by the big gear grinding on it. Is this normal for this style of machine (which I struggle to believe) or have I or a previous owner, done something daft with the way its set up? I can only see one way the gears can possibly go together so I don't think that's wrong. Do the model 30 Landis splitters do this too? I'm wondering if the machine is really intended to be set up to do a fairly narrow range of work, but do it very accurately, and then left alone, with something more easily adjustable used for a wider but less precise range of work. Thanks.


-
If you can deal with the smell, raw cod liver oil is very good for veg tanned leather. Mixed with tallow it's one of the traditional curriers fats. I rendered a few kilos of beef tallow a while ago which I've used on various things mixed with cod liver oil, based on a recipe from an old leather dressings book I got of abebooks a while ago. The smell is an issue though, but it goes away once the oils have stopped oxidising. I don't understand the chemistry but from what I've read it's the oxidation of the oils in contact with the collagen fibres of the leather that is beneficial, so while 'deodorised' cod liver oil might be more pleasant it doesn't do the same job as the raw stuff. It works best on things you can apply it to and then put aside someplace for a while to de-stink.
-
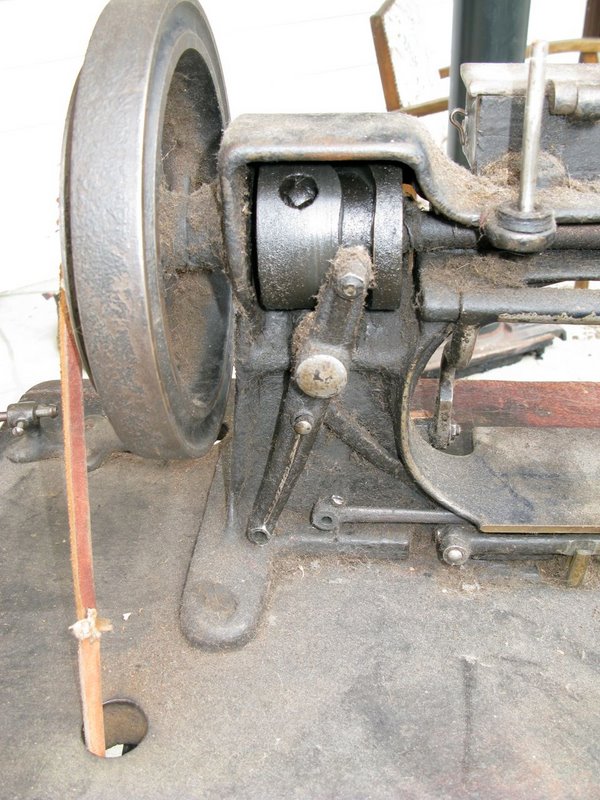
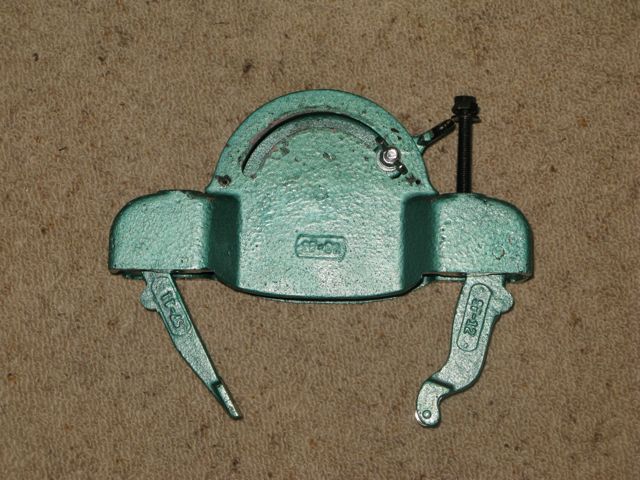
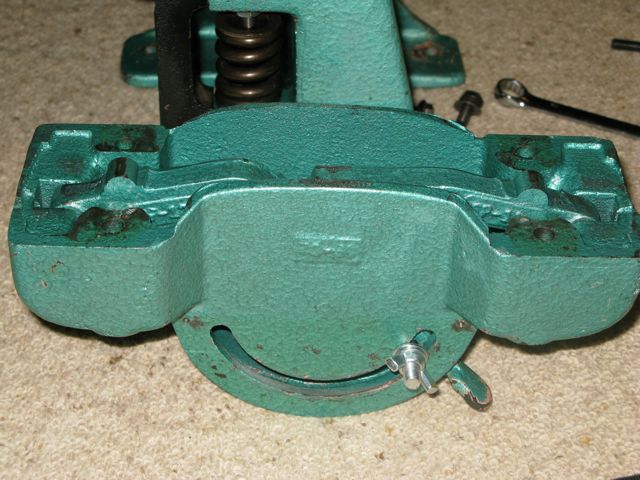
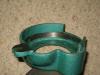
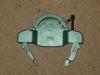
Thanks guys. Knut, your splitter looks very similar to mine but the main casting is slightly different. More like the Landis than the solid casting mine has: Bruce, here's the guts of the adjustment doohickey on the top of the splitter with the cams that lower the top roller. There are springs between the two roller bearing blocks which raise it, like on the Landis. The down side of this system is that it's pretty hard to lock down with the thumbscrew, if the leather is a touch thick it'll spring the top roller up. I have a couple of ideas on how to fix this though. A better handle to get it tighter and a cover plate that is tapered towards the thin setting end of the curved slot so it wedges in place better. Having stripped and cleaned the machine I have a fairly good understanding of how it all works but having never owned or used a splitter before I'm not quite sure of the subtleties of getting this machine set up properly. I've read the Landis manual from bootmaker.com since this machine is pretty close, but I'll start another thread with adjustment questions so it's more useful in the search results later for people with similar machines. Thanks.


-
Hi all, In another thread on this forum someone mentioned mil-spec sewing with machines and there were some requests for the army spec book detailing the techniques. I found these on Google Books the other day and figured that even if they aren't the book in question they are still interesting! They contain maintenance as well as operational instructions for the following Singer Models: 112W116 131W113 7-33 97-10 17W15 55-5 111W155 Organizational and field maintenance manual: sewing machines for the repair of parachutes and allied equipment, Singer models 112W116, (FSN 3530-171-2123) ... 111W155, (FSN 3530-359-8856). Google Books page PDF Download Link Operator's manual: sewing machines for the repair of parachutes and allied equipment, Singer models 112W116 (FSN 3530-892-4636) ... 111W151 (FSN 3530-892-4629). Google Books page PDF Download Link Organizational, field, and depot maintenance manual: parachute, cargo, 28-foot diameter nylon canopy, type T-7A (converted) Google Books link PDF Download Link Organizational and direct support maintenance manual: general repair procedures for clothng and individual equipment Google Books link PDF Download Lin k http://books.google.com/books/download/Organizational_and_direct_support_mainte.pdf?id=H9MXAAAAYAAJ&output=pdf&sig=ACfU3U2RK_xHEtFAdJBzeDgjgqr6J6bERg&source=gbs_v2_summary_r&cad=0' rel="external nofollow">All of the books are in the public domain and can be legally downloaded in full as PDFs using the links above. Enjoy!
-
Hi Bruce, Thanks for looking that up! That's exactly the type of top mine has, but it had a naff aluminium part covering the arc where the adjuster screw runs and it's a bit mangled and the screw won't grip it properly. I'll probably replace it with a brass or steel one. The roller can't be adjusted one side at a time. The adjustment bears on a pair of cams which apply pressure to the top roller symmetrically. I guess that as long as everything wears evenly it's a good way of keeping it straight but if it does ever get out of line I can't see a way it could be ajusted. I've got mine in bits now and the rusty parts are sitting in a bath of evapo-rust to clean them off. Once I've cleaned the gunk out of the rest of it I'll take some photos of it and put them up here. Cheers.
-
How Do You Photograph Belts And Guitar Straps?
amuckart replied to UKRay's topic in Leather Photography
Hi Ray, Sorry if I'm telling you stuff you already know. It's difficult to figure out what someone else knows about stuff just from the forum, but if I'm teaching you to suck eggs as they say over here, at least this might be useful to other readers. That kit should be all good. You might need another lamp if you want to avoid shadows. I found with two I couldn't quite get things well lit enough. The ixus 980 is a good camera, and it had a Program AE mode which is good. The biggest thing you'll want to do is turn the camera flash off and set it to the lowest ISO setting it'll do (80 or 100, no higher than 200). If you have issues with depth of field, set the camera to aperture priority mode and crank it down to f2.8 or so. From the photos you sent before it looks like either you have the flash on or you're lighting the belts from the same direction as the camera, which means you'll get bad reflections and bright spots on the shiny bits. You want to light the subject with indirect light bounced off the inside of the light box or at least filtered through a diffuser. These articles are ones I've found useful. Obviously you've already got a light tent so you don't need to build one, but the comments and notes on use are still good: http://www.studiolighting.net/homemade-light-box-for-product-photography/ http://digital-photography-school.com/how-to-make-a-inexpensive-light-tent http://www.pbase.com/wlhuber/light_box_light_tent This might be useful if you're having issues with harsh flash highlights: http://digital-photography-school.com/how-to-soften-up-harsh-flash-lighting http://digital-photography-school.com/how-to-make-a-diy-ring-flash-tutorial This is a good setup too: http://digital-photography-school.com/cooking-up-a-photograph-in-your-kitchen Cheers. -
Hi Knut, Do you happen to have a manual for it? Near as I can tell it is a clone of a Landis or American splitter but with a different adjustment mechanism on top. I'd love to see a photo of your one. Cheers.
-
How Do You Photograph Belts And Guitar Straps?
amuckart replied to UKRay's topic in Leather Photography
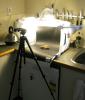
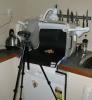
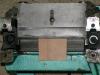
Hi Ray, There are four things you need. A decent camera, a decent tripod, a light box, and good software. Almost any modern digital camera will do the job, but you want one with a "programmed autofocus" mode. That allows you better control over flash and exposure without requiring fully manual mode that you only tend to get on high-end cameras. You won't get decent shots in this kind of situation with fully automatic mode. You don't need a cable release or remote, just set the camera to 2 second self-timer so you're not touching it and causing shake when you take the picture. The beauty of using a digital camera for this is that you can take a hundred shots of something and pick the one or two that work. You don't need a hugely expensive high-end tripod, but don't waste time with cheap flimsy things. The one I have is a decent portable tripod but it isn't stable enough to do long exposures without shaking, even when I'm not touching the camera. You want to avoid using the builtin flash, so your exposure times are going to be longer. If you can get a tripod that allows the camera to be mounted underneath pointing down you'll find that useful for this kind of work. You can build a light box quite easily. Google has lots of info on them. I made mine out of a 60lt plastic wheelie-crate that I store the paper and lights in when I'm not using it. It's not perfect, but it works pretty well. The major thing is to use 1550nm 'daylight' bulbs in the lights and to play around with the white balance of the pictures. Having a white card somewhere in shot you can crop out later is useful. Google's picasa app is a good free application for correcting white balance and doing basic edits. You don't need photoshop for basic product photos Here's the light box I use: The major thing I want to change is to make it so I can take photos looking straight down into the box. It's a lot easier to get the object set up in a box like that. Here are some pictures from it. I'm still getting too-bright highlights on some parts, but it still works a lot better than I could do otherwise. I keep some matte finish light card stock loosely rolled up in the box to use as backgrounds. You can also use fabric or felt. The key is not to use anything shiny and to have it be a smooth curve from the top-rear corner of the box to the front-bottom corner of the box so there aren't any sharp corners in the background of the shot. If you want any more info, please ask. I'm not an expert on these but I've managed to make it work Ok.