


amuckart
-
Posts
577 -
Joined
-
Last visited
Content Type
Profiles
Forums
Events
Blogs
Gallery
Store
Everything posted by amuckart
-
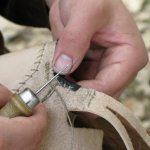
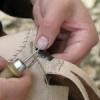
Hi all, I'm disassembling a 29k58 to overhaul it and there are a couple of taper pins giving me grief. The first is the one holding the thread take-up lever into the arm on the top of the machine, and the second is the one holding that arm onto the head. As near as I can tell, both should be driven out from the rear of the machine towards the operator, but neither will shift. Both are a little flattened on the small end, but not mushroomed, which makes me wonder if a tool steel pin punch is the right tool to remove them or if I should be using a brass rod or something. Can anyone offer advice on shifting stubborn taper pins like these? Cheers.
-
I suspect you mean UFA, they only become UFOs when the owners get really frustrated with them As far as I know, yes, they take the same needles as other 29-class machines.
-
New member needs identification
amuckart replied to Rolling Stone's topic in Leather Sewing Machines
I'm almost certainly wrong about this, but there are aspects of that, like the way the base fits the table, and the shape of the flywheel that are quite reminiscent of an A1. I wonder if it's a Pearson or BUSM machine. I'm almost certainly wrong about this, but there are aspects of that, like the way the base fits the table, and the shape of the flywheel that are quite reminiscent of an A1. I wonder if it's a Pearson or BUSM machine. -
Hi Mike, The thread shouldn't intersect with the channel knife at all. Did you re-thread it? I've emailed you a URL for the instruction manual.
-
It looks like it'll work Ok in the condition it's in. If you wanted to clean off the rust you're looking at something like evaporust - most other things will blow all the rest of the nickel off. As well as the red marked oiling points there are several covered oil holes that go down into axles etc, they have little flip-top covers on them. I'd go after the cogs with a decent oil as well. What I did with my Gritzner was liberally oiled every moving surface I could see with CRC Syntex, but I don't know if you can get that in the UK. I think you do have it threaded wrong. Take the thread out of the wax pot, through the channel in the post, around the tension wheel, up through the eye in the wire arm and straight into the takeup lever instead of going through the bits on the side like you have it. The holes in those are probably spannering points rather than thread path. If it keeps breaking thread after that, take a little tension off the thread spool - that's the main point the upper tension gets set in these machines. You should also either use prewaxed thread or have some oil in the wax pot, I put pure neatsfoot oil in mine for now until I can get some sellari's liquid wax. The other thing to do is polish the heck out of every point in the thread path. Hope that helps.
-
Hi Mike, This might be something for a new topic altogether. That's entirely recognisable as what turned into the Frobana Gritzner stitcher. Interesting to see what's the same and what's changed. It could probably be treadle driven with a big enough flywheel. I've got a manual for the Gritzner, just haven't had time to get it online sorry. I'll try and do that this weekend. It doesn't look all that bad really. My Gritzner looked terrible when I got my hands on it. I went after it with a spray bottle of undiluted industrial citrus cleaner and a waterblaster and now it looks great. Still drops the occasional stitch though :/ If that were mine I'd remove it from the wood and thoroughly clean it then scrub the lightly rusted bits with oil and grey scotch brite. The nickel plating is probably compromised where rust has gotten under it but that shouldn't affect the mechanics of the machine. When it comes to old stitchers the up side of this machine is that you can still get needles for it. The down side is that they cost about 8-euro each but when they work they work very nicely.
-
I Need An Opinion On Singer 29K55 Sewing Machine.
amuckart replied to Handstitched's topic in Leather Sewing Machines
G'day HS, I think the technical term for that machine in this part of the world is "rooted". I wouldn't bother if I were you. I've got 29k13's in better condition than that. That color of rust usually indicates serious neglect that has completely stuffed the internals as well as just the internals. -
I just went and looked at the website and saw that the adjustment on these is via eccentricity in the roller which means it'll be a bit harder to get back to a "zero" point each time. What you need are two marks, one on the top edges of the uprights for the edge of the blade - which will get slightly shorter every time you sharpen it; and one inside the uprights for the height of the roller, which could get trickier to see. There would be better ways of doing it but they'd require high-precision markings and a slight rework of the way the roller is mounted.
-
Go here: http://www3.telus.net/BrentBeach/Sharpen/ If what' you've got is like the pictures above it's basically a small plane blade and can be sharpened in exactly the same way. With a little practice, the system Brent lays out there will produce edges better than anything else out there. They are terrifyingly sharp. It takes a bit of investment in the setup, and some practice to get right but once you've done that it's quick, simple and it works, very very well. Scribe a set of lines in the top of the sides using a machinists square. That way you can get back to the same thickness again by putting the edge up to the line you used last time.
-
Some Holsters And Awls I Been Working On
amuckart replied to Nooj's topic in Gun Holsters, Rifle Slings and Knife Sheathes
Did you heat-treat the steel? Drill rod should be plenty hard for awl blades. -
Thanks Tony, I'll let you know what I work out.
-
Anyone? I'm trying to get the thing apart and am stuck trying to get the bell off. I'd really like to work out if the feet and drive stones are interchangeable with available parts so I can set it up to do veg tan with. Cheers.
-
I'm wondering if 45k clones like the Techsew GA-5 are close enough to the original 45ks they're clones of that I could use parts like the main shaft out of one in a 45k. Anyone know, or should I look for someone who's got a parted-out 45k? Cheers.
-
Junkers have rarity and an odd collectiability going for them. You can get 'em for less than that if you're willing to put a bit of work into getting them going again. I don't know how thick a sole the Junker can do, I've never tried feeding something through that might stop it. It's designed specifically for soling shoes and boots though. I'd get a square awl from Dick Anderson at Thornapple River Boots. He makes some of the nicest bootmaking awls out there. You use a square awl by hand. Pricking irons are used to clean out the wax from between the stitches and make everything look neat. What specifically are you wanting to make? It sounds like you'd be well served to sign up to Crispin Colloquy at http://www.thehcc.org and chat to people there. It's a specialist boot/shoemaker's forum and the people there are plenty friendly.
-
It's a knob that clamps to a steering wheel to allow you to turn it more easily. You see them on big trucks sometimes. They spin on the mounting so you can hold the knob and turn the wheel real fast. Much of the weight in these machines is in the motor and the pedestal mounting but even if you're not going to power it you'll want that to hold the machine at the right height etc. They're designed to sit on the pedestal and aren't trivially mountable on something else. People-powering one of these would be darn near impossible unless you rigged up some sort of treadmill and had a spare child or something to power it. You generally need both hands to steer the work through the machine. I'm not saying it'd be impossible to do single-handed but it'd take a hell of a lot of practice! I wouldn't think a Boss would be much good for outsoling shoes. If you want a hand-cranked machine specifically for that job you're looking at a Junker & Ruh SD.28/Pedersen 308, or a Frobana Gritzner. Both are good machines, but both are near impossible to get needles and parts for. The Junker can be a little tempremental if worn, and refurbished ones run to US$600ish plus god-only knows for needles. Gritzners are things you luck into, they're not terribly common outside of Europe. You can still get needles for the Gritzner, if you're prepared to pay 8-9Euro/needle. Alternatively you could buy a square awl and pricking irons and do it by hand.It doesn't take that long with practice :D
-
That looks like an American Straight Needle stitcher, though I couldn't tell you if it's all there. They're good machines but a bit different to use than a curved-needle stitcher like a Landis model 12. You can use one of these for sewing soles on boots and shoes. They're apparently great for side-seams on boots too. Have you seen it running?
-
Anyone Tried Casting Buckles In Pewter?
amuckart replied to UKRay's topic in Leatherwork Conversation
It worked for medieval people I've had a pewter-buckled belt for about 8 years now, and it's just fine. Of course, it was made from decent britannia metal, not recycled thrift store tankards. -
Anyone Tried Casting Buckles In Pewter?
amuckart replied to UKRay's topic in Leatherwork Conversation
Hi Ray, There are two quite different topics here. Pewter is easy to cast and melts at a low temperature requiring little in the way of safety equipment. Brass, bronze etc are very different beasts requiring serious heat and safety kit to do. You can cast pewter in high-temperature RTV, which is the easiest way. The medieval way is to use soapstone, which carves easily and burnishes smooth. You can use plaster of paris, but whatever you use it has to be completely dry. Pewter casts at a temperature that causes water to flash into steam which can blow your mold up, spraying hot metal everywhere. If you use RTV you can sculpt a model and use it to build the mold, if you use soapstone you have to carve the negative, which takes a fair bit of practice. The single most important bit of advice I've heard regarding pewter casting is to make sure your work surface tilts slightly away from you so that if you accidentally dump an entire crucible of metal it doesn't run off into your lap You can melt pewter (britannia metal) on a stovetop, or in a metal ladle with an LPG torch. Safety kit wise a face shield and welding gloves are sufficient, but a good apron is also a good plan. This may be useful: http://chestofbooks....ing-Pewter.html I presume you have Dress Accessories and The Medieval Household? -
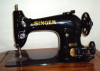
Can anyone ID this machine for me? It looks vaguely 123-esque in shape but I'm not sure qhat exactly it is. It may even be a simple domestic model, I can't get a sense of the scale from the photo. Thanks.
-
14Th Century Belts Made From Short Pieces Of Leather
amuckart replied to UKRay's topic in Historical Reenactment
Hi Ray, This probably doesn't help but in a decade and more of doing 14th century reenactment and research, I've never seen a belt made like that. The only time I've seen belts interwoven like you describe is in the complex scabbard suspensions of the 13th century. There was no general shortage of long lengths of leather in medieval times; there are plenty of extant examples of long straps and hundreds of iconographical ones. It's possible that what you were seeing was a poor representation of metal mounts on a leather belt. It wasn't uncommon for belts in 14thC Europe to have metal stiffeners and decorative mounts on them. -
Hi Franck, You are welcome. I have emailed you the manual. Needles for this machine have not been made for a long time and are very difficult to find. I'm afraid I don't know where to get any right now. They are more common in Europe though, so ebay or old shoe repair shops may have some. They cost a lot though - 8 Euro or more per needle is not uncommon.
-
Welcome to the forums. I assume you have a needle for the machine and need to know how to thread it? The machine is very simple to operate. The large handle on top is used to make it stitch and the small silver handle on the side raises and lowers the presser foot. The first thing you have to do is to firmly bolt the machine to a table, or to a piece of wood you can clamp to a table. The operating lever needs to be pulled and pushed quite firmly and this is impossible unless the machine is held down. I have manuals for the machine, and I have sent you a message to email me so I can send them to you.
-
I'd have done the same, and probably a damn sight less politely than you did. If there's someone else in the region who lacks the skill to do things right, then it sounds to me like they deserve each other.
-
Newbie Needing Restoration Advice Singer 29-4
amuckart replied to SewShine's topic in Leather Sewing Machines
Hi Rebekah, What have you done to clean it so far? The big risk with cleaning machines in this state is that anything which will lift the crud on them will also destroy the decals. If they've been painted over then anything that'll lift the paint will probably trash them, if the paint hasn't already. The fact that you've managed to uncover some of them suggests to me that it may not be paint over the top. Something I've found with machines of this age is that it's difficult to tell the difference between dirty paint and 100 year old oil deposits that have turned into black cruddy varnish over time. If the decals have actually been painted over, then they're most likely toast. That doesn't mean you can't get a good looking well working machine, just that it won't have original decals. There's also no guarantee how intact the decals are at this stage. It's much easier to clean these things up when they're in pieces, so if you're comfortable with taking a machine to bits and reassembling it again I'd go that route. Digital cameras are invaluable here. When I'm working on an unfamiliar or complex machine I take a photo of every change I make, and each screw, pin, or small part that gets removed is put in a hole in an index card and labelled so I can get it back together again. This also lets you look at parts that might be worn. Before you get too far into restoring the machine it's probably worth getting it to the point of making sure it actually sews well enough to be worth it. Machines of this age can work beautifully, but others can be just plain worn out. As soon as I've figured out what's wrong with my website I'll have a few PDFs on there showing how to get the major bits of the head apart. To clean the bare metal parts a solution of 1:20 concentrated citrus cleaner to water in a bucket works well. Put the parts in and let them soak for a couple of hours. For really stubborn dried grease 24 hours should shift it. Scrub with a stiff nailbrush or toothbrush to get the stubborn bits off then dry thoroughly (pat dry and use a hairdryer) and spray with WD40 to stop them rusting before you reassemble the machine. I'd do this at least for the parts in the front of the head and the gears and shuttle carrier at the end of the arm. For the shafts etc inside the machine a few cans of brake & parts cleaner will shift the worst of the gunk. If you can get it, re-lubricate with CRC Syntex once the cleaner has evaporated. During reassembly I lubricate all of the screws with a non-drying long-term lubricant. Personally I use CRC Lanocote, but any non-detergent, non-drying oil will work. This just makes future disassembly much much easier because it prevents the screws from seizing up. For the base, which has no decals, if you want to get it really pretty then get it soda blasted back to bare metal (soda-blasting, unlike shot or sandblasting won't damage or re-profile the iron) then degrease, prime, and paint it with automotive spraypaints. Otherwise disassembling it and scrubbing it with citrus cleaner before thoroughly drying and reassembling will do the trick. If it turns out the decals are toast, you could also do the same to the head of the machine, or just clean it and use it. If you need parts then talk to Bob Kovar at Toledo Industrial. He seems to be the go-to guy for bits for machines like this. -
If it uses 331LR needles, then buy up what you can when you find 'em. The 230s are made intermittently but none of the other sizes are any more and they're way expensive. I wouldn't run Nylon through this. Bonded poly would probably work since it doesn't stretch, but synthetic threads will tend to wear the thread path much faster than linen will. Some people just dunk the whole spool in silicone lube when they're running with synthetic thread. I fill the wax pot with neatsfoot oil when I'm running linen thread, but I haven't done much with this size of machine yet. Sellari's liquid wax is the other option. The pricker feet act like an overstitch wheel, but on the #6 at least you could also get flat feet. I have a set of pricker feet for my A1, but I really want a set of pricker feet for my #6es.
