


amuckart
-
Posts
577 -
Joined
-
Last visited
Content Type
Profiles
Forums
Events
Blogs
Gallery
Store
Everything posted by amuckart
-
Hi Art, Thanks for the later references, I tend to focus so much on pre-1600 stuff that's what I default to when I hear "historical reenactment". NZ doesn't have a big CW reenactment scene Do you have a copy, and if so can you quote it here? Thanks.
-
I second that recommendation. That's where I got started. I've been reading and participating in it for a few years now and it's still the best compendium of information out there. Do you have references for white code, or ingredients pre-18th Century? I've looked into this quite a bit, as have people like Marc Carlson, and to my knowledge there is just no surviving evidence for the content of medieval shoemaking waxes. If you know of some I'd be really interested in seeing it, especially if you can document the use of asphaltum in them! I'm familiar with the CW-era and 18th century recipes, including the ones for masheen/white wax, but extrapolating backwards to medieval/renaissance techniques from the 18th century doesn't work. I don't get the link between Sellari's wax and the content of medieval code, am I missing something? The trick with adding things like tallow is to add them in tiny quantities. I take single shavings off of a cake of tallow and add one, pour, pull, set and test then re-melt if required. With reference to the recipes of Al's you quote, be aware that Rausch Naval Yards burned down and you can't get pitch from there any more. Colonial Williamsburg ended up importing some from China at vast cost since you apparently can't even get it from Sweden any more, which is a pretty sad state of affairs.
-
The first thing that popped into my mind was 'what's the trumpet worth if you sold it'? If you're willing to part with it to get a sewing machine then that pretty much sets your budget. It's easy to underestimate how much machine consumables can cost too, so keep that in mind.
-
Sca Leather Coronet Historical Documentation?
amuckart replied to Mrs Barry Hicks's topic in Historical Reenactment
How legit is it? It isn't. People do it, for a variety of reasons, but -- and I say this with the greatest of affection for the Society -- people do, and wear, an awful lot of dumb un-documentable crap in the SCA I've never seen any documentary or pictorial evidence that anyone in the middle ages who was of a position to wear a crown wore anything other than the biggest, most gem-studded hunk of precious metal they could get their hands on, let alone a strip of leather, so Jarl Sigmund is probably the closest you'll ever get to a 'historical' figure wearing one. Assuming you haven't made it already and are trying to document after the fact, and need something to enter, why not hand sew a coif or something? I've never been to the East, but if I were judging an A&S competition I'd give a basic hand-sewn coif with good documentation a lot more points than a beautifully made but impossible to document leather 'coronet'. Just my 2c from over in Lochac. William de Wyke Per pale sable and argent a bend cotised counterchanged -
Looks like it's missing all the walking foot bits off the back.
-
S.e.w. Line 106-Rpl Any One Know About These
amuckart replied to cowcamp's topic in Leather Sewing Machines
Save your money and buy a Consew 206 or a Seiko STH-8BL. If you've got space for a Landis 1, surely you can fit a proper industrial machine in? -
Hi Brendan, No, I don't have any pre 18th century sources for the making of code at all. The Lystine Lordys Verament, as quoted on my site, tells us they had it in medieval times, but nothing about what it was made of or how. As far as I am aware, no such detail from any extant source has come to light. It's probable that it was pitch-based and unlikely that it contained beeswax. I'm working up a mix using pitch, rosin, and a tiny amount of tallow but it's pretty variable so down to experimentation with the materials you have on hand. Pitch is the key though, proper black pitch, not the rosin places like Jas Townsend sell as 'pitch'. Are you on the medieval shoemaking yahoo group? If you make medieval shoes, I'd suggest joining. There's a chap on there who bought a bulk load of bristles and is on selling them in manageable quantities. PM me your email address if you're not on the yahoo group and I'll send it on to him.
-
Best topic title ever! Nice machine too
-
I believe that was originally designed as an outsoler for shoes. They're neat machines. I want one for my ancient hand-cranked outsoler collection.
-
That's the consistent story I'm hearing. There's one, maybe two Chinese factories producing machines that're good to go out of the box, a bunch producing stuff that's basically sound in terms of material, parts and design, but with nothing in the way of assembly QA, and a whole lot churning out utter junk. The good ones are good to go out of the box with perhaps very minor tuning, the junk is going to be junk no matter what but the stuff in the middle that's basically sound but often badly assembled can be made good by people willing to go through the assembly QA. That's where people like Cowboy Bob and Cobra Steve come in. The thing is that you can buy the same machine's they're selling through someone else and get something that's unusable, because it's the work they put in that makes the machines good, and I think there's enough evidence from people using them to show that they are good, but only if you get them from the right person. I don't think that necessarily holds true, I think there's a class of machine made to good designs out of good materials (after all, the materials aren't exactly the difficult bit, 19th century iron and steel did just fine thanks) just badly assembled and spottily QAed at the factory. For those ones I think there's a very good chance they'll last the distance, after all they're faithful copies of good designs. They might never be as good as the Singers and Adlers were, but hell, Singer basically doesn't exist any more, and even Adlers aren't as good as Adlers used to be. I've got a handful of 'Big Old Singers' and they're beautiful pieces of work, but they're getting on for 100 years old, and it shows.
-
Gun Rig For A Friend
amuckart replied to cgleather's topic in Gun Holsters, Rifle Slings and Knife Sheathes
Very nice! Where'd you get the dice from? -
Heres one for your crituqeing pleasure
amuckart replied to Windom Leather's topic in Saddle and Tack Accessory Items
Me, I'd rather leave the @#!@#!$%#@$ thing at home! -
http://bootmaker.com/45Kmanual.pdf
-
-
Sorry the file links on my site are 404'ing at the moment. I'm having a fight with wordpress to make 'em work. Try college sewing for the bell crank parts.
-
If you do a google search for "compass race" does that show up what you're after?
-
If money was truly no object, I'd go to Campbell-Randall and get them to engineer me a Campbell high-lift with a 16" throat.
-
Thanks Gregg, you're right about my original question, and my circumstance. I've got some second hand industrials, Singers, a Seiko flatbed, a Pfaff 35-4, a #6 Pearson, a Pedersen outsoler, and I've got access to good motors at a price I'm willing to pay (refurbed Quick Rotan), and okay motors at half that. I can weld, so if it really comes down to it I can build a pedestal stand. What I don't have in New Zealand is a second-hand market for 441 or 205 type machines. What's left of the NZ saddlery industry seems to run on Pearson #6s and ancient Adler 205s, and you pretty much have to wait for someone to die before you can get your hands one one of those. NZ being a small place with a culture of keeping machines running way way after they should have died and never throwing anything away means that the second-hand machines that make it onto our local ebay equivalent are often quite worn out. This means I'm after something new, but lacking the budget to get a new Juki or Seiko (for that money I'll buy a rebuilt Campbell from Dan) I'm looking at Chinese clones. I know someone who bought a machine from a brand that's popular on this board that not only didn't sew out of the box, it needed a near complete rebuild to work almost acceptably. Fortunately they had access to a friendly local machinist or they'd have been left with a multi-thousand dollar boat anchor. What that taught me is that it's the person you buy the machine from, not the brand on it that's important. I don't mind taking a punt on a second-hand machine that hasn't cost me a lot and might or might not sew without a whole lot of work and spare parts, but if I'm going to buy a new machine it has to Just Work. Now, I could get Steve or Bob to ship me a machine from the USA, but the shipping and customs charges add enough to make that proposition unappealing compared to, say, buying a Highlead which are considered expensive but come with a good out-of-the-box reputation and head-only are actually cheaper than, say, a Cobra class 4 head from Steve by the time it's been shipped here from the US. Unless I luck into a good used 441 clone I'll probably end up going the Highlead route, just for cost efficiency. Cheers.
-
It's like a #6 Pearson, only not as good
-
The website, and the knives, look great! One thing that would be handy in the descriptions of the leather knives would be the stock thickness.
-
Redheaded Nerdgirl Seeking To Emulate Same
amuckart replied to Cavatica's topic in How Do I Do That?
Having had firsthand experience of both armour and corsets, I'd put fastenings on both sides. That way you can join the front and back by the shoulder straps and pull it on over your head. If the dagger harness is held onto the front of the armour with snaps, that could well be a good part of what holds it closed. Given the lack of obvious side fastenings on the costume one way you could approach it would be to treat it like a bulletproof vest and just have velcro on the inside. I agree on the side straps being for the daggers. You can see them go round in the back view. That makes me wonder if what I originally took to be rivets in the side view are actually snaps. I can't see any obvious closure to the sides at all. I'd bet they're also attached at the top by a single flexible strap onto the shoulder straps of the body armour otherwise they'd slide down. If you look in the hood shot you can see that the straps are loose around her upper arm, they're just there to make sure the spaders move with her arms. Those huge lacing holes do tell us that it never rains in the DragonAge universe though If I were going to do this in parts I'd suspend the layers off of internal straps. That's the normal technique for layered armour you want to be able to collapse slightly. Have a look at this picture to see what I mean Having said that the side views make this look a lot less like three pieces. Something I came across while searching google for that picture is this ebay auction which I have to share because maybe if I inflict the horror on someone else it'll get out of my head Those pictures are actually worth looking at because as near as I can tell the red parts of the breastplate are all one piece and so are a good example of what you can mould if you've got the right leather. -
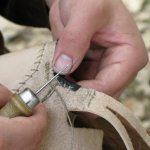
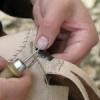
Lots of instructions - mine included I think - recommend using a double boiler. I often end up going to direct heat because boiling water isn't quite hot enough. You could try re-melting the whole lot in a double boiler then heating it further over direct heat, just be careful not to let it get smoky. Pour, smoosh around and taffy-pull from there and you might get a better result.
-
Redheaded Nerdgirl Seeking To Emulate Same
amuckart replied to Cavatica's topic in How Do I Do That?
Is the dress form curvy enough that you can saran-wrap it and mould directly onto there? That'd make life much easier. If it isn't, can you construct buildups for it? Failing that, I'd make a papier-mâché body mould and cast it in plaster of paris which will dry harder and faster than clay will. Consider how you will line it and what with (trust me you will want to line it) and either adjust the cast from there with body filler or very thick plaster or form the leather over the lining. From the second picture you linked to the parts are quite thick, I think TwinOaks is right, what they're using is probably moulded foam rubber. Not to say you can't do it with leather, you absolutely can but it will look slightly different because of the thickness. If you want to pursue the route of doing it in rubber rather than leather you're probably better to approach the shoulders and body armour as something more in line with a sculpted foam prosthetic than actual armour. Have a look at http://costumes.glit.../witchblade.htm for an idea. If you're going to mould it, don't stress too much about the pattern, get it roughly to shape and fix the details once it's formed over the mould. You'll be distorting the leather quite dramatically to form the cups so curve then texture. It's made to look like three parts, but it probably isn't. If you want it to move at all when you make it in leather, you'll want to make it as three parts though. The look won't be quite the same however. Do you have any pictures of the back, or ideas on how you'll do that? (Given that , it's probably a slingback ) 10oz would be great for armour if you were wanting something for SCA where someone was actually going to hit you. I wouldn't go over 6-7oz for this. much more than that and you'll have a heck of a time forming it. I'd get russet and dye it yourself, but something to note is that the colour of that is quite varied rather than a flat green all over so it won't be a simple single-application dye job, you'll want to airbrush it to get the colours right. -
The chunks of rosin will come out in the taffy pulling unless they're really big. When you say you couldn't do the taffy thing with yours, can you walk us through the steps you went through to get there? The mix does still have to be quite hot when you start to pull it - just cool enough that you don't burn yourself. You need to start the process by smooching it around underwater until the very hot liquid has cooled enough then lift it out and taffy pull.
-
Hi all, Another member of this forum was kind enough to send me an electronic copy of the manual for the Pearson No.6 Harness Machine. I have OCRed the manual to plain text and typeset it using LaTeX to a form relatively close to the original. The pagination isn't identical, but I've updated all the page references so they're correct. I have also corrected the various typographical errors in the original, but not the archaic spelling of some words. I will continue to work on the typesetting to see if I can produce output that paginates identically to the original. I would like to be able to make this available on my website for free download to make the information more widely available to owners of these machines, and to make available a higher-quality version than the photocopied ones I've seen so far. I have attached the current state to this post (typeset for standard A5 paper). No.6 Manual.pdf The text is done, but where I need help is with the diagrams. I am working on re-drawing the simple ones as clean vector graphics, and will include them as they're done, but the major plates at the end of the book are beyond my abilities, and the autotracing software I have access to can't get a good result. The instructions in the manual rely very heavily on the numbered parts in the plates so good quality versions of those with proper text labels are important. I can do all the labelling, but I'm hoping there's someone out there with the computer graphics skills (or access to high-end professional autotracing software) who can help with the conversion of these diagrams to SVG? Failing that does anyone have a good condition original copy of the manual they can scan in high-resolution (min 600dpi) and send me? If anyone has a soft copy of the parts manual for this beast they want to share I'll give that the same treatment. Thanks.